|
1.puppet介绍
Puppet是Puppet Labs基于ruby语言开发的自动化系统配置工具,可以以C/S模式或独立模式运行,支持对所有UNIX及类UNIX系统的批量配置和管理,最新版本也开始支持对Windows操作系统有限的一些管理。
Puppet适用于服务器管理的整个过程,比如初始安装、配置、更新以及系统下线。
2.puppet安装与配置
2.1服务器端安装
安装puppet-Server
首先在服务器端和客户端配置好hostname,因为puppet是基于hostname来检测的,同时都要修改hosts文件:
Puppet需要Ruby的支持,如果要查看命令行帮助的话需要额外ruby-rdoc这个软件包:
1.下载puppetlabs-release-5-5.noarch.rpm
参考网址:http://yum.puppetlabs.com/el/5/products/x86_64
安装
-
[root@service~]#rpm-ivhpuppetlabs-release-5-5.noarch.rpm
-
[root@service~]#yuminstallpuppet-server-y
-
…
-
Installed:
-
-
puppet-server.noarch0:2.7.19-1.el5
-
DependencyInstalled:
-
-
augeas-libs.x86_640:0.10.0-3facter.x86_641:1.6.11-1.el5puppet.noarch0:2.7.19-1.el5
-
-
ruby.x86_640:1.8.5-24.el5ruby-augeas.x86_640:0.4.1-1ruby-libs.x86_640:1.8.5-24.el5
-
-
ruby-shadow.x86_640:1.4.1-7
#这一步为默认安装rubyruby-libsruby-rdoc等软件包
-
[root@service~]#/etc/init.d/puppetmasterstart
关闭iptables,关闭selinux
-
[root@service~]#/etc/init.d/iptablesstop
-
[root@service~]#sed-i'/SELINUX/s/enforcing/disabled/'/etc/selinux/config
2.2客户端安装
安装puppet
在client上安装puppet客户端:
Puppet需要Ruby的支持,如果要查看命令行帮助的话需要额外ruby-rdoc这个软件包:
-
[root@service~]#rpm-ivhpuppetlabs-release-5-5.noarch.rpm
-
[root@service~]#yuminstallpuppet–y
-
…
-
Installed:
-
puppet.noarch0:2.7.19-1.el5
-
DependencyInstalled:
-
augeas-libs.x86_640:0.10.0-3facter.x86_641:1.6.11-1.el5
-
ruby.x86_640:1.8.5-24.el5ruby-augeas.x86_640:0.4.1-1
-
ruby-libs.x86_640:1.8.5-24.el5ruby-shadow.x86_640:1.4.1-7
-
Complete!
安装完毕!
2.3证书申请
Puppet客户端与服务器端是通过SSL隧道通信的,客户端安装完成后,需要向服务器端申请证书:
审批证书
a:client申请证书:
puppetd --test --server server.puppet.com
有出现SSl session字样
-
[root@client~]#puppetd--test--serverserver.puppet.com
-
-
info:CreatinganewSSLkeyforclient.puppet.com
-
info:Cachingcertificateforca
-
info:CreatinganewSSLcertificaterequestforclient.puppet.com
-
info:CertificateRequestfingerprint(md5):74:34:A9:DC:F6:52:B4:96:D1:FF:D3:68:F6:E5:7B:DE
-
Exiting;nocertificatefoundandwaitforcertisdisabled
b:server接受申请
-
[root@server~]#puppetca--list
-
"client.puppet.com"(74:34:A9:DC:F6:52:B4:96:D1:FF:D3:68:F6:E5:7B:DE)
显示申请的client
批准证书
-
[root@server~]#puppetca-sclient.puppet.com
-
notice:Signedcertificaterequestforclient.puppet.com
-
notice:RemovingfilePuppet::SSL::CertificateRequestclient.puppet.comat'
-
/var/lib/puppet/ssl/ca/requests/client.puppet.com.pem'
puppetca –s hostname批准当前证书
puppetca -s -a签署所有证书请求
c:client取回已经通过的审批证书
-
[root@client~]#puppetd--test--serverserver.puppet.com
-
-
info:Cachingcertificateforclient.puppet.com
-
info:Cachingcertificate_revocation_listforca
-
info:Cachingcatalogforclient.puppet.com
-
info:Applyingconfigurationversion'1346237401'
-
notice:Finishedcatalogrunin0.02seconds
完成
附:可能存在的错误
报错
-
[root@client-109 ~]# puppetd -server server.puppet.com -test
-
-
err: Could not retrieve catalog from remote server: certificate verify failed
-
warning: Not using cache on failed catalog
-
err: Could not retrieve catalog; skipping run
原因:服务端与客户端时间不同步!
2.)报错
-
[root@client ~]# puppetd --server server.puppet.com --test
-
-
err: Could not retrieve catalog from remote server: Server hostname 'server.puppet.com'
-
did not match server certificate; expected one of service.puppet.com,
-
-
DNS:puppet, DNS:puppet.puppet.com, DNS:service.puppet.com
原因:服务端hostname有误,检查server端的hostname!
3).报错
-
[root@client~]#puppetd--test--serverserver.puppet.com
-
-
err:Couldnotretrievecatalogfromremoteserver:certificateverifyfailed:
-
-
[selfsignedcertificateincertificatechainfor/CN=PuppetCA:server.puppet.com]
-
warning:Notusingcacheonfailedcatalog
-
err:Couldnotretrievecatalog;skippingrun
-
err:Couldnotsendreport:certificateverifyfailed:
-
-
[selfsignedcertificateincertificatechainfor/CN=PuppetCA:server.puppet.com]
原因:
如以上出现error字样则删除client上的ssl文件夹
-
err:Couldnotretrievecatalogfromremoteserver:certificateverifyfailed
-
warning:Notusingcacheonfailedcatalog
-
err:Couldnotretrievecatalog;skippingrun
-
-
rm-rf/var/lib/puppet/ssl/
-
再次循环申请证书puppetd--test--serverserver.puppet.com
2.4验证puppet配置
在服务端写个例子测试一下。这个例子作用很简单,用来在客户端的/tmp目录下新建一个test.txt文件,内容为:hello,test!
在服务端编写代码:【服务器端不需要新建这个文件】
-
vi/etc/puppet/manifests/site.pp
-
-
nodedefault{
-
-
file{
-
-
"/tmp/test.txt":content=>"helo,test!";
-
-
}
-
-
}
2.5客户端测试
在客户端执行puppetd,运行成功后会在/tmp看到新生成的test.txt:
-
[root@client~]#puppetd--test--serverserver.puppet.com
-
#显示如下
-
info:Cachingcatalogforclient.puppet.com
-
info:Applyingconfigurationversion'1346237596'
-
notice:/Stage[main]//Node[default]/File[/tmp/test.txt]/ensure:definedcontentas'
-
{md5}d7568aced6a958920309da96080e88e0'
-
notice:Finishedcatalogrunin0.03seconds
最后查看cat/tmp/test.txt
hello,test!
此致puppet服务器端和客户端安装完毕,接下来就是深入的配置了。
2.6客户端设置守护进程
方法一:启动puppet后台运行
[root@client tmp]# puppetd --server server.puppet.com--verbose --waitforcert 60
注释:--server master指明服务器节点地址
--waitforcert连接server检查的时间间隔,60分钟
--verbose输出冗余信息(可选选项)
方法二:得用crontab作定时同步
3.深入了解puppet
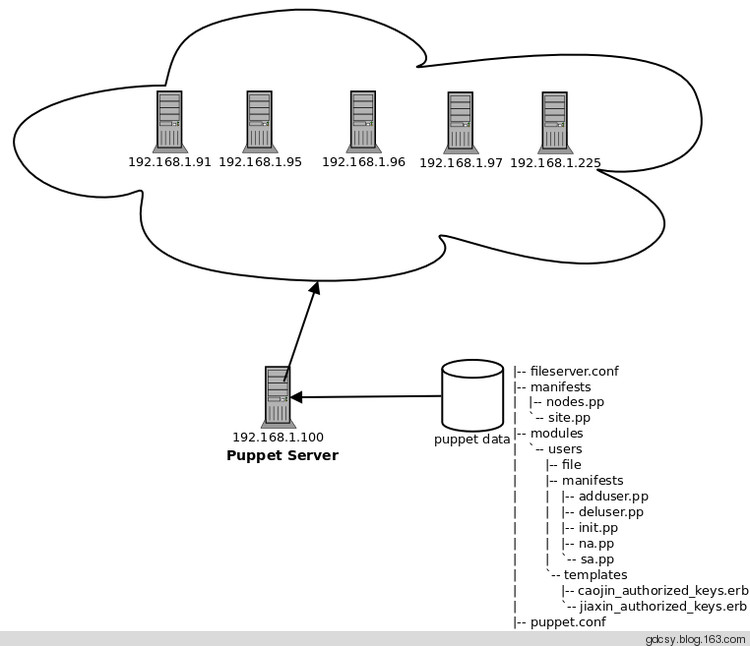
3.1环境架构图

3.2服务端配置目录树
-
|--fileserver.conf
-
|--manifests
-
||--nodes.pp
-
|`--site.pp
-
|--modules#定义模块
-
|`--users
-
||--file
-
||--manifests
-
|||--adduser.pp
-
|||--deluser.pp
-
|||--init.pp
-
|||--na.pp
-
||`--sa.pp
-
|`--templates
-
||--caojin_authorized_keys.erb
-
|`--jiaxin_authorized_keys.erb
-
|--puppet.conf#主配置配置文件
3.3用户管理模块
user mofules目录树
-
users
-
-
|--file
-
|--manifests
-
||--adduser.pp#添加用户类
-
||--deluser.pp#删除用户
-
||--init.pp
-
||--na.pp
-
|`--sa.pp
-
`--templates
-
|--caojin_authorized_keys.erb#用户key
-
`--jiaxin_authorized_keys.erb#用户key
adduser.pp 文件
-
classlinux::adduser{
-
defineadd_user($username=,$useruid=,$userhome=,$usershell='/bin/bash',$groups)
-
{
-
user
-
{$username:
-
uid=>$useruid,
-
shell=>$usershell,
-
groups=>$groups,
-
home=>"/home/$userhome",
-
}
-
file
-
{"/home/$userhome":
-
owner=>$useruid,
-
group=>$useruid,
-
mode=>700,
-
ensure=>directory;
-
}
-
file
-
{"/home/$userhome/.ssh":
-
owner=>$useruid,
-
group=>$useruid,
-
mode=>700,
-
ensure=>directory,
-
require=>File["/home/$userhome"];
-
}
-
file
-
{"/home/$userhome/.ssh/authorized_keys":
-
owner=>$useruid,
-
group=>$useruid,
-
mode=>600,
-
ensure=>present,
-
content=>template("users/${userhome}_authorized_keys.erb"),
-
require=>File["/home/$userhome/.ssh"];
-
}
-
}
-
}
deluser.pp
-
deluser.pp
-
classlinux::deluser
-
{
-
user
-
{
-
"caojin":
-
ensure=>absent,
-
}
-
}
sa.pp
-
import"adduser.pp"
-
classlinux::adduser::sainheritslinux::adduser
-
{
-
add_user
-
{
-
"jiaxin":
-
useruid=>2000,
-
username=>jiaxin,
-
userhome=>"jiaxin",
-
groups=>$operatingsystem?{
-
Ubuntu=>["admin"],
-
CentOS=>["wheel"],
-
RedHat=>["wheel"],
-
default=>["wheel"],
-
},
-
}
-
}
(责任编辑:IT) |

