|
参考资料:
http://centoshowtos.org/monitoring/graphite/
背景介绍:
通常,我们会将比较重要的指标都纳入到监控系统中,并在监控系统中进行绘图。
但有时候,可能会需要临时的针对某些特定的数据进行分析并绘图,并且通常都是一堆历史数据,进行事后分析的。
比如,近期线上的日志传输系统,在某些节点上传输的比较慢,那么我们就想分析一下哪些时段的日志比较慢,就从历史记录中取出了在这些节点上近4天所有日志的传输细节,包括日志大小,传输时间等;然后,通过Graphite,非常方便的导入了这些数据,并绘图分析。
具体配置:
环境介绍:
OS: CentOS6.5 x86_64 Minimal
1. 安装EPEL扩展库
# yum install -y epel-release
# sed -i s/#baseurl=/baseurl=/g /etc/yum.repos.d/epel.repo
# sed -i s/mirrorlist=/#mirrorlist=/g /etc/yum.repos.d/epel.repo
# yum clean all
2. 安装系统所需套件
yum install -y python python-devel python-pip
yum groupinstall -y 'Development Tools'
3. 安装配置Graphite相关软件(MySQL部分可以分开配置,使用独立的服务器)
# yum install -y graphite-web graphite-web-selinux mysql mysql-server MySQL-python
# mysql_secure_installation
|
1 |
Set root password? [Y/n] Y |
|
3 |
Re-enter new password: graphite |
|
4 |
Remove anonymous users? [Y/n] Y |
|
5 |
Disallow root login remotely? [Y/n] Y |
|
6 |
Remove test database and access to it? [Y/n] Y |
|
7 |
Reload privilege tables now? [Y/n] Y |
# mysql -uroot -pgraphite
|
1 |
mysql> CREATE DATABASE graphite; |
|
2 |
mysql> GRANT ALL PRIVILEGES ON graphite.* TO 'graphite'@'localhost' IDENTIFIED BY 'graphite'; |
|
3 |
mysql> FLUSH PRIVILEGES; |
# vi /etc/graphite-web/local_settings.py
|
4 |
'ENGINE': 'django.db.backends.mysql', |
|
6 |
'PASSWORD': 'graphite', |
# /usr/lib/python2.6/site-packages/graphite/manage.py syncdb
|
1 |
Would you like to create one now? (yes/no): yes |
|
2 |
Username (leave blank to use 'root'): root |
|
3 |
E-mail address: guosuiyu@gmail.com |
|
5 |
Password (again): graphite |
4. 启动Apache服务,作为Graphite的Web服务器
# /etc/init.d/httpd start
5. 安装底层的绘图与数据采集软件
# yum install -y python-carbon python-whisper
6. 启动数据采集进程
# /etc/init.d/carbon-cache start
7. 更新配置,保留所有metrics目录下数据90天(默认仅保留1天,也就是说看不到1天以前的数据绘图)
# vi /etc/carbon/storage-schemas.conf
|
6 |
[default_1min_for_90days] |
发送一些测试数据
# python /usr/share/doc/graphite-web-0.9.12/example-client.py
|
2 |
-------------------------------------------------------------------------------- |
|
3 |
system.loadavg_1min 0.01 1446086849 |
|
4 |
system.loadavg_5min 0.03 1446086849 |
|
5 |
system.loadavg_15min 0.05 1446086849 |
8. 查看当前服务器进程
# netstat -lntp
|
1 |
Active Internet connections (only servers) |
|
2 |
Proto Recv-Q Send-Q Local Address Foreign Address State PID/Program name |
|
3 |
tcp 0 0 0.0.0.0:80 0.0.0.0:* LISTEN 2131/httpd |
|
4 |
tcp 0 0 0.0.0.0:2003 0.0.0.0:* LISTEN 2210/python |
|
5 |
tcp 0 0 0.0.0.0:2004 0.0.0.0:* LISTEN 2210/python |
|
6 |
tcp 0 0 0.0.0.0:22 0.0.0.0:* LISTEN 1566/sshd |
|
7 |
tcp 0 0 127.0.0.1:25 0.0.0.0:* LISTEN 976/master |
|
8 |
tcp 0 0 0.0.0.0:7002 0.0.0.0:* LISTEN 2210/python |
|
9 |
tcp 0 0 0.0.0.0:3306 0.0.0.0:* LISTEN 2063/mysqld |
9. 生成24小时的模拟数据,体验Graphite的绘图功能
安装nc命令
# yum install -y nc
创建生成模拟数据的脚本
# vi feed_random_data.sh
|
03 |
# Generate random pageview data and feed Graphite |
|
05 |
tree_path=metrics.random.pageview |
|
08 |
now_timestamp=$(date +%s) |
|
09 |
minutes_number=$((${time_period_hours}*60)) |
|
11 |
echo ${minutes_number} |
|
12 |
timestamp=$((${now_timestamp}-${minutes_number}*60)) |
|
13 |
for i in $(seq 1 ${minutes_number}); do |
|
14 |
echo "echo ${tree_path} $(($RANDOM%5000)) ${timestamp} | nc localhost 2003" |
|
15 |
echo ${tree_path} $(($RANDOM%5000)) ${timestamp} | nc localhost 2003 |
执行脚本,将数据喂给Graphite,在使用nc命令的时候固定格式为:
|
1 |
echo 目录结构 数值 时间戳 | nc 服务器地址 服务端口 |
例如:
|
1 |
echo metrics.random.pageview 3680 1446095415 | nc localhost 2003 |
# chmod +x feed_random_data.sh
# ./feed_random_data.sh
当然,也可以参考上面的example-client.py脚本,使用Python的方式来喂数据。
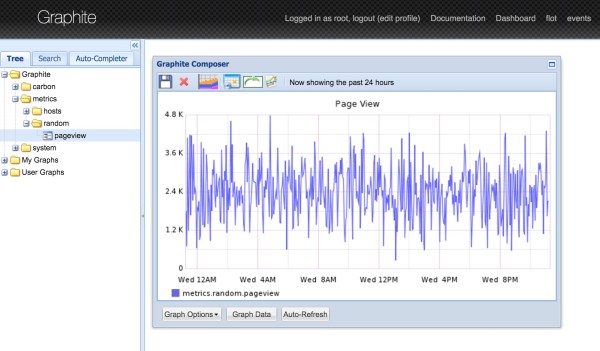
然后,打开Graphite Web,即可看到如下所示的绘图:
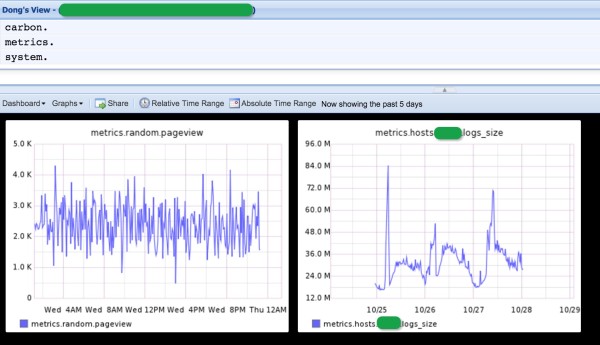
使用账号root/graphite登陆以后,还可以创建一个Dashboard,将多个绘图放在一起方便查看:
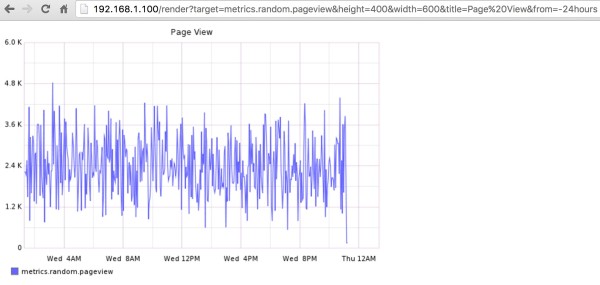
Graphite还支持通过API生成图片,方便我们获取,如下所示:
API URL:http://graphite.readthedocs.org/en/latest/render_api.html
(责任编辑:IT) |


