环境准备
python版本2.6
git版本 1.8.4.1
ruby版本ruby-2.0.0-p353
gitlab-shell版本 v1.8.0
gitlab版本6.4.3
因centos6系列的python版本是2.6的,已经支持,所以不必升级python版本。
在centos5下面需要升级python版本>2.5
安装epel的yum源
|
1 |
yum -y install http://dl.fedoraproject.org/pub/epel/6/x86_64/epel-release-6-8.noarch.rpm |
安装必要的软件包
|
1 |
yum -y install libicu-devel patch gcc-c++ readline-devel zlib-devel libffi-devel openssl-devel make autoconf automake libtool bison libxml2-devel libxslt-devel libyaml-devel zlib-devel openssl-devel cpio expat-devel gettext-devel curl-devel perl-ExtUtils-CBuilder perl-ExtUtils-MakeMaker |
安装git
因为git需要1.8版本以上,所以需要重新编译安装
移除当前git
下载1.8.4.1的git并安装
|
1 |
curl --progress https://git-core.googlecode.com/files/git-1.8.4.1.tar.gz | tar xz |
|
3 |
make prefix=/usr/local all |
|
4 |
make prefix=/usr/local install |
|
5 |
ln -fs /usr/local/bin/git* /usr/bin/ |
安装ruby环境
|
02 |
mkdir /tmp/ruby && cd /tmp/ruby |
|
03 |
curl --progress ftp://ftp.ruby-lang.org/pub/ruby/2.0/ruby-2.0.0-p353.tar.gz | tar xz |
|
05 |
./configure --disable-install-rdoc |
|
07 |
gem source -r https://rubygems.org/ |
|
08 |
gem source -a http://ruby.taobao.org/ |
|
09 |
gem install bundler --no-ri --no-rdoc |
|
10 |
ln -s /usr/local/bin/ruby /usr/bin/ruby |
|
11 |
ln -s /usr/local/bin/gem /usr/bin/gem |
|
12 |
ln -s /usr/local/bin/bundle /usr/bin/bundle |
添加git帐号并允许sudo
|
1 |
useradd --comment 'GitLab' git |
|
2 |
echo "git ALL=(ALL) NOPASSWD: ALL" >>/etc/sudoers |
安装git-shell
|
02 |
sudo -u git -H git clone https://gitlab.com/gitlab-org/gitlab-shell.git -b v1.8.0 |
|
04 |
sudo -u git -H cp config.yml.example config.yml |
|
06 |
修改gitlab_url为gitlab的域名 |
|
07 |
gitlab_url: "http://localhost/" |
|
09 |
gitlab_url: "http://git.it.net.cn/" |
|
11 |
sudo -u git -H ./bin/install |
安装mysql以及建立gitlab数据库
|
01 |
yum install mysql mysql-devel mysql-server -y |
|
02 |
/etc/init.d/mysqld start |
|
05 |
mysql> CREATE USER 'gitlab'@'localhost' IDENTIFIED BY 'gitlab'; |
|
06 |
mysql> CREATE DATABASE IF NOT EXISTS `gitlabhq_production` DEFAULT CHARACTER SET `utf8` COLLATE `utf8_unicode_ci`; |
|
07 |
mysql> GRANT SELECT, INSERT, UPDATE, DELETE, CREATE, DROP, INDEX, ALTER ON `gitlabhq_production`.* TO 'gitlab'@'localhost'; |
|
11 |
sudo -u git -H mysql -u gitlab -p -D gitlabhq_production |
安装redis
|
2 |
/etc/init.d/redis start |
安装gitlab
|
02 |
sudo -u git -H git clone https://gitlab.com/gitlab-org/gitlab-ce.git -b 6-4-stable gitlab |
|
04 |
sudo -u git -H cp config/gitlab.yml.example config/gitlab.yml |
|
07 |
修改host为刚才git-shell里面设置的域名 |
|
10 |
## Web server settings |
|
17 |
bin_path: /usr/local/bin/git |
|
25 |
sudo -u git -H mkdir /home/git/gitlab-satellites |
|
26 |
sudo -u git -H mkdir tmp/pids/ |
|
27 |
sudo -u git -H mkdir tmp/sockets/ |
|
28 |
sudo chmod -R u+rwX tmp/pids/ |
|
29 |
sudo chmod -R u+rwX tmp/sockets/ |
|
30 |
sudo -u git -H mkdir public/uploads |
|
31 |
sudo chmod -R u+rwX public/uploads |
|
32 |
sudo -u git -H cp config/unicorn.rb.example config/unicorn.rb |
|
33 |
sudo -u git -H cp config/initializers/rack_attack.rb.example config/initializers/rack_attack.rb |
设置gitlab的全局帐号
|
1 |
sudo -u git -H git config --global user.name "GitLab" |
|
2 |
sudo -u git -H git config --global user.email "gitlab@localhost" |
|
3 |
sudo -u git -H git config --global core.autocrlf input |
设置数据库链接地址和权限
|
01 |
sudo -u git cp config/database.yml.mysql config/database.yml |
|
02 |
sudo -u git -H vim config/database.yml |
|
08 |
database: gitlabhq_production |
|
13 |
# socket: /tmp/mysql.sock |
安装需要ruby的gems
|
3 |
修改source "https://rubygems.org/" |
|
4 |
为source "http://ruby.taobao.org/" |
|
6 |
修改remote: https://rubygems.org/ |
|
7 |
为remote: http://ruby.taobao.org/ |
|
9 |
sudo -u git -H bundle install --deployment --without development test postgres aws |
如果遇到如下错误:
|
1 |
Could not find modernizr-2.6.2 in any of the sources |
则修改:
|
02 |
修改:gem "modernizr", "2.6.2" |
|
03 |
为gem "modernizr-rails", "2.7.1" |
|
07 |
为:modernizr-rails (2.7.1) |
|
09 |
修改:modernizr (= 2.6.2) |
|
10 |
为:modernizr-rails (= 2.7.1) |
然后再执行安装
|
1 |
sudo -u git -H bundle install --deployment --without development test postgres aws |
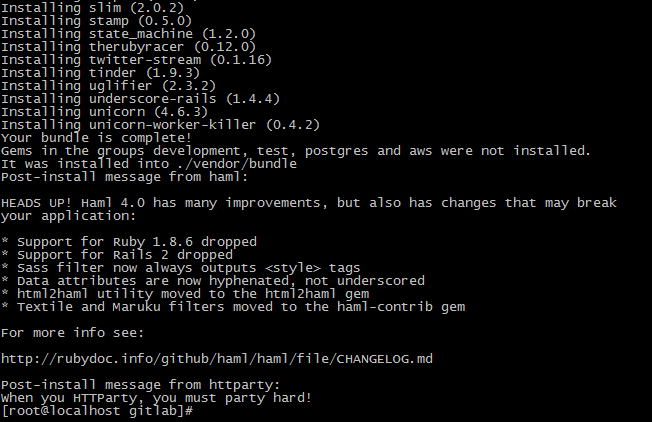
过程如下图:


初始化数据库
|
1 |
sudo -u git -H bundle exec rake gitlab:setup RAILS_ENV=production |
初始化数据库之后,会告诉你默认的管理员用户和密码:


安装启动文件以及日志切割文件
|
1 |
cp lib/support/init.d/gitlab /etc/init.d/gitlab |
|
2 |
cp lib/support/init.d/gitlab.default.example /etc/default/gitlab |
|
3 |
cp lib/support/logrotate/gitlab /etc/logrotate.d/gitlab |
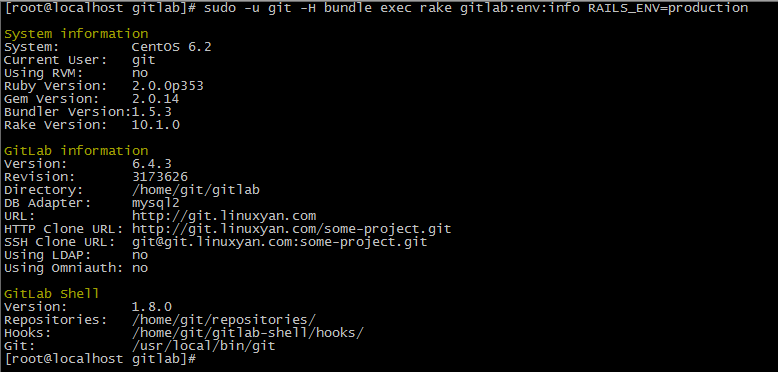
检测当前环境
|
1 |
sudo -u git -H bundle exec rake gitlab:env:info RAILS_ENV=production |
如下:

安装nginx
修改配置文件:
vim /etc/nginx/nginx.conf
|
03 |
pid /var/run/nginx.pid; |
|
06 |
worker_connections 1024; |
|
10 |
include /etc/nginx/mime.types; |
|
11 |
default_type application/octet-stream; |
|
13 |
log_format main '$remote_addr - $remote_user [$time_local] "$request" ' |
|
14 |
'$status $body_bytes_sent "$http_referer" ' |
|
15 |
'"$http_user_agent" "$http_x_forwarded_for"'; |
|
21 |
server unix:/home/git/gitlab/tmp/sockets/gitlab.socket; |
|
25 |
listen *:80 default_server; # e.g., listen 192.168.1.1:80; In most cases *:80 is a good idea |
|
26 |
server_name YOUR_SERVER_FQDN; # e.g., server_name source.example.com; |
|
27 |
server_tokens off; # don't show the version number, a security best practice |
|
28 |
root /home/git/gitlab/public; |
|
30 |
# Set value of client_max_body_size to at least the value of git.max_size in gitlab.yml |
|
31 |
client_max_body_size 5m; |
|
33 |
# individual nginx logs for this gitlab vhost |
|
34 |
access_log /var/log/nginx/gitlab_access.log; |
|
35 |
error_log /var/log/nginx/gitlab_error.log; |
|
38 |
# serve static files from defined root folder;. |
|
39 |
# @gitlab is a named location for the upstream fallback, see below |
|
40 |
try_files $uri $uri/index.html $uri.html @gitlab; |
|
43 |
# if a file, which is not found in the root folder is requested, |
|
44 |
# then the proxy pass the request to the upsteam (gitlab unicorn) |
|
46 |
proxy_read_timeout 300; # https://github.com/gitlabhq/gitlabhq/issues/694 |
|
47 |
proxy_connect_timeout 300; # https://github.com/gitlabhq/gitlabhq/issues/694 |
|
50 |
proxy_set_header X-Forwarded-Proto $scheme; |
|
51 |
proxy_set_header Host $http_host; |
|
52 |
proxy_set_header X-Real-IP $remote_addr; |
|
53 |
proxy_set_header X-Forwarded-For $proxy_add_x_forwarded_for; |
|
55 |
proxy_pass http://gitlab; |
更改权限,启动nginx
|
2 |
chown -R git.git /var/lib/nginx/ |
|
3 |
/etc/init.d/nginx start |
拉取gitlab静态资源文件
|
1 |
sudo -u git -H bundle exec rake assets:precompile RAILS_ENV=production |
启动gitlab
|
1 |
/etc/init.d/gitlab start |
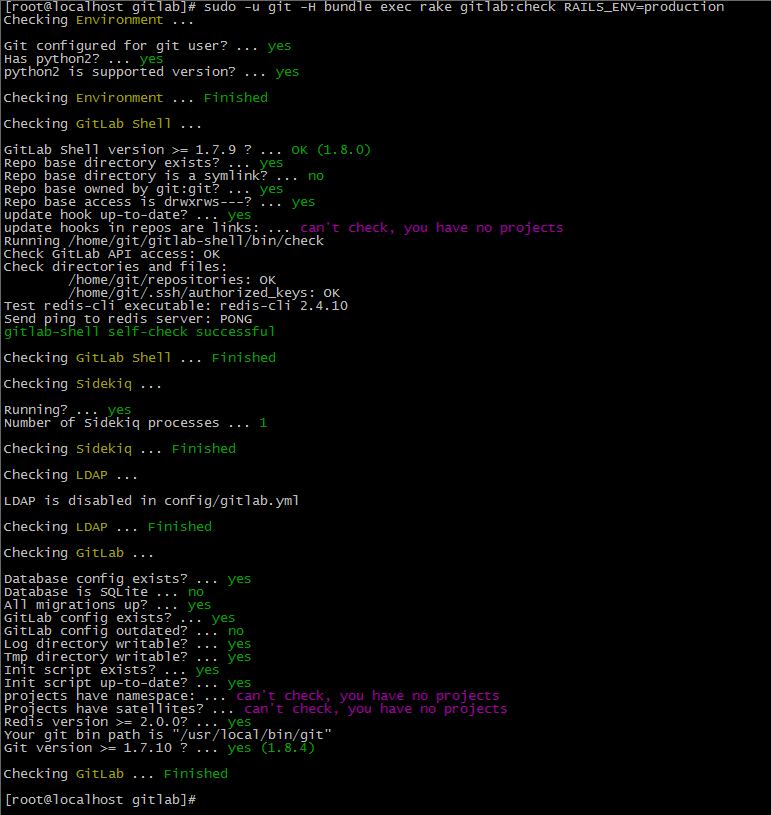
检测各个组件是否正常工作
|
1 |
sudo -u git -H bundle exec rake gitlab:check RAILS_ENV=production |
检测没有错误就表示已经安装好了gitlab,如图:

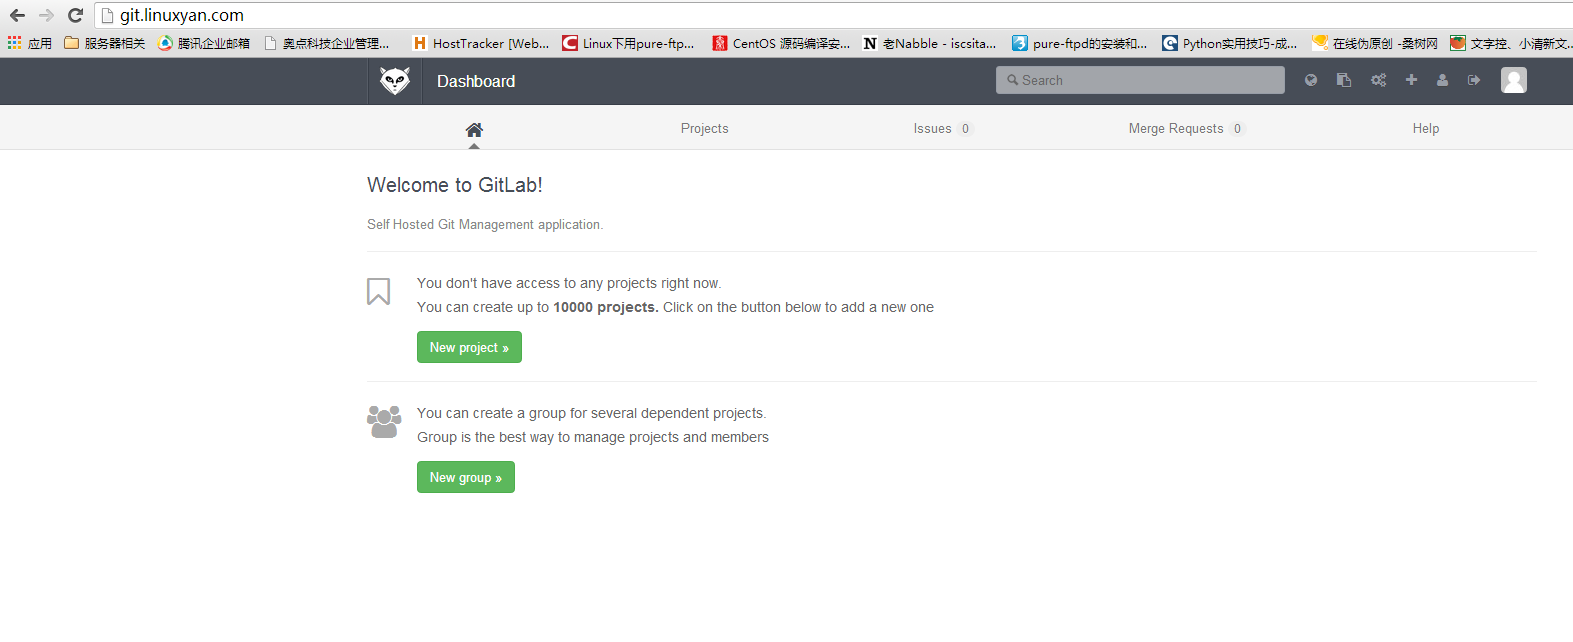
这个时候就可以用浏览器打开http://git.it.net.cn
初始管理员帐号和密码为:
admin@local.host
5iveL!fe
登录之后如下:

(责任编辑:IT) |


