|
环境列表
VMware-workstation-full-12.1.0-3272444.exe 虚拟机
putty.exe 客户端
CentOS-7-x86_64-DVD-1708.iso centos镜像
windows7旗舰版
jdk-7u67-linux-x64.rpm
apache-tomcat-7.0.82.tar.gz
mysql-5.7.20-1.el7.x86_64.rpm-bundle.tar
目录:
虚拟机安装
用户权限设置
jdk
tomcat
mysql
linux软件安装
tar:解压安装
安装包格式:tar、tar.gz、tar.bz
安装软件包:tar –zxvf [包名]
rpm:直接安装
安装包格式:rpm
安装软件包:rpm –ivh 软件包路径
卸载软件包:rpm –e 软件包全名
yum:在线安装
安装软件包:yum -y install subversion
卸载软件包:yum -y remove subversion
1.虚拟机安装
centos镜像https://www.centos.org/download/mirrors/
centos镜像:http://mirrors.aliyun.com/centos/7.4.1708/isos/x86_64/CentOS-7-x86_64-Everything-1708.iso

安装好后,发现虚拟机和主机不能连接,怎么办?
原因是两者的ip地址必须在同一个网段。(值得一提的是,centos旧点的版本没有这个问题,会自动配置成一个网段)
步骤1.怎么看主机的网段,看下面截图,可以找到专门为VMware虚拟的网段是40
在虚拟机中打开
编辑>虚拟网络编辑,可以看到NAT模式的名称是VMnet8,在主机中ifconfig命令后,可以看到VMnet8的网段是40

步骤2.设置虚拟机的网段为40.启动DHCP,可以自动分配正确的网段
在虚拟机中打开
系统工具>设置>网络
打开有线连接,DHCP(Dynamic Host Configuration Protocol,动态主机配置协议)会自动分配正确的网段

步骤3,主机可以连接虚拟机了

在主机可以用工具putty连接虚拟机,
用户权限设置
#新增用户ldgx#
[root@localhost ~]# userdel tomcat
[root@localhost ~]# useradd ldgx
[root@localhost ~]# passwd ldgx
更改用户 ldgx 的密码 。
新的 密码:
无效的密码: 密码少于 8 个字符
重新输入新的 密码:
passwd:所有的身份验证令牌已经成功更新。
#安装jdk#
[ldgx@localhost express_api]$ java -version
openjdk version "1.8.0_131"
OpenJDK Runtime Environment (build 1.8.0_131-b12)
OpenJDK 64-Bit Server VM (build 25.131-b12, mixed mode)
[root@localhost express_api]# rpm -i jdk-8u151-linux-x64.rpm
[root@localhost ~]# vi .bash_profile
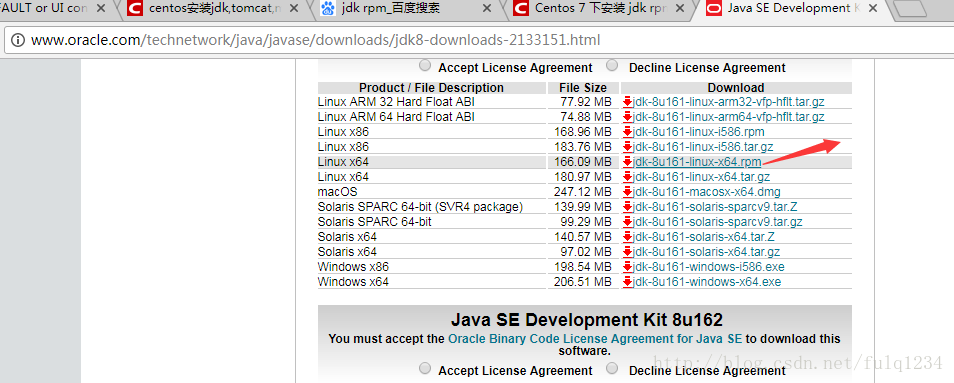
安装jdk
rpm -ivh /root/soft/jdk-7u67-linux-x64.rpm
查看已安装JDK软件包
rpm -qa|grep jdk
查找安装包的位置
rpm -qal | grep jdk1.7.0_67
环境变量增加,
用户环境变量:/home/[用户名]/.bash_profile
全局环境变量:修改/etc/profile
.bash_profile中增加内容
export JAVA_HOME=/usr/java/jdk1.7.0_67
export CLASSPATH=.:$JAVA_HOME/lib/dt.jar:$JAVA_HOME/lib/tools.jar
export PATH=:$JAVA_HOME/bin:$PATH
#立即生效
[root@localhost ~]# source .bash_profile
java版本号
[root@bogon fu]# java -version
java version "1.7.0_67"
Java(TM) SE Runtime Environment (build 1.7.0_67-b01)
Java HotSpot(TM) 64-Bit Server VM (build 24.65-b04, mixed mode)
#安装tomcat7
解压文件:
tar -zxvf apache-tomcat-7.0.82.tar.gz
启动tomcat:
sh /usr/local/apache-tomcat-7.0.82/bin/startup.sh
虚拟机自己的能访问。但是访问不了。linux的8080端口没有打开
linux开放8080端口:
iptables -A INPUT -ptcp --dport 8080 -j ACCEPT
service iptables save
[root@bogon ~]# service iptables save
The service command supports only basic LSB actions (start, stop, restart, try-restart, reload, force-reload, status). For other actions, please try to use systemctl.
出现错误的解决方法
解决方法:
先执行如下命令:
systemctl stop firewalld
systemctl mask firewalld
2.安装iptables services
yum install iptables-services
3.设置开机启动
systemctl enable iptables
4.重启iptables service
systemctl restart iptables
5.执行保存配置命令
service iptables save
6 安装mysql
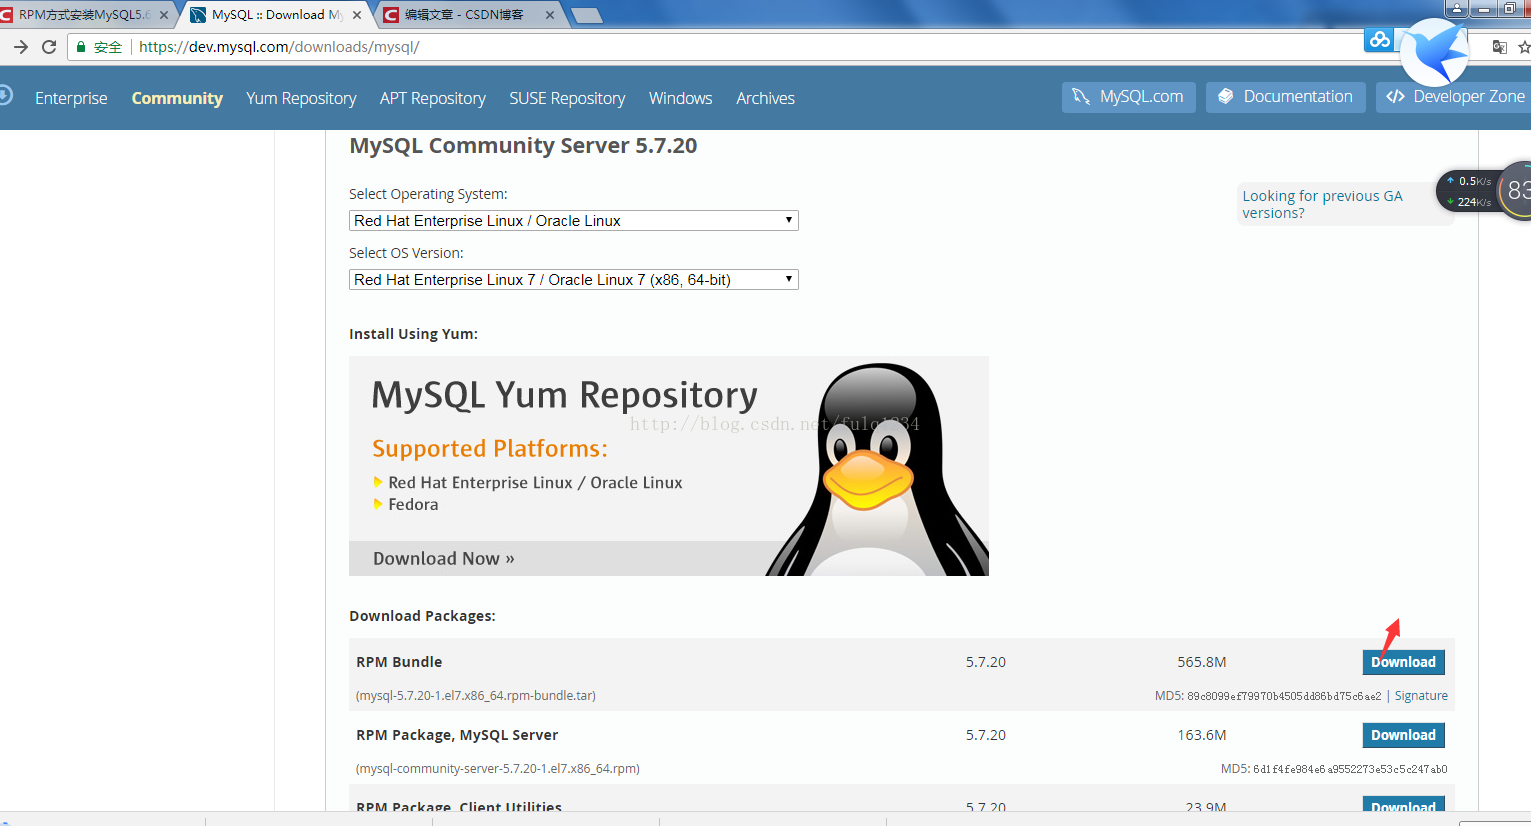
首先在官网下载正确的mysql
解压文件后:
[root@bogon mysql-5.7.20-1.el7.x86_64.rpm-bundle]# ls
mysql-community-client-5.7.20-1.el7.x86_64.rpm
mysql-community-common-5.7.20-1.el7.x86_64.rpm
mysql-community-devel-5.7.20-1.el7.x86_64.rpm
mysql-community-embedded-5.7.20-1.el7.x86_64.rpm
mysql-community-embedded-compat-5.7.20-1.el7.x86_64.rpm
mysql-community-embedded-devel-5.7.20-1.el7.x86_64.rpm
mysql-community-libs-5.7.20-1.el7.x86_64.rpm
mysql-community-libs-compat-5.7.20-1.el7.x86_64.rpm
mysql-community-minimal-debuginfo-5.7.20-1.el7.x86_64.rpm
mysql-community-server-5.7.20-1.el7.x86_64.rpm
mysql-community-server-minimal-5.7.20-1.el7.x86_64.rpm
mysql-community-test-5.7.20-1.el7.x86_64.rpmzheng
正确的安装顺序
rpm -ivh mysql-community-common-5.7.20-1.el7.x86_64.rpm
rpm -ivh mysql-community-libs-5.7.20-1.el7.x86_64.rpm
rpm -ivh mysql-community-client-5.7.20-1.el7.x86_64.rpm
rpm -ivh mysql-community-server-5.7.20-1.el7.x86_64.rpm
出现错误
# rpm -ivh mysql-community-common-5.7.20-1.el7.x86_64.rpm
file /usr/share/mysql/czech/errmsg.sys from install of mysql-community-common-5.7.20-1.el7.x86_64 conflicts with file from package mariadb-libs-1:5.5.56-2.el7.x86_64
解决方案
yum -y remove mariadb-libs-1:5.5.56-2.el7.x86_64
安装正确后
[root@bogon mysql-5.7.20-1.el7.x86_64.rpm-bundle]# rpm -ivh mysql-community-common-5.7.20-1.el7.x86_64.rpm
警告:mysql-community-common-5.7.20-1.el7.x86_64.rpm: 头V3 DSA/SHA1 Signature, 密钥 ID 5072e1f5: NOKEY
准备中... ################################# [100%]
正在升级/安装...
1:mysql-community-common-5.7.20-1.e################################# [100%]
[root@bogon mysql-5.7.20-1.el7.x86_64.rpm-bundle]# rpm -ivh mysql-community-libs-5.7.20-1.el7.x86_64.rpm
警告:mysql-community-libs-5.7.20-1.el7.x86_64.rpm: 头V3 DSA/SHA1 Signature, 密钥 ID 5072e1f5: NOKEY
准备中... ################################# [100%]
正在升级/安装...
1:mysql-community-libs-5.7.20-1.el7################################# [100%]
[root@bogon mysql-5.7.20-1.el7.x86_64.rpm-bundle]# rpm -ivh mysql-community-client-5.7.20-1.el7.x86_64.rpm
警告:mysql-community-client-5.7.20-1.el7.x86_64.rpm: 头V3 DSA/SHA1 Signature, 密钥 ID 5072e1f5: NOKEY
准备中... ################################# [100%]
正在升级/安装...
1:mysql-community-client-5.7.20-1.e################################# [100%]
[root@bogon mysql-5.7.20-1.el7.x86_64.rpm-bundle]# rpm -ivh mysql-community-server-5.7.20-1.el7.x86_64.rpm
警告:mysql-community-server-5.7.20-1.el7.x86_64.rpm: 头V3 DSA/SHA1 Signature, 密钥 ID 5072e1f5: NOKEY
准备中... ################################# [100%]
正在升级/安装...
1:mysql-community-server-5.7.20-1.e################################# [100%]
数据库初始化
为了保证数据库目录为与文件的所有者为 mysql 登陆用户,如果你是以 root 身份运行 mysql 服务,需要执行下面的命令初始化
mysqld --initialize --user=mysql
systemctl start mysqld.service
mysql -uroot -p
第一次不用输入密码直接登录,如果输入密码了或者碰到如下错误:
Access denied for user 'root'@'localhost' (using password:YES)
解决如下:
1.停止mysql服务
systemctl stop mysqld.service
2.修改配置文件无密码登录
vim /etc/my.cnf
在最后加上
skip-grant-tables
保存
3.启动mysql
systemctl start mysqld.service
4.登录mysql
mysql -u root
注意这里不要加-p
5.修改密码,mysql5.7用此语法
use mysql;
update mysql.user set authentication_string=password('123456') where user='root' ;
6.回到第二步把刚加的那句删掉
保存,重启mysql就可以了
查看mysql安装位置
[root@bogon ~]# find / -name mysql
/etc/logrotate.d/mysql
/etc/selinux/targeted/active/modules/100/mysql
/etc/selinux/targeted/tmp/modules/100/mysql
/var/lib/mysql
/var/lib/mysql/mysql
/usr/bin/mysql
/usr/lib64/mysql
/usr/share/mysql
MySQL配置
1.查看MySql默认编码
show variables like 'chara%';
下面操作中出现了错误,及解决方法
[root@bogon ~]# mysql -uroot -p
Enter password:
Welcome to the MySQL monitor. Commands end with ; or \g.
Your MySQL connection id is 2
Server version: 5.7.21
Copyright (c) 2000, 2018, Oracle and/or its affiliates. All rights reserved.
Oracle is a registered trademark of Oracle Corporation and/or its
affiliates. Other names may be trademarks of their respective
owners.
Type 'help;' or '\h' for help. Type '\c' to clear the current input statement.
mysql> show variables like 'chara%';
ERROR 1820 (HY000): You must reset your password using ALTER USER statement before executing this statement.
mysql> alter user 'root'@'localhost' identified by '123456';
Query OK, 0 rows affected (0.49 sec)
mysql> flush privileges;
Query OK, 0 rows affected (0.31 sec)
mysql> help contents
You asked for help about help category: "Contents"
For more information, type 'help <item>', where <item> is one of the following
categories:
Account Management
Administration
Compound Statements
Data Definition
Data Manipulation
Data Types
Functions
Functions and Modifiers for Use with GROUP BY
Geographic Features
Help Metadata
Language Structure
Plugins
Procedures
Storage Engines
Table Maintenance
Transactions
User-Defined Functions
Utility
mysql> show variables like 'chara%';
+--------------------------+----------------------------+
| Variable_name | Value |
+--------------------------+----------------------------+
| character_set_client | utf8 |
| character_set_connection | utf8 |
| character_set_database | latin1 |
| character_set_filesystem | binary |
| character_set_results | utf8 |
| character_set_server | latin1 |
| character_set_system | utf8 |
| character_sets_dir | /usr/share/mysql/charsets/ |
+--------------------------+----------------------------+
8 rows in set (0.53 sec)
mysql> exit
Bye
[root@bogon ~]#
2.创建MySQL用户配置
复制MySQL安装目录下的my-small.cnf到etc目录下
cp my-small.cnf /etc/my.cnf
3.修改MySQL编码,并重启服务
/etc/my.cnf文件中,在mysqld的首行位置加入 代码
character_set_server=utf8
4.开放3306端口
查看开放的端口
firewall-cmd --list-ports
防火墙,以前CentOS 6 系列中的 iptables 相关命令不能用了,查了下,发现Centos 7使用firewalld代替了原来的iptables。
参考http://blog.csdn.net/liam1994/article/details/77714794
[root@bogon ~]# firewall-cmd --zone=public --add-port=3306/tcp --permanent
FirewallD is not running
[root@bogon ~]# /sbin/iptables -I INPUT -p tcp -dport 3306 -j ACCEPT
Bad argument `3306'
Try `iptables -h' or 'iptables --help' for more information.
[root@bogon ~]# systemctl restart firewalld.service
Failed to restart firewalld.service: Unit is masked.
[root@bogon ~]# systemctl status firewalld
● firewalld.service
Loaded: masked (/dev/null; bad)
Active: inactive (dead)
3月 08 09:49:35 localhost.localdomain systemd[1]: ...
Hint: Some lines were ellipsized, use -l to show in full.
[root@bogon ~]# systemctl start firewalld //启动firewalld
Failed to start firewalld.service: Unit is masked.
[root@bogon ~]# ^C
[root@bogon ~]# systemctl unmask firewalld //上面出现的问题“unit is masked”,解决方法解锁firewalld
Removed symlink /etc/systemd/system/firewalld.service.
[root@bogon ~]# systemctl mask firewalld //下次需要锁定该服务时执行,这个不要执行
Created symlink from /etc/systemd/system/firewalld.service to /dev/null.
[root@bogon ~]# systemctl status firewalld //重新锁定后查看状态,果然dead
● firewalld.service
Loaded: masked (/dev/null; bad)
Active: inactive (dead)
3月 08 09:49:35 localhost.localdomain systemd[1]: Cannot add dependency job fo....
Hint: Some lines were ellipsized, use -l to show in full.
[root@bogon ~]# systemctl start firewalld //启动firewalld,发现需要解锁
Failed to start firewalld.service: Unit is masked.
[root@bogon ~]# systemctl unmask firewalld //解锁
Removed symlink /etc/systemd/system/firewalld.service.
[root@bogon ~]# systemctl status firewalld //状态
● firewalld.service - firewalld - dynamic firewall daemon
Loaded: loaded (/usr/lib/systemd/system/firewalld.service; enabled; vendor preset: enabled)
Active: inactive (dead)
Docs: man:firewalld(1)
3月 08 09:49:35 localhost.localdomain systemd[1]: Cannot add dependency job fo....
Hint: Some lines were ellipsized, use -l to show in full.
[root@bogon ~]# systemctl start firewalld //启动
[root@bogon ~]# systemctl status firewalld //状态active
● firewalld.service - firewalld - dynamic firewall daemon
Loaded: loaded (/usr/lib/systemd/system/firewalld.service; enabled; vendor preset: enabled)
Active: active (running) since 四 2018-03-08 14:54:26 CST; 5s ago
Docs: man:firewalld(1)
Main PID: 18159 (firewalld)
CGroup: /system.slice/firewalld.service
└─18159 /usr/bin/python -Es /usr/sbin/firewalld --nofork --nopid
3月 08 14:54:25 bogon systemd[1]: Starting firewalld - dynamic firewall daemon...
3月 08 14:54:26 bogon systemd[1]: Started firewalld - dynamic firewall daemon.
3月 08 14:54:30 bogon firewalld[18159]: WARNING: ICMP type 'beyond-scope' is ...6.
3月 08 14:54:30 bogon firewalld[18159]: WARNING: beyond-scope: INVALID_ICMPTY...e.
3月 08 14:54:30 bogon firewalld[18159]: WARNING: ICMP type 'failed-policy' is...6.
3月 08 14:54:30 bogon firewalld[18159]: WARNING: failed-policy: INVALID_ICMPT...e.
3月 08 14:54:30 bogon firewalld[18159]: WARNING: ICMP type 'reject-route' is ...6.
3月 08 14:54:30 bogon firewalld[18159]: WARNING: reject-route: INVALID_ICMPTY...e.
Hint: Some lines were ellipsized, use -l to show in full.
[root@bogon ~]#
5.给用户授权远程登录并刷新权限
给root用户赋于远程登录权限
grant all privileges on *.* to root@‘%’ identified by ‘123456’ with grant option
刷新MySQL权限:flush provileges
一、数据库没有授权
对于mysql数据库没有授权,只需要用一条命令就可以了。
//远程连接数据库的时候需要输入用户名和密码用户名:root密码:123456指点ip:%代表所有Ip,此处也可以输入Ip来指定Ip 输入后使修改生效还需要下面的语句mysql>FLUSH PRIVILEGES;
mysql> GRANT ALL PRIVILEGES ON *.* TO 'root'@'%' IDENTIFIED BY '123456' WITH GRANT OPTION
-> ;
Query OK, 0 rows affected, 1 warning (0.00 sec)
mysql> FLUSH PRIVILEGES;
Query OK, 0 rows affected (0.00 sec)
6.使用客户端测试连接数据库
|