当前位置: > CentOS > CentOS运维 >

编程方式刷新Squid缓存服务器的五种方法

时间:2016-02-02 18:44来源:linux.it.net.cn 作者:IT

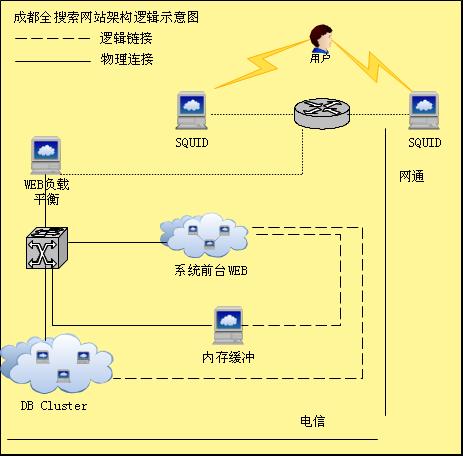
目前很多网站都使用Squid 作为前端缓存服务器并取得了很好的效果,成都全搜索也分别在网通和电信部署了专门的前端缓存服务器用于缓存图片,视频,静态页面, js 等静态资源。

全搜索系统架构逻辑示意图


网站进行内容更新是常有的事情,当被缓存的资源更新时,前端Squid 缓存服务器内容也必须要相应的更新,否则用户就可能会看到过期的数据。当没有程序支持时就需要每次登录到服务器上执行刷新操作,在服务器数量小的的时候这种方式还可行,如果服务器数量上了一定的规模,这就是一种非常笨重的处理方式,以下分别介绍通过编程方式实现刷新 Squid 的三种方法:


1.  refresh_pattern 用于配置Squid 的刷新策略,当 Squid 没有配置 ignonre-reload 来忽略客户端no-cachereload 头的时候。

ignore-reload - ignores a client no-cache or reload header. Doing this VIOLATES the HTTP standard. Enabling this feature could make you liable for problems which it causes. ignore-reload, 忽略客户端 no-cachereload 头,这是违反 HTTP 标准的做法,允许此特性可能导致相关问题 .


在这种情况下可以通过模拟客户端向服务器发送no-cache 头( ctrl + f5 就完成此功能)来实现刷新操作。发送的请求头如下:


[c-sharp] view plain copy print?
  1. <?php  
  2.     /** 
  3.      * 刷新Squid缓存 
  4.      * 
  5.      */  
  6.     interface Flush_Cache  
  7.     {  
  8.         /** 
  9.          * 执行刷新操作 
  10.          * 
  11.          * @param void $url 待刷新的URL地址 
  12.          */  
  13.         public function flush($url);  
  14.     }  
  15.       
  16.     /** 
  17.      * 通过发送HTTP Header头实现刷新功能 
  18.      * 
  19.      */  
  20.     class Flush_Cache_HTTP_Header_Impl implements Flush_Cache   
  21.     {  
  22.         /** 
  23.          * @see Flush_Cache::flush() 
  24.          * 
  25.          * @param void $url 
  26.          */  
  27.         public function flush($url)   
  28.         {  
  29.             if(empty($url))  
  30.             {  
  31.                 return;   
  32.             }  
  33.             $url_component = parse_url($url);  
  34.             global $g_squid_servers;  
  35.               
  36.             foreach ($g_squid_servers as $server)  
  37.             {  
  38.                 $squid_params = split(':' , $server);  
  39.                 $fsocket = fsockopen($squid_params[0], intval($squid_params[1]), $errono, $errstr, 3);  
  40.                   
  41.                 if(FALSE != $fsocket)  
  42.                 {  
  43.                     $head = "HEAD {$url_component['path']} HTTP/1.1/r/n";  
  44.                     $head .= "Accept: */*/r/n";  
  45.                     $head .= "Host: {$url_component['host']}/r/n";  
  46.                     $head .= "Cache-Control: no-cache/r/n";  
  47.                     $head .= "/r/n";  
  48.                       
  49.                     echo $head;  
  50.                       
  51.                     fwrite($fsocket , $head);  
  52.                       
  53.                     while (!feof($fsocket))  
  54.                     {  
  55.                         $line = fread($fsocket , 4096);  
  56.                           
  57.                         echo $line;  
  58.                     }  
  59.                       
  60.                     fclose($fsocket);  
  61.                 }  
  62.             }  
  63.         }  
  64.     }  
  65.       
  66.     $g_squid_servers = array('192.168.2.88:80');  
  67.     $flush_cache = new Flush_Cache_HTTP_Header_Impl();  
  68.       
  69.     $flush_cache->flush('http://ent.cdqss.com/index.html');  
  70. ?>  


2.  通过PURGE 头刷新缓存,这需要 Suqid 配置 ACL 以允许 PURGE 请求头,实例如下:

acl AdminBoxes src 127.0.0.1 172.16.0.1 192.168.0.1

acl Purge method PURGE


http_access allow AdminBoxes Purge

http_access deny Purge


打开配置之后可以使用如下的请求头来完成删除操作

PURGE http://www.lrrr.org/junk HTTP/1.0
Accept: */* 

上个例子代码中,把HEAD 修改为 PURGE 即可,如下:


[c-sharp] view plain copy print?
  1. $head = "PURGE {$url_component['path']} HTTP/1.1/r/n";  
  2. $head .= "Accept: */*/r/n";  
  3. $head .= "Host: {$url_component['host']}/r/n";  
  4. $head .= "Cache-Control: no-cache/r/n";  
  5. $head .= "/r/n";  


3.  通过使用多播HTCP 包来完成 Squid 清理,这是 MediaWiki 目前正在使用的方法,当wiki 更新时用于更新全球的 Squid 缓存服务器,实现原理为:发送 PURGE 请求到特定的多播组,所有 Squid 服务器通过订阅该多播组信息完成删除操作,这种实现方式非常高效,避免了 Squid 服务器处理响应和建立 TCP 连接的开销。参考资料: Multicast HTCP purging  


发送no-cache 头的方式在很多情况下不适用,因为大多数站长都会配置 ignore-reload 来阻止 no-cachereload 头以提高 Squid 的命中率;通过适当的权限控制 PURGE 清理将是一种非常简单可行的方式,考虑到安全问题我们可以仅允许特定的主机进行 PURGE 清理操作,对第 12 种方式 进 行简单的变通就可以用于管理较大规模数量的前端缓存服务器 - 我们可以在被允许的主机上提供一个专门的后台刷新队列,这个刷新队列在接收到刷新操作时就 多线程的向前端服务器发送删除指令,这样就达到了同步刷新的效果。第3种方式没有进行过尝试,因为需要安装相应的补丁,并进行配置,操作成本相对较高,在 服务器数量特别巨大的情况下这无疑是一种非常高效的实现方式。

4  批量清除Squid缓存的小工具

很实用的一个清除squid缓存的小工具:
http://www.wa.apana.org.au/~dean/squidpurge/

wget http://www.wa.apana.org.au/~dean/sources/purge-20040201-src.tar.gz
tar zxvf purge-20040201-src.tar.gz
cd purge
make
[root@cache purge]# ./purge -help
### Use at your own risk! No guarantees whatsoever. You were warned. ###

$Id: purge.cc,v 1.17 2000/09/21 10:59:53 cached Exp $
Usage: purge [-a] [-c cf] [-d l] [-(f|F) fn | -(e|E) re] [-p h[:p]]
[-P #] [-s] [-v] [-C dir [-H]] [-n]

-a display a little rotating thingy to indicate that I am alive (tty only).
-c c squid.conf location, default "/usr/local/squid/etc/squid.conf".
-C dir base directory for content extraction (copy-out mode).
-d l debug level, an or of different debug options.
-e re single regular expression per -e instance (use quotes!).
-E re single case sensitive regular expression like -e.
-f fn name of textfile containing one regular expression per line.
-F fn name of textfile like -f containing case sensitive REs.
-H prepend HTTP reply header to destination files in copy-out mode.
-n do not fork() when using more than one cache_dir.
-p h:p cache runs on host h and optional port p, default is localhost:3128.
-P # if 0, just print matches; otherwise or the following purge modes:
0x01 really send PURGE to the cache.
0x02 remove all caches files reported as 404 (not found).
0x04 remove all weird (inaccessible or too small) cache files.
0 and 1 are recommended - slow rebuild your cache with other modes.
-s show all options after option parsing, but before really starting.
-v show more information about the file, e.g. MD5, timestamps and flags.

1.清除URL中包含jackbillow.com的所有缓存
./purge -p 127.0.0.1:80 -P 1 -se 'jackbillow.com'

2.清除 URL 以“.mp3”结尾的缓存文件,例如:http://www.dzend.com/abc/test.mp3
./purge -p 127.0.0.1:80 -P 1 -se '/.mp3$'


批量删除squid缓存脚本

Squidweb缓存加速软件目前已经 是新浪、搜狐、网易等各大网站广泛应用。Squid会在设置的缓 存目录下建立多个目录,每一个目录下又建立多个目录,然后才在最里层的目录中存放缓存文件(object)。squid会根据用户请求网页的URL进行哈 希,生成缓存文件,存放在某一个目录中。squid启动之后,将在内存中建立一个哈希表,记录硬盘中缓存文件配置的情形。

对于类似http://you.video.sina.com.cn/index.html之类的网页,squid只会生成一个缓存文件。可以用squid附带的squidclient工具清除:

squidclient -m PURGE -p 80 http://you.video.sina.com.cn/index.html

注意:

Squid接受一种客户请求方式,用于删除cache对象。PURGE方式并非官方HTTP请求方式 之一。它与DELETE不同,对后者, squid将其转发到原始服务器。PURGE请求要求squid删除在uri里提交的目标。squid返回200(OK)或404(Not Found)。

PURGE方式某种程度上有点危险,因为它删除了cache目标。除非你定义了相应的ACL,否则squid禁止PURGE方式。正常的,你仅仅允许来自本机和少数可信任主机的PURGE请求。配置看起来如下:

acl AdminBoxes src 127.0.0.1 172.16.0.1 192.168.0.1

acl Purge method PURGE

http_access allow AdminBoxes Purge

http_access deny Purge

而对于带有参数的网页,例如新浪播客的Flash播放器http: //vhead.blog.sina.com.cn/player/outer_player.swf?auto=0&vid=4469852& uid=1278987704,因“?”后面的参数不同,导致URL也不同,squid会生成多个缓存文件,哈希分散存放在不同的目录。如果修改了这个 outer_player.swf文件,要更新squid缓存就要去清除不同目录下及内存中的很多个缓存文件,十分麻烦,于是我编写了一个Linux下的 shell脚本,去完成这件麻烦的事:

  脚本文件名:clear_squid_cache.sh

  #!/bin/sh

  squidcache_path="/data1/squid/var/cache"

  squidclient_path="/usr/local/squid/bin/squidclient"

  grep -a -r $1 $squidcache_path/* | strings | grep "http:" | awk -F'http:' '{print "http:"$2;}' >cache_list.txt

  for url in `cat cache_list.txt`; do

  $squidclient_path -m PURGE -p 80 $url

  done

注意: 请赋予clear_squid_cache.sh可执行权限(命令:chmod +x ./clear_squid_cache.sh)。请确保脚本所在目录可写。

  设置:

  squidcache_path= 表示squid缓存目录的路径

  squidclient_path= 表示squidclient程序所在的路径,默认为squid安装目录下的bin/squidclient

用法:

  1、清除所有Flash缓存(扩展名.swf):

  ./clear_squid_cache.sh swf

  2、清除URL中包含sina.com.cn的所有缓存:

  ./clear_squid_cache.sh sina.com.cn

  3、清除文件名为zhangyan.jpg的所有缓存:

  ./clear_squid_cache.sh zhangyan.jpg

效率:

经测试,在DELL 2950上清除26000个缓存文件用时2分钟左右。平均每秒可清除缓存文件177个。

(责任编辑:IT)
------分隔线----------------------------
栏目列表
推荐内容