|
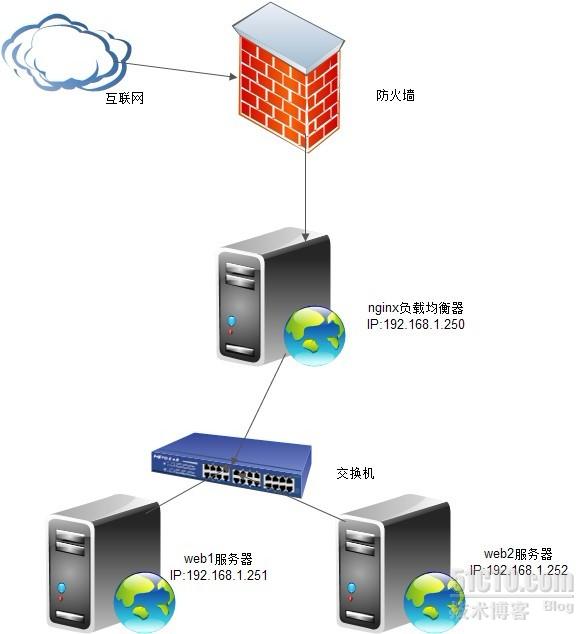
一、拓扑
二、安装软件
wget http://nginx.org/download/nginx-1.0.11.tar.gz
wget ftp://ftp.csx.cam.ac.uk/pub/software/programming/pcre/pcre-8.21.tar.gz
1、安装pcre
tar zxvf pcre-8.21.tar.gz
cd pcre-8.21
./configure
make && make install
2、安装nginx
tar zxvf nginx-1.0.11.tar.gz
cd nginx-1.0.11
useradd -s /sbin/nologin www
./configure --user=www --group=www --prefix=/usr/local/nginx --with-http_stub_status_module --with-http_ssl_module
make
make install
三、配置nginx
cd /usr/local/nginx/
cp nginx.conf nginx.conf.bak
vi nginx.conf
###############################################################################
user www www;
worker_processes 1;
error_log /usr/local/nginx/logs/nginx_error.log crit;
pid /usr/local/nginx/nginx.pid;
worker_rlimit_nofile 51200;
##############################################################################
events{
use epoll;
worker_connections 51200;
}
##############################################################################
http{
include mime.types;
default_type application/octet-stream;
sendfile on;
tcp_nopush on;
keepalive_timeout 60;
tcp_nodelay on;
##############################################################################
upstream 192.168.1.250 {
server 192.168.1.251;
server 192.168.1.252;
}
##############################################################################
server
{
listen 80;
server_name www.test.com *.test.com;
location / {
proxy_pass http://192.168.1.250;
proxy_set_header Host $host;
proxy_set_header X-Real-IP $remote_addr;
proxy_set_header X-Forwarded-For $proxy_add_x_forwarded_for;
}
location /nginx_status {
stub_status on;
access_log off;
allow 192.168.1.253;
deny all;
}
###############################################################################
log_format www_test_com '$remote_addr - $remote_user [$time_local] $request '
'"$status" $body_bytes_sent "$http_referer" '
'"$http_user_agent" "$http_x_forwarded_for"';
access_log /usr/local/nginx/logs/nginx.log www_test_com;
}
}
################################################################################
四、测试配置是否正常
[root@linux-1 conf]# /usr/local/nginx/sbin/nginx -t
nginx: the configuration file /usr/local/nginx/conf/nginx.conf syntax is ok
nginx: configuration file /usr/local/nginx/conf/nginx.conf test is successful
############################以上说明配置正确###################
五、启动和停止nginx负载均衡器
启动:
ulimit -SHn 51200
/usr/local/nginx/sbin/nginx
停止:
killall -9 nginx ####注意nginx可以写脚本形式让它启动停止
六、测试
web1-------->ip:192.168.1.251------------>index.html------------->the is web1
web2-------->ip:192.168.1.252------------>index.html------------->the is web2
测试结果:


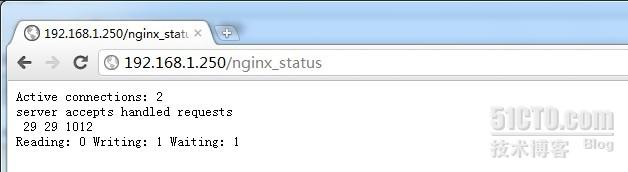
七、简单的使用监控模块(没有像LVS的ipvsadm强大,只是简单的查看而已)
http://192.168.1.250/nginx_status
##########################到些简单的负载配置完成#######################
八、简单讲解配置文件(讲解有错误请指教):
worker_processes 1; ###一般配置跟CPU的数量一样
error_log /usr/local/nginx/logs/nginx_error.log crit;###nginx错误日志使用
use epoll;###epoll模式
worker_connections 51200; ###每个进程最大连接数51200个
upstream 192.168.1.250 {
server 192.168.1.251;
server 192.168.1.252;
} ###############这个就是负载了,下面的就是后端的源服务器
location / {
proxy_pass http://192.168.1.250;
proxy_set_header Host $host;
proxy_set_header X-Real-IP $remote_addr;
proxy_set_header X-Forwarded-For $proxy_add_x_forwarded_for;
}##########后端源Web服务器通过X-Forwarded-For获取用户真实IP地址
location /nginx_status {
stub_status on;
access_log off;
allow 192.168.1.253;
deny all;
}############这个就是简单监控nginx的状态
本文出自 “游造技术博客” 博客,请务必保留此出处http://youzao.blog.51cto.com/3946111/751891
(责任编辑:IT) |