当前位置: > Ubuntu >

如何在 Ubuntu 16.04 上安装 OTRS (开源问题单系统)

时间:2017-06-07 03:25来源:linux.it.net.cn 作者:IT

OTRS ,即开源问题单ticket申请系统,是一个用于客户服务、帮助台和 IT 服务管理的开源问题单软件。该软件是用 Perl 和 javascript 编写的。对于那些需要管理票据、投诉、支持请求或其他类型的报告的公司和组织来说,这是一个问题单解决方案。OTRS 支持包括 MySQL、PostgreSQL、Oracle 和 SQL Server 在内的多个数据库系统,它是一个可以安装在 Windows 和 Linux 上的多平台软件。

在本教程中,我将介绍如何在 Ubuntu 16.04 上安装和配置 OTRS。我将使用 PostgreSQL 作为 OTRS 的数据库,将 Apache Web 服务器用作 Web 服务器。

先决条件

  • Ubuntu 16.04。
  • 最小 2GB 的内存。
  • root 权限

步骤 1 - 安装 Apache 和 PostgreSQL

在第一步中,我们将安装 Apache Web 服务器以及 PostgreSQL。我们将从 ubuntu 仓库中使用最新的版本。

使用 SSH 登录到你的 Ubuntu 服务器中:


  1. ssh root@192.168.33.14

更新 Ubuntu 仓库。


  1. sudo apt-get update

使用 apt 安装 Apache2 以及 PostgreSQL:


  1. sudo apt-get install -y apache2 libapache2-mod-perl2 postgresql

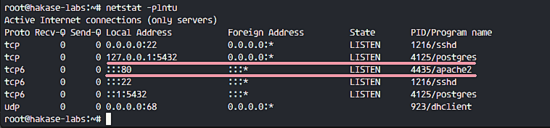
通过检查服务器端口确保 Apache 以及 PostgreSQL 运行了。


  1. netstat -plntu

Install Apache and PostgreSQL

Install Apache and PostgreSQL

你可以看到 80 端口被 apache 使用了,5432 端口被 postgresql 数据库使用了。

步骤 2 - 安装 Perl 模块

OTRS 基于 Perl,因此我们需要安装一些 OTRS 需要的 Perl 模块。

使用这个 apt 命令安装 perl 模块:


  1. sudo apt-get install -y libapache2-mod-perl2 libdbd-pg-perl libnet-dns-perl libnet-ldap-perl libio-socket-ssl-perl libpdf-api2-perl libsoap-lite-perl libgd-text-perl libgd-graph-perl libapache-dbi-perl libarchive-zip-perl libcrypt-eksblowfish-perl libcrypt-ssleay-perl libencode-hanextra-perl libjson-xs-perl libmail-imapclient-perl libtemplate-perl libtext-csv-xs-perl libxml-libxml-perl libxml-libxslt-perl libpdf-api2-simple-perl libyaml-libyaml-perl

安装完成后,我们需要为 apache 激活 Perl 模块,接着重启 apache 服务。


  1. a2enmod perl
  2. systemctl restart apache2

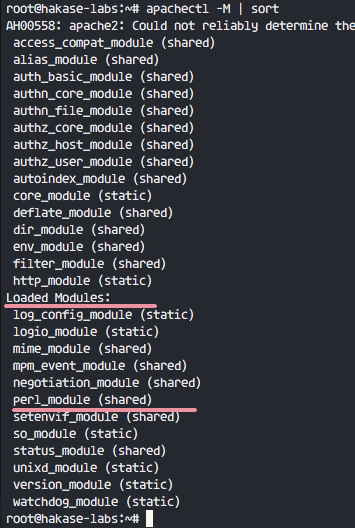
接下来,使用下面的命令检查模块是否已经加载了:


  1. apachectl -M | sort

Enable Apache Perl Module

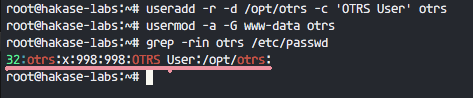
Enable Apache Perl Module

你可以在 “Loaded Modules” 部分下看到 perl_module。

步骤 3 - 为 OTRS 创建新用户

OTRS 是一个基于 web 的程序并且运行与 apache web 服务器下。为了安全,我们需要以普通用户运行它,而不是 root 用户。

使用 useradd 命令创建一个 otrs 新用户:


  1. useradd -r -d /opt/otrs -c 'OTRS User' otrs
  • -r:将用户作为系统用户。
  • -d /opt/otrs:在 /opt/otrs 下放置新用户的主目录。
  • -c:备注。

接下来,将 otrs 用户加入到 www-data 用户组,因为 apache 运行于 www-data 用户及用户组。


  1. usermod -a -G www-data otrs

在 /etc/passwd 文件中已经有 otrs 用户了。


  1. grep -rin otrs /etc/passwd

Create new user for OTRS

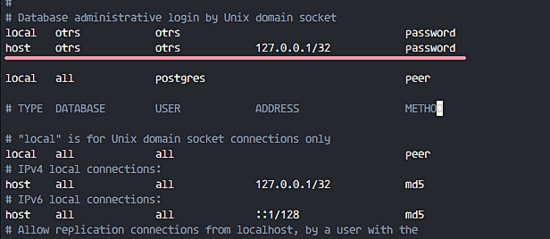
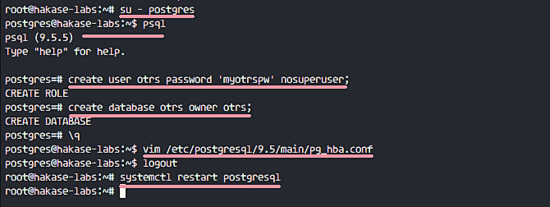
Create new user for OTRS

OTRS 的新用户已经创建了。

步骤 4 - 创建和配置数据库

在这节中,我们会为 OTRS 系统创建一个新 PostgreSQL 数据库,并对 PostgreSQL 数据库的配置做一些小的更改。

登录到 postgres 用户并访问 PostgreSQL shell。


  1. su - postgres
  2. psql

创建一个新的角色 otrs,密码是 myotrspw,并且是非特权用户。


  1. create user otrs password 'myotrspw' nosuperuser;

接着使用 otrs 用户权限创建一个新的 otrs 数据库:


  1. create database otrs owner otrs;
  2. \q

接下来为 otrs 角色验证编辑 PostgreSQL 配置文件。


  1. vim /etc/postgresql/9.5/main/pg_hba.conf

在 84 行后粘贴下面的配置:


  1. local   otrs            otrs                                    password
  2. host    otrs            otrs            127.0.0.1/32            password

保存文件并退出 vim

Database Authentication OTRS

Database Authentication OTRS

使用 exit 回到 root 权限并重启 PostgreSQL:


  1. exit
  2. systemctl restart postgresql

PostgreSQL 已经为 OTRS 的安装准备好了。

Configure PostgreSQL for OTRS

Configure PostgreSQL for OTRS

步骤 5 - 下载和配置 OTRS

在本教程中,我们会使用 OTRS 网站中最新的版本。

进入 /opt 目录并使用 wget 命令下载 OTRS 5.0:


  1. cd /opt/
  2. wget http://ftp.otrs.org/pub/otrs/otrs-5.0.16.tar.gz

展开该 otrs 文件,重命名目录并更改所有 otrs 的文件和目录的所属人为 otrs。


  1. tar -xzvf otrs-5.0.16.tar.gz
  2. mv otrs-5.0.16 otrs
  3. chown -R otrs:otrs otrs

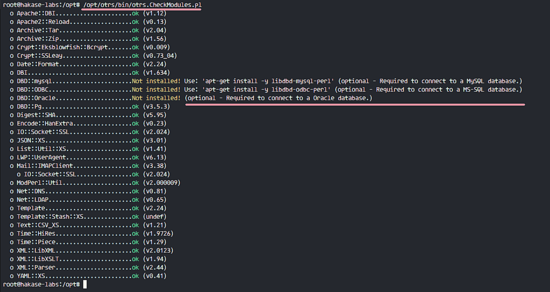
接下来,我们需要检查系统并确保可以安装 OTRS 了。

使用下面的 otrs 脚本命令检查 OTRS 安装需要的系统软件包:


  1. /opt/otrs/bin/otrs.CheckModules.pl

确保所有的结果是对的,这意味着我们的服务器可以安装 OTRS 了。

OTRS Chek Module needed for Installation

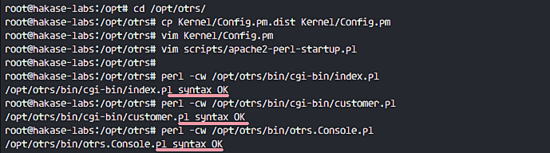
OTRS Chek Module needed for Installation

OTRS 已下载,并且我们的服务器可以安装 OTRS 了。

接下,进入 otrs 目录并复制配置文件。


  1. cd /opt/otrs/
  2. cp Kernel/Config.pm.dist Kernel/Config.pm

使用 vim 编辑 Config.pm 文件:


  1. vim Kernel/Config.pm

更改 42 行的数据库密码:


  1. $Self->{DatabasePw} = 'myotrspw';

注释 45 行的 MySQL 数据库支持:


  1. # $Self->{DatabaseDSN} = "DBI:mysql:database=$Self->{Database};host=$Self->{DatabaseHost};";

取消注释 49 行的 PostgreSQL 数据库支持:


  1. $Self->{DatabaseDSN} = "DBI:Pg:dbname=$Self->{Database};";

保存文件并退出 vim。

接着编辑 apache 启动文件来启用 PostgreSQL 支持。


  1. vim scripts/apache2-perl-startup.pl

取消注释 60 和 61 行:


  1. # enable this if you use postgresql
  2. use DBD::Pg ();
  3. use Kernel::System::DB::postgresql;

保存文件并退出编辑器。

最后,检查缺失的依赖和模块。


  1. perl -cw /opt/otrs/bin/cgi-bin/index.pl
  2. perl -cw /opt/otrs/bin/cgi-bin/customer.pl
  3. perl -cw /opt/otrs/bin/otrs.Console.pl

你可以在下面的截图中看到结果是 “OK”:

Check all modules again

Check all modules again

步骤 6 - 导入样本数据库

在本教程中,我们会使用样本数据库,这可以在脚本目录中找到。因此我们只需要将所有的样本数据库以及表结构导入到第 4 步创建的数据库中。

登录到 postgres 用户并进入 otrs 目录中。


  1. su - postgres
  2. cd /opt/otrs/

作为 otrs 用户使用 psql 命令插入数据库以及表结构。


  1. psql -U otrs -W -f scripts/database/otrs-schema.postgresql.sql otrs
  2. psql -U otrs -W -f scripts/database/otrs-initial_insert.postgresql.sql otrs
  3. psql -U otrs -W -f scripts/database/otrs-schema-post.postgresql.sql otrs

在需要的时候输入数据库密码 myotrspw。

Import OTRS Sample Database

Import OTRS Sample Database

步骤 7 - 启动 OTRS

数据库以及 OTRS 已经配置了,现在我们可以启动 OTRS。

将 otrs 的文件及目录权限设置为 www-data 用户和用户组。


  1. /opt/otrs/bin/otrs.SetPermissions.pl --otrs-user=www-data --web-group=www-data

通过创建一个新的链接文件到 apache 虚拟主机目录中启用 otrs apache 配置。


  1. ln -s /opt/otrs/scripts/apache2-httpd.include.conf /etc/apache2/sites-available/otrs.conf

启用 otrs 虚拟主机并重启 apache。


  1. a2ensite otrs
  2. systemctl restart apache2

确保 apache 启动没有错误。

Enable OTRS Apache Virtual Host

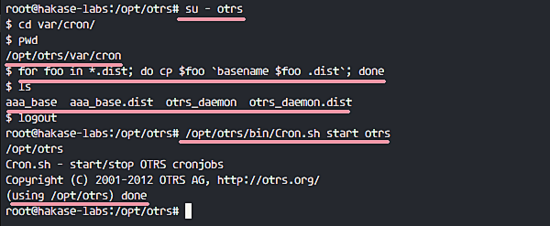
Enable OTRS Apache Virtual Host

步骤 8 - 配置 OTRS 计划任务

OTRS 已经安装并运行在 Apache Web 服务器中了,但是我们仍然需要配置 OTRS 计划任务。

登录到 otrs 用户,接着以 otrs 用户进入 var/cron 目录。


  1. su - otrs
  2. cd var/cron/
  3. pwd

使用下面的命令复制所有 .dist 计划任务脚本:


  1. for foo in *.dist; do cp $foo `basename $foo .dist`; done

使用 exit 回到 root 权限,并使用 otrs 用户启动计划任务脚本。


  1. exit
  2. /opt/otrs/bin/Cron.sh start otrs

Enable OTRS Cron

Enable OTRS Cron

接下来,手动收取电子邮件的 PostMaster 创建一个新的计划任务。我会配置为每 2 分钟收取一次邮件。


  1. su - otrs
  2. crontab -e

粘贴下面的配置:


  1. */2 * * * *    $HOME/bin/otrs.PostMasterMailbox.pl >> /dev/null

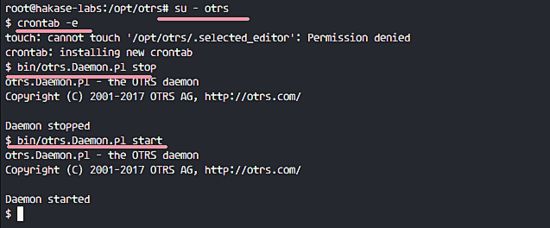
保存并退出。

现在停止 otrs 守护进程并再次启动。


  1. bin/otrs.Daemon.pl stop
  2. bin/otrs.Daemon.pl start

Enable OTRS Fetching Email

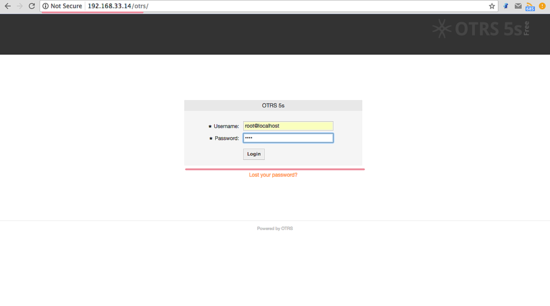
Enable OTRS Fetching Email

OTRS 安装以及配置完成了。

步骤 9 - 测试 OTRS

打开你的 web 浏览器并输入你的服务器 IP 地址: http://192.168.33.14/otrs/

使用默认的用户 root@localhost 以及密码 root 登录。

Installation Successfully OTRS Home Page

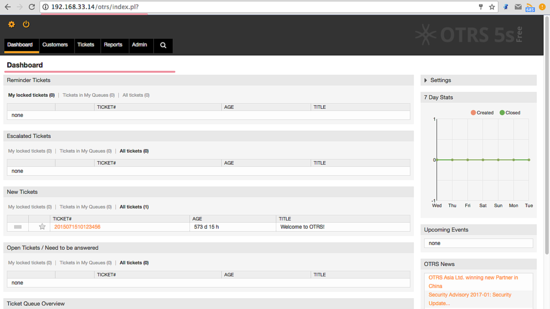
Installation Successfully OTRS Home Page

使用默认的 root 账户你会看到一个警告。点击警告信息来创建一个新的 admin root 用户。

下面是用另外的 admin root 用户登录后出现的 admin 页面,这里没有出现错误信息。

OTRS Admin Dashboard Without Error Messages

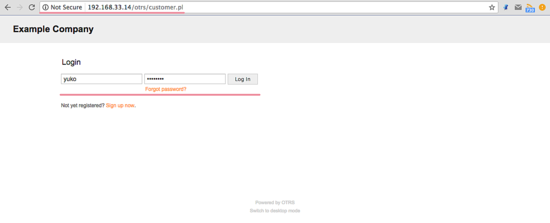
OTRS Admin Dashboard Without Error Messages

如果你想作为客户登录,你可以使用 customer.pl :http://192.168.33.14/otrs/customer.pl

你会看到客户登录界面,输入客户的用户名和密码。

OTRS Customer Login Page

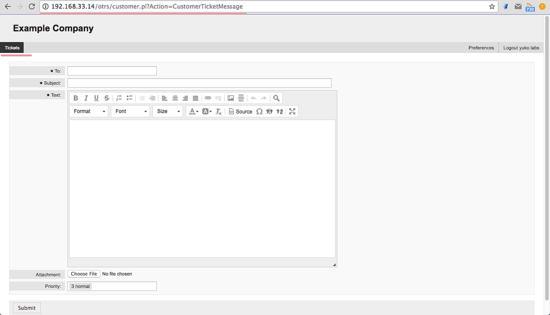
OTRS Customer Login Page

下面是一个创建新单据的客户页面。

Customer Open Ticket

Customer Open Ticket

步骤 10 - 疑难排查

如果你仍旧看到 “OTRS Daemon is not running” 的错误,你可以像这样调试 OTRS 守护进程。


  1. su - otrs
  2. cd /opt/otrs/

停止 OTRS 守护进程:


  1. bin/otrs.Daemon.pl stop

使用 --debug 选项启动 OTRS 守护进程。


  1. bin/otrs.Daemon.pl start --debug

参考

  • http://wiki.otterhub.org/index.php?title=InstallationonDebian6with_Postgres
  • http://www.geoffstratton.com/otrs-installation-5011-ubuntu-1604
  • https://www.linkedin.com/pulse/ticketing-system-otrs-ubuntu-1404-muhammad-faiz-khan

via: https://www.howtoforge.com/tutorial/how-to-install-otrs-opensource-trouble-ticket-system-on-ubuntu-16-04/

作者:Muhammad Arul 译者:geekpi 校对:wxy


(责任编辑:IT)
------分隔线----------------------------
栏目列表
推荐内容