案例环境
NAT模式
系统:Ubuntu 18.04.3
软件版本:Redis 4.0.14.tar.gz
|
主机名 |
IP地址 |
角色 |
|
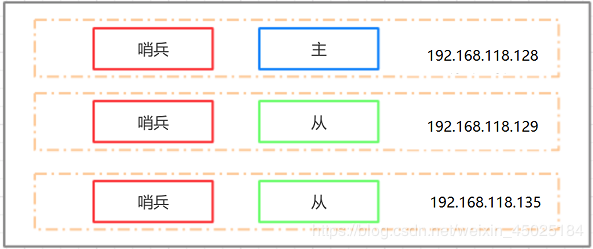
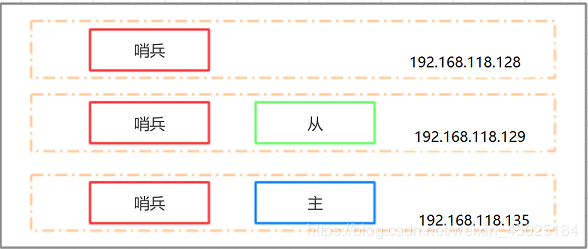
Redis-master |
192.168.118.128 |
Master、sentinel |
|
Redis-slave |
192.168.118.129 |
slave、sentinel |
|
Redis-slave |
192.168.118.135 |
slave、sentinel |
ubuntu18.04配置阿里源
-
以防出错,先备份
sudo cp /etc/apt/sources.list /etc/apt/sources.list.bak
-
编辑元列表文件
sudo vim /etc/apt/sources.list 或 sudo gedit /etc/apt/sources.list
deb http://mirrors.aliyun.com/ubuntu/ bionic main restricted universe multiverse
deb-src http://mirrors.aliyun.com/ubuntu/ bionic main restricted universe multiverse
deb http://mirrors.aliyun.com/ubuntu/ bionic-security main restricted universe multiverse
deb-src http://mirrors.aliyun.com/ubuntu/ bionic-security main restricted universe multiverse
deb http://mirrors.aliyun.com/ubuntu/ bionic-updates main restricted universe multiverse
deb-src http://mirrors.aliyun.com/ubuntu/ bionic-updates main restricted universe multiverse
deb http://mirrors.aliyun.com/ubuntu/ bionic-backports main restricted universe multiverse
deb-src http://mirrors.aliyun.com/ubuntu/ bionic-backports main restricted universe multiverse
deb http://mirrors.aliyun.com/ubuntu/ bionic-proposed main restricted universe multiverse
deb-src http://mirrors.aliyun.com/ubuntu/ bionic-proposed main restricted universe multiverse
-
更新软件列表
sudo apt-get update
-
更新软件包
sudo apt-get upgrade
关于列表里内容不尽相同的问题:
元列表里的bionic是18.04的版本号,每一版内容不同的地方就是版本号(或者官方一点的说:系统代号)
查看新版本信息
lsb_release -c
我们可以看到新版本的Ubuntu系统代号为bionic
同样的我们也可以得到之前版本的系统代号:
Ubuntu 12.04 (LTS)代号为precise。
Ubuntu 14.04 (LTS)代号为trusty。
Ubuntu 15.04 代号为vivid。
Ubuntu 15.10 代号为wily。
Ubuntu 16.04 (LTS)代号为xenial
因为更改apt安装源时用的系统不一样,元列表中系统代号也不同,不同版本的ubuntu系统源列表更改时需注意版本代号的不同
基本环境配置
-
关闭防火墙、selinux
sudo ufw disable
sudo setenforce 0
-
修改root密码
sudo passwd root
-
更新软件源列表
sudo apt-get update
-
安装 ftp、ssh、nfs、vim
sudo apt-get install -y vsftpd openssh-server nfs-kernel-server portmap vim
-
修改主机名
sudo hostnamectl set-hostname Redis-master
sudo hostnamectl set-hostname Redis-slave1
sudo hostnamectl set-hostname Redis-slave2
-
修改Host文件
vim /etc/hosts
192.168.118.128    Redis-master
192.168.118.135    Redis-slave1
192.168.118.129    Redis-slave2
安装redis
-
解压编译安装
tar zxvf redis-4.0.14.tar.gz
mv redis-4.0.14 /usr/local/redis
cd /usr/local/redis
make
报错,原因是没有安装gcc
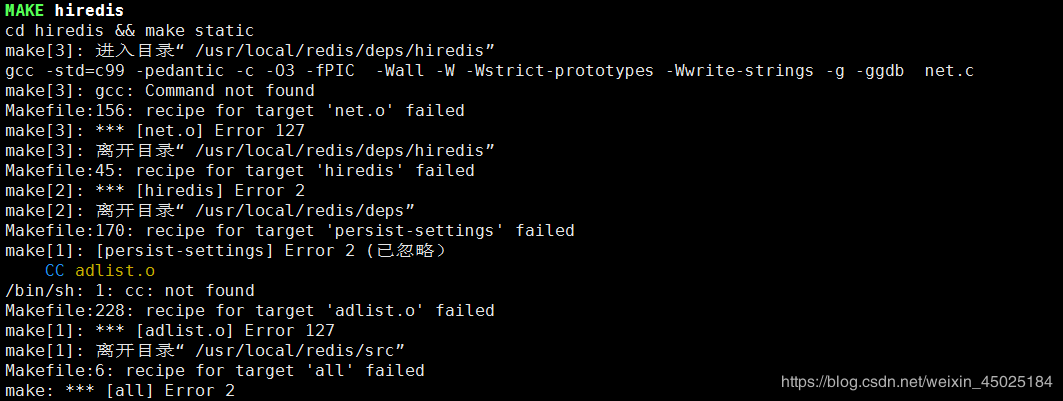
apt-get –y install gcc g++
make distclean
make
make install
主从/哨兵配置
redis.conf配置主从, sentinel.conf配置哨兵
-
【通用配置】
下面3项,在每个redis.conf里进行修改,在每个sentinel.conf里新增
#支持内网/本地访问,比如 bind 172.31.175.142 127.0.0.1
bind 本机内网IP 127.0.0.1
#支持后台运行,默认值为no
daemonize yes
#日志文件,比如redis.log、sentinel.log
logfile xxx.log
-
【slave的配置】
在2个slave的redis.conf下指定master
vim /usr/local/redis/redis.conf
#指定master
slaveof 192.168.118.128  6379
#设置从库只读
slave-read-only yes
-
【3台机器的sentinel的配置】
vim /usr/local/redis/sentinel.conf
在 entinel.conf下指定监控的master
#指定监控的master  ,  “2”表明故障恢复需要的哨兵数量
sentinel monitor mymaster 192.168.118.128  6379 2
启动
分别启动主从redis, 查看端口运行状态,验证没问题
root@Redis-master:/usr/local/redis# redis-server redis.conf
root@Redis-master:~# netstat -anptu | grep redis

root@Redis-slave1:/usr/local/redis# redis-server redis.conf
root@Redis-slave1:~# netstat -anptu | grep redis

root@Redis-slave2:/usr/local/redis# redis-server redis.conf
root@Redis-slave2:~# netstat -anptu | grep redis

关闭
redis-cli shutdown
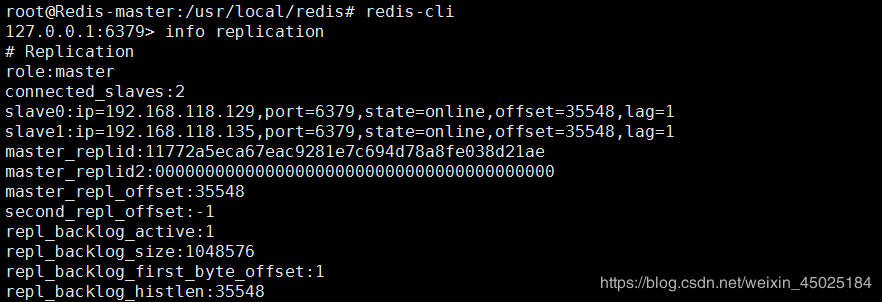
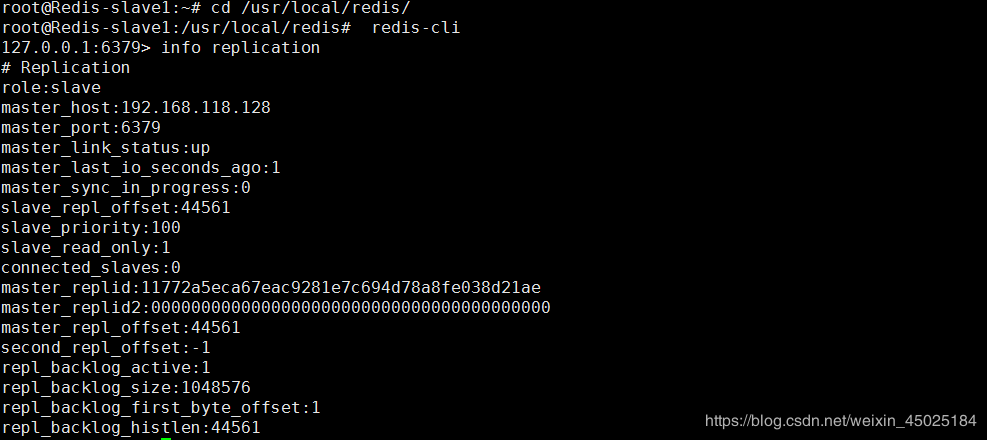
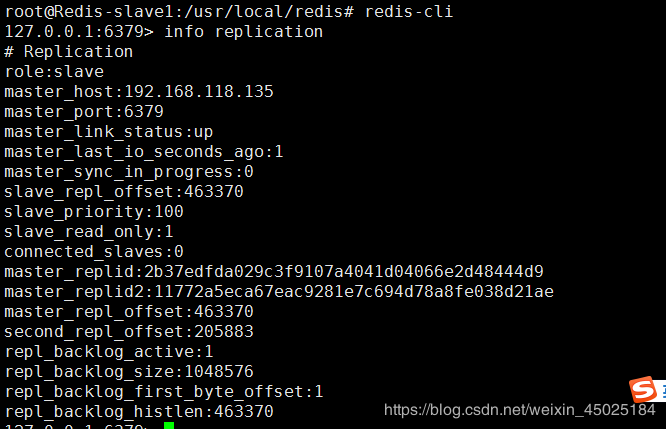
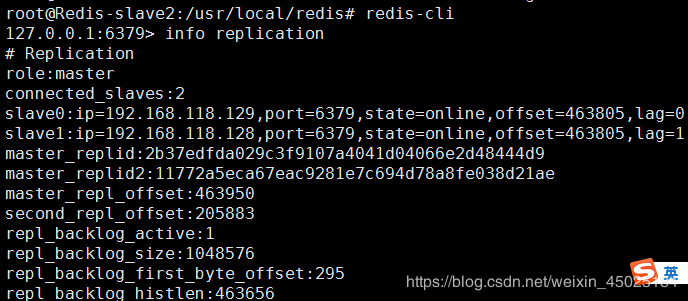
连接redis查看主从信息
cli连接redis成功后, 输入 info replication
root@Redis-master:/usr/local/redis# redis-cli
127.0.0.1:6379> info replication
root@Redis-slave1:/usr/local/redis#  redis-cli
127.0.0.1:6379> info replication
测试主从同步
-
在master 端操作

-
在selave 端查看
-
slave1

-
slave2

启动哨兵
---- (有部署哨兵的都启动) ----
root@Redis-slave1:/usr/local/redis# redis-sentinel  sentinel.conf
root@Redis-slave1:~# netstat -anptu | grep redis

故障转移
-
关闭Redis-master的redis-server进程.
redis-cli -h 192.168.118.128-p 6379 shutdown
-
查看主从信息
-
slave1(192.168.118.129)
master已经转移到Slave2(192.168.118.135)上
当故障转移成功后, redis就是一主一从
-
slave2(192.168.118.135)
slave从节点现在变为192.168.188.128和192.168.118.129
(责任编辑:IT) |