当前位置: > Linux教程 > Linux学习 >

Linux编译Openwrt(HC5661)详细教程

时间:2016-05-26 14:54来源:linux.it.net.cn 作者:IT

OpenWrt 可以被描述为一个嵌入式的 Linux 发行版,(主流路由器固件有 dd-wrt,tomato,openwrt三类)而不是试图建立一个单一的、静态的系统。OpenWrt的包管理提供了一个完全可写的文件系统,从应用程序供应商提供的选择和配置,并允许您自定义的设备,以适应任何应用程序。

编译Openwrt

编译过程可以查看官方的这篇文档:http://wiki.openwrt.org/zh-cn/doc/howto/build

这里编译用到的是我自己Fork的官方源码,添加了许多自定义的软件包:

 
1
2
3
4
5
https://github.com/kuoruan/openwrt
 
https://github.com/kuoruan/luci
 
https://github.com/kuoruan/packages


1.安装编译环境

首先需要一个Linux环境,怎么安装Linux我这里就不介绍了,你可以选择用虚拟机安装,最好能给Linux多分配几个内核,安装系统的时候新建一个普通用户。

需要注意的是,保证Linux的磁盘可用空间大于20G,编译过程中生成的文件大小是非常可观的。

根据Linux发行版本的不同,需要安装的软件包不太相同,我这里用到的是Centos 7 x86_64。

切换到root用户执行以下安装命令:

 
1
# yum -y install subversion binutils bzip2 gcc gcc-c++ gawk gettext flex ncurses-devel zlib-devel zlib-static make patch unzip perl-ExtUtils-MakeMaker  glibc glibc-devel glibc-static quilt ncurses-lib sed sdcc intltool sharutils bison wget git-core openssl-devel xz

其他Linux发行版看这篇介绍:http://wiki.openwrt.org/doc/howto/buildroot.exigence

2.下载源代码

后面的命令都在普通用户下执行:

 
1
2
3
4
5
# 这里是我自己的源码
git clone https://github.com/kuoruan/openwrt.git openwrt
 
# 这里是官方源码
git clone git://git.openwrt.org/openwrt.git


1
2
3
4
cd openwrt
# 下载软件包源码
./scripts/feeds update -a
./scripts/feeds install -a


3.创建配置文件(使用可视化界面)


1
make menuconfig

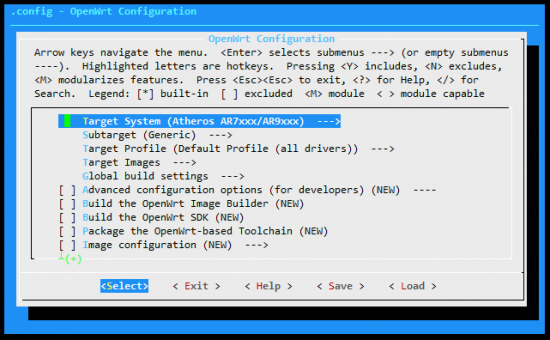
输入以上命令后,会看到这个界面:

我是为极路由HC5661编译系统,所有选项如下(其中一些包是我自己添加的):

 
1
2
3
4
5
6
7
8
9
10
11
12
13
14
15
16
17
18
19
20
21
22
23
24
25
26
27
28
29
30
31
32
33
34
35
36
37
Target System (Atheros AR7xxx/AR9xxx) ---> Ralink RT288x/RT3xxx
Subtarget (RT3x5x/RT5350 based boards) ---> MT7620 based boards
Base system ---> block-mount
Base system ---> dnsmasq-full
Kernel modules ---> Filesystems ---> kmod-fs-ext4
Kernel modules ---> Filesystems ---> kmod-fs-nfs
Kernel modules ---> Filesystems ---> kmod-fs-ntfs
Kernel modules ---> Filesystems ---> kmod-fs-vfat
Kernel modules ---> Native Language Support ---> kmod-nls-cp437
Kernel modules ---> Native Language Support ---> kmod-nls-iso8859-1
Kernel modules ---> Native Language Support ---> kmod-nls-utf8
Kernel modules ---> Other modules ---> kmod-mmc
Kernel modules ---> Other modules ---> kmod-sdhci-mt7620
LuCI ---> Collections ---> luci (NEW)
LuCI ---> Modules ---> Translations ---> Chinese (zh-cn) (NEW)
LuCI ---> Applications ---> luci-app-aria2 (离线下载)
LuCI ---> Applications ---> luci-app-chinadns (ChinaDNS)
LuCI ---> Applications ---> luci-app-mwan3 (负载均衡)
LuCI ---> Applications ---> luci-app-n2n_v2 (n2n_v2 VPN,穿透内网)
LuCI ---> Applications ---> luci-app-ntpc (时间同步)
LuCI ---> Applications ---> luci-app-p2pblock (P2P封锁)
LuCI ---> Applications ---> luci-app-shadowsocks-libev (影梭)
LuCI ---> Applications ---> luci-app-syncdial (单线多拨)
LuCI ---> Applications ---> luci-app-upnp (端口管理)
LuCI ---> Applications ---> luci-app-watchcat (自动重启)
Network ---> File Transfer ---> Aria2 configuration ---> Enable bittorrent support (NEW)
Network ---> File Transfer ---> Aria2 configuration ---> Enable metalink support (NEW)
Network ---> Routing and Redirection ---> ip-full
Network ---> 6in4
Network ---> ChinaDNS
Network ---> shadowsocks-libev
Utilities ---> Compression ---> bzip2
Utilities ---> Compression ---> unzip
Utilities ---> Compression ---> zip
Utilities ---> Filesystem ---> badblocks
Utilities ---> disc ---> fdisk
Utilities ---> lrzsz

 

4.设置无线驱动


1
2
3
make kernel_menuconfig
 
Machine selection  --->  Devicetree selection (MT7620A eval kit)  --->  MT7620A eval kit


5.开始编译


1
2
3
4
5
6
7
8
9
10
11
12
13
14
make
 
# 输出编译信息
make V=s
 
# 多核编译 后面那个数字为<你的CPU个数 + 1>
make -j 3
 
# 单个软件包操作
make package/<name>/clean V=99
make package/<name>/install V=99
make package/<name>/prepare V=99
make package/<name>/compile V=99
make package/<name>/configure V=99

编译完成之后,会在bin目录下生成.bin文件,刷入路由器即可。


(责任编辑:IT)
------分隔线----------------------------