|
本篇仅作为PVE使用bcache的参考
该方案的稳定性与可用性在PVE上皆存疑,请优先使用proxmox官方支持的其他方案
参考文档 https://www.kernel.org/doc/Documentation/bcache.txt
由于设备的限制以及不完善的测试方法,测试结果可能存在问题,仅供自嗨
使用bcache翻车的风险请自行承担
基础需求
已验证Proxmox 7至7.3版本可以使用,后续新版本估计也能用
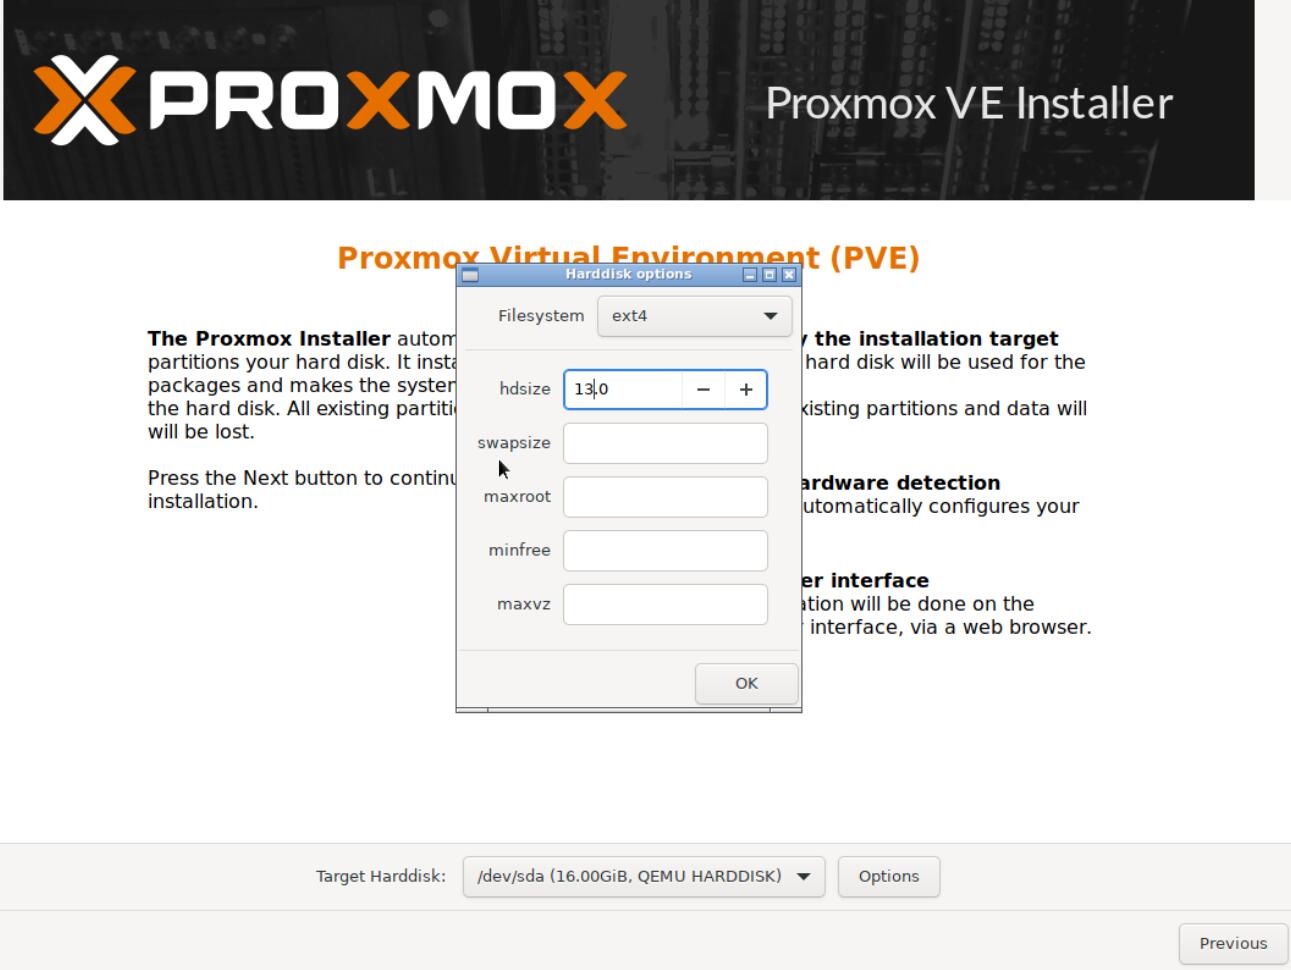
至少在提供加速的设备上有一个空余的分区用于创建Cache(缓存)
本篇演示,在系统盘中预先预留一部分空间
至少有一个被加速的设备,创建backend(后端设备)
环境预览与准备
-
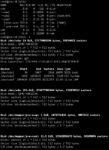
root@pve:~# lsblk
-
NAME MAJ:MIN RM SIZE RO TYPE MOUNTPOINT
-
sda 8:0 0 16G 0 disk
-
├─sda1 8:1 0 1007K 0 part
-
├─sda2 8:2 0 512M 0 part /boot/efi
-
└─sda3 8:3 0 12.5G 0 part
-
├─pve-swap 253:0 0 1G 0 lvm [SWAP]
-
└─pve-root 253:1 0 11.5G 0 lvm /
-
sdb 8:16 0 256G 0 disk
-
sr0 11:0 1 1024M 0 rom
-
-
root@pve:~# fdisk -l
-
Disk /dev/sda: 16 GiB, 17179869184 bytes, 33554432 sectors
-
Disk model: QEMU HARDDISK
-
Units: sectors of 1 * 512 = 512 bytes
-
Sector size (logical/physical): 512 bytes / 512 bytes
-
I/O size (minimum/optimal): 512 bytes / 512 bytes
-
Disklabel type: gpt
-
Disk identifier: C76EF95E-FFF3-4EC7-B2F7-094E9D2B9E7C
-
-
Device Start End Sectors Size Type
-
/dev/sda1 34 2047 2014 1007K BIOS boot
-
/dev/sda2 2048 1050623 1048576 512M EFI System
-
/dev/sda3 1050624 27262976 26212353 12.5G Linux LVM
-
-
-
Disk /dev/sdb: 256 GiB, 274877906944 bytes, 536870912 sectors
-
Disk model: QEMU HARDDISK
-
Units: sectors of 1 * 512 = 512 bytes
-
Sector size (logical/physical): 512 bytes / 512 bytes
-
I/O size (minimum/optimal): 512 bytes / 512 bytes
-
-
-
Disk /dev/mapper/pve-swap: 1 GiB, 1073741824 bytes, 2097152 sectors
-
Units: sectors of 1 * 512 = 512 bytes
-
Sector size (logical/physical): 512 bytes / 512 bytes
-
I/O size (minimum/optimal): 512 bytes / 512 bytes
-
-
-
Disk /dev/mapper/pve-root: 11.5 GiB, 12343836672 bytes, 24109056 sectors
-
Units: sectors of 1 * 512 = 512 bytes
-
Sector size (logical/physical): 512 bytes / 512 bytes
-
I/O size (minimum/optimal): 512 bytes / 512 bytes
收起
看不清文字的可以去点击查看大图
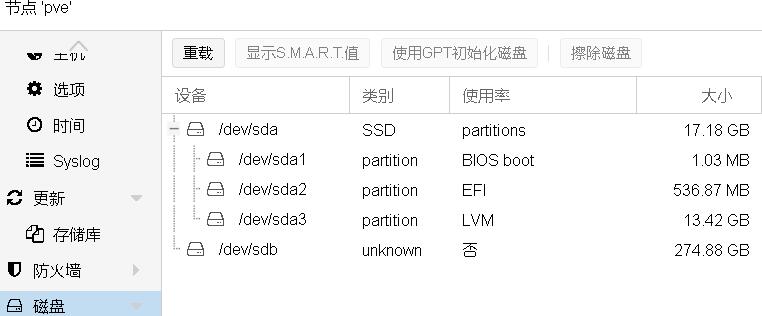
如图所示,本次将使用16G系统盘sda预留的空间,加速sdb设备
安装必须软件包

首先需要安装软件包bcache-tools,一般而言运行 apt update && apt install bcache-tools -y 就可以安装完成
-
root@pve:~# make-bcache
-
-bash: make-bcache: command not found
-
root@pve:~# apt update && apt install bcache-tools -y
-
Hit:1 https://mirrors.ustc.edu.cn/debian bullseye InRelease
-
Hit:2 https://mirrors.ustc.edu.cn/debian bullseye-updates InRelease
-
Hit:3 https://mirrors.ustc.edu.cn/debian-security bullseye-security InRelease
-
Hit:4 https://mirrors.ustc.edu.cn/proxmox/debian/pve bullseye InRelease
-
Reading package lists... Done
-
Building dependency tree... Done
-
Reading state information... Done
-
45 packages can be upgraded. Run 'apt list --upgradable' to see them.
-
Reading package lists... Done
-
Building dependency tree... Done
-
Reading state information... Done
-
The following NEW packages will be installed:
-
bcache-tools
-
0 upgraded, 1 newly installed, 0 to remove and 45 not upgraded.
-
Need to get 19.2 kB of archives.
-
After this operation, 109 kB of additional disk space will be used.
-
Get:1 https://mirrors.ustc.edu.cn/debian bullseye/main amd64 bcache-tools amd64 1.0.8-4 [19.2 kB]
-
Fetched 19.2 kB in 0s (116 kB/s)
-
Selecting previously unselected package bcache-tools.
-
(Reading database ... 43807 files and directories currently installed.)
-
Preparing to unpack .../bcache-tools_1.0.8-4_amd64.deb ...
-
Unpacking bcache-tools (1.0.8-4) ...
-
Setting up bcache-tools (1.0.8-4) ...
-
Processing triggers for man-db (2.9.4-2) ...
-
Processing triggers for initramfs-tools (0.140) ...
-
update-initramfs: Generating /boot/initrd.img-5.15.74-1-pve
-
Running hook script 'zz-proxmox-boot'..
-
Re-executing '/etc/kernel/postinst.d/zz-proxmox-boot' in new private mount namespace..
-
No /etc/kernel/proxmox-boot-uuids found, skipping ESP sync.
展开
分区并创建cache
此处使用fdisk吧sda剩余的空间进行分区
-
root@pve:~
-
-
Welcome to fdisk (util-linux 2.36.1).
-
Changes will remain in memory only, until you decide to write them.
-
Be careful before using the write command.
-
-
-
Command (m for help): n
-
Partition number (4-128, default 4): 4
-
First sector (27262977-33554398, default 27265024):
-
Last sector, +/-sectors or +/-size{K,M,G,T,P} (27265024-33554398, default 33554398):
-
-
Created a new partition 4 of type 'Linux filesystem' and of size 3 GiB.
-
-
Command (m for help): w
-
The partition table has been altered.
-
Syncing disks.
随后使用lsblk查看分区情况
-
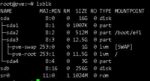
root@pve:~# lsblk
-
NAME MAJ:MIN RM SIZE RO TYPE MOUNTPOINT
-
sda 8:0 0 16G 0 disk
-
├─sda1 8:1 0 1007K 0 part
-
├─sda2 8:2 0 512M 0 part /boot/efi
-
├─sda3 8:3 0 12.5G 0 part
-
│ ├─pve-swap 253:0 0 1G 0 lvm [SWAP]
-
│ └─pve-root 253:1 0 11.5G 0 lvm /
-
└─sda4 8:4 0 3G 0 part
-
sdb 8:16 0 256G 0 disk
-
sr0 11:0 1 1024M 0 rom
可见新分区sda4,此时创建缓存
-
root@pve:~# make-bcache -C /dev/sda4
-
UUID: 590956d8-da0f-4c9f-a1de-37599d8a4a66
-
Set UUID: 80897d41-8347-402c-b950-d7bcfb78454f
-
version: 0
-
nbuckets: 6141
-
block_size: 1
-
bucket_size: 1024
-
nr_in_set: 1
-
nr_this_dev: 0
-
first_bucket:
查看创建的缓存信息
-
root@pve:~# bcache-super-show /dev/sda4
-
sb.magic ok
-
sb.first_sector 8 [match]
-
sb.csum 2141F91CAE066BC4 [match]
-
sb.version 3 [cache device]
-
-
dev.label (empty)
-
dev.uuid 590956d8-da0f-4c9f-a1de-37599d8a4a66
-
dev.sectors_per_block 1
-
dev.sectors_per_bucket 1024
-
dev.cache.first_sector 1024
-
dev.cache.cache_sectors 6287360
-
dev.cache.total_sectors 6288384
-
dev.cache.ordered yes
-
dev.cache.discard no
-
dev.cache.pos 0
-
dev.cache.replacement 0 [lru]
-
-
cset.uuid 80897d41-8347-402c-b950-d7bcfb78454f
创建backend
接着创建被加速的backend
-
root@pve:~# make-bcache -B /dev/sdb
-
UUID: 554c410c-f568-42b9-ae04-cc6168f6a3d4
-
Set UUID: 34b24963-0db3-4cce-8d3e-b765633fdccd
-
version: 1
-
block_size: 1
-
data_offset: 16
查看被加速的backend
-
root@pve:~# bcache-super-show /dev/sdb
-
sb.magic ok
-
sb.first_sector 8 [match]
-
sb.csum 9373030BA8EB9FBE [match]
-
sb.version 1 [backing device]
-
-
dev.label (empty)
-
dev.uuid 554c410c-f568-42b9-ae04-cc6168f6a3d4
-
dev.sectors_per_block 1
-
dev.sectors_per_bucket 1024
-
dev.data.first_sector 16
-
dev.data.cache_mode 0 [writethrough]
-
dev.data.cache_state 0 [detached]
-
-
cset.uuid 34b24963-0db3-4cce-8d3e-b765633fdccd
往backend附加cache
此处附加的uuid,是在上面查询到的cache的uuid
-
root@pve:~# echo 80897d41-8347-402c-b950-d7bcfb78454f > /sys/block/bcache0/bcache/attach
随后再次查看backend设备,可见已经有cache被附加
-
root@pve:~# bcache-super-show /dev/sdb
-
sb.magic ok
-
sb.first_sector 8 [match]
-
sb.csum 9CD3F5996941D630 [match]
-
sb.version 1 [backing device]
-
-
dev.label (empty)
-
dev.uuid 554c410c-f568-42b9-ae04-cc6168f6a3d4
-
dev.sectors_per_block 1
-
dev.sectors_per_bucket 1024
-
dev.data.first_sector 16
-
dev.data.cache_mode 0 [writethrough]
-
dev.data.cache_state 1 [clean]
-
-
cset.uuid 80897d41-8347-402c-b950-d7bcfb78454f
分区并挂载使用
PVE的mkfs可以支持以下格式
-
root@pve:~# mkfs.
-
mkfs.bfs mkfs.btrfs mkfs.cramfs mkfs.ext2 mkfs.ext3 mkfs.ext4 mkfs.fat mkfs.minix mkfs.msdos mkfs.vfat mkfs.xfs
这里我们选用通俗易懂的ext4,你喜欢的话也可以是btrfs之类的
-
root@pve:~# mkfs.ext4 /dev/bcache0
-
mke2fs 1.46.5 (30-Dec-2021)
-
Discarding device blocks: done
-
Creating filesystem with 67108862 4k blocks and 16777216 inodes
-
Filesystem UUID: b590690a-9030-47ee-b11c-cd20fd88c956
-
Superblock backups stored on blocks:
-
32768, 98304, 163840, 229376, 294912, 819200, 884736, 1605632, 2654208,
-
4096000, 7962624, 11239424, 20480000, 23887872
-
-
Allocating group tables: done
-
Writing inode tables: done
-
Creating journal (262144 blocks): done
-
Writing superblocks and filesystem accounting information: done
随后查看一下是否创建了
-
root@pve:~# lsblk
-
NAME MAJ:MIN RM SIZE RO TYPE MOUNTPOINT
-
sda 8:0 0 16G 0 disk
-
├─sda1 8:1 0 1007K 0 part
-
├─sda2 8:2 0 512M 0 part /boot/efi
-
├─sda3 8:3 0 12.5G 0 part
-
│ ├─pve-swap 253:0 0 1G 0 lvm [SWAP]
-
│ └─pve-root 253:1 0 11.5G 0 lvm /
-
└─sda4 8:4 0 3G 0 part
-
└─bcache0 252:0 0 256G 0 disk
-
sdb 8:16 0 256G 0 disk
-
└─bcache0 252:0 0 256G 0 disk
-
sr0 11:0 1 1024M 0 rom
修改fstab挂载分区
首先创建一个目录用于后续挂载
随后,查看一下bcache0的uuid
-
root@pve:~# lsblk -lf
-
NAME FSTYPE FSVER LABEL UUID FSAVAIL FSUSE% MOUNTPOINT
-
sda
-
sda1
-
sda2 vfat FAT32 1946-93A4 510.7M 0% /boot/efi
-
sda3 LVM2_member LVM2 001 vyIvUH-oFVV-I5GX-7WSp-M3II-PXJ1-Ku19cF
-
sda4 bcache 590956d8-da0f-4c9f-a1de-37599d8a4a66
-
sdb bcache 554c410c-f568-42b9-ae04-cc6168f6a3d4
-
sr0
-
bcache0 ext4 1.0 b590690a-9030-47ee-b11c-cd20fd88c956
-
pve-swap swap 1 ab14f45e-12f6-49d2-be06-408a3d69d35f [SWAP]
-
pve-root ext4 1.0 c9f3a7d3-10c3-4705-b1a9-2e42cd01ac0e 8G 23% /
再对fstab进行修改
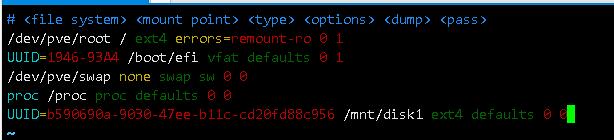
改完了保存重启,反正你都得改这里,手动mount不如直接冲,相信自己
重启完看看挂载情况
-
root@pve:~
-
sysfs on /sys type sysfs (rw,nosuid,nodev,noexec,relatime)
-
proc on /proc type proc (rw,relatime)
-
udev on /dev type devtmpfs (rw,nosuid,relatime,size=8140972k,nr_inodes=2035243,mode=755,inode64)
-
devpts on /dev/pts type devpts (rw,nosuid,noexec,relatime,gid=5,mode=620,ptmxmode=000)
-
tmpfs on /run type tmpfs (rw,nosuid,nodev,noexec,relatime,size=1634948k,mode=755,inode64)
-
/dev/mapper/pve-root on / type ext4 (rw,relatime,errors=remount-ro)
-
securityfs on /sys/kernel/security type securityfs (rw,nosuid,nodev,noexec,relatime)
-
tmpfs on /dev/shm type tmpfs (rw,nosuid,nodev,inode64)
-
tmpfs on /run/lock type tmpfs (rw,nosuid,nodev,noexec,relatime,size=5120k,inode64)
-
cgroup2 on /sys/fs/cgroup type cgroup2 (rw,nosuid,nodev,noexec,relatime)
-
pstore on /sys/fs/pstore type pstore (rw,nosuid,nodev,noexec,relatime)
-
efivarfs on /sys/firmware/efi/efivars type efivarfs (rw,nosuid,nodev,noexec,relatime)
-
bpf on /sys/fs/bpf type bpf (rw,nosuid,nodev,noexec,relatime,mode=700)
-
systemd-1 on /proc/sys/fs/binfmt_misc type autofs (rw,relatime,fd=30,pgrp=1,timeout=0,minproto=5,maxproto=5,direct,pipe_ino=15299)
-
hugetlbfs on /dev/hugepages type hugetlbfs (rw,relatime,pagesize=2M)
-
mqueue on /dev/mqueue type mqueue (rw,nosuid,nodev,noexec,relatime)
-
debugfs on /sys/kernel/debug type debugfs (rw,nosuid,nodev,noexec,relatime)
-
tracefs on /sys/kernel/tracing type tracefs (rw,nosuid,nodev,noexec,relatime)
-
sunrpc on /run/rpc_pipefs type rpc_pipefs (rw,relatime)
-
fusectl on /sys/fs/fuse/connections type fusectl (rw,nosuid,nodev,noexec,relatime)
-
configfs on /sys/kernel/config type configfs (rw,nosuid,nodev,noexec,relatime)
-
/dev/sda2 on /boot/efi type vfat (rw,relatime,fmask=0022,dmask=0022,codepage=437,iocharset=iso8859-1,shortname=mixed,errors=remount-ro)
-
/dev/bcache0 on /mnt/disk1 type ext4 (rw,relatime)
-
lxcfs on /var/lib/lxcfs type fuse.lxcfs (rw,nosuid,nodev,relatime,user_id=0,group_id=0,allow_other)
-
/dev/fuse on /etc/pve type fuse (rw,nosuid,nodev,relatime,user_id=0,group_id=0,default_permissions,allow_other)
-
tmpfs on /run/user/0 type tmpfs (rw,nosuid,nodev,relatime,size=1634944k,nr_inodes=408736,mode=700,inode64)
展开
-
root@pve:~# lsblk
-
NAME MAJ:MIN RM SIZE RO TYPE MOUNTPOINT
-
sda 8:0 0 16G 0 disk
-
├─sda1 8:1 0 1007K 0 part
-
├─sda2 8:2 0 512M 0 part /boot/efi
-
├─sda3 8:3 0 12.5G 0 part
-
│ ├─pve-swap 253:0 0 1G 0 lvm [SWAP]
-
│ └─pve-root 253:1 0 11.5G 0 lvm /
-
└─sda4 8:4 0 3G 0 part
-
└─bcache0 252:0 0 256G 0 disk /mnt/disk1
-
sdb 8:16 0 256G 0 disk
-
└─bcache0 252:0 0 256G 0 disk /mnt/disk1
-
sr0 11:0 1 1024M 0 rom
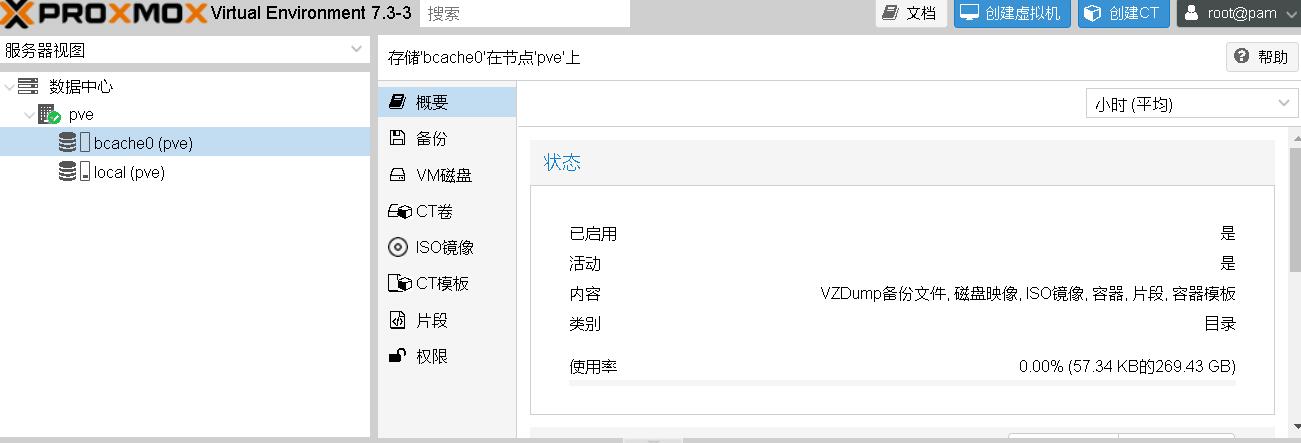
在PVE中添加存储目录
在数据中心的存储中,添加目录,把刚刚创建的挂载点,填进去就完事了

修改缓存模式为writeback
此处不作详细介绍,可以参考文档
echo writeback > /sys/block/bcache0/bcache/cache_mode
 - Bad write performance

   If write performance is not what you expected, you probably wanted to be
   running in writeback mode, which isn't the default (not due to a lack of
   maturity, but simply because in writeback mode you'll lose data if something
   happens to your SSD)::

	# echo writeback > /sys/block/bcache0/bcache/cache_mode
当cache_mode是writeback时,此时缓存有dirty与clean两种状态,请不要在dirty状态下搞事情
调优sequential_cutoff
此处不作详细介绍,可以参考文档
sequential_cutoff
- Bad performance, or traffic not going to the SSD that you'd expect
By default, bcache doesn't cache everything. It tries to skip sequential IO -
because you really want to be caching the random IO, and if you copy a 10
gigabyte file you probably don't want that pushing 10 gigabytes of randomly
accessed data out of your cache.
But if you want to benchmark reads from cache, and you start out with fio
writing an 8 gigabyte test file - so you want to disable that::
# echo 0 > /sys/block/bcache0/bcache/sequential_cutoff
To set it back to the default (4 mb), do::
# echo 4M > /sys/block/bcache0/bcache/sequential_cutoff
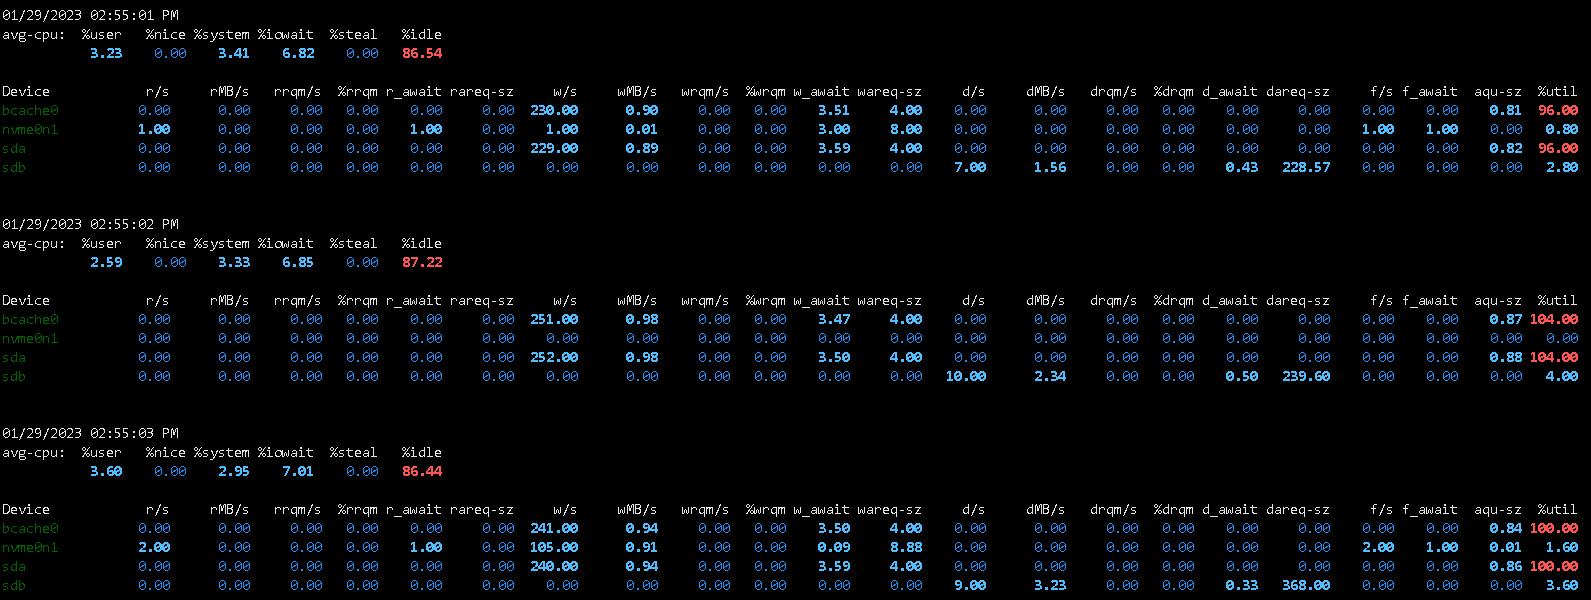
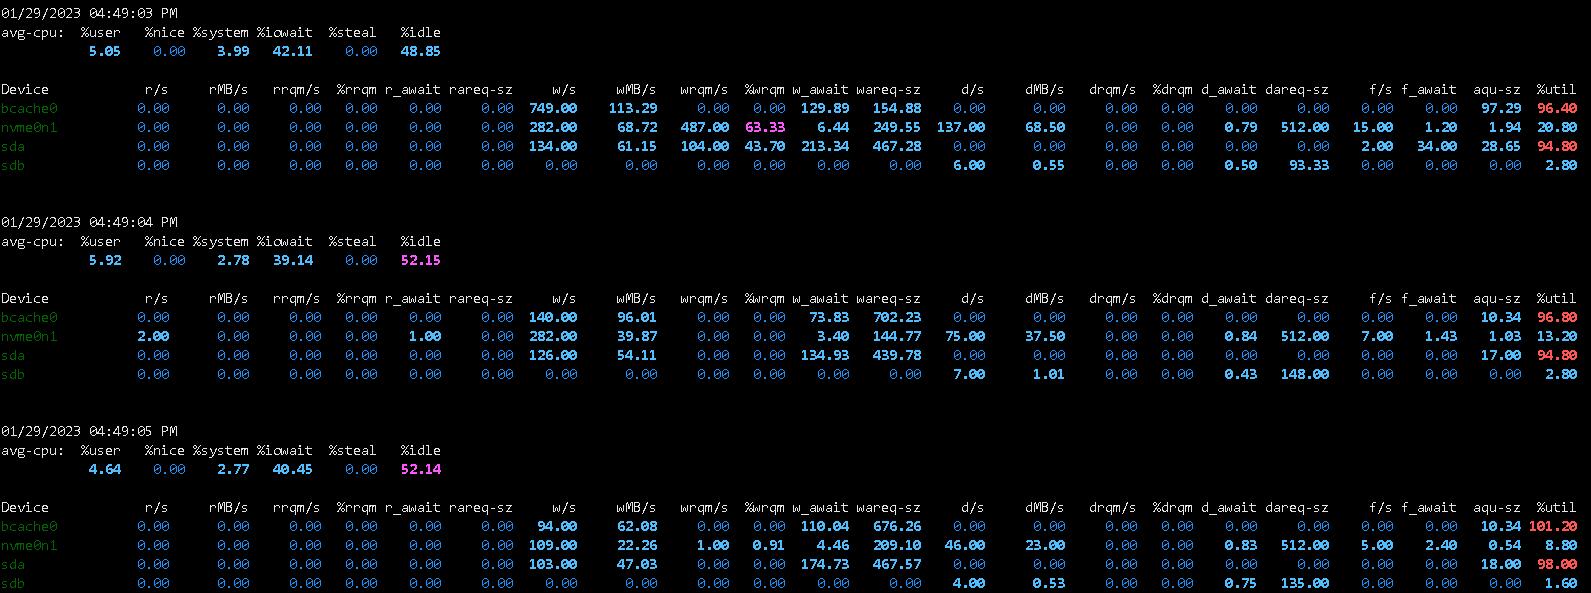
简单性能测试
此处测试设备
-
ASUS B150 gaming
-
QQLT
-
DDR3 8GB x3
-
傲腾16G
-
HGST_HTS545050A7E380
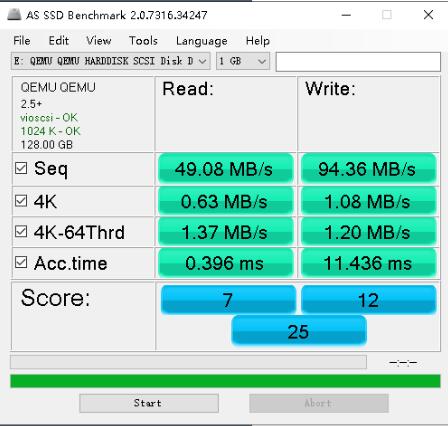
简单在的虚拟机中跑一下AS SSD,你以为我会在PVE里面直接跑吗,想不到吧
别问我为什么数据这么诡异
(责任编辑:IT) |