|
一、架构
1、ovirt部署架构
一个标准的oVirt部署架构应包括如下三个主要部分:
1个ovirt-engine,用来进行管理虚拟机(创建、开关启停)、配置网络和存储等操作;
1个或多个主机(节点),用来运行虚拟机;
1个或多个存储节点,用来存放虚机镜像和iso镜像;
engine中有一个认证服务(组件)用来实现用户和管理员的认证。
主机节点是安装有vdsm和libvirt组件的linux发行版,也包含一些用来实现网络虚拟化和其它系统服务的组件。自Fedora17以后的linux发行版都支持(推荐使用centos),还有oVirt-node,oVirt-node是一个基于发行版精简的系统,只包含足够支撑虚拟化运行的组件。
存储节点可以使用块存储或文件存储,可以是利用主机节点自身的存储做存储节点(local on host模式),或者使用外部的存储,例如通过NFS访问,或者是IP-SAN/FC-SAN。还有一种就是超融合架构,通过gluster将主机节点自身的磁盘组成池来使用,同时能够实现高可用和冗余。
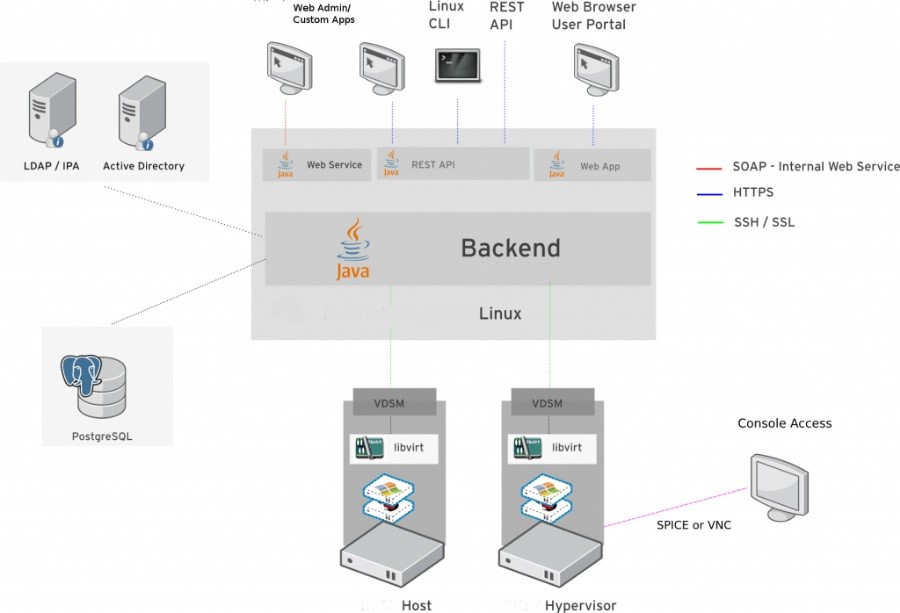
2、组件架构
主要组件:
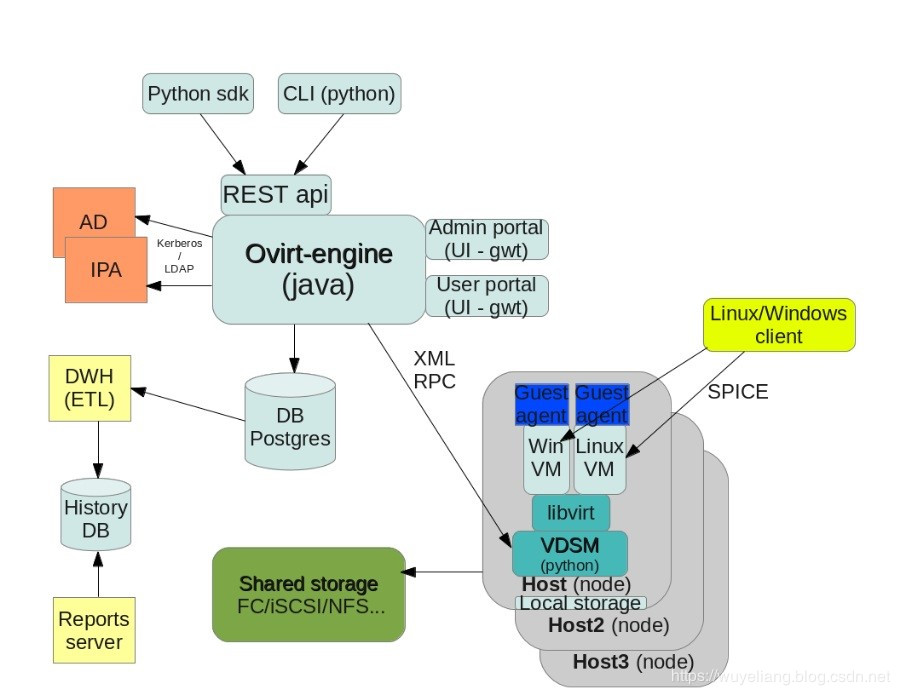
Engine(oVirt-engine)——oVirt的管理组件,管理oVirt主机,管理虚机、存储、网络;
管理门户——Engine为管理员提供的web入口;
用户门户——Engine为普通用户提供的web入口;
REST API——通过这个api可以允许程序进行虚拟化管理操作,oVirt的命令行工具和python SDK就是调用的此api;
CLI/SDK——命令行接口和SDK提供一种与engine通信的方式;
数据库——engine使用Postgresql数据库来持久化数据;
主机代理(VDSM)——主机节点上用于与engine通信的组件,接收engine的命令执行虚机的相关操作;
虚机代理(Guest Agent)——运行于虚机内部,通过一个虚拟串口与外部通信,向engine提供所需的信息;
AD/IPA——目录服务,engine通过目录服务来获取用户和组的信息,根据engine的权限进行控制;
DWH(数据仓库)——数据仓库组件使用Talend对从数据库中获取的数据进行挖掘,并存入历史数据库中;
报告引擎——使用Jasper根据历史数据库中的数据生成系统资源使用报告;
SPICE客户端——用户用来访问虚机的工具。
3、逻辑架构
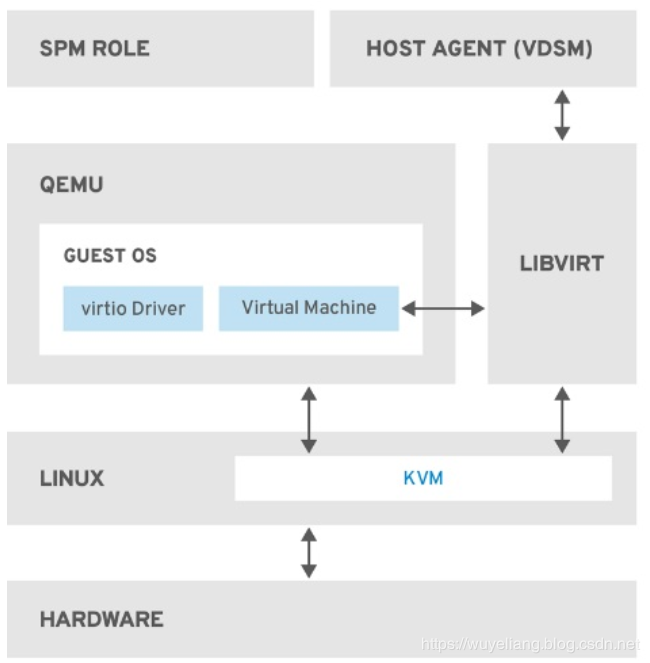
KVM
基于内核的虚拟机(KVM)是一个可加载的内核模块,通过使用intel vt或amd-v硬件扩展提供完全虚拟化。尽管KVM本身在内核空间中运行,但在其上运行的Guests在用户空间中作为单个QEMU进程运行。KVM允许主机将其物理硬件提供给虚拟机。
QEMU
QEMU是一个多平台仿真器,用于提供完整的系统仿真。QEMU模拟一个完整的系统,例如一个PC(包括一个或多个处理器)和外围设备。QEMU可用于启动不同的操作系统或调试系统代码。QEMU与KVM和具有虚拟化硬件扩展的处理器一起工作,提供完全的硬件辅助虚拟化。
Host Agent(VDSM)
在ovirt/RHV中,vdsm执行虚拟机和存储的相关操作。它还促进了主机间的通信。vdsm监视主机资源,如内存、存储和网络。此外,vdsm还管理虚拟机创建、统计信息积累和日志收集等任务。vdsm实例在每个主机上运行,并使用可配置的端口54321从ovirt-engine/RHVM接收管理命令。
VDSM-REG
vdsm使用vdsm-reg向ovirt-engine/RHVM注册每个主机。vdsm-reg使用端口80或端口443提供有关自身及其主机的信息。
libvirt
libvirt为虚拟机及其相关虚拟设备的管理提供了便利。当ovirt-engine/RHVM启动虚拟机生命周期命令(启动、停止、重新启动)时,vdsm将在相关主机上调用libvirt来执行这些命令。
SPM(Storage Pool Manager)
存储池管理器(SPM)是分配给数据中心中的一个主机的角色。SPM主机拥有为数据中心进行所有存储域结构元数据更改的唯一权限。这包括虚拟磁盘、快照和模板的创建、删除和操作。它还包括为存储区域网络(SAN)上的稀疏块设备分配存储。SPM的角色可以迁移到数据中心中的任何主机。因此,数据中心中的所有主机都必须能够访问数据中心中定义的所有存储域。
ovirt-engine/RHVM确保SPM始终可用。在存储连接错误的情况下,RHVM会将SPM角色重新分配给另一个主机。
Guest OS(客户操作系统)
在ovirt/RHV虚拟化环境中,客户操作系统不需要修改就可以安装在虚拟机上。客户操作系统和客户上的任何应用程序都不知道是虚拟环境,并正常运行。Redhat提供了增强的设备驱动程序,允许更快、更高效地访问虚拟化设备。您还可以在Guest OS上安装红帽虚拟化Guest Agent,它向管理控制台提供增强的GuestOS信息。
二、环境部署
1、环境信息

2、安装ovirt-engine节点
1)、安装源:
# yum install -y http://resources.ovirt.org/pub/yum-repo/ovirt-release43.rpm
2)、安装ovirt-engine
# yum install -y ovirt-engine
3).配置ovirt-engine
ovirt-engine安装完成后需要运行首次配置向导
# engine-setup
[ INFO ] Stage: Initializing
[ INFO ] Stage: Environment setup
Configuration files: ['/etc/ovirt-engine-setup.conf.d/10-packaging-jboss.conf', '/etc/ovirt-engine-setup.conf.d/10-packaging.conf']
Log file: /var/log/ovirt-engine/setup/ovirt-engine-setup-20190420195341-6bsbdg.log
Version: otopi-1.7.7 (otopi-1.7.7-1.el7.centos)
[ INFO ] Stage: Environment packages setup
[ INFO ] Stage: Programs detection
[ INFO ] Stage: Environment setup
[ INFO ] Stage: Environment customization
--== PRODUCT OPTIONS ==--
Configure Engine on this host (Yes, No) [Yes]: 回车
Configure ovirt-provider-ovn (Yes, No) [Yes]: 回车(OVN:Open Virtual Network,配置虚拟网络)
Configure Image I/O Proxy on this host (Yes, No) [Yes]: 回车(Image I/O Proxy可以支持向oVirt平台中上传虚拟机的磁盘镜像)
Configure WebSocket Proxy on this host (Yes, No) [Yes]: 回车(WebSocket Proxy用来支持使用noVNC远程登录虚拟机图形界面管理)
* Please note * : Data Warehouse is required for the engine.
If you choose to not configure it on this host, you have to configure
it on a remote host, and then configure the engine on this host so
that it can access the database of the remote Data Warehouse host.
Configure Data Warehouse on this host (Yes, No) [Yes]: 回车(在本机配置数据库)
Configure VM Console Proxy on this host (Yes, No) [Yes]: 回车(支持访问虚拟机的串口console通信)
--== PACKAGES ==--
[ INFO ] Checking for product updates...
[ INFO ] No product updates found
--== NETWORK CONFIGURATION ==--
Host fully qualified DNS name of this server [localhost.localdomain]: 回车(使用默认hostname就行,反正是准备用IP地址访问无所谓)
[WARNING] Failed to resolve localhost.localdomain using DNS, it can be resolved only locally
Setup can automatically configure the firewall on this system.
Note: automatic configuration of the firewall may overwrite current settings.
NOTICE: iptables is deprecated and will be removed in future releases
Do you want Setup to configure the firewall? (Yes, No) [Yes]: no回车(因为之前已经把防火墙服务给关掉了,所以就不用再配置防火墙的具体设置了)
--== DATABASE CONFIGURATION ==--
Where is the DWH database located? (Local, Remote) [Local]: 回车(DWH:Data WareHouse使用本地数据库)
Setup can configure the local postgresql server automatically for the DWH to run. This may conflict with existing applications.
Would you like Setup to automatically configure postgresql and create DWH database, or prefer to perform that manually? (Automatic, Manual) [Automatic]: 回车(自动配置PostGreSQL数据库)
Where is the Engine database located? (Local, Remote) [Local]: 回车(Engine用到的数据库位于本机)
Setup can configure the local postgresql server automatically for the engine to run. This may conflict with existing applications.
Would you like Setup to automatically configure postgresql and create Engine database, or prefer to perform that manually? (Automatic, Manual) [Automatic]: 回车(使用安装程序自动创建Engine数据库)
--== OVIRT ENGINE CONFIGURATION ==--
Engine admin password: 输入后台管理员admin的密码回车
Confirm engine admin password: 再输入一遍密码回车
Application mode (Virt, Gluster, Both) [Both]: 回车
Use default credentials (admin@internal) for ovirt-provider-ovn (Yes, No) [Yes]: 回车(使用默认的admin@internal内部管理员账号)
--== STORAGE CONFIGURATION ==--
Default SAN wipe after delete (Yes, No) [No]: 回车(yes的话在删除虚拟机的虚拟磁盘后会擦除存储设备上的对应块)
--== PKI CONFIGURATION ==--
Organization name for certificate [localdomain]: 回车
--== APACHE CONFIGURATION ==--
Setup can configure the default page of the web server to present the application home page. This may conflict with existing applications.
Do you wish to set the application as the default page of the web server? (Yes, No) [Yes]: 回车(使用apache作为web服务器)
Setup can configure apache to use SSL using a certificate issued from the internal CA.
Do you wish Setup to configure that, or prefer to perform that manually? (Automatic, Manual) [Automatic]: 回车(自动配置CA证书)
--== SYSTEM CONFIGURATION ==--
--== MISC CONFIGURATION ==--
Please choose Data Warehouse sampling scale:
(1) Basic
(2) Full
(1, 2)[1]: 回车(使用基本的数据库示例初始化数据)
--== END OF CONFIGURATION ==--
[ INFO ] Stage: Setup validation
[WARNING] Cannot validate host name settings, reason: resolved host does not match any of the local addresses
[WARNING] Warning: Not enough memory is available on the host. Minimum requirement is 4096MB, and 16384MB is recommended.
Do you want Setup to continue, with amount of memory less than recommended? (Yes, No) [No]: yes回车(因为是在虚拟机上装的,内存有点小,才会提示这个)
--== CONFIGURATION PREVIEW ==--
Application mode : both
Default SAN wipe after delete : False
Update Firewall : False
Host FQDN : localhost.localdomain
Configure local Engine database : True
Set application as default page : True
Configure Apache SSL : True
Engine database secured connection : False
Engine database user name : engine
Engine database name : engine
Engine database host : localhost
Engine database port : 5432
Engine database host name validation : False
Engine installation : True
PKI organization : localdomain
Set up ovirt-provider-ovn : True
Configure WebSocket Proxy : True
DWH installation : True
DWH database host : localhost
DWH database port : 5432
Configure local DWH database : True
Configure Image I/O Proxy : True
Configure VMConsole Proxy : True
Please confirm installation settings (OK, Cancel) [OK]: 回车
[ INFO ] Stage: Transaction setup
[ INFO ] Stopping engine service
[ INFO ] Stopping ovirt-fence-kdump-listener service
[ INFO ] Stopping dwh service
[ INFO ] Stopping Image I/O Proxy service
[ INFO ] Stopping vmconsole-proxy service
[ INFO ] Stopping websocket-proxy service
[ INFO ] Stage: Misc configuration
[ INFO ] Stage: Package installation
[ INFO ] Stage: Misc configuration
[ INFO ] Upgrading CA
[ INFO ] Initializing PostgreSQL
[ INFO ] Creating PostgreSQL 'engine' database
[ INFO ] Configuring PostgreSQL
[ INFO ] Creating PostgreSQL 'ovirt_engine_history' database
[ INFO ] Configuring PostgreSQL
[ INFO ] Creating CA
[ INFO ] Creating/refreshing DWH database schema
[ INFO ] Configuring Image I/O Proxy
[ INFO ] Setting up ovirt-vmconsole proxy helper PKI artifacts
[ INFO ] Setting up ovirt-vmconsole SSH PKI artifacts
[ INFO ] Configuring WebSocket Proxy
[ INFO ] Creating/refreshing Engine database schema
[ INFO ] Creating/refreshing Engine 'internal' domain database schema
[ INFO ] Adding default OVN provider to database
[ INFO ] Adding OVN provider secret to database
[ INFO ] Setting a password for internal user admin
[ INFO ] Generating post install configuration file '/etc/ovirt-engine-setup.conf.d/20-setup-ovirt-post.conf'
[ INFO ] Stage: Transaction commit
[ INFO ] Stage: Closing up
[ INFO ] Starting engine service
[ INFO ] Starting dwh service
[ INFO ] Restarting ovirt-vmconsole proxy service
--== SUMMARY ==--
[ INFO ] Restarting httpd
In order to configure firewalld, copy the files from
/etc/ovirt-engine/firewalld to /etc/firewalld/services
and execute the following commands:
firewall-cmd --permanent --add-service ovirt-postgres
firewall-cmd --permanent --add-service ovirt-https
firewall-cmd --permanent --add-service ovn-central-firewall-service
firewall-cmd --permanent --add-service ovirt-fence-kdump-listener
firewall-cmd --permanent --add-service ovirt-imageio-proxy
firewall-cmd --permanent --add-service ovirt-websocket-proxy
firewall-cmd --permanent --add-service ovirt-http
firewall-cmd --permanent --add-service ovirt-vmconsole-proxy
firewall-cmd --permanent --add-service ovirt-provider-ovn
firewall-cmd --reload
The following network ports should be opened:
tcp:2222
tcp:35357
tcp:443
tcp:5432
tcp:54323
tcp:6100
tcp:6641
tcp:6642
tcp:80
tcp:9696
udp:7410
An example of the required configuration for iptables can be found at:
/etc/ovirt-engine/iptables.example
Please use the user 'admin@internal' and password specified in order to login
Web access is enabled at:
http://localhost.localdomain:80/ovirt-engine
https://localhost.localdomain:443/ovirt-engine
Internal CA 95:CB:1A:EA:A7:CC:48:A3:14:8F:79:8D:BC:07:4F:98:D7:EB:B4:19
SSH fingerprint: SHA256:ltDYySFckI6bPO0OV+yzErG3YVqgA8zBnHZkEK3bWRs
[WARNING] Warning: Not enough memory is available on the host. Minimum requirement is 4096MB, and 16384MB is recommended.
--== END OF SUMMARY ==--
[ INFO ] Stage: Clean up
Log file is located at /var/log/ovirt-engine/setup/ovirt-engine-setup-20190420195341-6bsbdg.log
[ INFO ] Generating answer file '/var/lib/ovirt-engine/setup/answers/20190420195951-setup.conf'
[ INFO ] Stage: Pre-termination
[ INFO ] Stage: Termination
[ INFO ] Execution of setup completed successfully
4)、ovirt取消主机名解析,修改/etc/ovirt-engine/engine.conf.d/99-sso.conf
SSO_CALLBACK_PREFIX_CHECK=false
5)、重启ovirt-engine服务
# service ovirt-engine restart
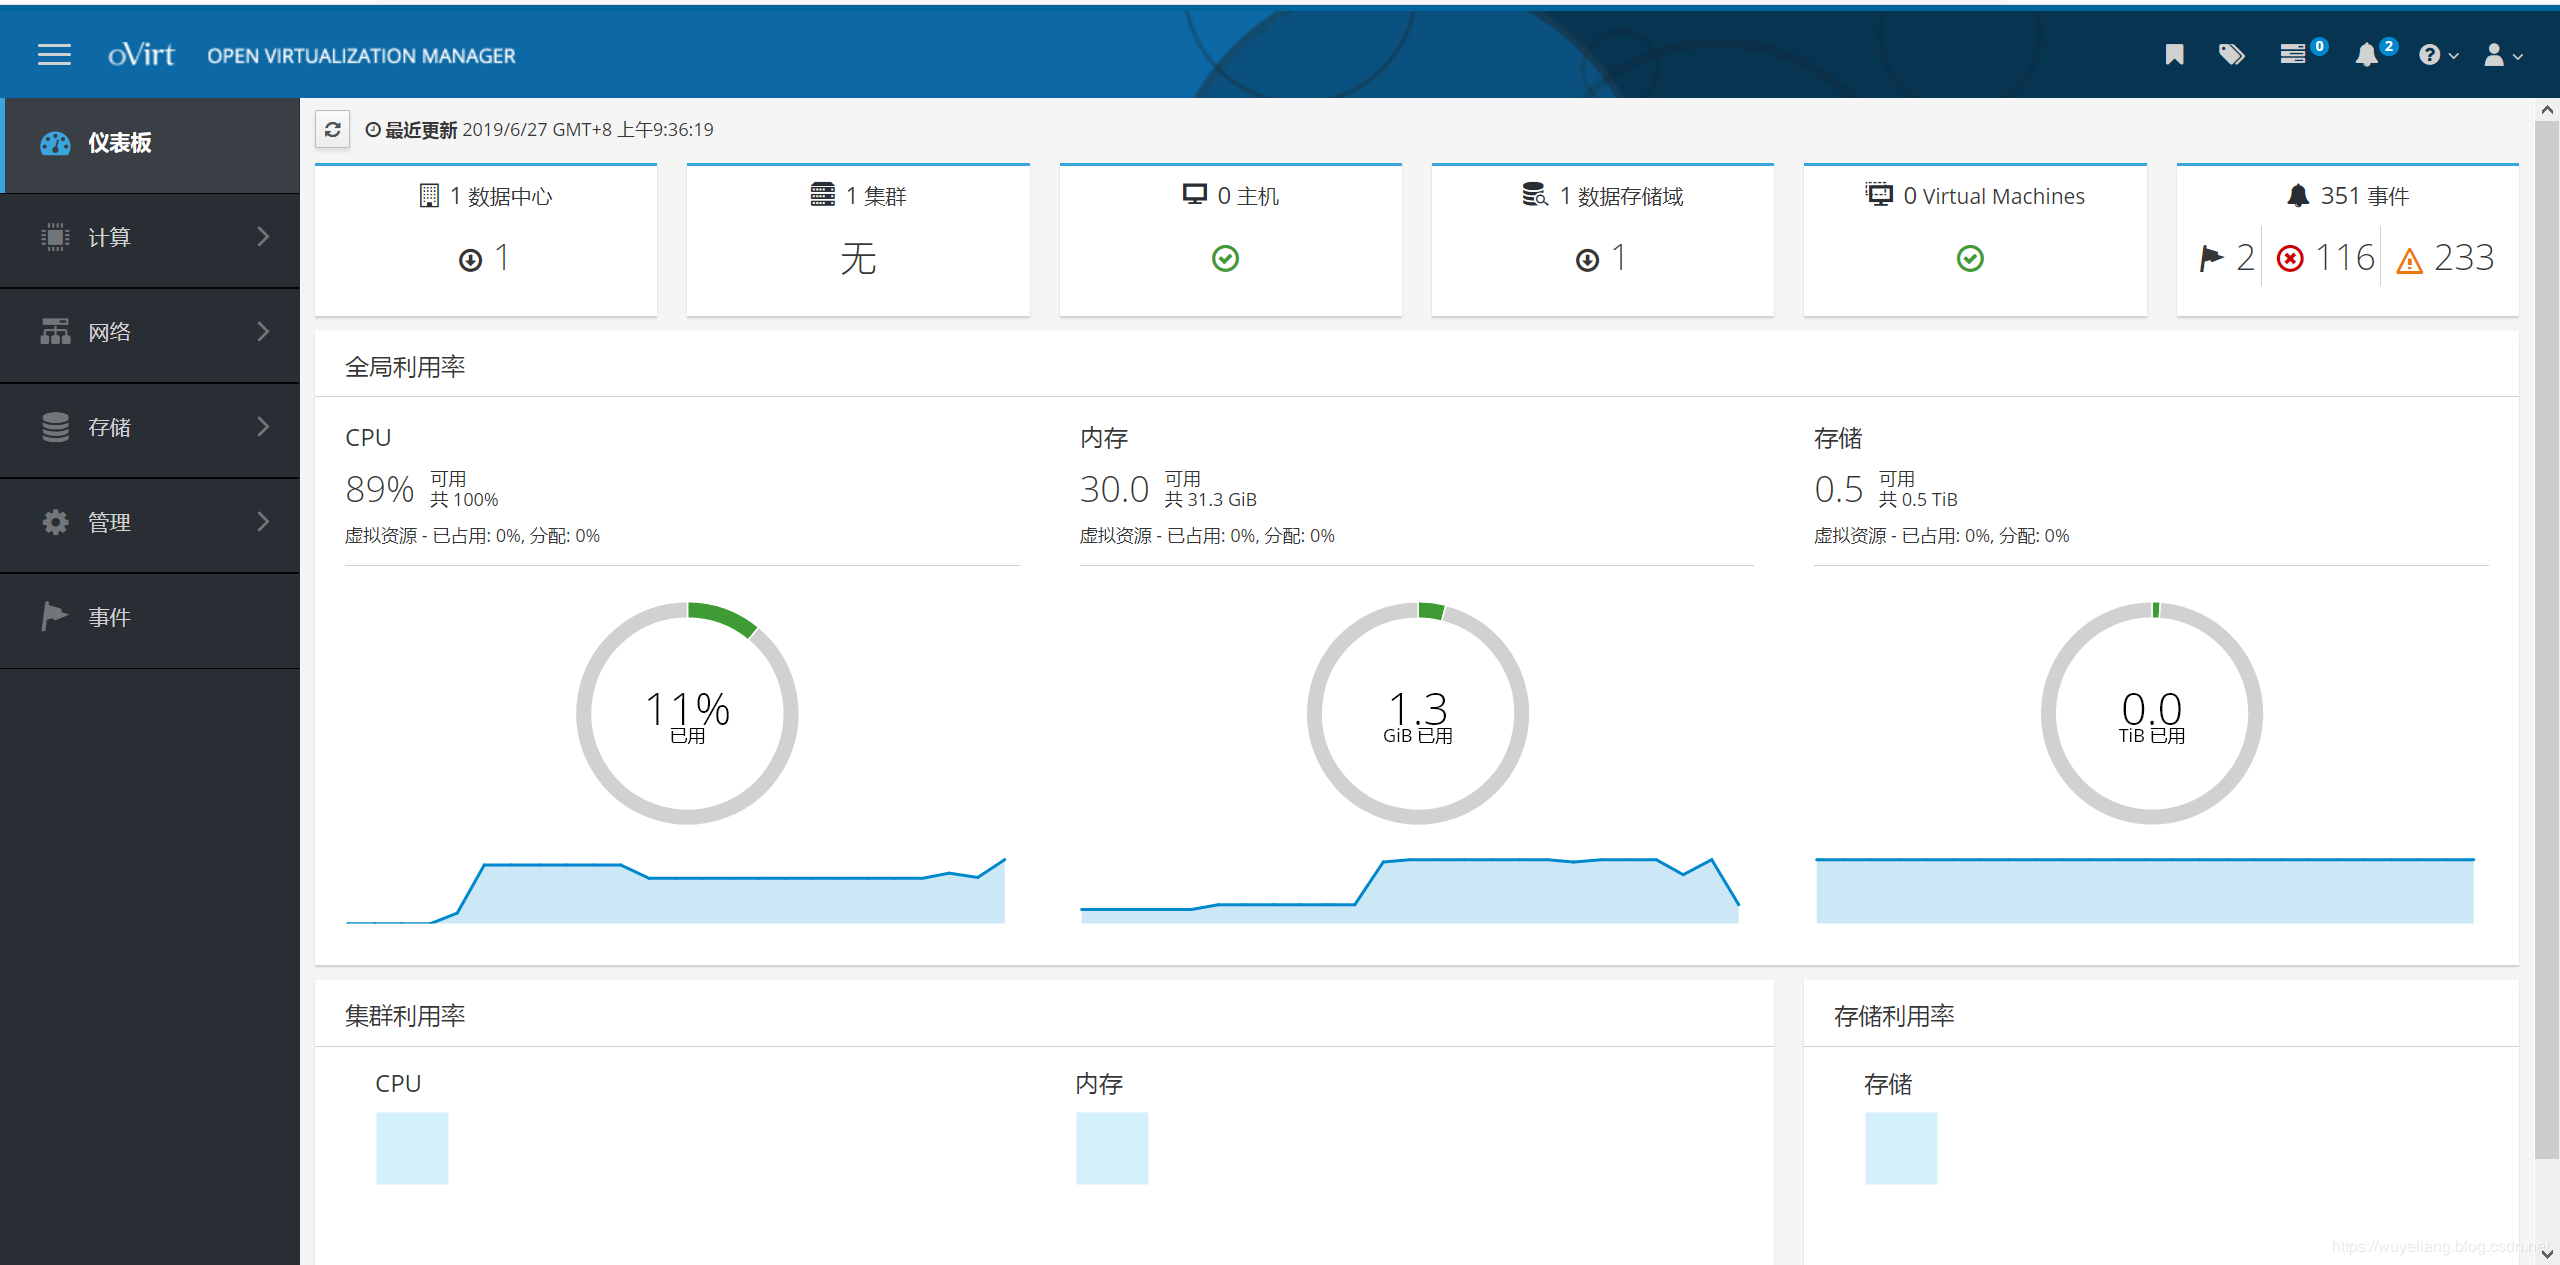
6)、通过ovirt-engine的节点地址登录web
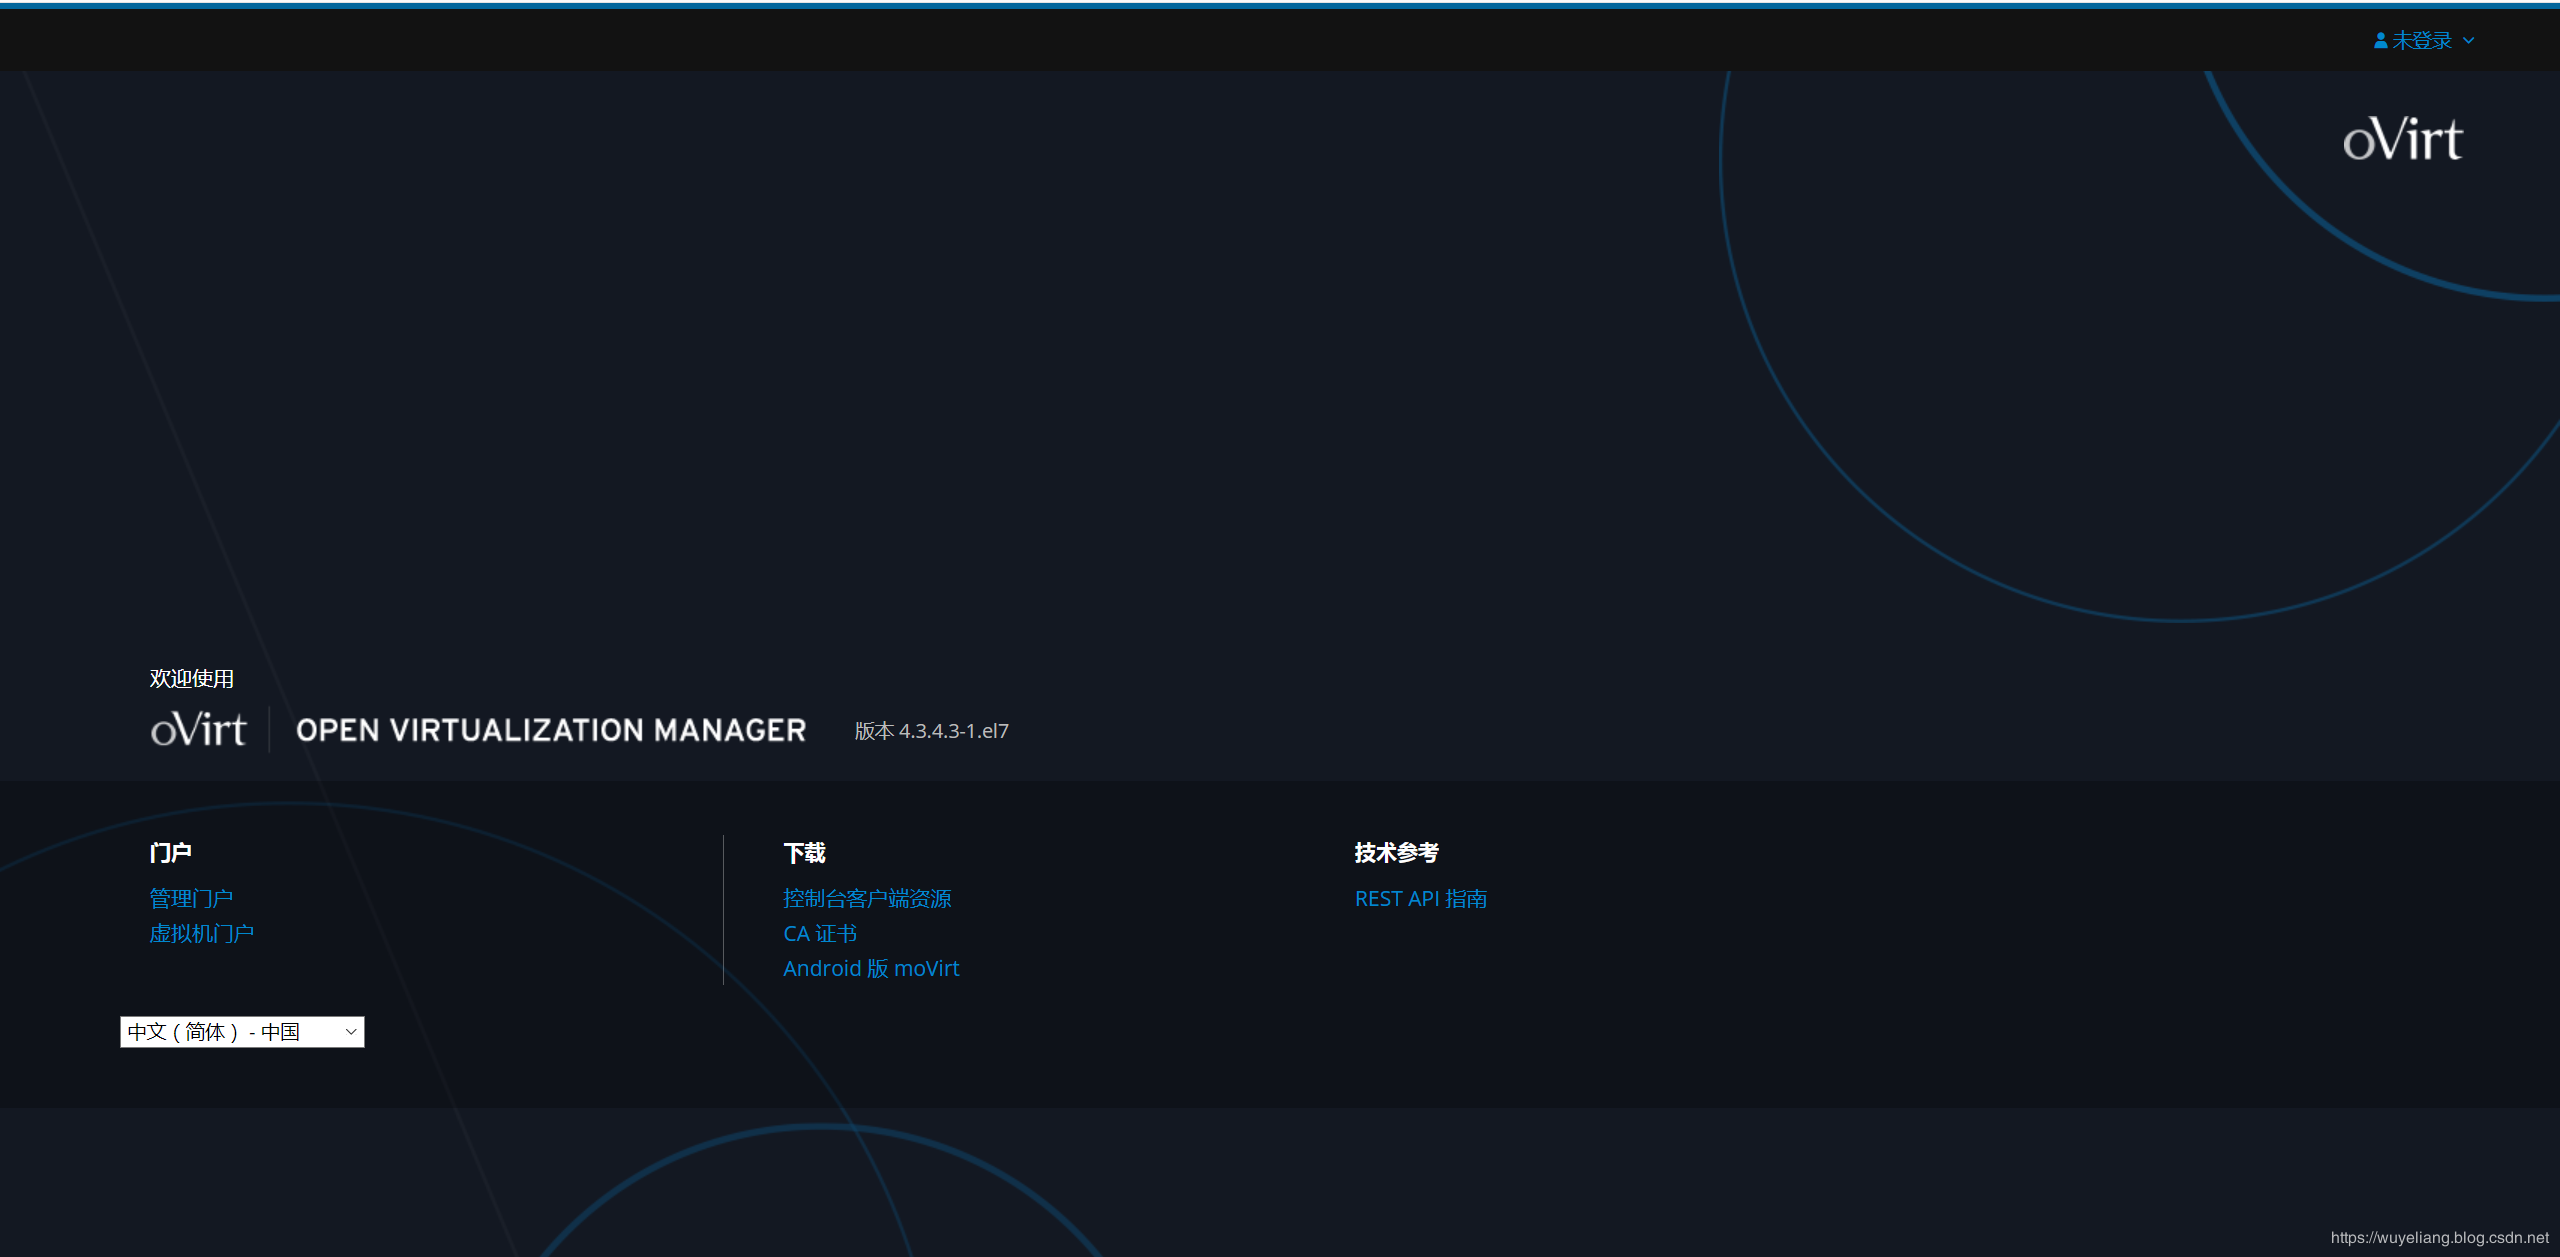
用户名admin
密码:上述安装过程输入的密码
3、安装计算节点
1)、安装源:
# yum install -y http://resources.ovirt.org/pub/yum-repo/ovirt-release43.rpm
2)、安装软件包
# yum -y install qemu-kvm libvirt virt-install bridge-utils vdsm
3)、启动服务并设置开机启动
# systemctl start libvirtd
# systemctl enable libvirtd
添加节点
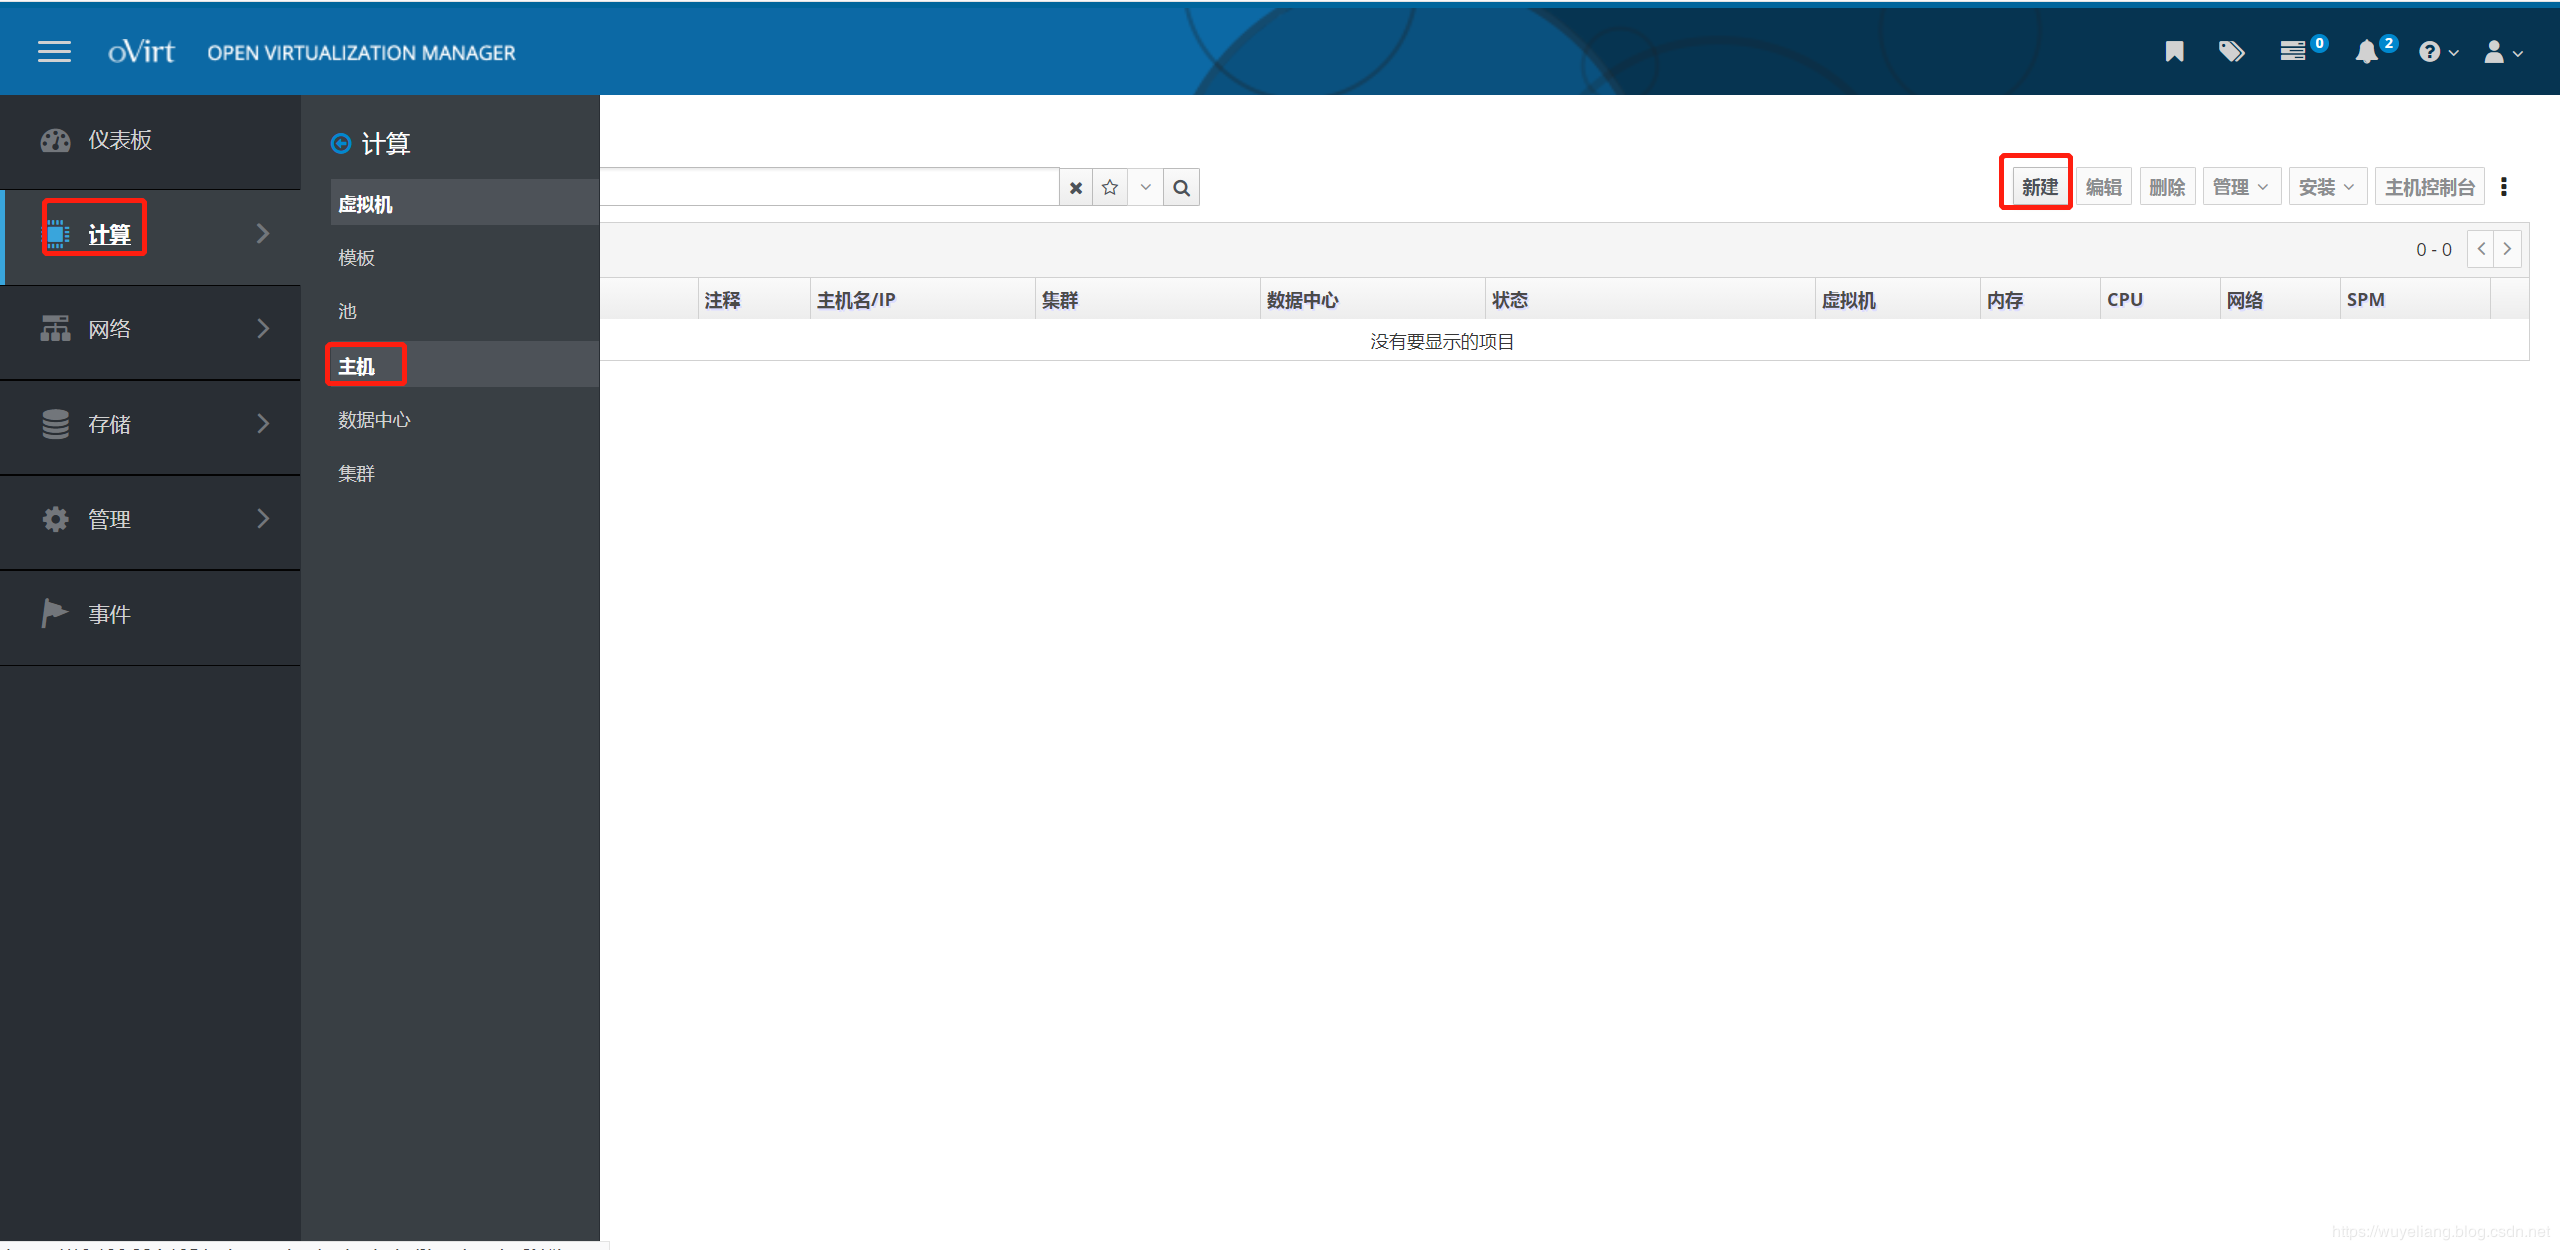
输入节点的Ip地址和root密码
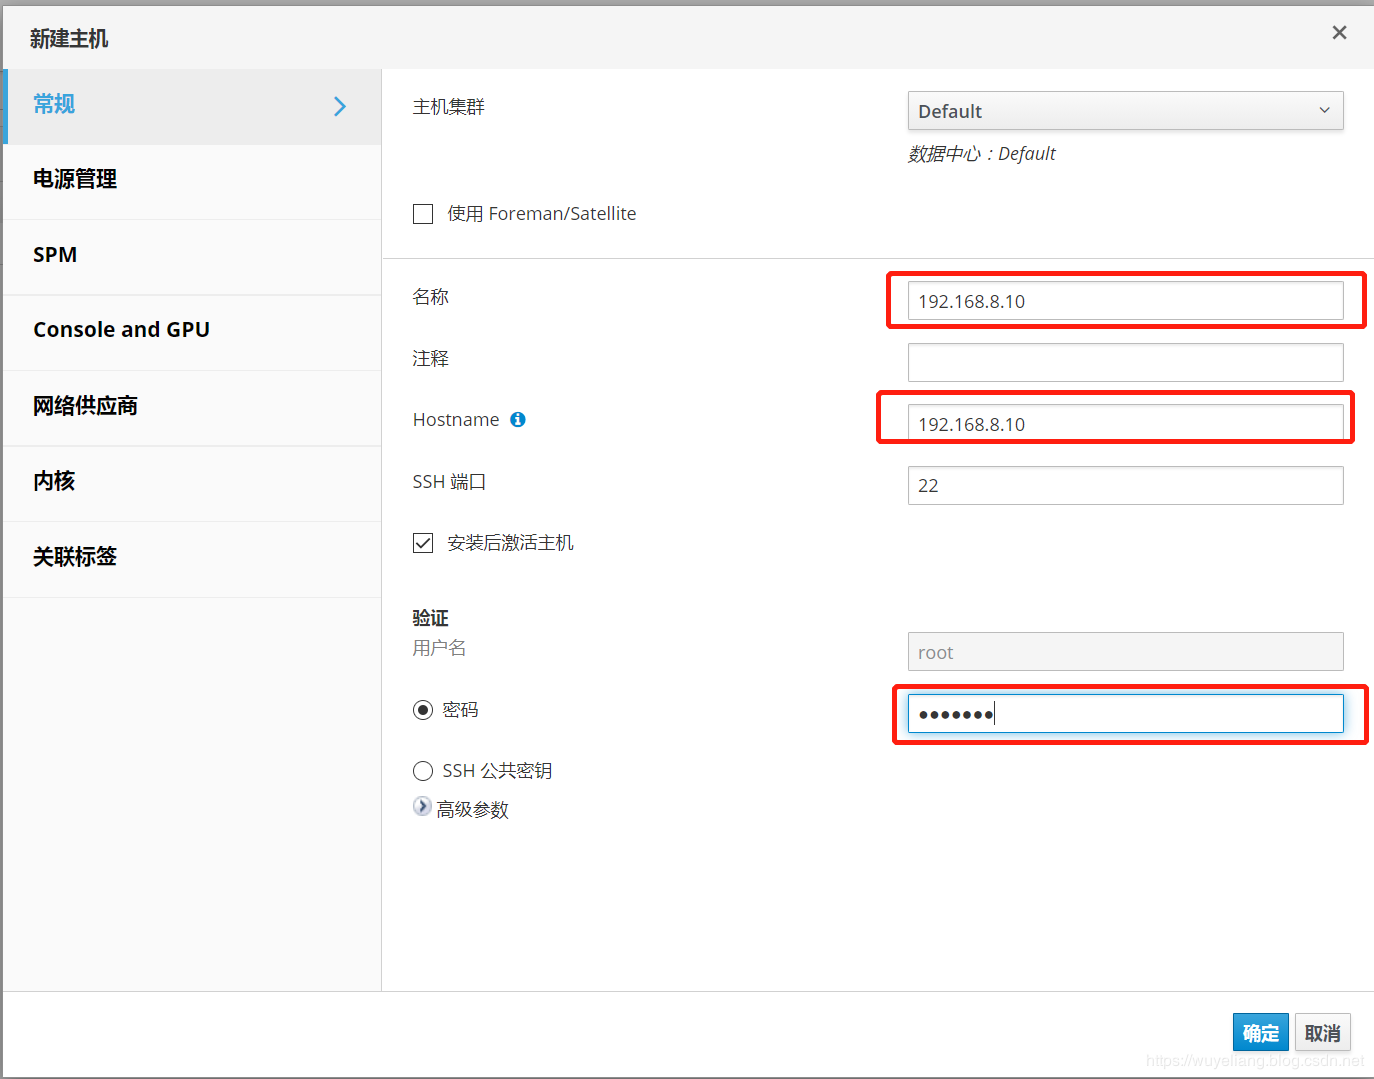
此处忽略电源管理

点击事件可以看到过程
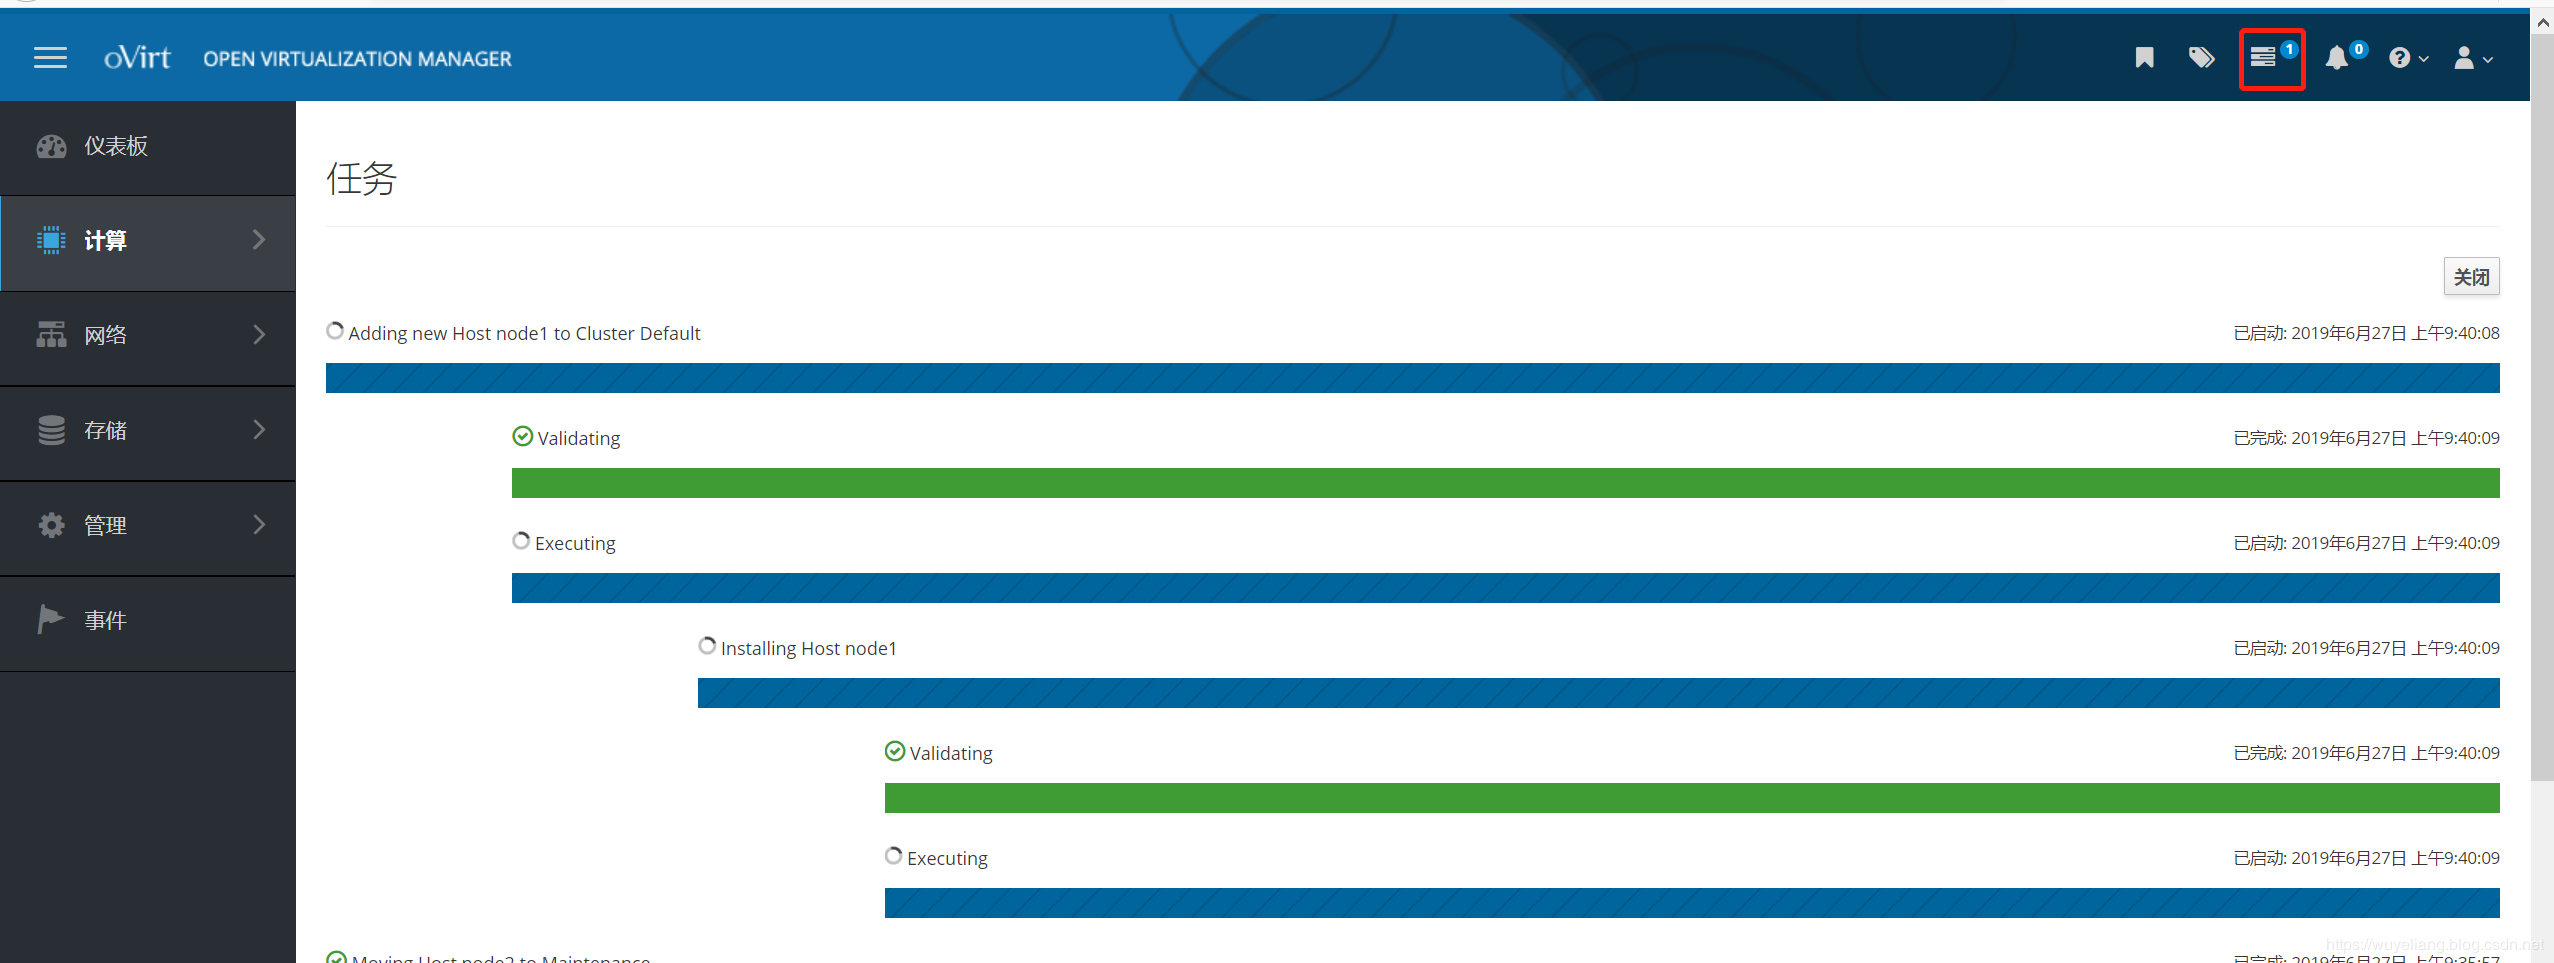
节点正在安装过程

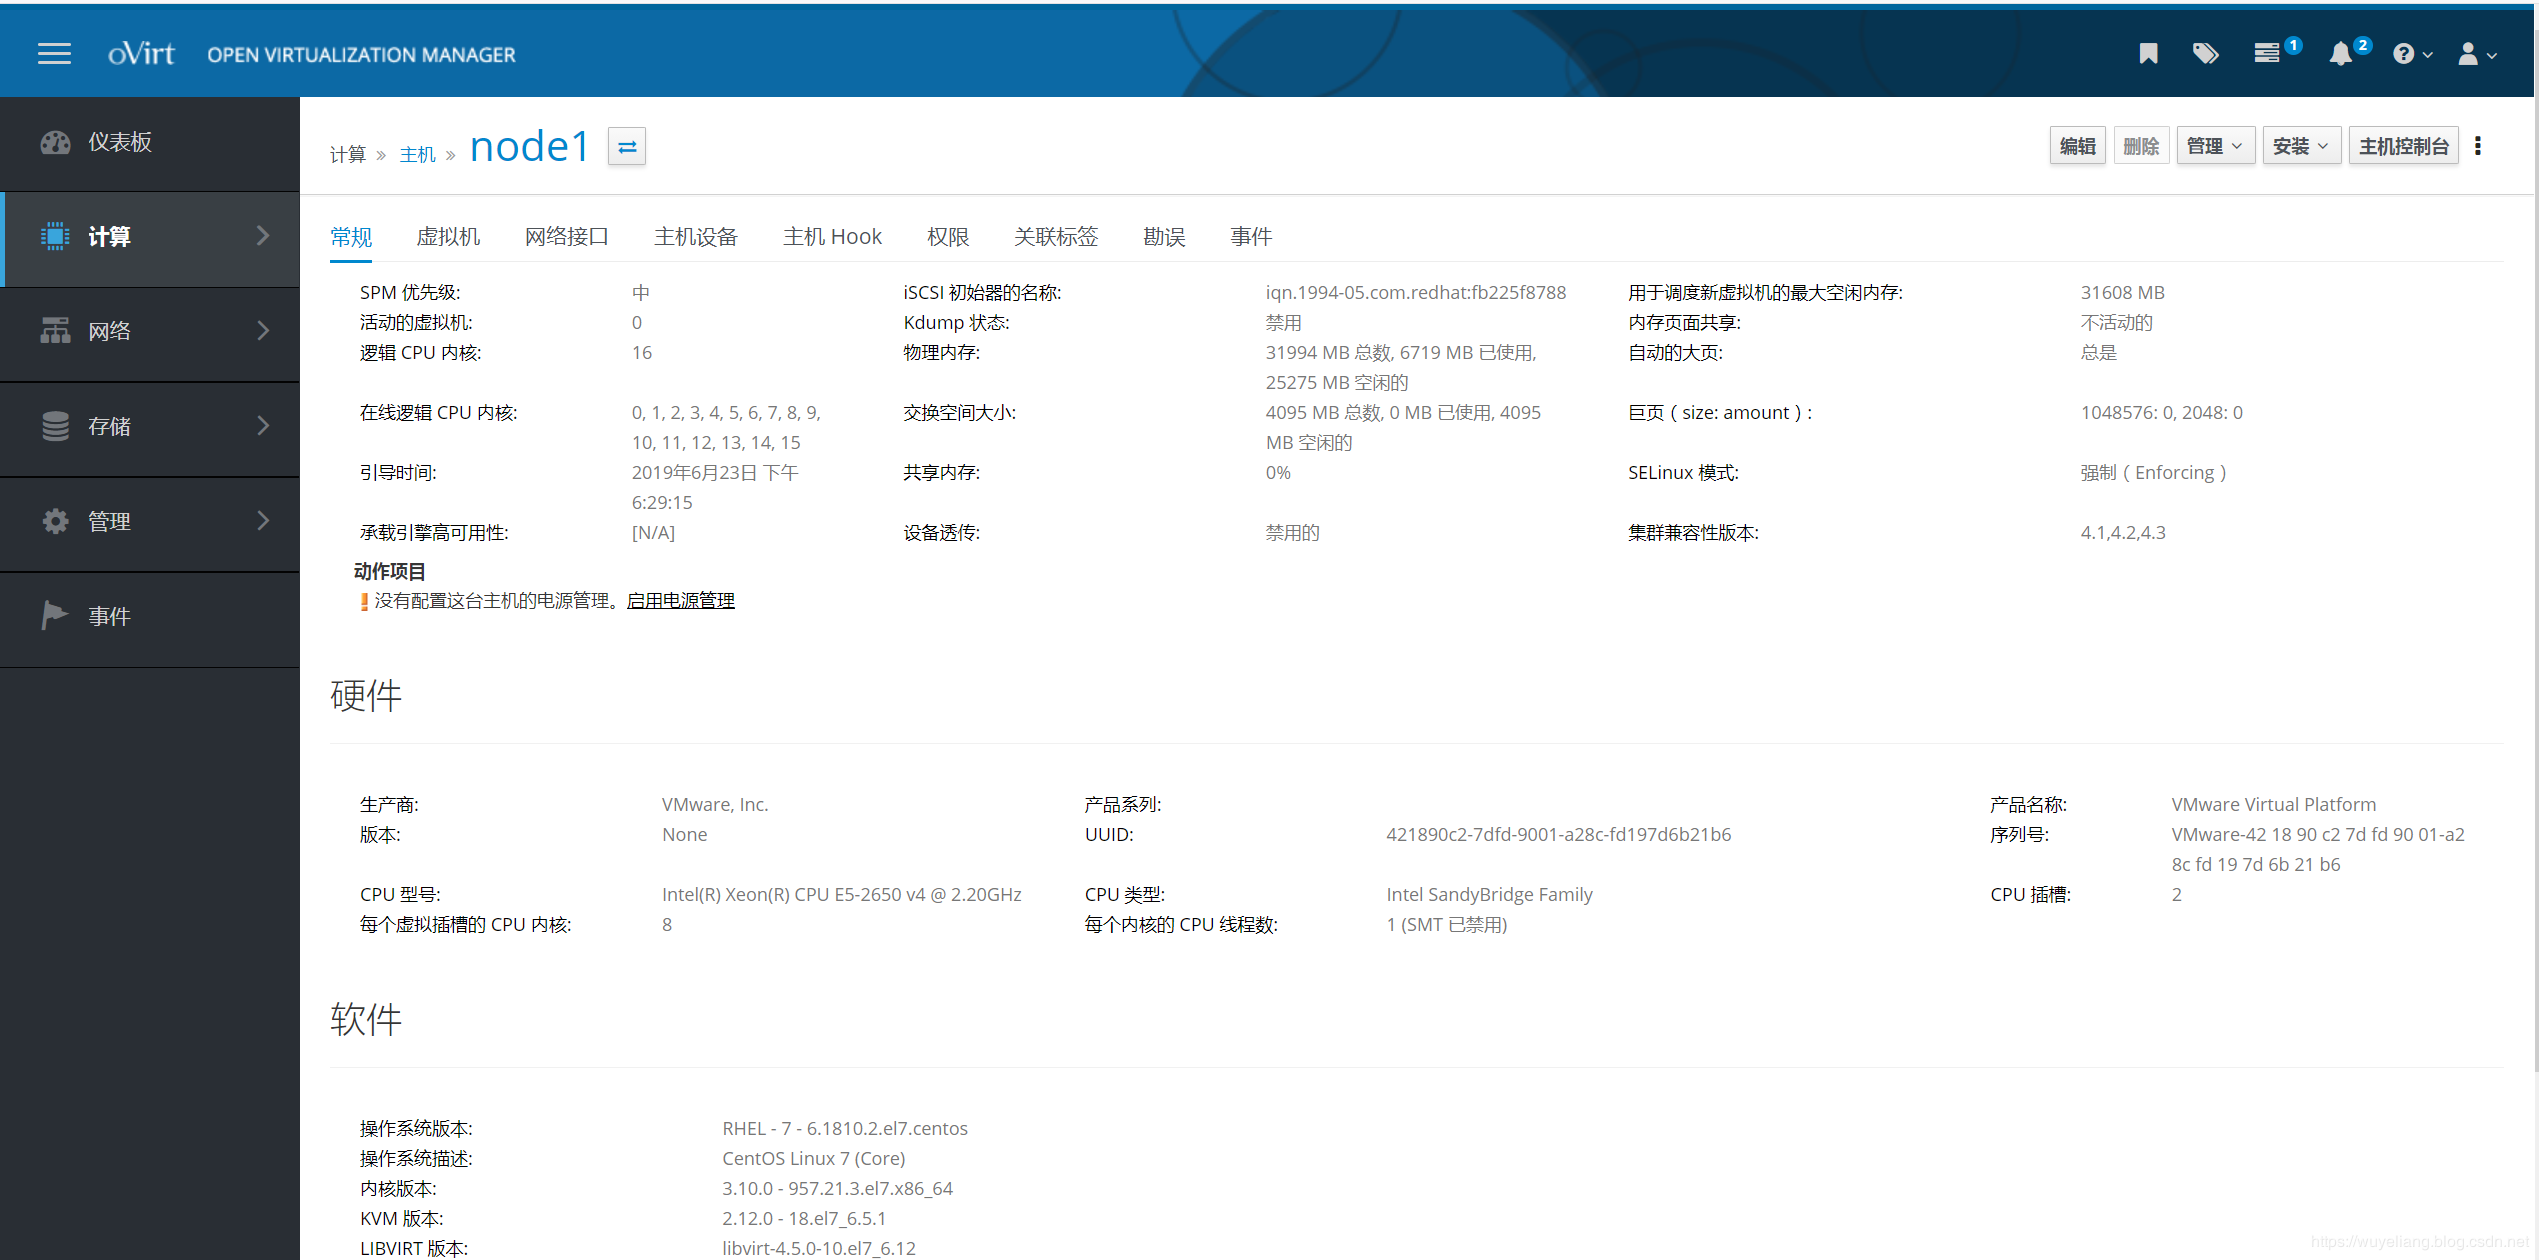
添加完成之后可以看到节点信息
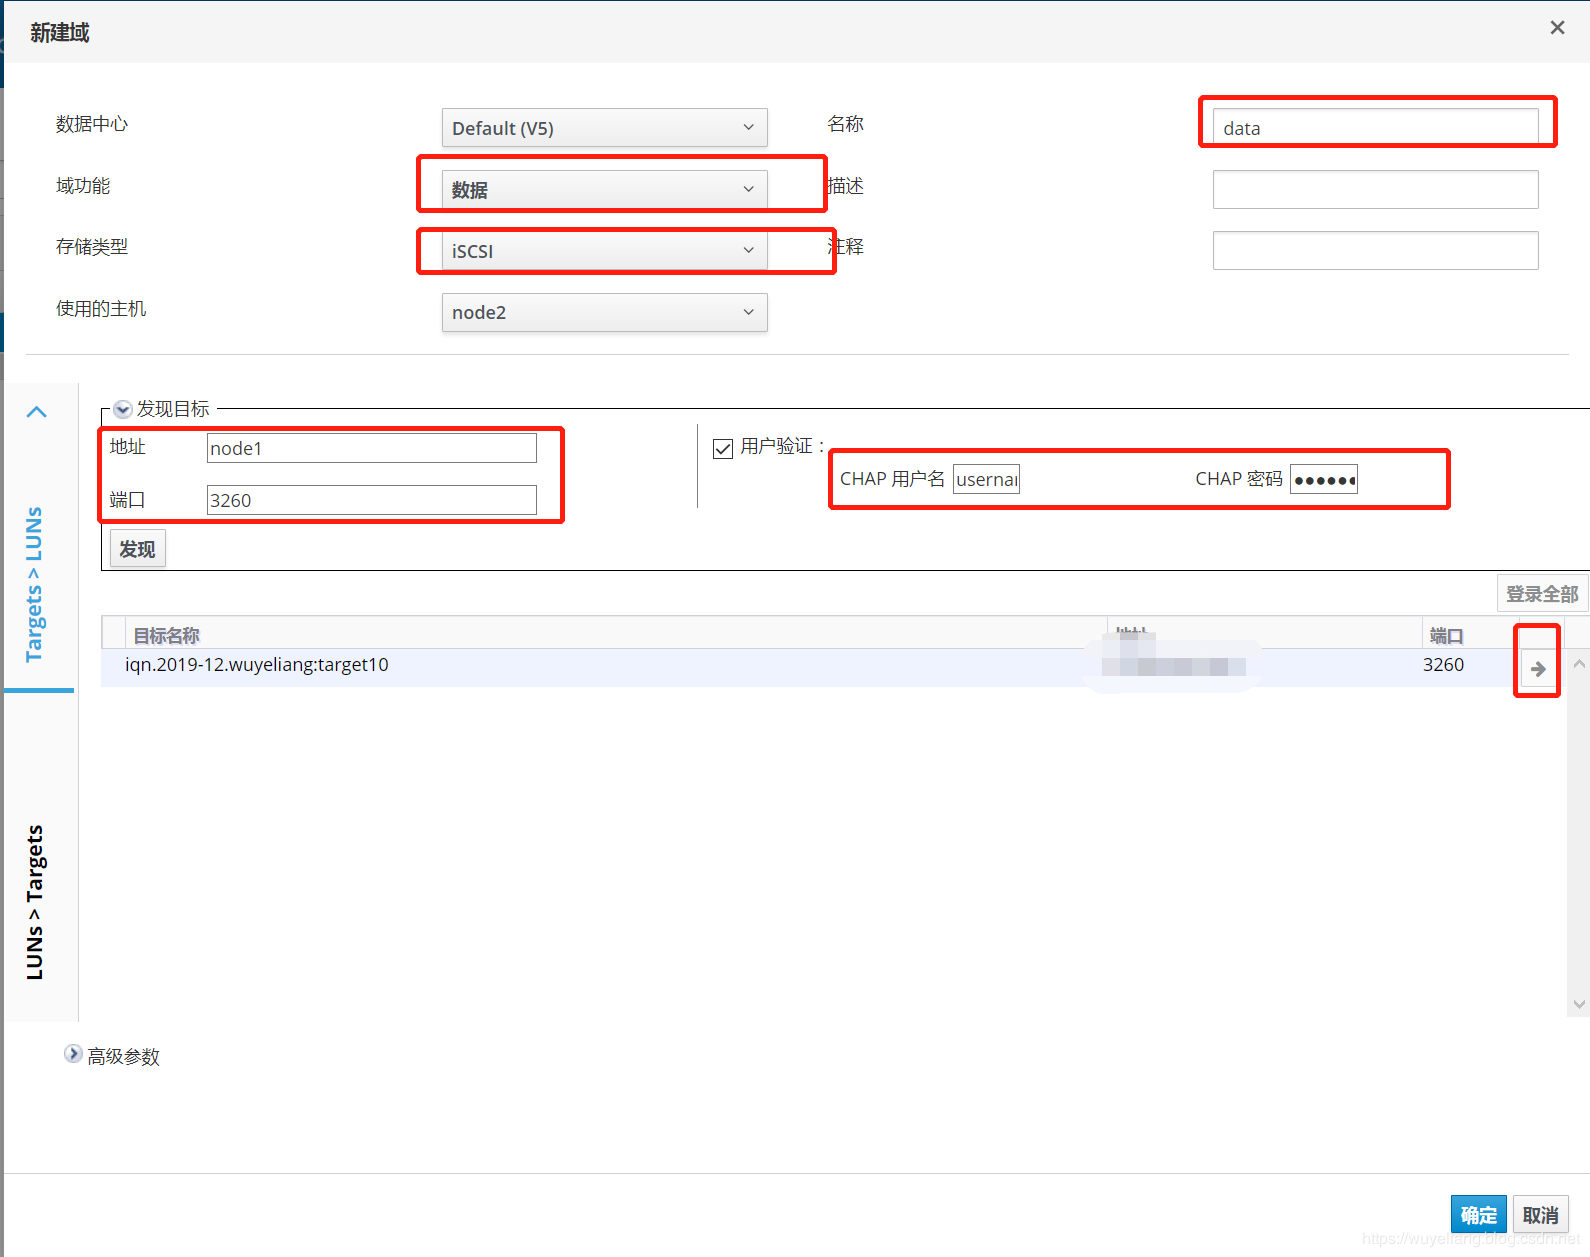
4、配置data存储域,此处用iscsi存储(每个计算节点执行)
1)、安装源
# yum install epel* -y
# yum -y install scsi-target-utils
2)、修改配置文件/etc/tgt/targets.conf
<target iqn.2019-06.wuyeliang:target00>
backing-store /dev/sdb #数据盘
initiator-address 172.16.8.0/24 #此处用存储网段
incominguser username password #客户端登录用户名及密码
</target>
3)、配置防火墙
# firewall-cmd --add-service=iscsi-target --permanent
success
# firewall-cmd --reload
success
4)、启动服务并设置开机启动
# systemctl start tgtd
# systemctl enable tgtd
5)、查看状态
# tgtadm --mode target --op show
6)、在界面上添加存储域

添加存储信息
5、配置镜像域和导出域
1)、安装软件包
# yum -y install nfs-utils
2)、如果单独的其他节点请做以下操作
# groupadd -g 36 kvm
# useradd -u 36 -g kvm -M -d / -s /sbin/nologin vdsm
3)、创建目录并设置权限
# mkdir -p /images
# mkdir -p /export
# chown vdsm:kvm /export
# chown vdsm:kvm /images
4)、创建文件/etc/exports.d/ovirt-engine-iso-domain.exports内容如下
/images 172.16.8.0/24(rw)
/ images 172.16.8.0/24(rw)
5)、启动服务
# systemctl start rpcbind nfs-server
# systemctl enable rpcbind nfs-server
6)、设置防火墙
# firewall-cmd --add-service=nfs --permanent
# firewall-cmd --add-service={nfs3,mountd,rpc-bind} --permanent
# firewall-cmd –reload
7)、添加镜像域

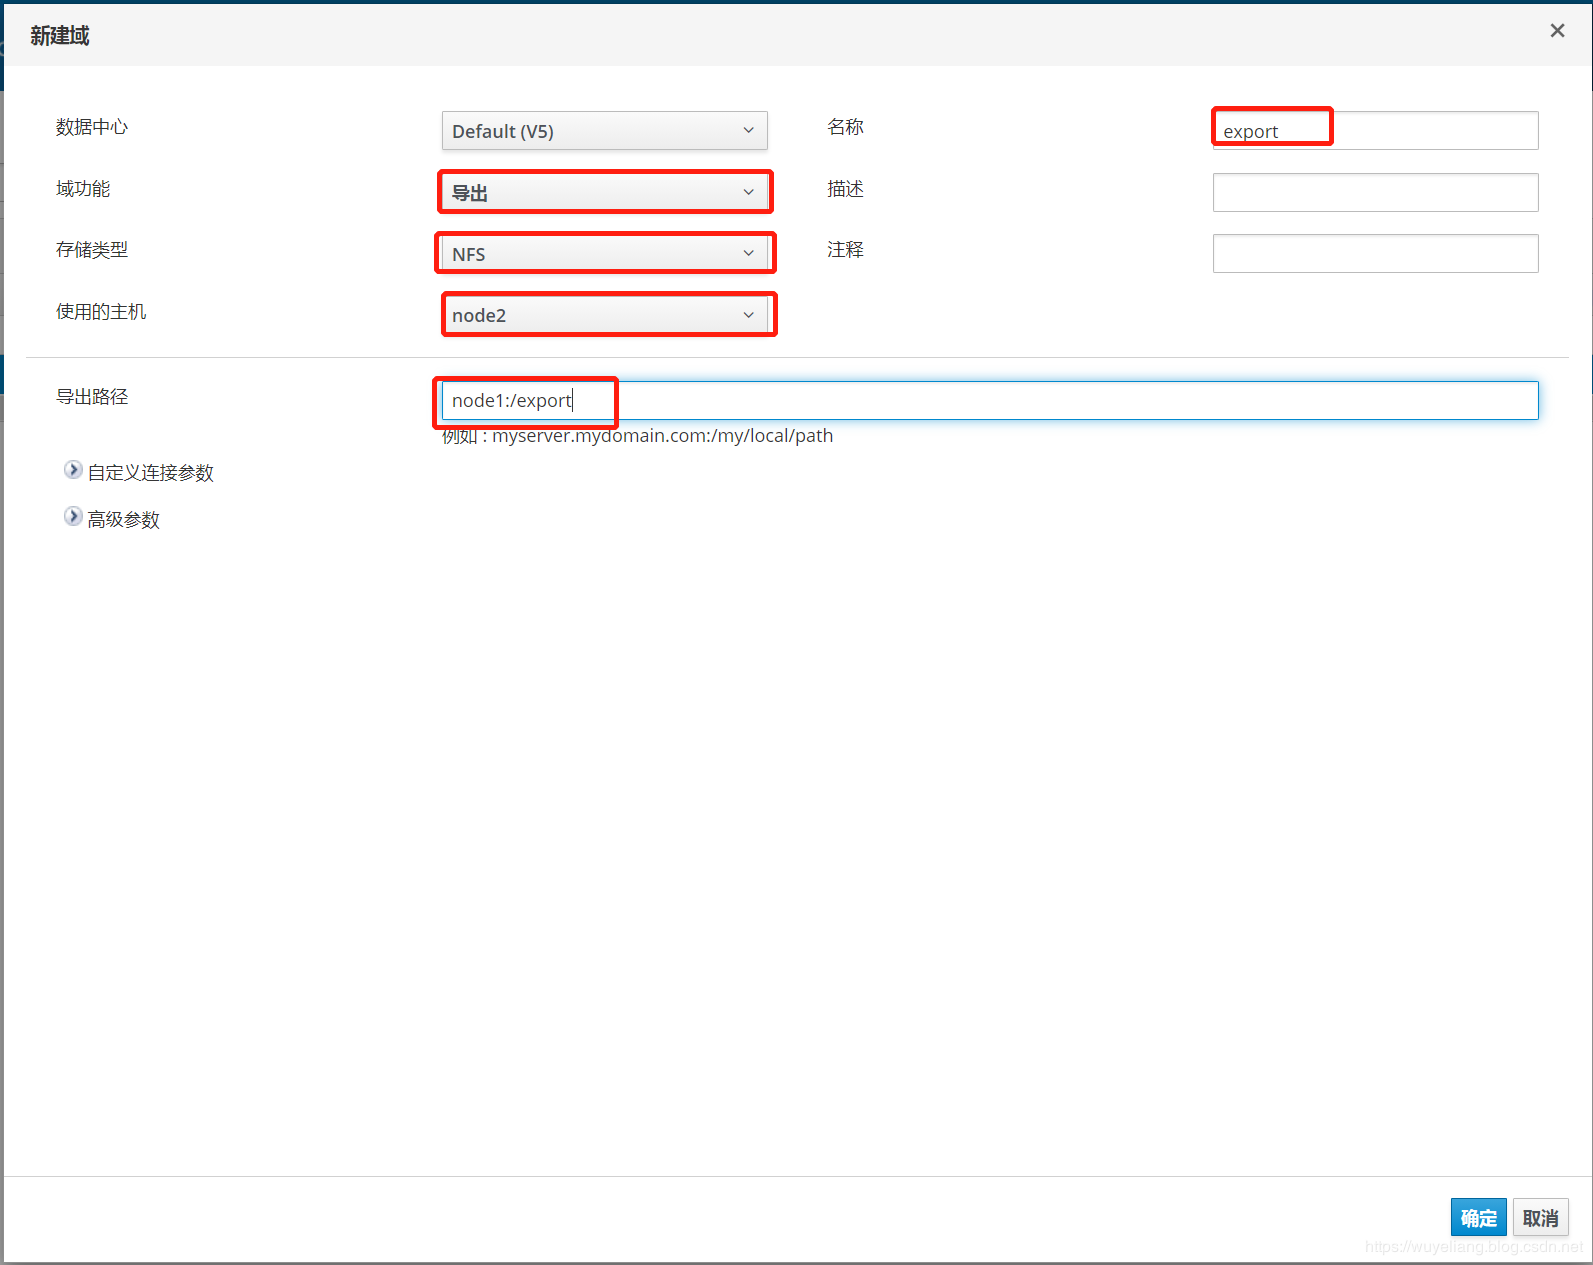
8)、添加导出域
6、上传镜像
将CentOS-7-x86_64-DVD-1804.iso通过ftp工具上传到ovirt-engine节点上
# engine-iso-uploader -i ISO_DOMAIN upload CentOS-7-x86_64-DVD-1804.iso
Please provide the REST API password for the admin@internal oVirt Engine user (CTRL+D to abort): # oVirt admin password
Uploading, please wait...
INFO: Start uploading CentOS-7-x86_64-DVD-1804.iso
Uploading: [########################################] 100%
INFO: CentOS-7-x86_64-DVD-1804.iso uploaded successfully
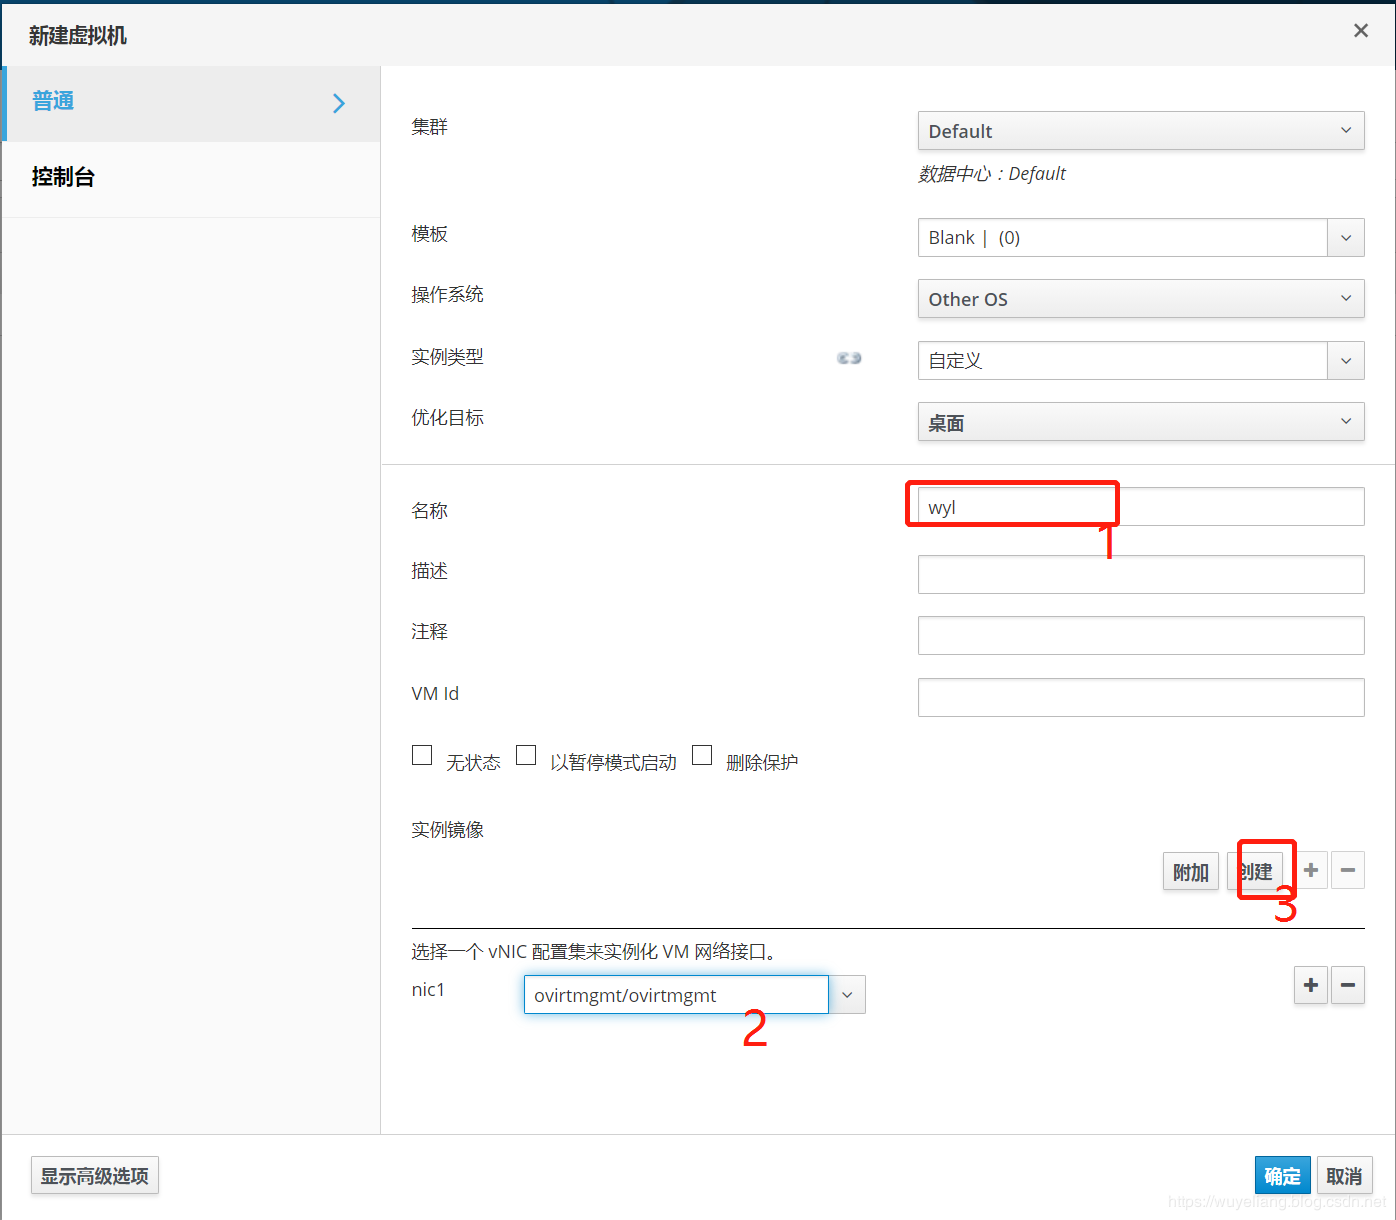
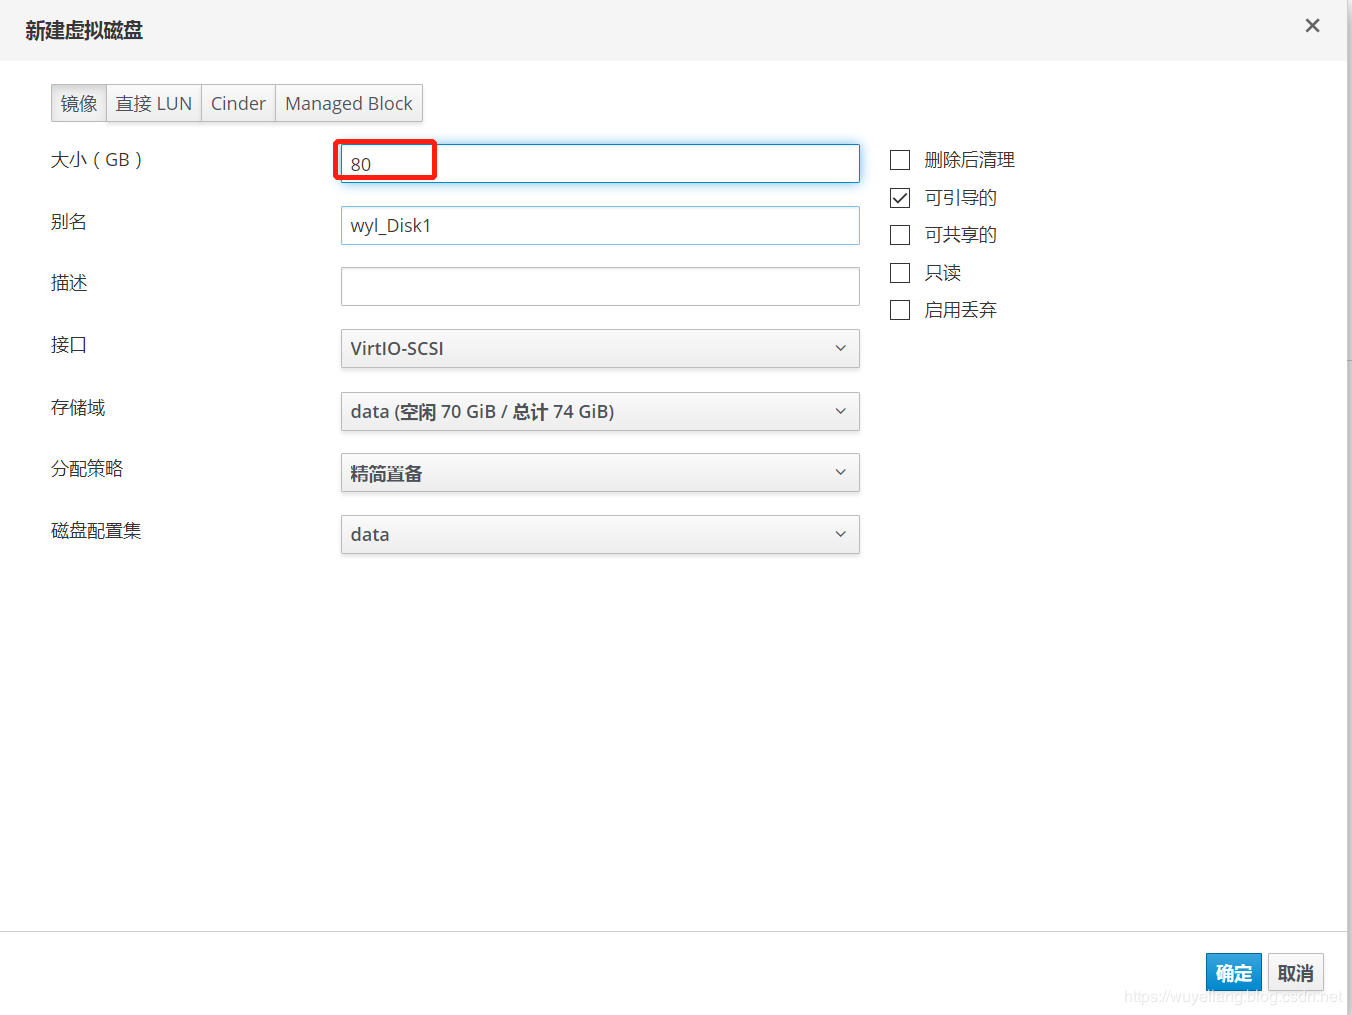
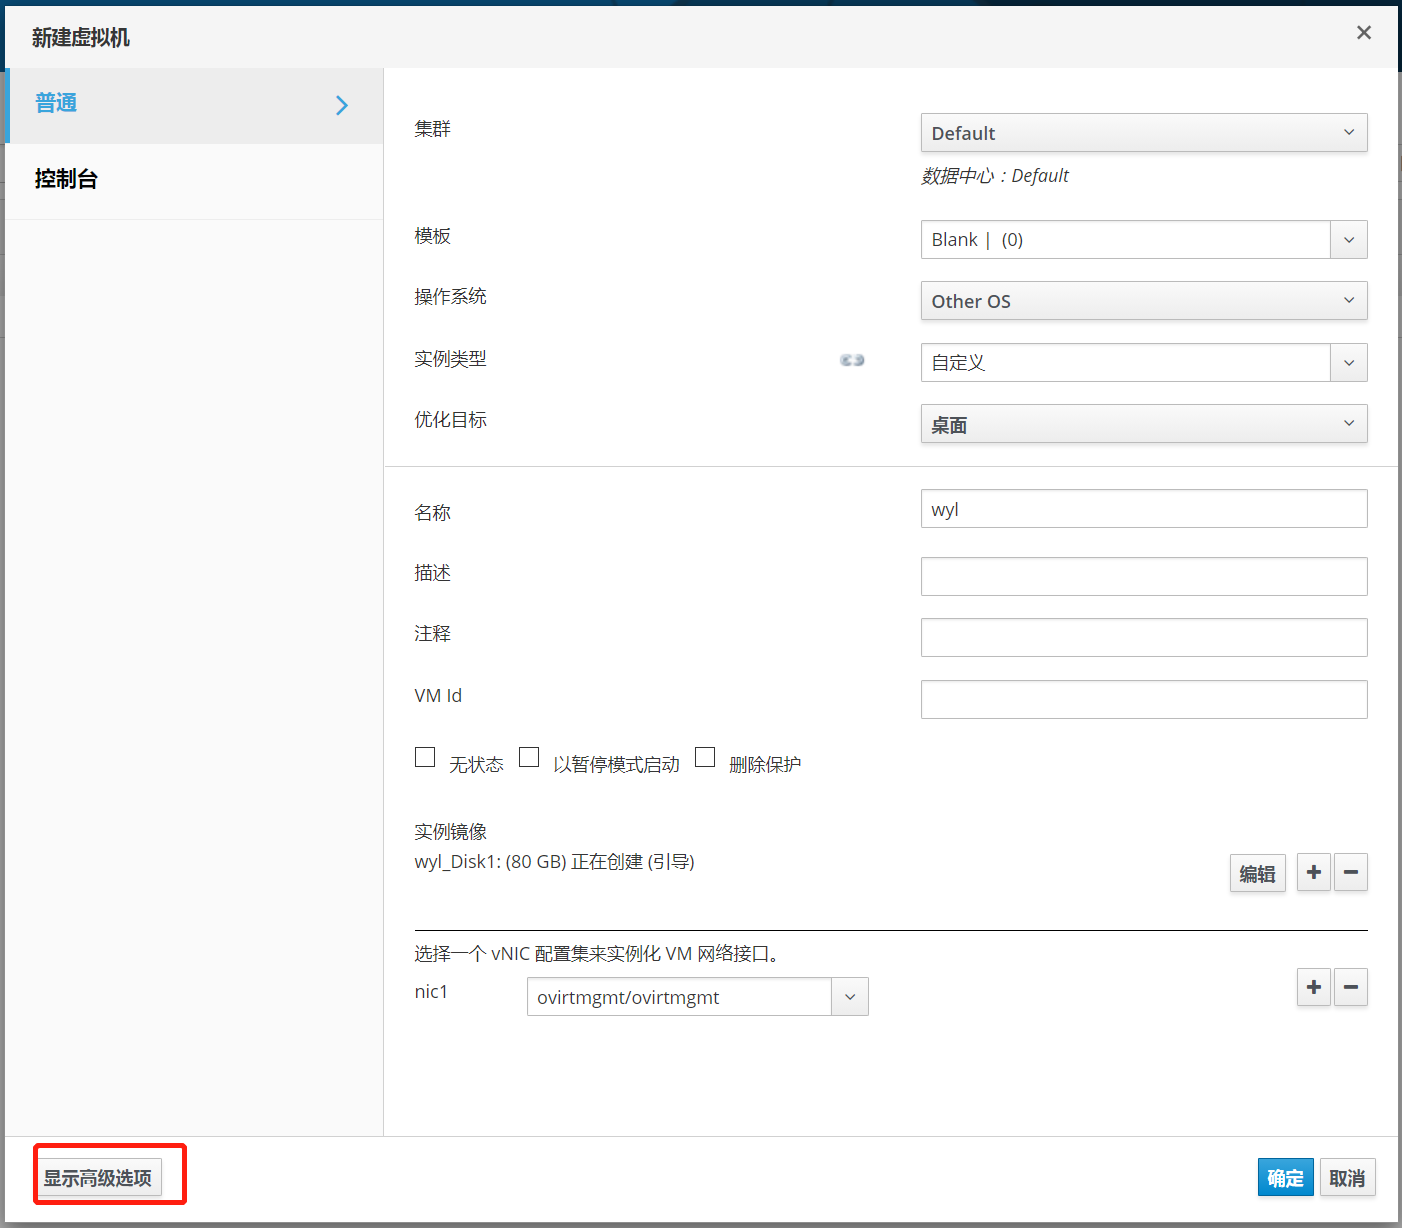
7、创建虚拟机

输入主机名和选择网卡
添加一块磁盘大小为80G
点击高级
设置启动项从光驱启动
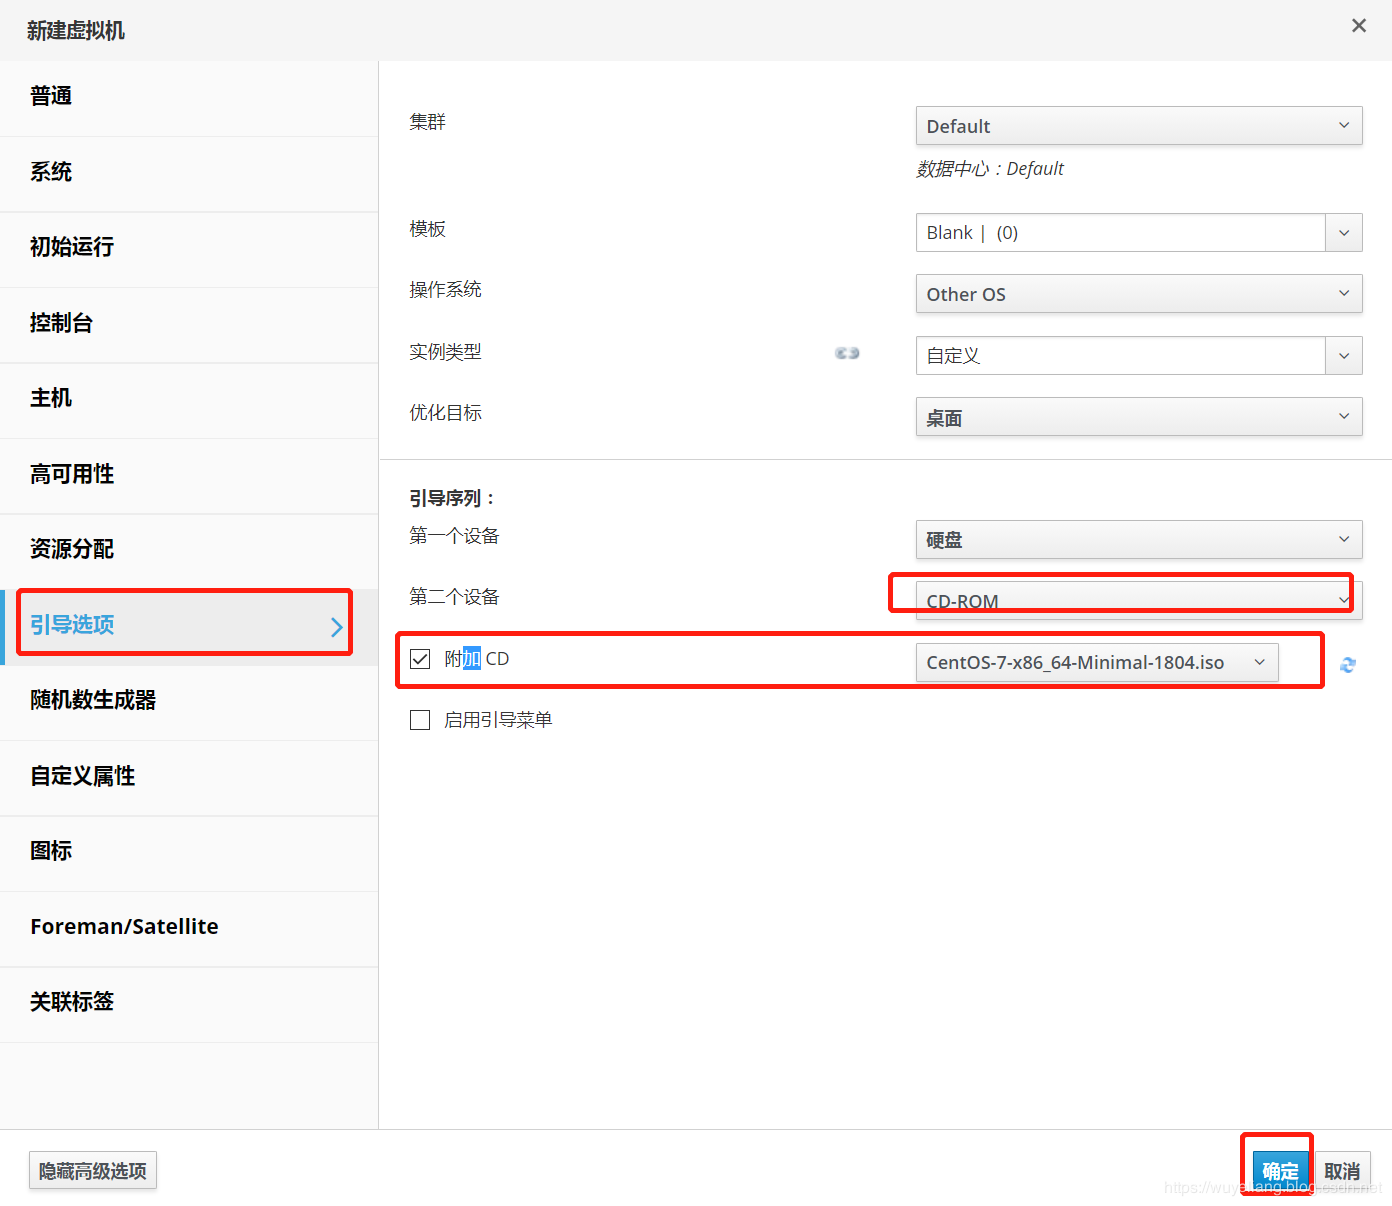
点击启动
 (责任编辑:IT) |