|
做为论坛站点:有两种类型的数据要处理:
|
|
1、结构化的数据: 如:用户名、用户发表的评论等,这些可以存储在关系型数据库中:
2、非结构化的数据:如:用户上传的附件。则存储到文件系统中。
|
论坛的架构:
使用两台httpd服务器来服务用户的访问请求。使用DNS的A记录做客户访问轮循到这两台服务器上。php做为httpd的模块工作。
论坛架构如下图所示:
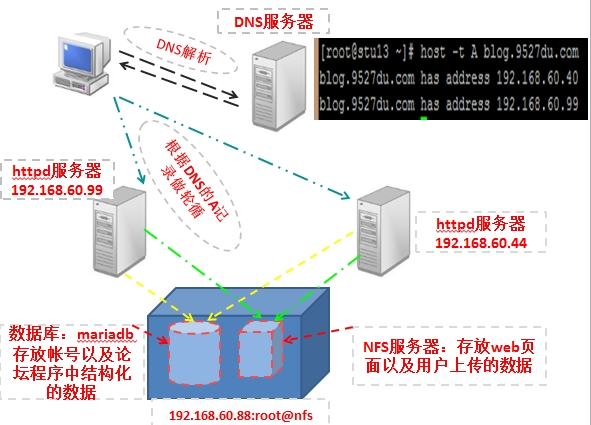
一、搭建NFS文件共享服务器。
要点:保证192.168.60.99与192.168.60.40两台httpd服务器的进程能够往共享文件系统(目录)中写数据。
1、创建共享目录。
|
|
[root@nfs ~]# vim /etc/exports
[root@nfs ~]# cat /etc/exports
/web 192.168.60.0/24(rw,no_root_squash)
|
说明:只要是:192.168.60.0网段的用户都可以挂载使用NFS共享的目录。
2、两台httpd服务器尝试是否可以挂载NFS共享的目录。
(1)、httpd A(192.168.60.99):服务器挂载 /web
查看NFS服务器共享的目录(文件系统)
|
|
[root@stu13 ~]# showmount -e 192.168.60.88
Export list for 192.168.60.88:
/web 192.168.60.0/24
|
挂载共享目录
|
|
[root@stu13 ~]# mount -t nfs 192.168.60.88:/web /mnt/nfs/
|
查看是否挂载上。
|
|
[root@stu13 ~]# mount | grep "nfs[[:space:]]"
192.168.60.88:/web on /mnt/nfs type nfs (rw,addr=192.168.60.88)
|
(2)、httpd B(192.168.60.40):服务器也挂载:/web
查看NFS服务器共享的目录(文件系统)
|
|
[root@localhost ~]# showmount -e 192.168.60.88
Export list for 192.168.60.88:
/web 192.168.60.0/24
|
挂载共享目录
|
|
[root@localhost ~]# mount -t nfs 192.168.60.88:/web /mnt/nfs/
|
查看是否挂载成功
|
|
[root@localhost ~]# mount | grep "nfs[[:space:]]"
192.168.60.88:/web on /mnt/nfs type nfs (rw,addr=192.168.60.88)
|
3、创建使用NFS服务器共享文件系统(目录)的用户;
httpd A(192.168.60.99)与 httpd B(192.168.60.40) 服务器的: User、Group都使用:usenfs
也就是服务用户请求的进程或线程的属主与属组是:usenfs. 由于用户上传附件的话,要往共享文件系统中写数据。所以,我们一定要保证该用户能够往,共享服务器NFS的共享文件目录中写数据。
(1)、分别在httpd A与httpd B服务器中设置usenfs 用户,用户ID号为400.
|
|
[root@stu13 ~]# id usenfs
uid=400(usenfs) gid=400(usenfs) groups=400(usenfs)
|
|
|
[root@localhost ~]# useradd -u 400 -r usenfs
[root@localhost ~]# id usenfs
uid=400(usenfs) gid=400(usenfs) groups=400(usenfs)
|
(2)、在NFS服务器上,也创建一样的用户(指的是id号一样)且要求该用户要有NFS共享出去的文件系统(/web)有读写执行权限。
|
|
[root@nfs ~]# useradd -u 400 -r usenfs
[root@nfs ~]# id usenfs
uid=400(usenfs) gid=400(usenfs) groups=400(usenfs)
|
使用控制列表的文件授权
设置前:
|
|
[root@nfs ~]# getfacl /web
getfacl: Removing leading '/' from absolute path names
# file: web
# owner: root
# group: root
user::rwx
group::r-x
other::r-x
|
说明:
从上述信息可知,usenfs用户是无法往该目录中创建文件的。
通过文件权限列表方法,授与某用户权限。
|
|
[root@nfs ~]# setfacl -m u:usenfs:rwx /web
[root@nfs ~]# getfacl /web
getfacl: Removing leading '/' from absolute path names
# file: web
# owner: root
# group: root
user::rwx
user:usenfs:rwx
group::r-x
mask::rwx
other::r-x
|
说明:
由于usenfs用户有rwx权限,当以该用户的身份发起创建文件的进程就可以往该目录中创建文件了。
二、创建LAMP平台
说明:这里使用php做为模块的方式跟httpd交互。数据库mariadb与NFS服务器在同一台主机192.168.60.88工作。
1、编译httpd服务器软件:
两台httpd服务器都使用一样的设置进行源码编译安装。
方法如下:
需要的软件包:
|
|
httpd-2.4.9.tar.bz2
apr-util-1.4.1.tar.bz2
apr-1.4.6.tar.bz2
|
说明:httpd-2.4版本要求:apr的版本一定在1.4以上。
查看系统的apr库的版本,
|
|
[root@stu13 admin]# ldconfig -v | grep apr
libaprutil-1.so.0 -> libaprutil-1.so.0.3.9
libgstdataprotocol-0.10.so.0 -> libgstdataprotocol-0.10.so.0.25.0
libapr-1.so.0 -> libapr-1.so.0.3.9
|
说明:由于apr的版本不适合httpd-2.4,所以要升级apr库。升级方式:rpm包;源码包。这里选择源码包。
安装:apr-1.4.6.tar.bz2 和 apr-util-1.4.1.tar.bz2
|
|
[root@stu13 admin]# tar -xf apr-1.4.6.tar.bz2
[root@stu13 admin]# cd apr-1.4.6
[root@stu13 apr-1.4.6]# ./configure --prefix=/usr/local/apr-1.4
[root@stu13 apr-1.4.6]# make && make install
|
|
|
[root@stu13 admin]# tar -xf apr-util-1.4.1.tar.bz2
[root@stu13 admin]# cd apr-util-1.4.1
[root@stu13 apr-util-1.4.1]# ./configure --prefix=/usr/local/apr-util-1.4 --with-apr=/usr/local/apr-1.4
[root@stu13 apr-util-1.4.1]# make && make install
|
编译安装httpd服务器
|
|
[root@stu13 admin]# tar -xf httpd-2.4.9.tar.bz2
[root@stu13 httpd-2.4.9]# ./configure \
--prefix=/usr/local/httpd-2.4.9 \ 安装程序存放的位置
--sysconfdir=/etc/httpd-2.4.9 \ 配置文件存放的位置
--enable-so \ 采用共享模块的方式编译安装httpd。可以灵活加载卸载模块。
--enable-ssl \ 启用ssl安全传输功能
--enable-cgi \ 启用cgi功能
--enable-rewrite \ 启用重定向功能
--with-zlib \ 支持压缩功能。传输传输时,启用该功能可以节省带宽
--with-pcre \ 加密
--with-apr=/usr/local/apr-1.4 \ 使用新安装的apr,由于没有导出该库。所以要指定在哪个目录
--with-apr-util=/usr/local/apr-util-1.4 \
--enable-modules=all \ 安装全部模块
--enable-mpms-shared=all \ 把prefork、worker、event都编译。httpd-2.4支持动态切换mpm。
--with-mpm=event 默认使用的mpm为:event
|
|
|
[root@stu13 httpd-2.4.9]# make && make install
|
安装加密工具:
安装 libmcrypt
|
|
[root@stu13 lamp]# tar -xf libmcrypt-2.5.8.tar.bz2
[root@stu13 lamp]# cd libmcrypt-2.5.8
[root@stu13 libmcrypt-2.5.8]# ./configure --prefix=/usr/local/libmcrypt
[root@stu13 libmcrypt-2.5.8]# make && make install
|
2、编译php
(1)、编译php
|
|
[root@stu13 admin]# tar -xf php-5.4.26.tar.bz2
[root@stu13 admin]# cd php-5.4.26
[root@stu13 php-5.4.26]# ./configure \
--prefix=/usr/local/php-5.4 \ php的安装目录
--with-mysql=mysqlnd \ 使用php内置连接数据库的驱动
--with-pdo-mysql=mysqlnd \ 使用php内置连接数据库的驱动
--with-mysqli=mysqlnd \ 使用php内置连接数据库的驱动
--with-openssl \ 启用支持ssl
--enable-mbstring \ 支持更多字集
--with-freetype-dir \
--with-jpeg-dir \ 支持jpeg格式的图片
--with-png-dir \ 支持png格式的图片
--with-libxml-dir \ 支持扩展标记语言xml
--enable-xml \
--with-apxs2=/usr/local/httpd-2.4.9/bin/apxs \ 把php编辑成httpd的模块
--with-mcrypt=/usr/local/libmcrypt \ 使用加密
--with-config-file-path=/etc/ 配置文件的存放位置
--with-config-file-scan-dir=/etc/php.d \
--with-bz2 \ 支持bz2数据压缩
--enable-maintainer-zts 安全线程,使用httpd的:event、wordker就要启用该选项。
[root@stu13 php-5.4.26]# make && make install
|
复制配置文件
|
|
[root@stu13 php-5.4.26]# cp php.ini-production /etc/php.ini
|
(2)、编辑httpd服务器的配置文件,让httpd服务器与php结合。
提供index.php的主页
|
|
<IfModule dir_module>
DirectoryIndex index.php index.html
</IfModule>
|
支持.php格式网页
|
|
AddType application/x-httpd-php .php
AddType application/x-httpd-php-source .phps
|
查看是否启用php模块
|
|
[root@stu13 php-5.4.26]# grep "^LoadModule[[:space:]]php.*" /etc/httpd-2.4.9/httpd.conf
LoadModule php5_module modules/libphp5.so
|
修改httpd会话服务进程的属主属组
修改网页文档的根:
|
|
DocumentRoot "/mnt/nfs"
<Directory "/mnt/nfs">
Options -Indexes -FollowSymLinks
AllowOverride None
Require all granted
</Directory>
|
3、安装二进制格式的mariadb数据库
|
|
[root@localhost admin]# tar -xf mariadb-5.5.36-linux-i686.tar.gz -C /usr/local
[root@localhost local]# ln -sv mariadb-5.5.36-linux-i686 mysql
create symbolic link `mysql' to `mariadb-5.5.36-linux-i686'
[root@localhost local]# ll | grep mysql
lrwxrwxrwx 1 root root 25 Aug 17 20:16 mysql -> mariadb-5.5.36-linux-i686
|
创建mysql用户,最好把它创建为系统用户。
|
|
root@localhost local]# useradd -r mysql
[root@localhost local]# id mysql
uid=101(mysql) gid=103(mysql) groups=103(mysql)
|
数据目录放在/mydata。
要点:
|
|
数据的冗余: 要把存放数据的块设备做成提供数据冗余的raid组合。
数据的备份: 要把数据存放的块设备做成lvm.
这里就略过。。。。。
|
(1)、修改数据库数据存放目录的属主属组
|
|
[root@localhost /]# chown mysql:mysql /mydata/
[root@localhost /]# ll | grep mydata
drwxr-xr-x 2 mysql mysql 4096 Aug 17 21:03 mydata
|
(2)、修改解压后的二进制程序的:属主为mysql,属组为mysql
|
|
[root@localhost mysql]# chown -R mysql:mysql ./*
[root@localhost mysql]# ll
total 216
drwxr-xr-x 2 mysql mysql 4096 Aug 17 20:02 bin
-rw-r--r-- 1 mysql mysql 17987 Feb 24 07:50 COPYING
。。。。。。
drwxr-xr-x 4 mysql mysql 4096 Aug 17 20:02 sql-bench
drwxr-xr-x 4 mysql mysql 4096 Aug 17 20:02 support-files
|
(3)、初始化mysql。
|
|
[root@localhost mysql]# scripts/mysql_install_db --user=mysql --datadir=/mydata
Installing MariaDB/MySQL system tables in '/mydata' ...
OK
Filling help tables...
OK
|
把属主改为root
|
|
[root@localhost mysql]# chown -R root .
[root@localhost mysql]# cp support-files/my-large.cnf /etc/my.cnf
|
根据实现情况编辑配置文件添加下述两行
|
|
[root@localhost mysql]# vim /etc/my.cn
thread_concurrency = 4 ------> CPU与线程的对应关系
datadir = /web ------> 存放数据的目录
|
(4)、提供MySQL的启动脚本,并检查是否有执行权限
|
|
[root@localhost mysql]# cp support-files/mysql.server /etc/init.d/mysqld
[root@localhost mysql]# chkconfig --add mysqld
[root@localhost mysql]# chkconfig --list mysqld
mysqld 0:off 1:off 2:on 3:on 4:on 5:on 6:off
[root@localhost mysql]# chkconfig mysqld off
|
(5)、启动数据库服务器
|
|
[root@localhost mysql]# service mysqld start
Starting MySQL.. [ OK ]
|
测试是否可以操作数据库
|
|
[root@localhost mysql]# ./bin/mysql
Welcome to the MariaDB monitor. Commands end with ; or \g.
Your MariaDB connection id is 2
。。。。。
MariaDB [(none)]> show databases;
+--------------------+
| Database |
+--------------------+
| information_schema |
| mydb |
| mysql |
| performance_schema |
| test |
+--------------------+
5 rows in set (0.00 sec)
|
注意:安装数据库时的默认用户。都是无需密码就可以登陆数据库系统。为了安全考虑。所以,要把它删除或加密码。
|
|
MariaDB [(none)]> select user,host,password from mysql.user;
+------+----------------+----------+
| user | host | password |
+------+----------------+----------+
| root | localhost | |
| root | nfs.9527du.com | |
| root | 127.0.0.1 | |
| root | ::1 | |
| | localhost | |
| | nfs.9527du.com | |
+------+----------------+----------+
6 rows in set (0.00 sec)
|
清除不需要的用户
|
|
MariaDB [(none)]> drop user 'root'@'nfs.9527du.com';
MariaDB [(none)]> drop user 'root'@'::1';
MariaDB [(none)]> drop user ''@'localhost';
MariaDB [(none)]> drop user ''@'nfs.9527du.com';
MariaDB [(none)]> drop user 'root'@'localhost';
|
设置密码:
|
|
MariaDB [(none)]> set password for 'root'@'127.0.0.1' = password('root');
MariaDB [(none)]> select user,host,password from mysql.user;
+------+-----------+-------------------------------------------+
| user | host | password |
+------+-----------+-------------------------------------------+
| root | 127.0.0.1 | *81F5E21E35407D884A6CD4A731AEBFB6AF209E1B |
+------+-----------+-------------------------------------------+
1 row in set (0.00 sec)
|
添加一个管理数据库的用户可以从任意IPv4的地址登陆到数据库。授权有操作数据库的一切权利
|
|
MariaDB [(none)]> grant all on *.* to 'root'@'%.%.%.%' identified by 'root';
Query OK, 0 rows affected (0.00 sec)
|
为了立即生效刷新数据库授权表
|
|
MariaDB [(none)]> flush privileges;
Query OK, 0 rows affected (0.00 sec)
|
三、测试LAMP平台:
1、httpd A(192.168.60.99) 与 httpd B(192.168.60.40) 分别挂载NFS服务器共享的/web目录。
查看NFS共享的目录
|
|
[root@stu13 httpd-2.4.9]# showmount -e 192.168.60.88
Export list for 192.168.60.88:
/web 192.168.60.0/24
|
挂载并检查是否成功
|
|
[root@stu13 httpd-2.4.9]# mount -t nfs 192.168.60.88:/web /mnt/nfs/
[root@stu13 httpd-2.4.9]# mount | grep "nfs[[:space:]]"
192.168.60.88:/web on /mnt/nfs type nfs (rw,addr=192.168.60.88)
|
在另一台httpd服务器查看NFS共享的目录
|
|
[root@node1 ~]# showmount -e 192.168.60.88
Export list for 192.168.60.88:
/web 192.168.60.0/24
|
挂载共享目录并检查是否挂载成功
|
|
[root@node1 ~]# mount -t nfs 192.168.60.88:/web /mnt/nfs/
[root@node1 http-2.4.9]# mount | grep "nfs[[:space:]]"
192.168.60.88:/web on /mnt/nfs type nfs (rw,addr=192.168.60.88)
|
2、启动httpd A 与 httpd B服务器,确保服务会话的进程的属主为:usenfs;
httpd A(192.168.60.99)
|
|
[root@stu13 httpd-2.4.9]# ps aux | grep httpd
root 2427 0.2 2.0 24704 10656 ? Ss 14:52 0:00 /usr/local/httpd-2.4.9/bin/httpd -k start
usenfs 2428 0.0 1.9 302436 9968 ? Sl 14:52 0:00 /usr/local/httpd-2.4.9/bin/httpd -k start
usenfs 2429 0.0 1.9 302436 9972 ? Sl 14:52 0:00 /usr/local/httpd-2.4.9/bin/httpd -k start
usenfs 2431 0.0 1.9 303460 9976 ? Sl 14:52 0:00 /usr/local/httpd-2.4.9/bin/httpd -k start
|
httpd A(192.168.60.40)
|
|
[root@node1 http-2.4.9]# ps aux | grep httpd
root 1888 0.0 2.0 24704 10660 ? Ss 15:12 0:00 /usr/local/http-2.4.9/bin/httpd -k start
usenfs 1889 0.0 1.9 302436 9972 ? Sl 15:12 0:00 /usr/local/http-2.4.9/bin/httpd -k start
usenfs 1890 0.0 1.9 303460 9980 ? Sl 15:12 0:00 /usr/local/http-2.4.9/bin/httpd -k start
usenfs 1896 0.0 1.9 302436 9976 ? Sl 15:12 0:00 /usr/local/http-2.4.9/bin/httpd -k start
|
3、添加测试页面,是否能够连接MySQL以及httpd服务器能够解释.php格式的网页。
在共享目录/web中创建:checkmysql.php网页文件。内容所下。
|
|
<?php
$link = mysql_connect('192.168.60.88','root','root');
if ($link)
echo "Success...";
else
echo "Failure...";
?>
|
4、访问页面测试
启动mariadb数据库:
|
|
[root@nfs ~]# service mysqld start
Starting MySQL..... [ OK ]
|
测试httpd A(192.168.60.99):
|
|
[root@nfs ~]# curl -eI http://192.168.60.99/checkmysql.php
Success...
|
说明:httpd A(192.168.60.99)连接mariadb数据库成功。且能够启用php解释php代码。
测试httpd B(192.168.60.40):
|
|
[root@nfs ~]# curl -eI http://192.168.60.40/checkmysql.php
Success...
|
说明:httpd A(192.168.60.40)连接mariadb数据库成功。且能够启用php解释php代码。
关闭mariadb数据库并测试一次。
|
|
[root@nfs ~]# service mysqld stop
Shutting down MySQL. [ OK ]
[root@nfs ~]# curl -eI http://192.168.60.99/checkmysql.php
Failure...
[roocurl -eI http://192.168.60.40/checkmysql.php
Failure...
|
说明:
两台httpd服务器已经能够与后端的MySQL服务器交互了。且能够解释php格式的页面文档了。
四、部署: wordpress-3.3.1.zh.CN博客程序:
1、创建wordpress博客程序连接MySQL数据库的用户以及创建它使用的数据库。
|
|
MariaDB [(none)]> create database wordpress;
MariaDB [(none)]> grant all on wordpress.* to 'wordpress'@'192.168.60.%' identified by 'wordpress';
MariaDB [(none)]> flush privileges
|
说明:
基于安全方面的考虑,wordpress用户只有使用wordpress数据库的权利。没有操作其它数据库的权利。
2、配置wordpress博客程序
|
|
[root@stu13 nfs]# unzip wordpress-3.3.1-zh_CN.zip
[root@stu13 wordpress]# cp wp-config-sample.php wp-config.php
|
编辑wp-config.php配置文件,输入连接MySQL数据的用户和密码以及使用的数据库
|
|
[root@stu13 wordpress]# vim wp-config.php
// ** MySQL 设置 - 具体信息来自您正在使用的主机 ** //
/** WordPress 数据库的名称 */
define('DB_NAME', 'wordpress');
/** MySQL 数据库用户名 */
define('DB_USER', 'wordpress');
/** MySQL 数据库密码 */
define('DB_PASSWORD', 'wordpress');
/** MySQL 主机 */
define('DB_HOST', '192.168.60.88');
/** 创建数据表时默认的文字编码 */
define('DB_CHARSET', 'utf8');
|
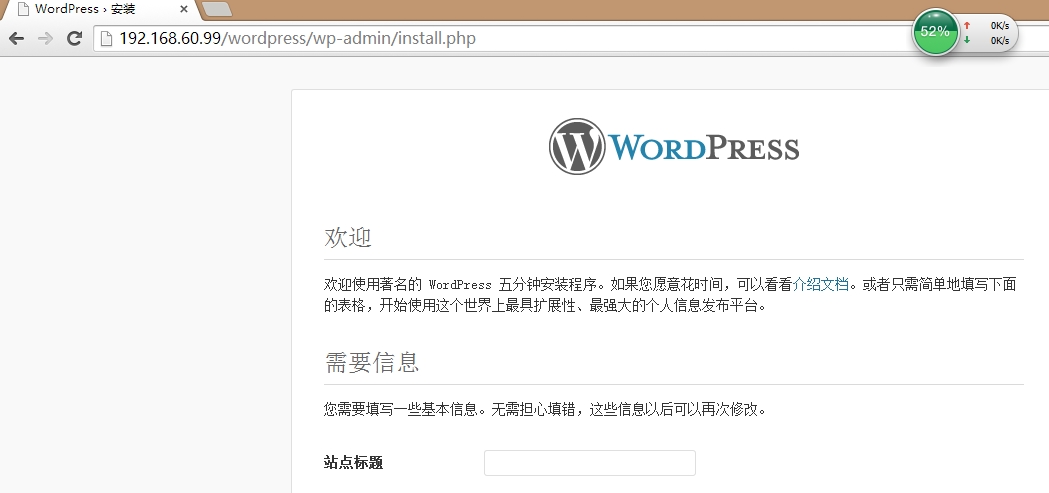
在192.168.60.99这台服务器上,打开wordpress程序安装向导
在192.168.60.40 这台httpd服务器上也打开wordpress的安装向导并安装wordpress博客程序。下图为安装后的界面:
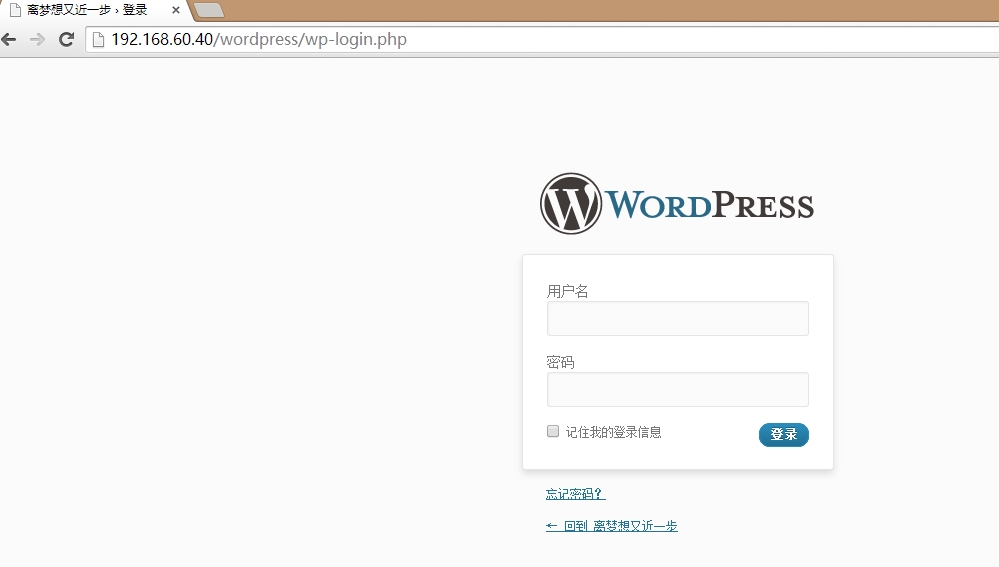
通过另一台服务器浏览

OK....
本文出自 “Linux” 博客,请务必保留此出处http://9528du.blog.51cto.com/8979089/1541380
(责任编辑:IT) |