|
MariaDB作为Mysql的一个分支,在开源项目中已经广泛使用,例如大热的openstack,所以,为了保证服务的高可用性,同时提高系统的负载能力,集群部署是必不可少的。
MariaDB Galera Cluster 介绍
MariaDB Galera Cluster 是开源的 MariaDB同步多主机集群。它仅支持XtraDB/ InnoDB存储引擎(虽然有对MyISAM实验支持 - 看wsrep_replicate_myisam系统变量)。

主要功能:
-
同步复制
-
真正的multi-master,即所有节点可以同时读写数据库
-
自动的节点成员控制,失效节点自动被清除
-
新节点加入数据自动复制
-
真正的并行复制,行级
-
用户可以直接连接集群,使用感受上与MySQL完全一致
优势:
-
因为是多主,所以不存在Slavelag(延迟)
-
不存在丢失事务的情况
-
同时具有读和写的扩展能力
-
更小的客户端延迟
-
节点间数据是同步的,而Master/Slave模式是异步的,不同slave上的binlog可能是不同的
技术:
Galera集群的复制功能基于Galeralibrary实现,为了让MySQL与Galera library通讯,特别针对MySQL开发了wsrep API。
Galera插件保证集群同步数据,保持数据的一致性,靠的就是可认证的复制,工作原理如下图: 
当客户端发出一个commit的指令,在事务被提交之前,所有对数据库的更改都会被 write-set 收集起来,并且将write-set 纪录的内容发送给其他节点。
write-set 将在每个节点进行认证测试,测试结果决定着节点是否应用write-set更改数据。
如果认证测试失败,节点将丢弃 write-set ;如果认证测试成功,则事务提交。
1 安装环境准备
安装MariaDB集群至少需要3台服务器(如果只有两台的话需要特殊配置,请参照官方文档)
在这里,我列出试验机器的配置:
操作系统版本:centos7
-
node4:10.128.20.16
-
node5:10.128.20.17
-
node6:10.128.20.18
以第一行为例,node4为 hostname ,10.128.20.16为 ip ,在三台机器修改 /etc/hosts 文件,我的文件如下:
-
10.128.20.16 node4
-
10.128.20.17 node5
-
10.128.20.18 node6
为了保证节点间相互通信,需要禁用防火墙设置(如果需要防火墙,则参照官方网站增加防火墙信息设置)
在三个节点分别执行命令:
-
systemctl stop firewalld
然后将 /etc/sysconfig/selinux 的 selinux 设置成 disabled ,这样初始化环境就完成了。
2 安装 MariaDB Galera Cluster
-
[root@node4 ~]# yum install -y mariadb mariadb-galera-server mariadb-galera-common galera rsync
-
[root@node5 ~]# yum install -y mariadb mariadb-galera-server mariadb-galera-common galera rsync
-
[root@node6 ~]# yum install -y mariadb mariadb-galera-server mariadb-galera-common galera rsync
3 配置 MariaDB Galera Cluster
初始化数据库服务,只在一个节点进行
-
[root@node4 mariadb]# systemctl start mariadb
-
[root@node4 mariadb]# mysql_secure_installation
-
-
NOTE: RUNNING ALL PARTS OF THIS SCRIPT IS RECOMMENDED FOR ALL MariaDB
-
SERVERS IN PRODUCTION USE! PLEASE READ EACH STEP CAREFULLY!
-
-
In order to log into MariaDB to secure it, we'll need the current
-
password for the root user. If you've just installed MariaDB, and
-
you haven't set the root password yet, the password will be blank,
-
so you should just press enter here.
-
-
Enter current password for root (enter for none):
-
OK, successfully used password, moving on...
-
-
Setting the root password ensures that nobody can log into the MariaDB
-
root user without the proper authorisation.
-
-
Set root password? [Y/n]
-
New password:
-
Re-enter new password:
-
Password updated successfully!
-
Reloading privilege tables..
-
... Success!
-
-
-
By default, a MariaDB installation has an anonymous user, allowing anyone
-
to log into MariaDB without having to have a user account created for
-
them. This is intended only for testing, and to make the installation
-
go a bit smoother. You should remove them before moving into a
-
production environment.
-
-
Remove anonymous users? [Y/n] n
-
... skipping.
-
-
Normally, root should only be allowed to connect from 'localhost'. This
-
ensures that someone cannot guess at the root password from the network.
-
-
Disallow root login remotely? [Y/n] y
-
... Success!
-
-
By default, MariaDB comes with a database named 'test' that anyone can
-
access. This is also intended only for testing, and should be removed
-
before moving into a production environment.
-
-
Remove test database and access to it? [Y/n] n
-
... skipping.
-
-
Reloading the privilege tables will ensure that all changes made so far
-
will take effect immediately.
-
-
Reload privilege tables now? [Y/n] y
-
... Success!
-
-
Cleaning up...
-
-
All done! If you've completed all of the above steps, your MariaDB
-
installation should now be secure.
-
-
Thanks for using MariaDB!
关闭数据库,修改 /etc/my.cnf.d/galera.cnf
-
[root@node4 mariadb]# systemctl stop mariadb
-
[root@node4 ~]# vim /etc/my.cnf.d/galera.cnf
修改以下内容:
-
[mysqld]
-
......
-
wsrep_provider = /usr/lib64/galera/libgalera_smm.so
-
wsrep_cluster_address = "gcomm://node4,node5,node6"
-
wsrep_node_name = node4
-
wsrep_node_address=10.128.20.16
-
#wsrep_provider_options="socket.ssl_key=/etc/pki/galera/galera.key; socket.ssl_cert=/etc/pki/galera/galera.crt;"
提示:如果不用ssl的方式认证的话,请把 wsrep_provider_options 注释掉。
将此文件复制到node5、node6,注意要把 wsrep_node_name 和 wsrep_node_address 改成相应节点的hostname 和 ip。
4 启动 MariaDB Galera Cluster 服务
-
[root@node4 ~]# /usr/libexec/mysqld --wsrep-new-cluster --user=root &
观察日志:
-
[root@node4 ~]# tail -f /var/log/mariadb/mariadb.log
-
-
150701 19:54:17 [Note] WSREP: wsrep_load(): loading provider library 'none'
-
150701 19:54:17 [Note] /usr/libexec/mysqld: ready for connections.
-
Version: '5.5.40-MariaDB-wsrep' socket: '/var/lib/mysql/mysql.sock' port: 3306 MariaDB Server, wsrep_25.11.r4026
出现 ready for connections ,证明我们启动成功,继续启动其他节点:
-
[root@node5 ~]# systemctl start mariadb
-
[root@node6 ~]# systemctl start mariadb
可以查看 /var/log/mariadb/mariadb.log,在日志可以看到节点均加入了集群中。
警告⚠:--wsrep-new-cluster 这个参数只能在初始化集群使用,且只能在一个节点使用。
5 查看集群状态
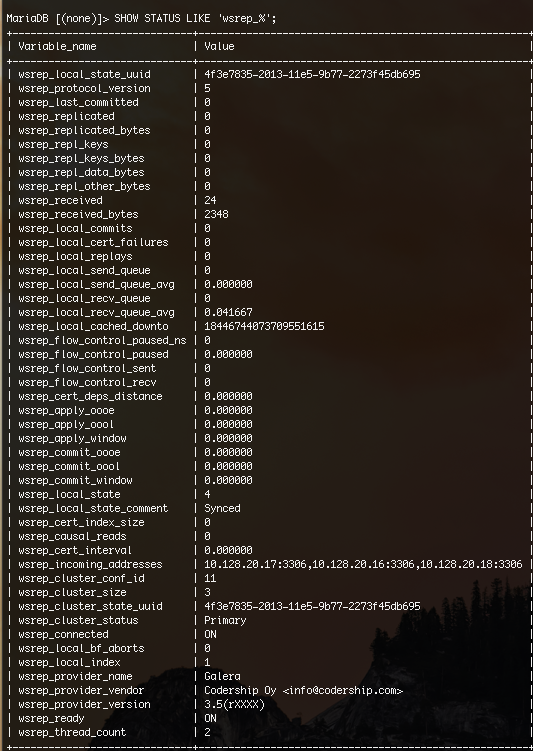
我们可以关注几个关键的参数:
wsrep_connected = on 链接已开启
wsrep_local_index = 1 在集群中的索引值
wsrep_cluster_size =3 集群中节点的数量
wsrep_incoming_addresses = 10.128.20.17:3306,10.128.20.16:3306,10.128.20.18:3306 集群中节点的访问地址
6 验证数据同步
我们在 node4 上新建数据库 galera_test ,然后在 node5 和 node6 上查询,如果可以查询到 galera_test 这个库,说明数据同步成功,集群运行正常。
-
[root@node4 ~]# mysql -uroot -proot -e "create database galera_test"
-
[root@node5 ~]# mysql -uroot -proot -e "show databases"
-
+--------------------+
-
| Database |
-
+--------------------+
-
| information_schema |
-
| galera_test |
-
| mysql |
-
| performance_schema |
-
+--------------------+
-
[root@node6 ~]# mysql -uroot -proot -e "show databases"
-
+--------------------+
-
| Database |
-
+--------------------+
-
| information_schema |
-
| galera_test |
-
| mysql |
-
| performance_schema |
-
+--------------------+
至此,我们的 MariaDB Galera Cluster 已经成功部署。
参考文章
来源:http://code.oneapm.com/database/2015/07/02/mariadb-galera-cluster/
(责任编辑:IT) |