|
在 《服务器架设笔记——使用Apache插件解析简单请求》 一文中,我们已经可以获取请求内容。这只是万里长征的第一步。因为一般来说,客户端向服务器发起请求,服务器会有着复杂的业务处理逻辑。举个例子,大部分 客户端软件都有日志模块。其中包含了用户的一些行为,比如你点击了某个按钮。客户端将该信息上报给服务端,服务端解析这些信息,并记录在案,以供运维和产 品人员分析。而这种记录在案行为,一般不会是使用直接读写文件的方式,而是要使用数据库。所以打通数据库和服务器是非常重要的一环。 (转载请指明出于breaksoftware的csdn博客) 我选择目前比较流行的MySQL。首先我们要先安装MySQL apt-get install mysql-server 然后我们要安装MySQL的C++开发库。Apache的DBD模块要使用这个开发库 apt-get install libmysql++-dev 安装完毕后,我们手工建立一个数据库。之后我们创建的Apache插件只是将该数据库中的数据select出来。 登陆MySQL: mysql -u root -p 
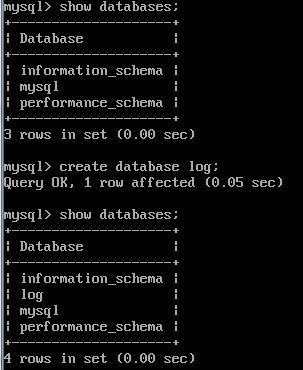
创建数据库log: create database log; 
创建表query_log use log; create table query_log(id INT UNIQUE, query VARCHAR(128), time int); 
插入两条数据 insert into query_log values(0, "query_log1“, 100); insert into query_log values(1, "query_log2", 101); 
因为我们之前编译的APR-UTIL模块没有启动编译MySQL相关的库,所以我们要重新编译APR-UTIL ./configure --prefix=/usr/local/apr-util --with-apr=/usr/local/apr --with-mysql make make install 再编译一下Apache 修改httpd.conf文件,放开mod_dbd.so的加载注释
使用 《服务器架设笔记——编译Apache及其插件》 中的方法生成一个插件use_mysql。使用如下方式让Apache连接到MySQL
static void query_database(request_rec *r) {
  apr_pool_t* pool = r->pool;
  const apr_dbd_driver_t* driver = NULL;
  apr_status_t status = apr_dbd_get_driver(pool, "mysql", &driver);
  if (APR_SUCCESS != status) {
    ap_rprintf(r, "apr_dbd_select error\n");
    return;
  }

  apr_dbd_t* handle = NULL;
  status = apr_dbd_open(driver, pool, "host=localhost;user=root;pass=password;dbname=log", &handle);
  if (APR_SUCCESS != status) {
    ap_rprintf(r, "apr_dbd_open error\n");
    return;
  }
其中需要注意的是apr_dbd_open中第三个参数,它标识了以什么用户名和密码打开哪台机器上的哪个数据库。这个参数根据数据库的类型不同而不同,比如针对sqlite型数据库就要传递数据库文件路径。 然后我们执行查询操作
apr_dbd_results_t* res = NULL;
  const char* sql = "select * from query_log";
  status = apr_dbd_select(driver, pool, handle, &res, sql, 0);
  if (APR_SUCCESS != status) {
    ap_rprintf(r, "apr_dbd_select error\n");
    return;
  }
我们将query_log表中的所有数据都提取出来,然后遍历并输出结果
apr_dbd_row_t* row = NULL;
  const char* id = NULL;
  const char* query = NULL;
  const char* time = NULL;
  while (apr_dbd_get_row(driver, pool, res, &row, -1) == 0 ) {
    id = apr_dbd_get_entry(driver, row, 0);
    query = apr_dbd_get_entry(driver, row, 1);
    time = apr_dbd_get_entry(driver, row, 2);
    if (id) {
      ap_rprintf(r, "id\t:\t%s\n", id);
    }
    else {
      ap_rprintf(r, "id is NULL\n");
    }

    if (query) {
      ap_rprintf(r, "query\t:\t%s\n", query);
    }
    else {
      ap_rprintf(r, "query is NULL\n");
    }

    if (time) {
      ap_rprintf(r, "time\t:\t%s\n", time);
    }
    else {
      ap_rprintf(r, "time is NULL\n");
    }

  }
}
如此,我们便将Apache和MySQL打通。我们发起一次请求,查看结果如下: id : 0 query : query_log1 time : 100 id : 1 query : query_log2 time : 101 The sample page from mod_use_mysql.c 虽然现在写起来,感觉还是很顺畅。但是在研究这个问题时遇到了各种各样的问题,而且可以参考的资料都很少。所以在此记录,以便感兴趣的人可以少走弯路。 |

