|
1. 在root权限下,通过如下命令安装Vsftp。
[root@VM_250_202_tlinux ~]# yum install vsftpd
2. 在启动vsftpd服务之前,需要登录云服务器修改配置文件,将匿名登录禁用掉。
打开配置文件,命令如下:
[root@VM_250_202_tlinux ~]# vim /etc/vsftpd/vsftpd.conf
在配置文件中第11行的“anonymous_enable=YES”前面加上#号,即将匿名登录禁用。
3. 读取生效配置。
[root@VM_250_202_tlinux ~]# cat /etc/vsftpd/vsftpd.conf |grep ^[^#]
local_enable=YES
write_enable=YES
local_umask=022
anon_upload_enable=YES
anon_mkdir_write_enable=YES
anon_umask=022
dirmessage_enable=YES
xferlog_enable=YES
connect_from_port_20=YES
xferlog_std_format=YES
listen=YES
pam_service_name=vsftpd
userlist_enable=YES
tcp_wrappers=YES
4. 启动vsftpd服务。
[root@VM_250_202_tlinux ~]# service vsftpd start
5. 设置FTP用户账号。设置成功后,即可通过该账号登录FTP服务器。
(1)设置FTP用户的账号,例如账号为“ftpuser1”,目录为/home/ftpuser1,且设置不允许通过ssh登录。
[root@VM_250_202_tlinux ~]# useradd -d /home/ftpuser1 -s /sbin/nologin ftpuser1
(2)设置账号对应的密码,例如密码为“ftpuser1”。
[root@VM_250_202_tlinux ~]# passwd ftpuser1
6. 修改vsftpd的pam配置,使用户可以通过自己设置的FTP用户帐号和密码连接到云服务器。
(1)修改pam。
[root@VM_250_202_tlinux ~]# vim /etc/pam.d/vsftpd
内容修改为:
#%PAM-1.0
auth required /lib64/security/pam_listfile.so item=user sense=deny file=/etc/ftpusers onerr=succeed
auth required /lib64/security/pam_unix.so shadow nullok
auth required /lib64/security/pam_shells.so
account required /lib64/security/pam_unix.so
session required /lib64/security/pam_unix.so
(2)确认修改后的文件是否正确。
[root@VM_250_202_tlinux ~]# cat /etc/pam.d/vsftpd #%PAM-1.0
auth required /lib64/security/pam_listfile.so item=user sense=deny file=/etc/ftpusers onerr=succeed
auth required /lib64/security/pam_unix.so shadow nullok
auth required /lib64/security/pam_shells.so
account required /lib64/security/pam_unix.so
session required /lib64/security/pam_unix.so
(3)重启vsftpd服务,使修改生效。
[root@VM_250_202_tlinux ~]# service vsftpd restart
Shutting down vsftpd: [ OK ]
Starting vsftpd for vsftpd: [ OK ]
Step2. 下载并安装开源软件FileZilla
请使用FileZilla的3.5.1、3.5.2版本(使用3.5.3版本的FileZilla进行FTP上传会有问题)。
由于FileZilla 官网上只提供了最新的3.5.3版本下载,因此建议用户自行搜索3.5.1、3.5.2下载地址。
建议的3.5.1 下载地址:http://www.oldapps.com/filezilla.php?old_filezilla=6350
Step3. 连接FTP
运行FileZilla,按下图所示进行配置,配置后点击“快速链接”:
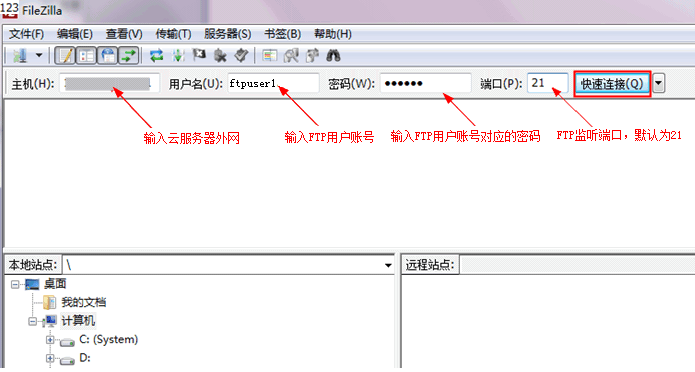
配置信息说明如下:
(1)主机:云服务器的公网IP(在云服务器“管理视图”页面可查看云服务器的公网IP)。
(2)用户名:在Step1中设置的FTP用户的账号,这里以“ftpuser1”为例。
(3)密码:在Step1中设置的FTP用户账号对应的密码,这里以“ftpuser1”为例。
(4)端口:FTP监听端口,默认为“21”。
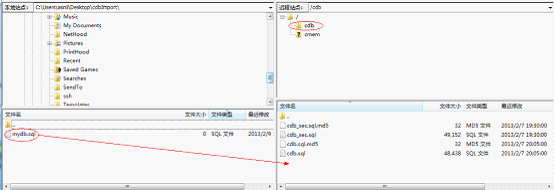
Step4. 上传文件到CentOS云服务器
上传文件时,鼠标选中本地文件,拖拽到远程站点,即将文件上传到了CentOS云服务器。
注意:
云服务器FTP通道不支持上传tar压缩包后自动解压,以及删除tar包功能。
上传文件示意图如下所示:
(责任编辑:IT) |