|
zabbix是一个基于WEB界面的开源网络监控程序。官网:http://www.zabbix.com/。使用系统为CentOS6.2,监控机IP为192.168.1.100,被监控机IP为192.168.1.200。官方wiki:http://www.zabbix.com/wiki/。
一、监控机安装安装PHP Web Server环境及所需软件
这里选择用apache+php+mysql。安装zabbix需要的web server环境软件包:
yum install httpd mysql mysql-devel mysql-server php php-mysql php-bcmath php-gd php-mbstring php-xml
配置LAMP过程略过。
安装EPEL源,因为有软件包需要从EPEL源下载:
rpm -Uvh http://download.fedoraproject.org/pub/epel/6/i386/epel-release-6-5.noarch.rpm
安装zabbix需要的其它软件包:
yum install curl-devel net-snmp-devel fping e2fsprogs-devel zlib-devel libgssapi-devel krb5-devel openssl-devel libidn-devel iksemel-devel patch make gcc gcc-c++
二、编译安装zabbix
目前版本为Zabbix 1.8.X。
cd /tmp
wget http://sourceforge.net/projects/zabbix/files/ZABBIX%20Latest%20Stable/1.8.11/zabbix-1.8.11.tar.gz/download
tar -zxvf zabbix-1.8.11.tar.gz
cd zabbix-1.8.11
./configure --enable-agent --enable-ipv6 --enable-proxy --enable-server --with-mysql --with-libcurl --with-net-snmp --with-jabber
make
make install
三、监控机配置zabbix
1、添加zabbix用户
useradd zabbix
2、创建zabbix数据库
#mysql -u root -p
mysql>create database zabbix default character set utf8;
mysql>quit;
3、导入数据库
mysql -u root -p zabbix < /tmp/zabbix-1.8.11/create/schema/mysql.sql
mysql -u root -p zabbix < /tmp/zabbix-1.8.11/create/data/data.sql
mysql -u root -p zabbix < /tmp/zabbix-1.8.11/create/data/images_mysql.sql
4、创建相关目录
mkdir -p /etc/zabbix/alert.d
mkdir -p /var/log/zabbix-server
mkdir -p /var/log/zabbix-agent
mkdir -p /var/run/zabbix-server
mkdir -p /var/run/zabbix-agent
chown zabbix.zabbix /var/run/zabbix*
chown zabbix.zabbix /var/log/zabbix*
5、复制配置文件
cp /tmp/zabbix-1.8.11/misc/conf/zabbix_server.conf /etc/zabbix
cp /tmp/zabbix-1.8.11/misc/conf/zabbix_agentd.conf /etc/zabbix
cp /tmp/zabbix-1.8.11/misc/init.d/redhat/8.0/zabbix_server /etc/init.d
cp /tmp/zabbix-1.8.11/misc/init.d/redhat/8.0/zabbix_agentd /etc/init.d
6、编辑配置文件
1)配置zabbix_server.conf:
vim /etc/zabbix/zabbix_server.conf
将:
LogFile=/tmp/zabbix_server.log
修改为:
LogFile=/var/log/zabbix-server/zabbix_server.log
找到:
# PidFile=/tmp/zabbix_server.pid
在下面添加:
PidFile=/var/run/zabbix-server/zabbix_server.pid
找到:
# DBPassword=
在下面添加:
DBPassword=123456 //这里填mysql root用户密码
找到:
# AlertScriptsPath=/home/zabbix/bin/
在下面添加:
AlertScriptsPath=/etc/zabbix/alert.d/
找到:
# FpingLocation=/usr/sbin/fping
在下面添加:
FpingLocation=/usr/sbin/fping
2)配置zabbix_agentd.conf:
vim /etc/zabbix/zabbix_agentd.conf
将:
# PidFile=/tmp/zabbix_agentd.pid
修改为:
PidFile=/var/run/zabbix-agent/zabbix_agentd.pid
将:
LogFile=/tmp/zabbix_agentd.log
修改为:
LogFile=/var/log/zabbix-agent/zabbix_agentd.log
找到:
# EnableRemoteCommands=0
在下面添加:
EnableRemoteCommands=1
找到:
# Timeout=3
在下面添加:
Timeout=10
3)修改自启动文件中的路径
vim /etc/init.d/zabbix_server
将:
progdir="/usr/local/zabbix/bin/"
修改为:
progdir="/usr/local/sbin/"
vim /etc/init.d/zabbix_agentd
将:
progdir="/usr/local/zabbix/bin/"
修改为:
progdir="/usr/local/sbin/"
7、启动zabbix
chkconfig zabbix_server on
chkconfig zabbix_agentd on
chmod +x /etc/init.d/zabbix_server
chmod +x /etc/init.d/zabbix_agentd
service zabbix_server restart
service zabbix_agentd restart
8、配置web前端
cp -r /tmp/zabbix-1.8.11/frontends/php /var/www/html/zabbix
浏览器访问:http://监控机IP/zabbix
网页上部提示:
date(): It is not safe to rely on the system's timezone settings. You are *required* to use the date.timezone setting or the date_default_timezone_set() function.
编辑/etc/php.ini
修改:
date.timezone = PRC
service httpd restart
继续访问http://监控机IP/zabbix
1. Introduction
点击Next。
2. Licence agreement
选择I agree,点击Next。
3. Check of pre-requisites
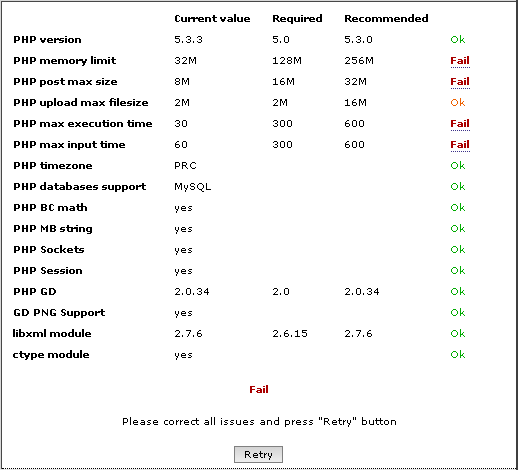
还需要编辑php.ini,将一些配置项修改成Required的值。
vim /etc/php.ini
修改以下几项:
max_execution_time = 300
max_input_time = 300
memory_limit = 128M
post_max_size = 16M
service httpd restart
后面都显示ok后,点击Next。
4. Configure DB connection
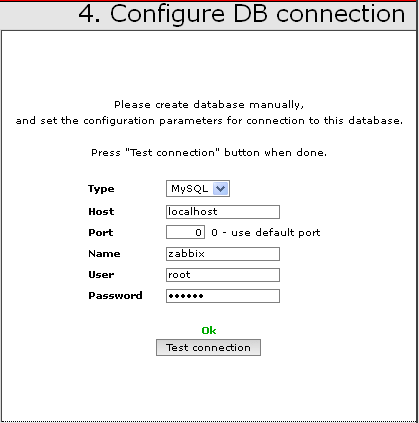
输入mysql用户密码。点击Test connection,显示ok后,点击Next。
5. Zabbix server details
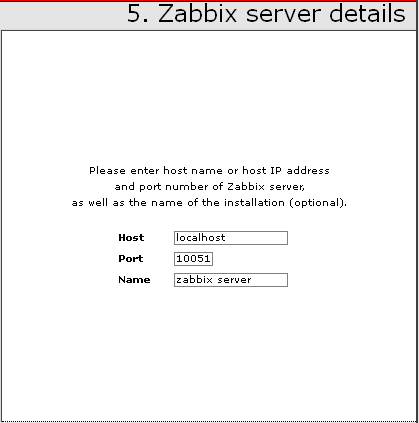
输入host name(选填),点击Next。
6. Pre-Installation summary
确认配置信息,点击Next。
7. Install
提示:Config file does not exist.
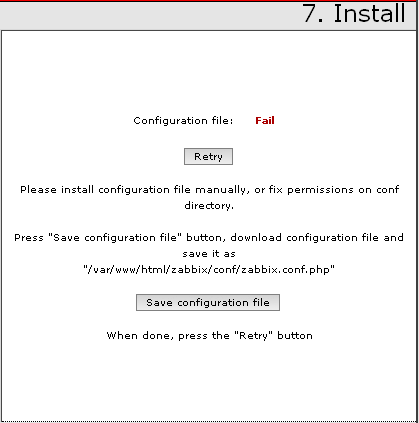
点击Save configuration file,将zabbix.conf.php文件放到/var/www/html/zabbix/conf目录下。
Configuration file: Ok之后点击Next。
8. Finish
点击Finish。
随后进入登陆页面,使用默认用户名admin,密码zabbix登陆。
四、被监控机安装zabbix agent
1、这里安装已编译好的Pre-compiled Zabbix 1.8.5 (stable) agents。
cd /tmp
wget http://www.zabbix.com/downloads/1.8.5/zabbix_agents_1.8.5.linux2_6.i386.tar.gz
tar -zxvf zabbix_agents_1.8.5.linux2_6.i386.tar.gz
mkdir /usr/local/zabbix
mv bin/ /usr/local/zabbix/bin
mv sbin/ /usr/local/zabbix/sbin
2、添加用户和服务端口
adduser zabbix
echo 'zabbix_agent 10050/tcp' >> /etc/services
echo 'zabbix_trap 10051/tcp' >> /etc/services
3、建立配置文件
mkdir /etc/zabbix
mkdir -p /var/log/zabbix-agent
mkdir -p /var/run/zabbix-agent
chown zabbix.zabbix /var/run/zabbix*
chown zabbix.zabbix /var/log/zabbix*
由于预编译的zabbix agent没有zabbix_agnetd.conf文件,从监控机上复制一个过来放到/etc/zabbix目录。
vim /etc/zabbix/zabbix_agnetd.conf
修改Server和Hostname两项:
Server=192.168.1.100 #填监控机IP
Hostname=test
4、启动zabbix agent
/usr/local/zabbix/sbin/zabbix_agentd -c /etc/zabbix/zabbix_agentd.conf &
5、设置zabbix agent自启动
echo '/usr/local/zabbix/sbin/zabbix_agentd -c /etc/zabbix/zabbix_agentd.conf &' >> /etc/rc.local
五、监控机添加主机
1、浏览器访问http://监控机IP/zabbix,输入用户名密码登陆。
选择Configuration - Hosts - Create Host,输入被监控机信息。
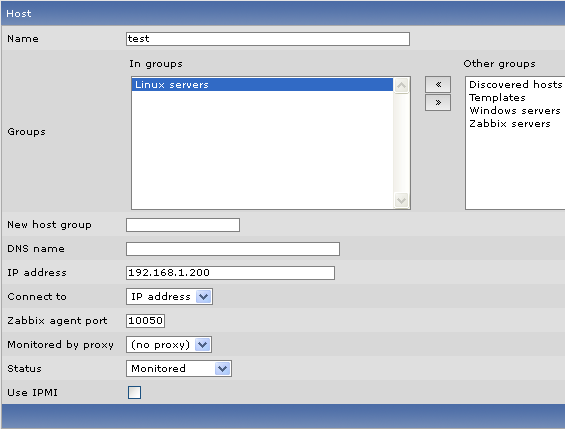
右边Linked templates添加一个模板,模板里预设了很多监控项。

最后点击Save保存。Availability显示一个绿颜色的Z,或者点击Items右边显示Availability: Available说明已经成功连上被监控机。
2、添加图形
Configuration - Hosts - 点击Hosts列表被监控机后面的Graphs项 - 点击右上角Create Graph。填写Name,在下面的Items添加需要画图的项目。
3、其它
zabbix还可以设置Trigger触发器、Actions动作,当Trigger满足条件被触发后执行Actions发出警告。
参考资料:
http://www.zabbix.com/wiki/howto/install/centos/centosinstall
http://os.51cto.com/art/201103/251698.htm
http://cyhow.blog.51cto.com/blog/892355/624187
http://www.zabbix.com/wiki/howto/monitor/os/linux/agentinstallonlinux
zabbix使用:
http://blog.csdn.net/nine_gsf/article/details/6125745
(责任编辑:IT) |


