|
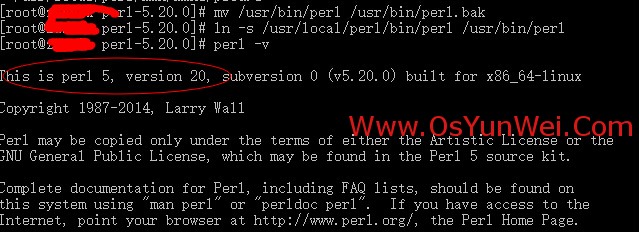
说明: 操作系统:CentOS 6.x web环境:php+nginx+mysql nginx安装目录:/usr/local/nginx nginx配置文件:/usr/local/nginx/conf/nginx.conf nginx默认站点目录:/usr/local/nginx/html/ 需求:让nginx能够解析.cgi后缀的文件 具体操作: 一、安装perl-fcgi依赖包,通过安装perl-fcgi来支持nginx运行.cgi yum install perl-CPAN perl-ExtUtils-CBuilder perl-ExtUtils-MakeMaker 二、安装perl cd /usr/local/src wget http://www.cpan.org/src/5.0/perl-5.20.0.tar.gz #下载安装包,需要提前安装wget工具 tar -xzf perl-5.20.0.tar.gz #解压 cd perl-5.20.0 #进入目录 ./Configure -des -Dprefix=/usr/local/perl #配置 make #编译 make install #安装 mv /usr/bin/perl /usr/bin/perl.bak #备份系统默认的perl ln -s /usr/local/perl/bin/perl /usr/bin/perl #把刚刚安装好的新perl软连接到perl在系统中的默认位置 perl -v #查看perl版本
系统运维 www.osyunwei.com 温馨提醒:qihang01原创内容©版权所有,转载请注明出处及原文链 三、安装perl支持模块 1、安装perl fcgi模块 cd /usr/local/src wget http://www.cpan.org/authors/id/F/FL/FLORA/FCGI-0.74.tar.gz tar zxvf FCGI-0.74.tar.gz cd FCGI-0.74 perl Makefile.PL #配置 make make install 2、安装FCGI-ProcManager模块 cd /usr/local/src wget http://www.cpan.org/authors/id/B/BO/BOBTFISH/FCGI-ProcManager-0.24.tar.gz tar zxvf FCGI-ProcManager-0.24.tar.gz cd FCGI-ProcManager-0.24 perl Makefile.PL make make install 3、安装IO模块 cd /usr/local/src wget http://www.cpan.org/authors/id/G/GB/GBARR/IO-1.25.tar.gz tar zxvf IO-1.25.tar.gz cd IO-1.25 perl Makefile.PL make make install 4、安装IO::ALL模块 cd /usr/local/src wget http://www.cpan.org/authors/id/I/IN/INGY/IO-All-0.79.tar.gz tar zxvf IO-All-0.79.tar.gz cd IO-All-0.79 perl Makefile.PL make make install 四、配置nginx支持.cgi 1、vi /usr/local/nginx/perl-fcgi.pl #编辑,添加以下代码 #!/usr/bin/perl # # author Daniel Dominik Rudnicki # thanks to: Piotr Romanczuk # email daniel@sardzent.org # version 0.4.3 # webpage http://www.nginx.eu/ # # BASED @ http://wiki.codemongers.com/NginxSimpleCGI # # # use strict; use FCGI; use Getopt::Long; use IO::All; use Socket; sub init { GetOptions( "h" => \$help, "verbose!"=>\$verbose, "pid=s" => \$filepid, "l=s" => \$logfile, "S:s" => \$unixsocket, "P:i" => \$unixport) or usage(); usage() if $help; print " Starting Nginx-fcgi\n" if $verbose; print " Running with $> UID" if $verbose; print " Perl $]" if $verbose; if ( $> == "0" ) { print "\n\tERROR\tRunning as a root!\n"; print "\tSuggested not to do so !!!\n\n"; exit 1; } if ( ! $logfile ) { print "\n\tERROR\t log file must declared\n" . "\tuse $0 with option -l filename\n\n"; exit 1; } print " Using log file $logfile\n" if $verbose; "\n\n" >> io($logfile); addlog($logfile, "Starting Nginx-cfgi"); addlog($logfile, "Running with $> UID"); addlog($logfile, "Perl $]"); addlog($logfile, "Testing socket options"); if ( ($unixsocket && $unixport) || (!($unixsocket) && !($unixport)) ) { print "\n\tERROR\tOnly one option can be used!\n"; print "\tSuggested (beacuse of speed) is usage UNIX socket -S \n\n"; exit 1; } if ($unixsocket) { print " Daemon listening at UNIX socket $unixsocket\n" if $versbose; addlog($logfile, "Deamon listening at UNIX socket $unixsocket"); } else { print " Daemon listening at TCP/IP socket *:$unixport\n" if $verbose; # addlog($logfile, "Daemon listening at TCP/IP socket *:$unixport"); } if ( -e $filepid ) { print "\n\tERROR\t PID file $filepid already exists\n\n"; addlog($logfile, "Can not use PID file $filepid, already exists."); exit 1; } if ( $unixsocket ) { print " Creating UNIX socket\n" if $verbose; $socket = FCGI::OpenSocket( $unixsocket, 10 ); if ( !$socket) { print " Couldn't create socket\n"; addlog($logfile, "Couldn't create socket"); exit 1; } print " Using UNIX socket $unixsocket\n" if $verbose; } else { print " Creating TCP/IP socket\n" if $verbose; $portnumber = ":".$unixport; $socket = FCGI::OpenSocket( $unixport, 10 ); if ( !$socket ) { print " Couldn't create socket\n"; addlog($logfile, "Couldn't create socket"); exit 1; } print " Using port $unixport\n" if $verbose; } addlog($logfile, "Socket created"); if ( ! $filepid ) { print "\n\tERROR\t PID file must declared\n" . "\tuse $0 with option -pid filename\n\n"; exit 1; } print " Using PID file $filepid\n" if $verbose; addlog($logfile, "Using PID file $filepid"); my $pidnumber = $$; $pidnumber > io($filepid); print " PID number $$\n" if $verbose; addlog($logfile, "PID number $pidnumber"); } sub addzero { my ($date) = shift; if ($date < 10) { return "0$date"; } return $date; } sub logformat { my ($sec,$min,$hour,$mday,$mon,$year,$wday,$yday,$iddst) = localtime(time); my $datestring; $year += 1900; $mon++; $mon = addzero($mon); $mday = addzero($mday); $min = addzero($min); $datestring = "$year-$mon-$mday $hour:$min"; return($datestring); } sub addlog { my ($log_file, $log_message) = @_; my $curr_time = logformat(); my $write_message = "[$curr_time] $log_message"; $write_message >> io($log_file); "\n" >> io($log_file); } sub printerror { my $message = @_; print "\n Nginx FastCGI\tERROR\n" . "\t $message\n\n"; exit 1; } sub usage { print "\n Nginx FastCGI \n" . "\n\tusage: $0 [-h] -S string -P int\n" . "\n\t-h\t\t: this (help) message" . "\n\t-S path\t\t: path for UNIX socket" . "\n\t-P port\t\t: port number" . "\n\t-p file\t\t: path for pid file" . "\n\t-l file\t\t: path for logfile" . "\n\n\texample: $0 -S /var/run/nginx-perl_cgi.sock -l /var/log/nginx/nginx-cfgi.log -pid /var/run/nginx-fcgi.pid\n\n"; exit 1; } init; # END() { } BEGIN() { } *CORE::GLOBAL::exit = sub { die "fakeexit\nrc=".shift()."\n"; }; eval q{exit}; if ($@) { exit unless $@ =~ /^fakeexit/; } ; # fork part my $pid = fork(); if( $pid == 0 ) { &main; exit 0; } print " Forking worker process with PID $pid\n" if $verbose; addlog($logfile, "Forking worker process with PID $pid"); print " Update PID file $filepid\n" if $verbose; addlog($logfile, "Update PID file $filepid"); $pid > io($filepid); print " Worker process running.\n" if $verbose; addlog ($logfile, "Parent process $$ is exiting"); exit 0; sub main { $request = FCGI::Request( \*STDIN, \*STDOUT, \*STDERR, \%req_params, $socket ); if ($request) { request_loop()}; FCGI::CloseSocket( $socket ); } sub request_loop { while( $request->Accept() >= 0 ) { # processing any STDIN input from WebServer (for CGI-POST actions) $stdin_passthrough = ''; $req_len = 0 + $req_params{'CONTENT_LENGTH'}; if (($req_params{'REQUEST_METHOD'} eq 'POST') && ($req_len != 0) ){ while ($req_len) { $stdin_passthrough .= getc(STDIN); $req_len--; } } # running the cgi app if ( (-x $req_params{SCRIPT_FILENAME}) && (-s $req_params{SCRIPT_FILENAME}) && (-r $req_params{SCRIPT_FILENAME}) ){ foreach $key ( keys %req_params){ $ENV{$key} = $req_params{$key}; } if ( $verbose ) { addlog($logfile, "running $req_params{SCRIPT_FILENAME}"); } # http://perldoc.perl.org/perlipc.html#Safe-Pipe-Opens # open $cgi_app, '-|', $req_params{SCRIPT_FILENAME}, $stdin_passthrough or print("Content-type: text/plain\r\n\r\n"); print "Error: CGI app returned no output - Executing $req_params{SCRIPT_FILENAME} failed !\n"; # addlog($logfile, "Error: CGI app returned no output - Executing $req_params{SCRIPT_FILENAME} failed !"); if ($cgi_app) { print <$cgi_app>; close $cgi_app; } } else { print("Content-type: text/plain\r\n\r\n"); print "Error: No such CGI app - $req_params{SCRIPT_FILENAME} may not exist or is not executable by this process.\n"; addlog($logfile, "Error: No such CGI app - $req_params{SCRIPT_FILENAME} may not exist or is not executable by this process."); } } } ################################################ :wq! #保存退出 chmod 755 /usr/local/nginx/perl-fcgi.pl #添加脚本执行权限 备注:以上代码在拷贝的时候注意格式,否则出错。 perl-fcgi下载 2、vi /usr/local/nginx/start_perl_cgi.sh #编辑,添加以下代码,注意,这里nginx运行账户为www组的www用户 ################################################ #!/bin/bash #set -x dir=/usr/local/nginx stop () { #pkill -f $dir/perl-fcgi.pl kill $(cat $dir/logs/perl-fcgi.pid) rm $dir/logs/perl-fcgi.pid 2>/dev/null rm $dir/logs/perl-fcgi.sock 2>/dev/null echo "stop perl-fcgi done" } start () { rm $dir/now_start_perl_fcgi.sh 2>/dev/null chown www.www $dir/logs echo "$dir/perl-fcgi.pl -l $dir/logs/perl-fcgi.log -pid $dir/logs/perl-fcgi.pid -S $dir/logs/perl-fcgi.sock" >>$dir/now_start_perl_fcgi.sh chown www.www $dir/now_start_perl_fcgi.sh chmod u+x $dir/now_start_perl_fcgi.sh sudo -u www $dir/now_start_perl_fcgi.sh echo "start perl-fcgi done" } case $1 in stop) stop ;; start) start ;; restart) stop start ;; esac ################################################ :wq! #保存退出 chmod 755 /usr/local/nginx/start_perl_cgi.sh #添加脚本执行权限 /usr/local/nginx/start_perl_cgi.sh start #启动perl_cgi cd /usr/local/nginx/logs #查看此目录下是否已生成perl-fcgi.sock文件
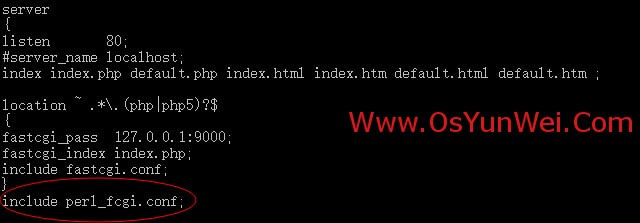
系统运维 www.osyunwei.com 温馨提醒:qihang01原创内容©版权所有,转载请注明出处及原文链 #如果没有生成此文件,请检查以上步骤,直到有这个文件,才能继续下面的操作。 3、添加perl_fcgi.conf文件 cd /usr/local/nginx/conf vi perl_fcgi.conf #编辑,添加以下代码 location ~ .*\.(pl|cgi)?$ { gzip off; fastcgi_pass unix:/usr/local/nginx/logs/perl-fcgi.sock; fastcgi_index index.cgi; fastcgi_param GATEWAY_INTERFACE CGI/1.1; fastcgi_param SERVER_SOFTWARE nginx; fastcgi_param QUERY_STRING $query_string; fastcgi_param REQUEST_METHOD $request_method; fastcgi_param CONTENT_TYPE $content_type; fastcgi_param CONTENT_LENGTH $content_length; fastcgi_param SCRIPT_FILENAME $document_root$fastcgi_script_name; fastcgi_param SCRIPT_NAME $fastcgi_script_name; fastcgi_param REQUEST_URI $request_uri; fastcgi_param DOCUMENT_URI $document_uri; fastcgi_param DOCUMENT_ROOT $document_root; fastcgi_param SERVER_PROTOCOL $server_protocol; fastcgi_param REMOTE_ADDR $remote_addr; fastcgi_param REMOTE_PORT $remote_port; fastcgi_param SERVER_ADDR $server_addr; fastcgi_param SERVER_PORT $server_port; fastcgi_param SERVER_NAME $server_name; fastcgi_read_timeout 60; } :wq! #保存退出 4、修改nginx配置文件/usr/local/nginx/conf/nginx.conf cp /usr/local/nginx/conf/nginx.conf /usr/local/nginx/conf/nginx.conf-bak #备份原文件 vi /usr/local/nginx/conf/nginx.conf #编辑修改,在server段添加include perlfcgi.conf;
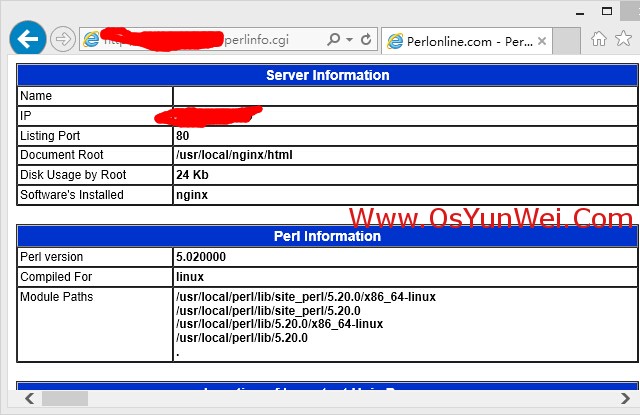
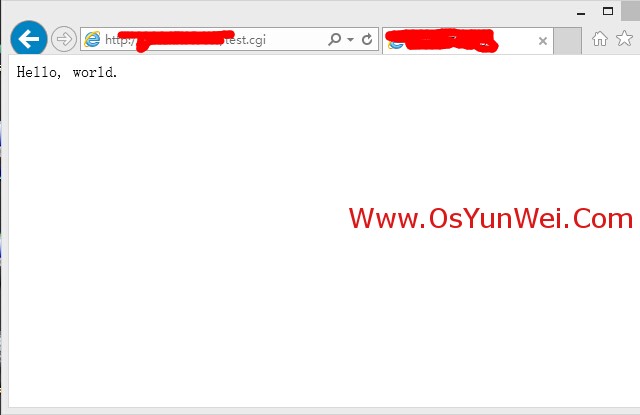
server { listen 80; #server_name localhost; index index.php default.php index.html index.htm default.html default.htm ; location ~ .*\.(php|php5)?$ { fastcgi_pass 127.0.0.1:9000; fastcgi_index index.php; include fastcgi.conf; } include perl_fcgi.conf; :wq! #保存退出 五、测试nginx支持.cgi 1、vi /usr/local/nginx/html/perlinfo.cgi #编辑,添加以下代码 ######################################## #!/usr/bin/perl print "Content-type: text/html\n\n"; #Location of Perl $output = `whereis perl`; @locations = split(" ",$output); foreach $line (@locations) { $whereperl .= "$line<br>"; } #Location of Sendmail $output = `whereis sendmail`; @locations = split(" ",$output); foreach $line (@locations) { $wheresendmail .= "$line<br>"; } #Location of Current Directory $currentdirectory = `pwd`; #Perl Variables $perlversion = $]; #Perl Os $perlos = $^O; #Module Paths foreach $line (@INC) { $modulepaths .= "$line<br>"; } #Environment Variables $environment = qq~ <table width="100%" border="1" cellspacing="0" cellpadding="2" bordercolor="#000000"> <tr> <td colspan="2" bgcolor="#0033CC"> <div align="center" class="tabletitle">Environment Variables</div> </td> </tr> ~; @allkeys = keys(%ENV); foreach $key (@allkeys) { $value = $ENV{$key}; if ($value eq "") {$value = "-";} $environment .= qq~ <tr> <td width="150" class="tableitems">$key</td> <td class="tablevalue">$value</td> </tr> ~; } $environment .= qq~ </table> ~; $documentroot = $ENV{'DOCUMENT_ROOT'}; if ($documentroot ne "") { @lines = `du -c -k $documentroot`; $lastline = @lines-1; ($diskusage) = split/[\t| ]/,$lines[$lastline]; } #Server Software $serverip = $ENV{'SERVER_ADDR'}; $servername = $ENV{'SERVER_NAME'}; $serverport = $ENV{'SERVER_PORT'}; $serversoftware = $ENV{'SERVER_SOFTWARE'}; $serveruptime =`uptime`; #Localtime ($sec,$min,$hour,$mday,$mon,$year,$wday,$yday,$isdst) = localtime(time); @months = ("Jan","Feb","Mar","Apr","May","Jun","Jul","Aug","Sep","Oct","Nov","Dec"); $date = sprintf("%02d-%s-%04d",$mday,$months[$mon],$year+1900); $time = sprintf("%02d:%02d:%02d",$hour,$min,$sec); $localtime = "$date, $time"; #GMTtime ($sec,$min,$hour,$mday,$mon,$year,$wday,$yday,$isdst) = gmtime(time); @months = ("Jan","Feb","Mar","Apr","May","Jun","Jul","Aug","Sep","Oct","Nov","Dec"); $date = sprintf("%02d-%s-%04d",$mday,$months[$mon],$year+1900); $time = sprintf("%02d:%02d:%02d",$hour,$min,$sec); $gmttime = "$date, $time"; print qq~ <html> <head> <title>Perlonline.com - Perlinfo.cgi</title> <meta http-equiv="Content-Type" content="text/html; charset=iso-8859-1"> <style type="text/css"> <!-- .tabletitle { font-family: Arial, Helvetica, sans-serif; font-size: 14px; font-weight: bold; background-position: center; color: #FFFFFF} .tableitems { font-family: Arial, Helvetica, sans-serif; font-size: 12px} .tablevalue { font-family: Arial, Helvetica, sans-serif; font-size: 12px; font-weight: bolder} --> </style> </head> <body bgcolor="#FFFFFF" text="#000000"> <table width="100%" border="1" cellpadding="2" cellspacing="0" bordercolor="#000000"> <tr bgcolor="#0033CC"> <td colspan="2" class="tabletitle"> <div align="center">Server Information</div> </td> </tr> <tr> <td class="tableitems" width="150" valign="top">Name</td> <td class="tablevalue">$servername</td> </tr> <tr> <td class="tableitems" width="150" valign="top">IP</td> <td class="tablevalue">$serverip</td> </tr> <tr> <td class="tableitems" width="150" valign="top">Listing Port</td> <td class="tablevalue">$serverport</td> </tr> <tr> <td class="tableitems" width="150" valign="top">Document Root</td> <td class="tablevalue">$documentroot</td> </tr> <tr> <td class="tableitems" width="150" valign="top">Disk Usage by Root</td> <td class="tablevalue">$diskusage Kb</td> </tr> <tr> <td class="tableitems" width="150" valign="top">Software's Installed</td> <td class="tablevalue">$serversoftware</td> </tr> </table> <br> <table width="100%" border="1" cellspacing="0" cellpadding="2" bordercolor="#000000"> <tr bgcolor="#0033CC"> <td colspan="2" class="tabletitle"> <div align="center">Perl Information</div> </td> </tr> <tr> <td class="tableitems" width="150" valign="top">Perl version</td> <td class="tablevalue">$perlversion</td> </tr> <tr> <td class="tableitems" width="150" valign="top">Compiled For</td> <td class="tablevalue">$perlos</td> </tr> <tr> <td class="tableitems" width="150" valign="top">Module Paths</td> <td class="tablevalue">$modulepaths</td> </tr> </table> <br> <table width="100%" border="1" bordercolor="#000000" cellpadding="2" cellspacing="0"> <tr bgcolor="#0033CC"> <td colspan="2" class="tabletitle"> <div align="center">Location of Important Unix Programs</div> </td> </tr> <tr> <td class="tableitems" width="150" valign="top">Perl</td> <td class="tablevalue">$whereperl</td> </tr> <tr> <td class="tableitems" width="150" valign="top">Sendmail</td> <td class="tablevalue">$wheresendmail</td> </tr> </table> <br> <table width="100%" border="1" cellspacing="0" cellpadding="2" bordercolor="#000000"> <tr bgcolor="#0033CC"> <td colspan="2" class="tabletitle"> <div align="center">Time</div> </td> </tr> <tr> <td class="tableitems" width="150" valign="top">Server Time (Local)</td> <td class="tablevalue">$localtime</td> </tr> <tr> <td class="tableitems" width="150" valign="top">Server Time (GMT)</td> <td class="tablevalue">$gmttime</td> </tr> </table> <br> $environment <p align="center" class="tablevalue"> </p> <p align="center" class="tablevalue">All rights Reserved 2001. <a href="http://www.perlonline.biz">Perlonline.biz</a></p> </body> </html> ~; ######################################## :wq! #保存退出 perlinfo下载 2、vi /usr/local/nginx/html/test.cgi #编辑,添加以下代码 #!/usr/bin/perl print "Content-type: text/html\n\n"; print "<html><body>Hello, world.</body></html>"; :wq! #保存退出 chown www.www -R /usr/local/nginx/html/ chmod 744 -R /usr/local/nginx/html/perlinfo.cgi chmod 744 -R /usr/local/nginx/html/test.cgi 在浏览器中打开以上2个测试页面,如下图所示:
至此,Linux下配置nginx支持.cig教程完成。 扩展阅读: Linux下安装Bugzilla 一、下载Bugzilla http://ftp.mozilla.org/pub/mozilla.org/webtools/archived/bugzilla-3.4.6.tar.gz http://ftp.mozilla.org/pub/mozilla.org/webtools/bugzilla-4.4.5.tar.gz 解压Bugzilla到nginx站点根目录 二、创建数据库 mysql -u root -p create database bugs; #创建数据库 insert into mysql.user(Host,User,Password) values('localhost','bugs',password('bugs')); #新建账户bugs,密码bugs flush privileges; #刷新系统授权表 grant all on bugs.* to 'bugs'@'localhost' identified by 'bugs' with grant option; flush privileges; #刷新系统授权表 三、安装Bugzilla perl -MCPAN -e shell #设置参数,设置cpan镜像,cpan会让你设置参数 一直按回车 到最后输入一个cpan的镜像就好了,选择中科大的源, 进入到Bugzilla文件根目录 ./checksetup.pl --check-modules #检查模块 /usr/bin/perl install-module.pl DateTime #安装模块 /usr/bin/perl install-module.pl List::MoreUtils /usr/bin/perl install-module.pl DateTime::Locale yum install mysql-devel #安装mysql数据库驱动,根据提示安装相应的模块,直到检查全部通过。 ./checksetup.pl #根据提示安装输入管理员邮箱、账号密码等信息 提示:bugzilla-3.4.6需要再CentOS5.x下安装,CentOS6.x安装会出错。 (责任编辑:IT) |


