|
Nginx反向代理设置
背景:
1.美国团队开发的web程序部署在一台服务器上,老旧的GlassFish2.x,还是windows,以下称App1。
2.我们新开发的web程序部署在另一台服务器上,Ubuntu12.04 server,新版本的GlassFish3.x,以下称App2。
www.2cto.com
问题:
要想办法把这两个程序伪装成一个站点,这样可以解决两个问题:
1.认证问题,浏览器先从App1登陆,保存cookie。然后再访问App2的时候,会将cookie发过来,App2通过解析cookie内的token,来进行用户身份认证,如果无token,或者无cookie,自动转向App1要求登陆。否则拿到token后,通过server端调用App1的验证API来检查该用户session是否过期。
2.同时支持HTTP/HTTPS,因为登陆等敏感请求需要加密。
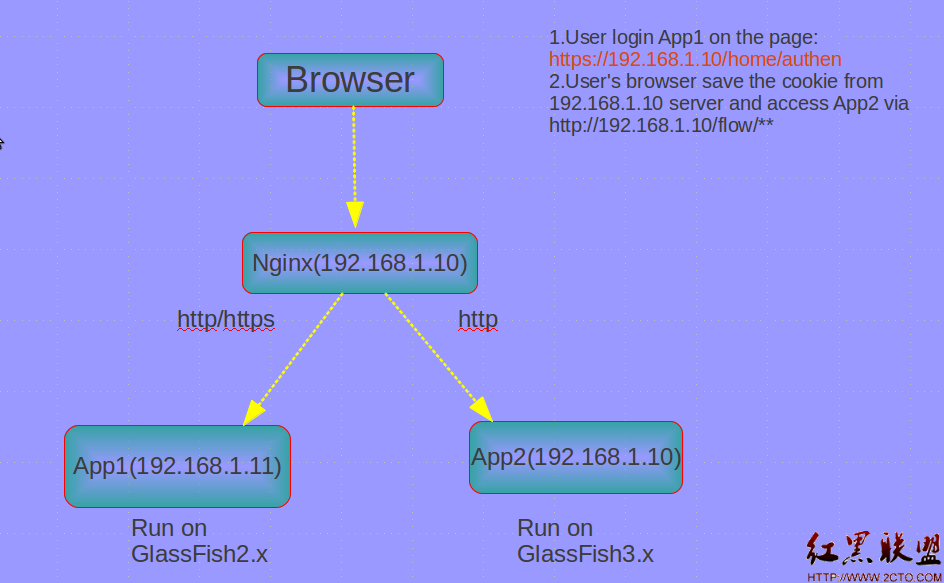
来一张图,对理解我的话比较有帮助:

如何配置呢,将配置写在一个独立的conf文件里面,包括两部分,一部分配置HTTP.
[plain]
server {
listen 80;
server_name 192.168.1.10;
access_log /opt/agol_http.log my_log;
location ^~ /home {
proxy_pass http://192.168.1.11;
proxy_set_header Host $host;
proxy_set_header X-Forwarded-For $proxy_add_x_forwarded_for;
}
www.2cto.com
location ^~ /sharing {
proxy_pass http://192.168.1.11;
proxy_set_header Host $host;
proxy_set_header X-Forwarded-For $proxy_add_x_forwarded_for;
}
location /geoflow {
proxy_pass http://192.168.1.10:8081/flow;
proxy_set_header Host $host;
proxy_set_header X-Forwarded-For $proxy_add_x_forwarded_for;
}
[plain]
}
HTTPS也单独配置一个Server
[plain]
# HTTPS server
server {
listen 443 ssl;
ssl_certificate /usr/nginx/conf/server.crt;
ssl_certificate_key /usr/nginx/conf/server.key;
server_name 10.112.18.178;
access_log /opt/agol_https.log my_log;
location / { www.2cto.com
proxy_pass https://192.168.1.11;
proxy_set_header Host $host;
proxy_set_header X-Forwarded-For $proxy_add_x_forwarded_for;
}
}
这样Nginx看到如果是HTTPS请求,全部转向App1。如果是HTTP请求,则要看URL,根据不同的location,决定转向不同的应用。这个具体情况灵活配置了。
最后在nginx.conf的http设置里面加上
include agol.conf;
即可。
(责任编辑:IT) |
