|
ngx_cache_purge 是 nginx 的第三方那个模块,用于清除 FastCGI, proxy, SCGI and uWSGI 缓存,nginx默认安装就会带有反向代理的功能,但想要更好的使用,还得配备frickle.com的ngx_cache_purge模块,用于清除指定URL的缓存。 proxy_cache和fastcgi_cache构成了Nginx的缓存,proxy_cache主要用于反向代理时,对后端内容源服务器进行缓存,fastcgi_cache主要用于对FastCGI的动态程序进行缓存。两者的功能基本上一样。
官方网站:http://labs.frickle.com/nginx_ngx_cache_purge/
github:https://github.com/FRiCKLE/ngx_cache_purge/
1、下载ngx_cache_purge-2.2 ,解压,得到路径
wget -c http://labs.frickle.com/files/ngx_cache_purge-2.2.tar.gz
tar zxvf ngx_cache_purge-2.2.tar.gz
cd ngx_cache_purge-2.2
pwd
/usr/local/src/ngx_cache_purge-2.2
2、查看已经安装好nginx的编译参数(找到二进制文件nginx -V) [root@localhost ~]# /usr/local/nginx/sbin/nginx -V nginx version: nginx/1.7.8 built by gcc 4.8.2 20140120 (Red Hat 4.8.2-16) (GCC) TLS SNI support enabled configure arguments: --user=www --group=www --prefix=/usr/local/nginx --with-http_stub_status_module --with-http_ssl_module --with-http_gzip_static_module 3、进入原nginx解压的安装包目录下运行上面查询到的编译参数,并且使用–add-module=模块的路径 添加模块
cd /usr/local/src/nginx-1.7.8
./configure --user=www --group=www --prefix=/usr/local/nginx --with-http_stub_status_module --with-http_ssl_module --with-http_gzip_static_module --add-module=/usr/local/src/ngx_cache_purge-2.2
make && make install
4、验证刚才添加的第三方模块ngx_cache_purge 是否安装成功
[root@localhost nginx-1.7.8]# /usr/local/nginx/sbin/nginx -V
nginx version: nginx/1.7.8
built by gcc 4.8.2 20140120 (Red Hat 4.8.2-16) (GCC)
TLS SNI support enabled
configure arguments: --user=www --group=www --prefix=/usr/local/nginx --with-http_stub_status_module --with-http_ssl_module --with-http_gzip_static_module --add-module=/root/ngx_cache_purge-2.2
5、最基本的配置:清除反向代理的缓存。
    http {
        proxy_cache_path  /tmp/cache  keys_zone=tmpcache:10m;

        server {
            location / {
                #反向代理某后端服务器
                proxy_pass         http://127.0.0.1:8000;
                #设置一个缓存区域的名称,一个相同的区域可以在不同的地方使用。
                proxy_cache        tmpcache;
                #指令指定了包含在缓存中的缓存关键字。
                proxy_cache_key    $uri$is_args$args;
            }
            #仅允许本地网络清理缓存
            location ~ /purge(/.*) {
                allow              127.0.0.1;
                deny               all;
                proxy_cache_purge  tmpcache $1$is_args$args;
            }
        }
    }
6、生产环境下的proxy_cache缓存与清除配置
user www www;
worker_processes 8;
worker_cpu_affinity 00000001 00000010 00000100 00001000 00010000 00100000 01000000 10000000;
 /usr/local/nginx/logs/nginx.pid;
worker_rlimit_nofile 65535;

events {

 use epoll;
 worker_connections 65535;

 }

http {

 include mime.types;
 default_type application/octet-stream;
 charset utf-8;
 server_names_hash_bucket_size 128;
 client_header_buffer_size 32k;
 large_client_header_buffers 4 32k;
 client_max_body_size 300m;

 sendfile on;
 tcp_nopush on;
 keepalive_timeout 60;
 tcp_nodelay on;
 client_body_buffer_size 512k;

 proxy_connect_timeout 5;
 proxy_read_timeout 60;
 proxy_send_timeout 5;
 proxy_buffer_size 16k;
 proxy_buffers 4 64k;
 proxy_busy_buffers_size 128k;
 proxy_temp_file_write_size 128k;

 gzip on;
 gzip_min_length 1k;
 gzip_buffers 4 16k;
 gzip_http_version 1.0;
 gzip_comp_level 2;
 gzip_vary on;
 gzip_types text/plain text/css image/png image/gif image/jpeg application/x-javascript text/xml application/xml application/xml+rss text/javascript image/x-icon;
 gzip_proxied expired no-cache no-store private auth;
 gzip_disable "MSIE [1-6]\.";

 log_format main '$remote_addr – $remote_user [$time_local] "$request" '
 '$status $body_bytes_sent "$http_referer" '
 '"$http_user_agent" "$http_x_forwarded_for"'
 '"$upstream_cache_status"';

 #proxy_temp_path和proxy_cache_path指定的路径必须在同一分区,因为它们之间是硬链接的关系
 proxy_temp_path /var/cache/nginx/proxy_temp_dir;
 #设置Web缓存区名称为cache_one,内存缓存空间大小为200MB,1天没有被访问的内容自动清除,硬盘缓存空间大小为30GB。
 proxy_cache_path /var/cache/nginx/proxy_cache_dir levels=1:2 keys_zone=cache_one:200m inactive=1d max_size=30g;

 #后端请求服务器
 upstream backend_server {

 server http://back01.test.com weight=1 max_fails=2 fail_timeout=30s;
 server http://back02.test.com weight=1 max_fails=2 fail_timeout=30s;

 }
 server {

 listen 80;
 server_name www.test.com;
 index index.html index.htm;
 root /usr/share/wwwroot/;

 #设置proxy_cache缓存
 location / {

 #如果后端的服务器返回502、504、执行超时等错误,自动将请求转发到upstream负载均衡池中的另一台服务器,实现故障转移。
 proxy_next_upstream http_502 http_504 error timeout invalid_header;
 proxy_redirect off;
 #缓存 cache_one
 proxy_cache cache_one;
 #正常状态缓存时间12小时
 proxy_cache_valid 200 304 12h;
 #以域名、URI、参数组合成Web缓存的Key值,Nginx根据Key值哈希,存储缓存内容到二级缓存目录内
 proxy_cache_key $host$uri$is_args$args;
 proxy_set_header Host $host;
 proxy_set_header X-Forwarded-For $remote_addr;
 proxy_pass http://backend_server;
 add_header X-Cache '$upstream_cache_status from $host';
 #默认10天缓存
 expires 10d;

 }

 #用于清除缓存,假设一个URL为http://www.test.com/test.txt,通过访问http://www.test.com/purge/test.txt就可以清除该URL的缓存。
 location ~ /purge(/.*) {

 #设置访问purge路径的权限的账号和密码。
 auth_basic "TDT Center CACHE Center";
 auth_basic_user_file /tmp/htpasswd;
 #设置只允许指定的IP或IP段才可以清除URL缓存。
 allow 127.0.0.1;
 allow 192.168.5.0/24;
 deny all;
 proxy_cache_purge cache_one $host$1$is_args$args;

 }

 #扩展名以.php、.jsp、.cgi结尾的动态应用程序不缓存。
 location ~ .*\.(php|jsp|cgi)?$ {
 proxy_set_header Host $host;
 proxy_set_header X-Forwarded-For $remote_addr;
 proxy_pass http://backend_server;
 log_not_found off;
 }

 access_log /usr/local/nginx/logs/access.log main;

 }

}
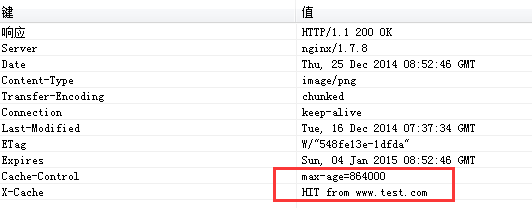
访问网站目录下一张图片可以看到header信息:
关于详细的Nginx的proxy cache 模块详细官方文档解释:
http://nginx.org/cn/docs/http/ngx_http_proxy_module.html
6、使用fastcgi_cache缓存
#在http层加入
#15m为内存占用 1g为硬盘最大占用空间
fastcgi_cache_path /home/cache/fcgi levels=1:2 keys_zone=fcgi:15m inactive=1d max_size=1g;
在location层加入
location ~ [^/]\.php(/|$) {
 fastcgi_pass 127.0.0.1:9000;
 fastcgi_index index.php;
 include fastcgi_params;
 fastcgi_cache fcgi; #表示开启FastCGI缓存并为其指定一个名称。
 fastcgi_cache_valid 200 302 301 1h; #缓存http状态200 302 301 1小时
 fastcgi_cache_valid any 1m; #其他应答代码缓存1分钟。
 fastcgi_cache_min_uses 1; #设置链接请求几次就被缓存。
 fastcgi_cache_use_stale error timeout invalid_header http_500; #定义哪些情况下用过期缓存
 fastcgi_cache_key $request_method://$host$request_uri;
 #注意一定要加上$request_method作为cache key,否则如果HEAD类型的先请求会导致后面的GET请求返回为空
}

location ~ /purge(/.*) {
 #设置访问purge路径的权限的账号和密码。
 auth_basic "TDT Center CACHE Center";
 auth_basic_user_file /tmp/htpasswd;
 #设置只允许指定的IP或IP段才可以清除URL缓存。
 allow 127.0.0.1;
 allow 192.168.5.0/24;
 deny all;
 proxy_cache_purge fcgi $host$1$is_args$args;
}
(责任编辑:IT) |

