|
通过本章你将学会利用Nginx配置多台虚拟主机,清楚代理服务器的作用,区分正向代理和反向代理的区别,搭建使用Nginx反向搭理和负载均衡,了解Nginx常用配置的说明。即学即用,你还在等什么?一睹为快先了解Nginx的三大功能
效果图:包含基于ip的虚拟主机测试,基于域名的虚拟主机测试,反向代理和负载均衡的测试 配置多台虚拟主机
虚拟主机是一种特殊的软硬件技术,它可以将网络上的每一台计算机分成多个虚拟主机,每个虚拟主机都可以独立对外提供www服务。从而实现一台主机能对外提供多个web服务,而且每个虚拟主机之间是互不影响的。 基于ip的虚拟主机
[root@itdragon ~]# cd /etc/sysconfig/network-scripts/
[root@itdragon network-scripts]# ip addr
1: lo: <LOOPBACK,UP,LOWER_UP> mtu 65536 qdisc noqueue state UNKNOWN qlen 1
2: ens33: <BROADCAST,MULTICAST,UP,LOWER_UP> mtu 1500 qdisc pfifo_fast state UP qlen 1000
    inet 192.168.225.131/24 brd 192.168.225.255 scope global dynamic ens33
[root@itdragon network-scripts]# vim ifcfg-ens33
# 添加
IPADDR1="192.168.225.132"
IPADDR2="192.168.225.133"
[root@itdragon network-scripts]# systemctl restart network
[root@itdragon network-scripts]# ip addr
2: ens33: <BROADCAST,MULTICAST,UP,LOWER_UP> mtu 1500 qdisc pfifo_fast state UP qlen 1000
    inet 192.168.225.131/24 brd 192.168.225.255 scope global dynamic ens33
    inet 192.168.225.132/24 brd 192.168.225.255 scope global secondary ens33
    inet 192.168.225.133/24 brd 192.168.225.255 scope global secondary ens33
[root@itdragon ~]# cd /usr/local/nginx
[root@itdragon nginx]# cp -r html/ html-131/
[root@itdragon nginx]# cp -r html/ html-132/
[root@itdragon nginx]# cp -r html/ html-133/
[root@itdragon nginx]# vim html-131/index.html
[root@itdragon nginx]# vim html-132/index.html
[root@itdragon nginx]# vim html-133/index.html
[root@itdragon nginx]# vim conf/nginx.conf
# 添加
server {
    listen       80;
    server_name  192.168.225.132;
    location / {
       root   html-132;
       index  index.html index.htm;
    }
}
server {
    listen       80;
    server_name  192.168.225.133;
    location / {
       root   html-133;
       index  index.html index.htm;
    }
}
[root@itdragon nginx]# sbin/nginx -s reload
第一步:执行命令ip addr 打印协议地址,得知网卡名是ens33,ip地址是192.168.225.131 基于端口的虚拟主机和基于ip的虚拟主机配置几乎一样,只是在修改Nginx配置文件时,只修改监听的端口和root对应的目录,其他的没有变。这里就不贴命令了。 基于域名的虚拟主机这是Nginx比较常用的配置,也是有利于人类使用的配置方式。这里通过修改window系统下的host文件来模拟DNS服务器。
# Windows
C:\Windows\System32\drivers\etc\hosts文件
# nginx 域名配置虚拟主机
192.168.225.131 www.itdragon.com
192.168.225.131 picture.itdragon.com
192.168.225.131 search.itdragon.com

# CentOS
[root@itdragon nginx]# cp -r html/ html-search
[root@itdragon nginx]# cp -r html/ html-picture
[root@itdragon nginx]# vim html-search/index.html
[root@itdragon nginx]# vim html-picture/index.html
[root@itdragon nginx]# vim conf/nginx.conf
server {
    listen       80;
    server_name  search.itdragon.com;
    location / {
       root   html-search;
       index  index.html index.htm;
    }
}
server {
    listen       80;
    server_name  picture.itdragon.com;
    location / {
       root   html-picture;
       index  index.html index.htm;
    }
}
[root@itdragon nginx]# sbin/nginx -s reload
第一步:在window环境中,修改host文件,添加ip 域名映射关系,用来模拟DNS服务器 Nginx 反向代理
在了解Nginx 反向代理之前,我们先熟悉一下什么是代理服务器
清楚了代理服务器后,我们再来了解正向代理和反向代理的区别 现在开始配置Nginx的反向代理
[root@itdragon ~]# vim /usr/local/solr/tomcat1/webapps/ROOT/index.jsp
[root@itdragon ~]# vim /usr/local/solr/tomcat2/webapps/ROOT/index.jsp
[root@itdragon ~]# cd /usr/local/nginx
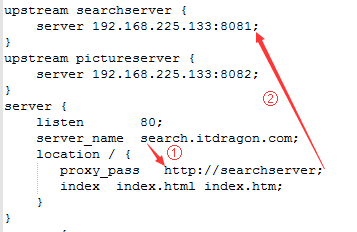
[root@itdragon nginx]# vim conf/nginx.conf
upstream searchserver {
server 192.168.225.133:8081;
}
upstream pictureserver {
server 192.168.225.133:8082;
}
server {
listen 80;
server_name search.itdragon.com;
location / {
proxy_pass http://searchserver;
index index.html index.htm;
}
}
server {
listen 80;
server_name picture.itdragon.com;
location / {
proxy_pass http://pictureserver;
index index.html index.htm;
}
}
[root@itdragon nginx]# sbin/nginx -s reload
第一步:准备两个tomcat服务器,端口分别是8081和8082,并分别修改index.jsp 文件便于区分测试
反向代理流程 Nginx 负载均衡负载均衡 在高性能的主机上分配更多的负载,在性能低的主机分配少一些的负载,充分利用主机的性能,将其服务器的总压力。Nginx的 upstream默认是以轮询的方式实现负载均衡,也可以分配权值。
[root@itdragon ~]# vim /usr/local/solr/tomcat3/webapps/ROOT/index.jsp
[root@itdragon ~]# vim /usr/local/solr/tomcat4/webapps/ROOT/index.jsp
[root@itdragon ~]# cd /usr/local/nginx
[root@itdragon nginx]# vim conf/nginx.conf
upstream pictureserver {
    server 192.168.225.133:8082 weight=2;
    server 192.168.225.133:8083 weight=1;
    server 192.168.225.133:8084 weight=1;
}
[root@itdragon nginx]# sbin/nginx -s reload
第一步:新增两个tomcat服务器,端口分别为8083和8084,并分别修改index.jsp 文件便于区分测试 常用配置说明
events {                                        # 工作模式
    worker_connections  1024;                   # 最大连接数
}
http {                                          # 配置http服务器
    include       mime.types;                   # 定义mime的文件类型
    default_type  application/octet-stream;     # 默认文件类型
    sendfile        on;                         # 开启 sendfile 函数(zero copy 方式)输出文件
    keepalive_timeout  65;                      # 连接超时时间,单位秒

    upstream pictureserver {                    # 定义负载均衡设备的ip和状态
        server 192.168.225.133:8081 ;           # 默认权重值为一
        server 192.168.225.133:8082 weight=2;   # 值越高,负载的权重越高
        server 192.168.225.133:8083 down;       # 当前server 暂时不参与负载
        server 192.168.225.133:8084 backup;     # 当其他非backup状态的server 不能正常工作时,才请求该server,简称热备
    }
    server {                                    # 设定虚拟主机配置
        listen  80;                             # 监听的端口
        server_name  picture.itdragon.com;      # 监听的地址,多个域名用空格隔开
        location / {                            # 默认请求 ,后面 "/" 表示开启反向代理,也可以是正则表达式
           root     html;                       # 监听地址的默认网站根目录位置
           proxy_pass   http://pictureserver;   # 代理转发
           index  index.html index.htm;         # 欢迎页面
           deny 127.0.0.1;                      # 拒绝的ip
           allow 192.168.225.133;               # 允许的ip
        }
        error_page   500 502 503 504  /50x.html;# 定义错误提示页面
        location = /50x.html {                  # 配置错误提示页面
            root   html;
        }
    }
具体配置详情可以参考:http://blog.csdn.net/happydream_c/article/details/54943802 总结
1 Nginx 通过修改nginx.conf server_name配置,达到配置多台基于ip,基于域名的虚拟主机 到这里Nginx的多虚拟主机,反向代理和负载均衡就结束了 (责任编辑:IT) |