当前位置: > Linux服务器 > SVN >

Linux下的SVN环境安装与配置(Apache2.2.19 + Subversion1.6.17

时间:2014-10-07 17:25来源:linux.it.net.cn 作者:it

1. 安装准备

apache2.2.19:http://labs.renren.com/apache-mirror//httpd/httpd-2.2.19.tar.gz

subversion1.6.17:http://subversion.tigris.org/downloads/subversion-1.6.17.tar.gz

subversion-deps1.6.17:http://subversion.tigris.org/downloads/subversion-deps-1.6.17.tar.gz

apr:http://mirror.bjtu.edu.cn/apache//apr/apr-1.4.5.tar.gz

apr-util:http://mirror.bjtu.edu.cn/apache//apr/apr-util-1.3.12.tar.gz

sqlite-amalgamation-3.7.3:http://www.sqlite.org/sqlite-amalgamation-3.7.3.tar.gz

2.安装编译环境

1
yum -y install gcc openssl-devel expat-devel openssl-devel libxml2-devel

3.编译安装软件

1).安装apr

1
2
3
4
5
tar zxvf apr-1.4.5.tar.gz
cd apr-1.4.5
./configure
make
make install

2).安装apr-util

1
2
3
4
5
tar zxvf apr-util-1.3.12.tar.gz
cd apr-util-1.3.12
./configure --with-apr=/usr/local/apr
make
make install

3).安装 apache

1
2
3
4
5
tar zxvf httpd-2.2.19.tar.gz
cd httpd-2.2.19
./configure --prefix=/usr/local/apache2 -enable-dav -enable-so -enable-ssl -enable-maintainer-mode -enable-rewrite --with-apr=/usr/local/apr/bin/apr-1-config --with-apr-util=/usr/local/apr/bin/apu-1-config
make
make install

4).安装subversion

1
2
3
4
5
6
tar zxvf subversion-1.6.17.tar.gz
tar zxvf subversion-deps-1.6.17.tar.gz
cd subversion-1.6.17
./configure --prefix=/usr/local/subversion --with-apxs=/usr/local/apache2/bin/apxs --with-apr=/usr/local/apr --with-apr-util=/usr/local/apr --with-ssl --with-zlib=/usr/local/lib --without-berkeley-db --enable-maintainer-mode
make
make install

如果编译过程中出现configure: error: Subversion requires SQLite,按以下步骤进行后再继续进行上一步操作。

1
2
3
tar zxvf sqlite-amalgamation-3.7.3.tar.gz
cd sqllit-3.7.3
cp sqlite3.c ../subversion-1.6.17/sqlite-amalgamation/sqlite3.c

4、配置apache,启用SVN

1
cat /usr/local/apache2/conf/httpd.conf | grep svn

显示以下信息则为正确安装成功:

1
2
LoadModule dav_svn_module modules/mod_dav_svn.so
LoadModule authz_svn_module modules/mod_authz_svn.so

1)更改apache运行用户(vi /usr/local/apache2/conf/httpd.conf)

1
2
User svn
Group svn

2)svn访问配置

1
2
3
4
5
6
7
8
9
10
11
12
13
14
15
16
17
18
19
20
21
# Location中的/svn只是个虚目录,用于区别普通的网站访问,
# 例如url为 http://127.0.0.1/svn/repos,则/svn的部分就会由下述配置去解析。
# 如果你想在url中使用/svnroot去解析,那么下面的Location配置就变为 <Location /svnroot>
<Location /svn/>
       #----虚拟目录后要加上"/",否则访问出现403.(bug)
    Dav svn
    SVNListParentPath on
        #----允许在网页上显示svn父目录list --记住,注释不要和配置项写到同一行,否则会出错..
    SVNParentPath "/home/svn/repositories"
        #----/home/svn/repositories 是SVN的父目录
    AuthType Basic
        #----连接类型设置
    AuthName "Subversion Repository"
        #----连接框提示
    AuthUserFile /home/svn/etc/passwd
        #----用户配置文件
    AuthzSVNAccessFile /home/svn/etc/authz
        #----验证
    Satisfy Any
    Require valid-user
</Location>

3)建立用户验证文件(新建用户)

1
/usr/local/apache2/bin/htpasswd -c /home/svn/etc/passwd svn

4)建立权限验证文件(vi /home/svn/etc/authz)

1
2
3
4
5
6
7
8
9
10
11
12
13
[groups]
group_develop = svn
 
[/]
* = r
 
[repos1:/]
@group_develop = rw
* =
 
[repos2:/]
@group_develop = rw
svnman = rw

5.创建资源库

1
2
/usr/local/subversion/bin/svnadmin create /home/svn/repositories/repos1
/usr/local/subversion/bin/svnadmin create /home/svn/repositories/repos2

6.启动apache

1
/usr/local/apache/bin/apachectl start

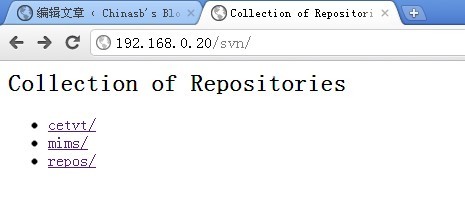
最后上张图吧:

(责任编辑:IT)
------分隔线----------------------------