|
zabbixЖҪМЁІҝКрОДөө
ІҝКрzabbixјаҝШЖҪМЁ
1.ТӘЗуЈә
ТӘЗуІҝКрТ»МЁZabbixјаҝШ·юОсЖчЈ¬Т»МЁұ»јаҝШЦч»ъОӘЈ¬јаҝШ»ъЖч°ьАЁzabbixјаҝШ·юОсЖчЧФЙнЎЈ
2.·Ҫ°ёЈә
1.zabbixЖҪМЁТААөLNMPјЬ№№»·ҫіЎЈ
2.№ЩНшПВФШzabbixФҙВл°ьЎЈ
3.РЮёДPHPЕдЦГОДјюВъЧгzabbixРиЗуЎЈ
4.°ІЧ°јаҝШ¶ЛЦч»ъzabbix.serverЈ¬РЮёД»щұҫЕдЦГ
5.°ІЧ°ұ»јаҝШ¶ЛЦч»ъweb.serverЈ¬РЮёД»щұҫЕдЦГ
Цч»ъГыіЖ НшҝЁУлIPөШЦ·
zabbix.server eno16777736Јә192.168.125. 138
web.server ens32Јә192.168.125.125
К№УГ1МЁRHEL7РйДв»ъЈ¬°ІЧ°ІҝКрLNMP»·ҫіЎўZabbixјҙПа№ШөДТААө°ьЈ¬ЕдЦГКэҫЭҝвІў¶ФZabbixјаҝШЖҪМЁҪшРРіхКј»ҜІЩЧчЎЈК№УГ1МЁұ»јаҝШ¶ЛЈ¬ФҙВл°ІЧ°Zabbix AgentЎЈ
3.ІҝКрІҪЦиЈә
1ЎўҙоҪЁLNMPјЬ№№»·ҫі
К№УГҪЕұҫ°ІЧ°zabbixЖҪМЁРиТӘөДLNMPөЧІгјЬ№№ЎЈ
[root@localhost ~]# vim lnmp.sh //РВҪЁLNMPТ»јьҙоҪЁҪЕұҫ
#!/bin/bash
# author:kwin
# Email:kwinwong@hotmail.com
src="/usr/local/src/"
cd $src
#ХТөҪЦё¶ЁҪшіМЈ¬ІўЙұЛА
#findPortKill 80
findPortKill (){
processe=`lsof -i:${1} -n|awk '{print $2}'|grep '^[1-9]'`
for i in $processe
do
# echo "Kill the $1 process [ $i ]"
kill -9 $i
done
}
#ҙҙҪЁҝмҪЭ·ҪКҪЈ¬НіТ»№ЬАн
#createLink ${ИнјюДҝВј}
createLink(){
path=${1}
linkPath='/link'
#Из№ыОДјюјРІ»ҙжФЪЈ¬ҙҙҪЁОДјюјР
if test ! -d ${linkPath}
then
mkdir ${linkPath}
fi
fileName=`echo ${path} | awk -F '/' '{print $1 $NF}'`
if test -d ${linkPath}/${fileName}
then
rm -rf ${linkPath}/${fileName}
fi
ln -s ${path} ${linkPath}
}
#Ҫ«ГьБоЛщФЪДҝВјМнјУөҪПөНіІОКэPATHЦРЈ¬·ҪұгөчУГ
addToPATH(){
bin=${1}
echo $PATH|grep ${bin} >/dev/null
if [ $? -ne 0 ]; then
echo "export PATH=\$PATH:${bin}">>/etc/profile
fi
}
#°ІЧ°nginx
installNginx(){
yum -y install pcre-devel openssl openssl-devel gcc gcc-c++ ncurses-devel perlddd
fileName="nginx-1.9.9"
package="${fileName}.tar.gz"
installDir="/usr/local/nginx"
if test ! -f ${package}
then
wget http://nginx.org/download/${package}
fi
tar zxvf $package
cd $fileName
./configure --prefix=${installDir}
make && make install
echo "°ІЧ°НкіЙ"
#Из№ыіцПЦҙнОу ХТөҪ80ХјУГөДҪшіМІўЙұЛАЈ¬ФЩЦШЖф
#Из№ы»№УРОКМв ЗлЧФРРөчКФЕдЦГОДјю
/usr/local/nginx/sbin/nginx 1> /dev/null 2>&1
if [ $? -ne 0 ]; then
findPortKill 80
/usr/local/nginx/sbin/nginx
fi
#sleep : Д¬ИПТФГлОӘөҘО»ЎЈ
#usleep : Д¬ИПТФОўГлОӘөҘО»ЎЈ
#1s = 1000ms = 1000000us
usleep 100000
pid=`cat /usr/local/nginx/logs/nginx.pid`
echo "nginx ТСҫӯЖф¶ҜЈ¬ҪшіМәЕОӘ${pid}"
bin="${installDir}/sbin"
addToPATH ${bin}
#ҙҙҪЁҝмҪЭ·ҪКҪЈ¬НіТ»№ЬАн
createLink ${installDir}
}
#°ІЧ°nginx
installPHP(){
yum -y install expect
#°ІЧ°libmcryptөЪИэ·ҪyumФҙ
wget http://www.atomicorp.com/installers/atomic
#sh ./atomic
#expectЧФ¶ҜУҰҙр
#өұРиТӘҪ»»Ҙ ЧЦ·ыЦРУРyesКұЧФ¶ҜКдИлyes»Шіө
expect <<EOF
set timeout -1
spawn sh ./atomic
expect "yes"
send "yes\r"
expect eof
EOF
#yum install -y epel-release
#yum -y update
#°ІЧ°РиТӘөДДЈҝй,yumТ»Іў°ІЧ°ТААөҝв
yum -y install libjpeg libjpeg-devel libpng libpng-devel freetype freetype-devel libxml2 libxml2-devel mysql pcre-devel curl-devel libxslt-devel php-mcrypt libmcrypt libmcrypt-devel
fileName="php-7.0.8"
package="${fileName}.tar.gz"
installDir="/usr/local/php7_fpm"
if test ! -f ${package}
then
wget http://cn2.php.net/distributions/${package}
fi
tar zxvf $package
cd $fileName
./configure --prefix=${installDir} \
--with-curl \
--with-freetype-dir \
--with-gd \
--with-gettext \
--with-iconv-dir \
--with-kerberos \
--with-libdir=lib64 \
--with-libxml-dir \
--with-mysqli \
--with-openssl \
--with-pcre-regex \
--with-pdo-mysql \
--with-pdo-sqlite \
--with-pear \
--with-png-dir \
--with-xmlrpc \
--with-xsl \
--with-zlib \
--enable-bcmath \
--enable-libxml \
--enable-inline-optimization \
--enable-gd-native-ttf \
--enable-mbregex \
--enable-mbstring \
--enable-opcache \
--enable-pcntl \
--enable-shmop \
--enable-soap \
--enable-sockets \
--enable-sysvsem \
--enable-xml \
--enable-zip \
--with-mcrypt \
--enable-fpm \
--with-config-file-path=${installDir}/etc
#PHP.iniД¬ИП ФЪ${installDir}/binДҝВјПВ
make && make install
echo "°ІЧ°НкіЙ"
cp php.ini-development ${installDir}/etc/php.ini
cp ${installDir}/etc/php-fpm.conf.default ${installDir}/etc/php-fpm.conf
cp ${installDir}/etc/php-fpm.d/www.conf.default ${installDir}/etc/php-fpm.d/www.conf
cp -R ./sapi/fpm/init.d.php-fpm /etc/init.d/php-fpm
chmod a+x -R /etc/init.d/
/etc/init.d/php-fpm restart
echo "php-fpm ТСҫӯЖф¶ҜЈ¬ҪшіМәЕОӘ9000"
echo "өчУГ/etc/init.d/php-fpmҝШЦЖ·юОс"
bin="${installDir}/bin"
addToPATH ${bin}
#ҙҙҪЁҝмҪЭ·ҪКҪЈ¬НіТ»№ЬАн
createLink ${installDir}
}
function installMysql(){
cat > /etc/yum.repos.d/MariaDB.repo <<EOF
# MariaDB 10.0 CentOS repository list - created 2014-04-01 04:32 UTC
# http://mariadb.org/mariadb/repositories/
[mariadb]
name = MariaDB
baseurl = http://yum.mariadb.org/10.1.11/centos7-amd64/
gpgkey=https://yum.mariadb.org/RPM-GPG-KEY-MariaDB
gpgcheck=1
EOF
yum install -y MariaDB-server MariaDB-client MariaDB-devel
echo "°ІЧ°НкіЙ"
mysqladmin -u root password 'root'
#Из№ыіцПЦҙнОу ХТөҪ3306ХјУГөДҪшіМІўЙұЛАЈ¬ФЩЦШЖф
#Из№ы»№УРОКМв ЗлЧФРРөчКФЕдЦГОДјю
service mysql start 1> /dev/null 2>&1
if [ $? -ne 0 ]; then
findPortKill 3306
service mysql start
fi
#ЙиЦГҝӘ»ъЖф¶ҜMariaDB
chkconfig mysql on
echo "mysql ТСҫӯЖф¶ҜЈ¬ҪшіМәЕОӘ3306 Д¬ИПГЬВлОӘroot"
echo "өчУГservice mysql start|stop|restartҝШЦЖ·юОс»тФт"
echo "/etc/init.d/mysql start|stop|restart"
}
function init(){
case $1 in
1)
installNginx #өчУГәҜКэұШРлФЪәҜКэәуГж
;;
2)
installMysql #өчУГәҜКэұШРлФЪәҜКэәуГж
;;
3)
installPHP #өчУГәҜКэұШРлФЪәҜКэәуГж
;;
4)
installMysql
installNginx
installPHP
;;
*)
echo 'You do not select a number between 1 to 4'
;;
esac
}
echo 'Input a number between 1 to 4'
echo '1.°ІЧ°nginx 2.°ІЧ°mysql'
echo '3.°ІЧ°PHP 4.Т»јь°ІЧ°LNMP'
read mode
init ${mode}
source /etc/profile
#. /etc/profile
#ЧўТв: . әН /etc/profile УРҝХёс Н¬ source /etc/profile
1.[root@localhost ~]# chmod 700 lnmp.sh //ёіУиҪЕұҫrootУГ»§ЦҙРРИЁПЮЎЈ
2.[root@localhost ~]# ./lnmp.sh //ЦҙРРҪЕұҫ
Input a number between 1 to 4
1.°ІЧ°nginx 2.°ІЧ°mysql
3.°ІЧ°PHP 4.Т»јь°ІЧ°LNMP
##КдИл4»ШіөЎЈ
2Ўў°ІЧ°Зе»ӘҙуС§ҫөПсФҙЎЈ
1.[root@localhost ~]# rpm -ivh https://mirrors.tuna.tsinghua.edu.cn/zabbix/zabbix/4.0/rhel/7/x86_64/zabbix-release-4.0-2.el7.noarch.rpm //ПВФШІўЕдЦГzabbix 4.0 өДyumФҙ
3Ўў°ІЧ°zabbixЖҪМЁИнјюЎўКэҫЭҝвј°ЖдТААө°ьЎЈ
1.[root@localhost ~]# yum install -y zabbix-server-mysql zabbix-web-mysql zabbix-agent mariadb-server.x86_64 //°ІЧ°zabbixТААөҝвј°mariadb
4ЎўІҝКрmariadbКэҫЭҝв
1. [root@localhost ~]# systemctl restart mariadb.service //Жф¶ҜmariadbКэҫЭҝв
2. [root@localhost ~]# mysql_secure_installation
/usr/bin/mysql_secure_installation: line 379: find_mysql_client: command not found
NOTE: RUNNING ALL PARTS OF THIS SCRIPT IS RECOMMENDED FOR ALL MariaDB
SERVERS IN PRODUCTION USE! PLEASE READ EACH STEP CAREFULLY!
In order to log into MariaDB to secure it, we'll need the current
password for the root user. If you've just installed MariaDB, and
you haven't set the root password yet, the password will be blank,
so you should just press enter here.
Enter current password for root (enter for none): өұЗ°КэҫЭҝвГЬВлОӘҝХЈ¬ЦұҪУ°ҙ»Шіөјь
OK, successfully used password, moving on...
Setting the root password ensures that nobody can log into the MariaDB
root user without the proper authorisation.
Set root password? [Y/n] y
New password:КдИлТӘОӘroot№ЬАнФұЙиЦГөДКэҫЭҝвГЬВл
Re-enter new password:ФЩҙОКдИлГЬВл
Password updated successfully!
Reloading privilege tables..
... Success!
By default, a MariaDB installation has an anonymous user, allowing anyone
to log into MariaDB without having to have a user account created for
them. This is intended only for testing, and to make the installation
go a bit smoother. You should remove them before moving into a
production environment.
Remove anonymous users? [Y/n] yЈЁЙҫіэДдГыХЛ»§Ј©
... Success!
Normally, root should only be allowed to connect from 'localhost'. This
ensures that someone cannot guess at the root password from the network.
Disallow root login remotely? [Y/n] yЈЁҪыЦ№root№ЬАнФұҙУФ¶іМөЗВјЈ©
... Success!
By default, MariaDB comes with a database named 'test' that anyone can
access. This is also intended only for testing, and should be removed
before moving into a production environment.
Remove test database and access to it? [Y/n] yЈЁЙҫіэtestКэҫЭҝвІўИЎПы¶ФЛьөД·ГОКИЁПЮЈ©
- Dropping test database...
... Success!
- Removing privileges on test database...
... Success!
Reloading the privilege tables will ensure that all changes made so far
will take effect immediately.
Reload privilege tables now? [Y/n] yЈЁЛўРВКЪИЁұнЈ¬ИГіхКј»ҜәуөДЙи¶ЁБўјҙЙъР§Ј©
... Success!
Cleaning up...
All done! If you've completed all of the above steps, your MariaDB
installation should now be secure.
Thanks for using MariaDB!
5ЎўөјИлzabbixіхКјКэҫЭұн
[root@localhost ~]# mysql -uroot -p
Enter password: //өЗВјmariadbКэҫЭҝв
Welcome to the MariaDB monitor. Commands end with ; or \g.
Your MariaDB connection id is 35
Server version: 5.5.65-MariaDB MariaDB Server
Copyright (c) 2000, 2018, Oracle, MariaDB Corporation Ab and others.
Type 'help;' or '\h' for help. Type '\c' to clear the current input statement.
MariaDB [(none)]> create database zabbix character set utf8 collate utf8_bin; //РВҪЁzabbixКэҫЭҝвЦё¶ЁҝвК№УГutf8ёсКҪЎЈІ»К№УГutf8ёсКҪөД»°әуЖЪУцөҪЦРОД»бұЁҙнЎЈ
MariaDB [(none)]> grant all on zabbix.* to zabbix@localhost identified by "13542031695"; //РВҪЁzabbixКэҫЭҝвХЛ»§ЎЈУГ»§ГыәНГЬВлҝЙТФЧФјәЦё¶ЁЎЈ
MariaDB [(none)]> Ctrl-C -- exit!
Aborted //НЛіцКэҫЭҝв
[root@localhost ~]# rpm -ql zabbix-server-mysql //ІйХТzabbixіхКјКэҫЭҝвВ·ҫ¶
/usr/share/doc/zabbix-server-mysql-4.0.21/create.sql.gz //ХТөҪ.sql.gzёсКҪөДХвМх
[root@localhost ~]# cd /usr/share/doc/zabbix-server-mysql-4.0.21/ //ЗР»»өҪzabbixД¬ИПКэҫЭДҝВј
[root@localhost zabbix-server-mysql-4.0.21]# gzip -d create.sql.gz //ҪвС№КэҫЭ°ь
[root@localhost zabbix-server-mysql-4.0.21]# mysql -uzabbix -p13542031695 zabbix < create.sql //өјИлөҪzabbixКэҫЭҝв
6ЎўРЮёДzabbixЕдЦГОДјю»щұҫІОКэ
[root@localhost ~]# vim /etc/zabbix/zabbix_server.conf //РЮёДЕдЦГОДјю
DBUser=zabbix //ЧўТвХвАпТӘРЮёДіЙzabbixКэҫЭҝвХЛәЕ
### Option: DBPassword
# Database password.
# Comment this line if no password is used.
#
# Mandatory: no
# Default:
DBPassword=13542031695 //Ц»РиРЮёДКэҫЭҝвzabbixУГ»§өДГЬВл
### Option: DBSocket
# Path to MySQL socket.
#
# Mandatory: no
# Default:
# DBSocket=
### Option: DBPort
# Database port when not using local socket.
#
7ЎўЖф¶Ҝzabbix·юОс
[root@localhost ~]# systemctl enable zabbix-server.service //јУИлҝӘ»ъЖф¶ҜПоДҝ
[root@localhost ~]# systemctl start zabbix-server.service //Жф¶Ҝzabbix·юОс
[root@localhost ~]# netstat -lntup //Ійҝҙ10051¶ЛҝЪКЗ·сұ»јаМэЈ¬Жф¶ҜіЙ№ҰөД»°10051¶ЛҝЪ»бұ»јаМэЎЈ
3067/cupsd
tcp6 0 0 ::1:25 :::* LISTEN 2150/master
tcp6 0 0 :::60672 :::* LISTEN 1781/rpc.statd
tcp6 0 0 :::10050 :::* LISTEN 1797/zabbix_agentd //ЧўТвХвРР
tcp6 0 0 :::10051 :::* LISTEN 2577/zabbix_server
tcp6 0 0 :::111 :::* LISTEN 1767/rpcbind
tcp6 0 0 :::80 :::* LISTEN 1759/httpd
tcp6 0 0 :::21 :::* LISTEN
[root@localhost ~]# systemctl restart httpd //Жф¶Ҝhttpd·юОс
[root@localhost ~]# systemctl enable httpd //јУИлҝӘ»ъЖф¶ҜПо
4Ўў°ІЧ°zabbixЖҪМЁ
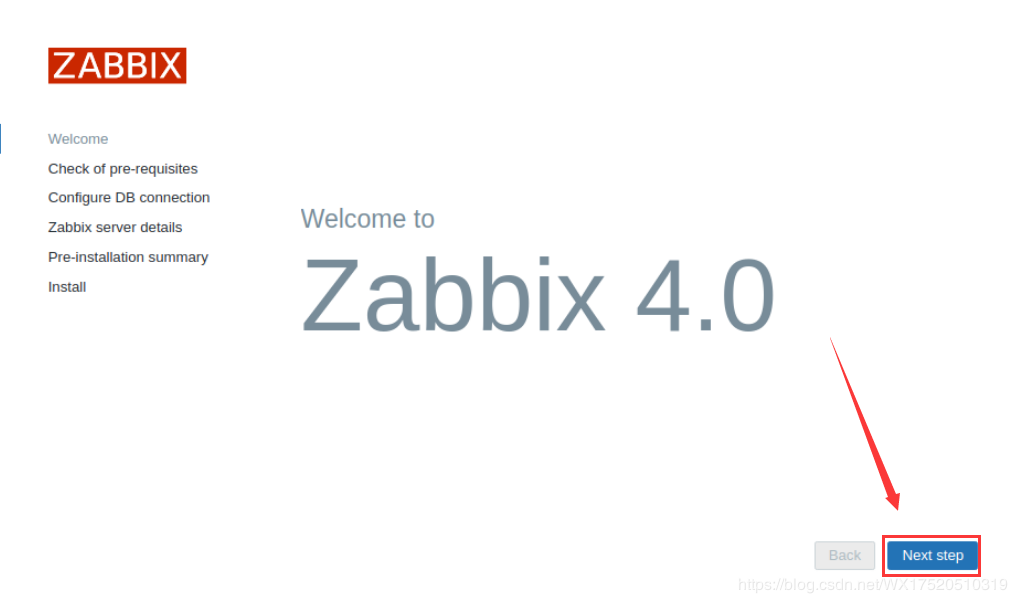
1ЎўФЪдҜААЖчКдИл192.168.168.125.138/zabbixКЧҙОөЗВҪ»бЧФ¶ҜМшЧӘөҪsetup.phpТэөј°ІЧ°ЎЈ

2ЎўҪшИлТэөјҪзГжәуөгЈЁnext stepЈ©ПВТ»ІҪЎЈ
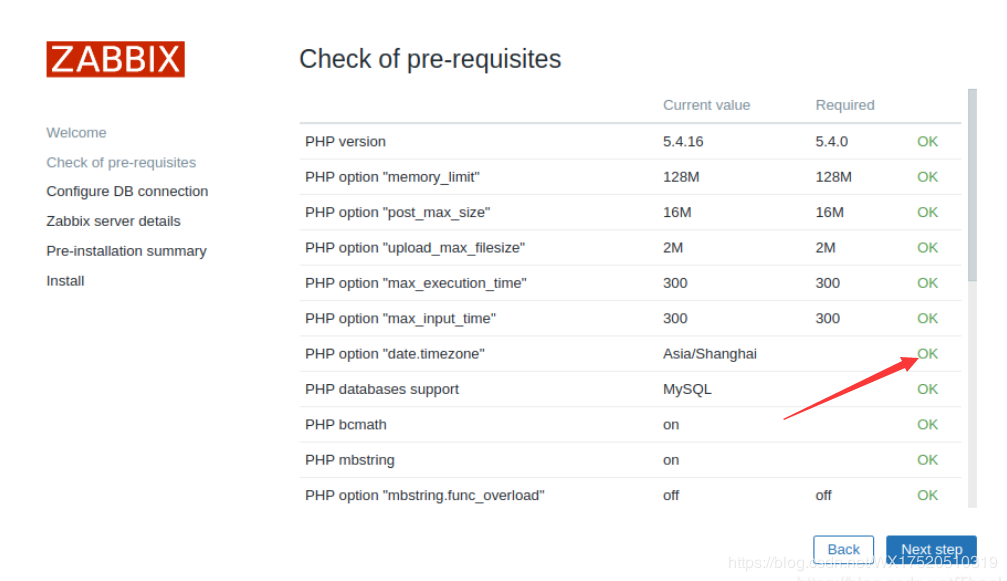
3ЎўјмІйёчТААөЧйјюКЗ·сХэіЈЈЁХвАпПФКҫОҙЦӘөДөДКұЗшЈ©ЎЈ
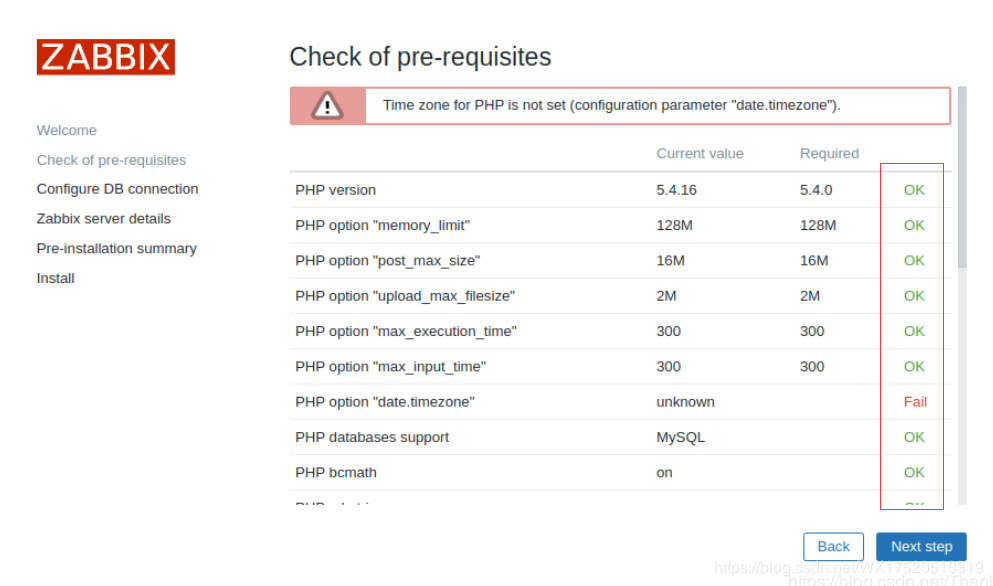
# ұајӯКұЗшД¬ИПКЗЧўКН
[root@localhost ~]# vim /etc/httpd/conf.d/zabbix.conf
php_value date.timezone Asia/Shanghai //ИҘөфЧўКН·ыәЕ°СКРЗшёДОӘAsia/Shanghai
# НЁ№эapacheАҙөчХыphpөДІОКэЈ¬ЦШЖфhttpd·юОс
[root@localhost ~]# systemctl restart httpd
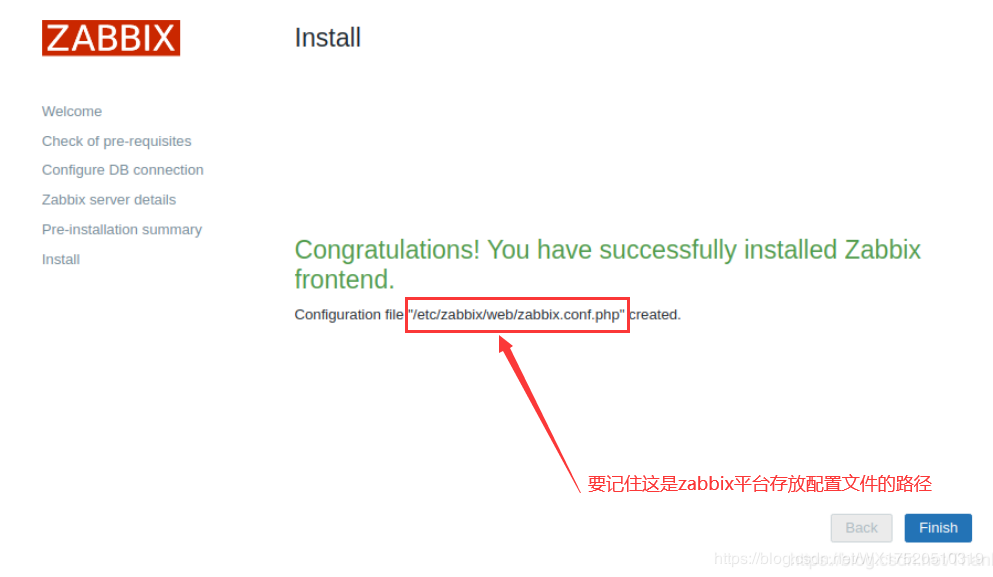
ЛўРВНшТіәуПФКҫokЈЎОКМвҪвҫцЎЈ
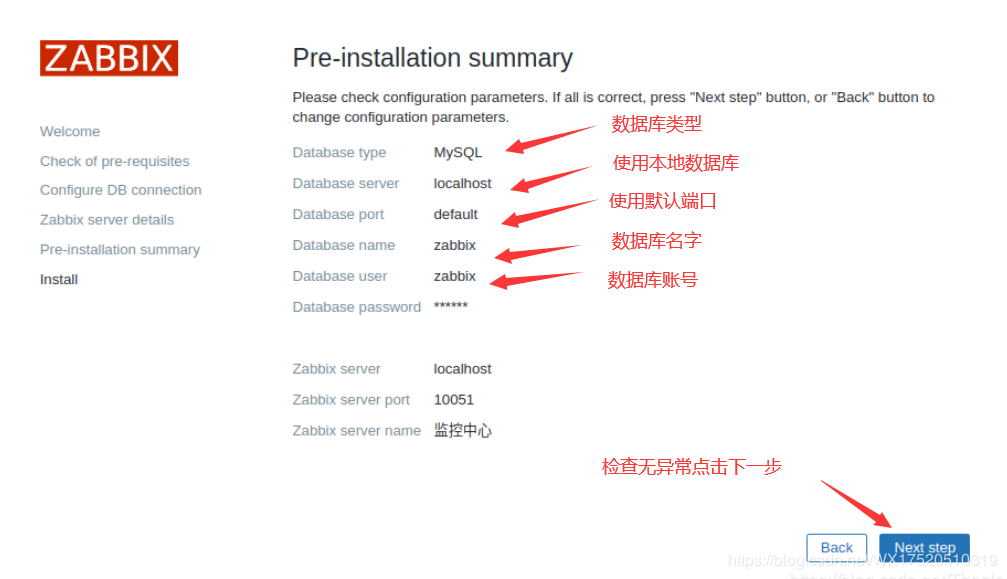
4ЎўјьИлұҫөШКэҫЭҝвРЕПўЎЈ

5ЎўМоРҙzabbix serverөДГыЧЦ
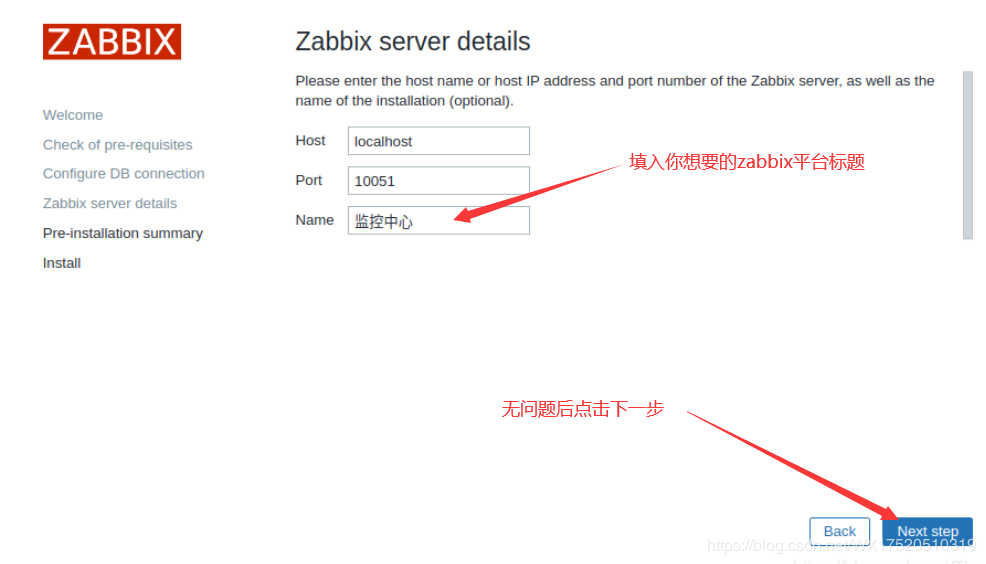
6ЎўЧоәујмІйёчІОКэЕдЦГ
7ЎўZabbixөЗВј
Д¬ИПөДУГ»§ГыКЗЈәAdminЈ¬ГЬВлКЗЈәzabbix ЈЁЦ®З°өјИлzabbixД¬ИПіхКјКэҫЭҝвКұКэҫЭҝвАпөДД¬ИПУГ»§Ј©
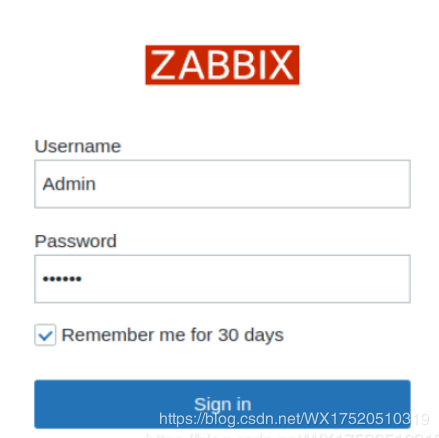
ХэіЈөЗВјФтZabbix°ІЧ°іЙ№ҰЈәәуРшөЗВјФЪдҜААЖчКдИлhttp://192.168.125.138/zabbix/zabbix.phpјҙҝЙҪшИлzabbixЖҪМЁЎЈ
 (ФрИОұајӯЈәIT) |