CentOS下WEB-httpd用户认证控制和https在httpd上的实现
时间:2014-12-16 01:08 来源:linux.it.net.cn 作者:IT
我们就可以通过设置用户认证和实现https加密传输的实验来配置httpd了,下面是本次实验的要求:
实验环境:
CentOS release6.6(Final) 1台
Windows XP 1台
IP地址:
172.16.31.31 www.stu31.com web服务器端
172.16.31.188 Windows XP 测试客户端
Windows XP 安装了chrom浏览器和系统自带的IE浏览器
软件版本:
httpd-2.2.15-39.el6.centos.x86_64
实验要求:
1、建立httpd服务器,要求:
提供两个基于名称的虚拟主机:
(a)www1.stu31.com,页面文件目录为/web/vhosts/www1;错误日志为/var/log/httpd/www1.err,访问日志为/var/log/httpd/www1.access;
(b)www2.stu31.com,页面文件目录为/web/vhosts/www2;错误日志为/var/log/httpd/www2.err,访问日志为/var/log/httpd/www2.access;
(c)为两个虚拟主机建立各自的主页文件index.html,内容分别为其对应的主机名;
(d)通过www1.stu31.com/server-status输出httpd工作状态相关信息,且只允许提供帐号密码才能访问(status:status);
2、为上面的第2个虚拟主机提供https服务,使得用户可以通过https安全的访问此web站点;
(1)要求使用证书认证,证书中要求使用的国家(CN)、州(Henan)、城市(Zhengzhou)和组织(stu31);
(2)设置部门为tech,主机名为www2.stu31.com,邮箱为admin@stu31.com;
实验过程:
我们就通过rpm包的方式来安装httpd了,安装过程很简单;重要的是配置:
[root@www ~]# rpm-qa httpd
httpd-2.2.15-39.el6.centos.x86_64
1、建立httpd服务器(基于编译的方式进行),要求:
提供两个基于名称的虚拟主机:
(a)www1.stu31.com,页面文件目录为/web/vhosts/www1;错误日志为/var/log/httpd/www1.err,访问日志为/var/log/httpd/www1.access;
(b)www2.stu31.com,页面文件目录为/web/vhosts/www2;错误日志为/var/log/httpd/www2.err,访问日志为/var/log/httpd/www2.access;
(c)为两个虚拟主机建立各自的主页文件index.html,内容分别为其对应的主机名;
(d)通过www1.stu31.com/server-status输出httpd工作状态相关信息,且只允许提供帐号密码才能访问(status:status);
一. 配置DNS服务器,为客户端提供域名解析服务。
主配置文件配置:
[root@www ~]# cat/etc/named.conf
//
// named.conf
//
// Provided by RedHat bind package to configure the ISC BIND named(8) DNS
// server as acaching only nameserver (as a localhost DNS resolver only).
//
// See/usr/share/doc/bind*/sample/ for example named configuration files.
//
options {
// listen-on port 53 { 127.0.0.1; };
// listen-on-v6 port 53 { ::1; };
directory "/var/named";
dump-file "/var/named/data/cache_dump.db";
statistics-file"/var/named/data/named_stats.txt";
memstatistics-file"/var/named/data/named_mem_stats.txt";
// allow-query { localhost; };
recursion yes;
// dnssec-enable yes;
// dnssec-validation yes;
// dnssec-lookaside auto;
/* Path to ISC DLV key */
/*bindkeys-file"/etc/named.iscdlv.key";
managed-keys-directory"/var/named/dynamic";
*/
};
logging {
channel default_debug {
file"data/named.run";
severity dynamic;
};
};
zone "."IN {
type hint;
file "named.ca";
};
include"/etc/named.rfc1912.zones";
include "/etc/named.root.key";
区域文件配置,加入stu31.com这个区域:
[root@bindconf.d]# cat /etc/named.rfc1912.zones
zone"stu31.com" IN {
type master;
file "stu31.com.zone";
};
区域解析库文件配置:
[root@www named]#cat stu31.com.zone
$TTL 600
$ORIGIN stu31.com.
@ IN SOA ns1.stu31.com. root.stu31.com. (
2014121301
1H
5M
3D
6H)
IN NS ns1.stu31.com.
IN MX 5 mail
ns1 IN A 172.16.31.31
www IN A 172.16.31.31
www1 IN A 172.16.31.31
www2 IN A 172.16.31.31
mail IN A 172.16.31.31
pop3 IN CNAME mail
iamp4 IN CNAME mail
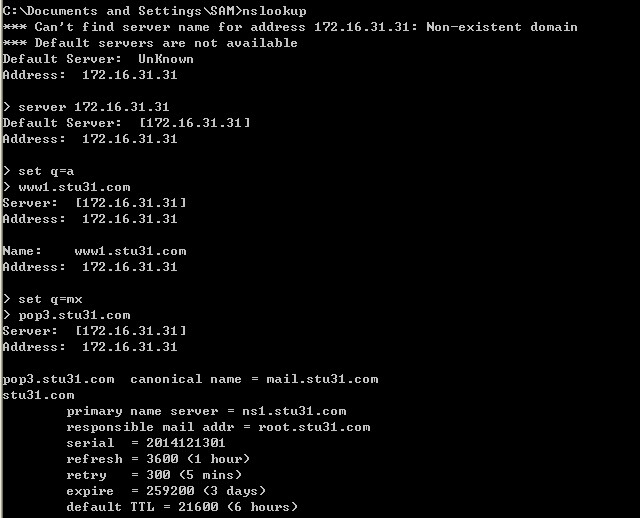
测试DNS服务器可用性:
二.Httpd服务器配置
创建网站目录及加入测试网页:
[root@www named]#mkdir -pv /web/vhosts/www1
[root@www named]#vim /web/vhosts/www1/index.html
www1.stu31.com
[root@www named]#mkdir -pv /web/vhosts/www2
[root@www named]#vim /web/vhosts/www2/index.html
www2.stu31.com
配置httpd的主配置文件/etc/httpd/conf/httpd.conf,我列出了主要配置:
[root@www named]#vim /etc/httpd/conf/httpd.conf
#DocumentRoot"/var/www/html"
NameVirtualHost 172.16.31.31:80
<VirtualHost172.16.31.31:80>
DocumentRoot /web/vhosts/www1
ServerName www1.stu31.com
ErrorLog "/var/log/httpd/www1.err"
CustomLog"/var/log/httpd/www1.access" combind
<Location/server-status>
SetHandler server-status
Authtype Basic
Authname "status area"
AuthUserFile /etc/httpd/users/.htpasswd
Require valid-user
</Location>
</VirtualHost>
<VirtualHost172.16.31.31:80>
DocumentRoot /web/vhosts/www2
ServerName www2.stu31.com
ErrorLog"/var/log/httpd/www2.err"
CustomLog"/var/log/httpd/www2.access" combind
</VirtualHost>
上面蓝色部分配置是用户认证配置,下面我们需要检查语法:
[root@www named]#httpd -t
Syntax OK
针对用户认证配置,我们需要建立用户访问的认证用户文件:
[root@www named]#mkdir /etc/httpd/users
[root@www named]# htpasswd-c -m /etc/httpd/users/.htpasswd status
New password:
Re-type newpassword:
Adding passwordfor user status
完成后我们就可以启动httpd服务,来进行用户认证测试:
[root@www named]#service httpd restart
Stoppinghttpd: [FAILED]
Startinghttpd: [ OK ]
三.用户认证测试:
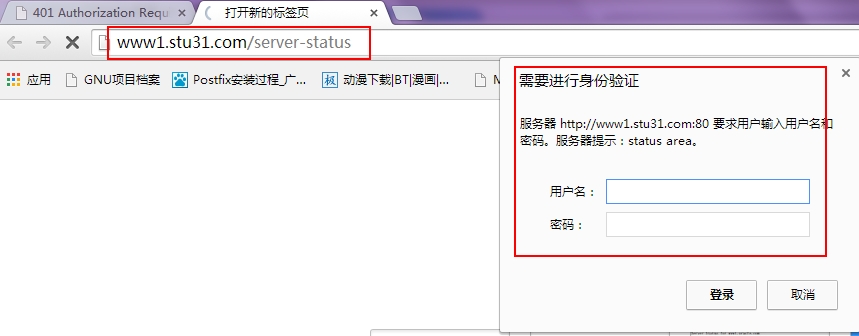
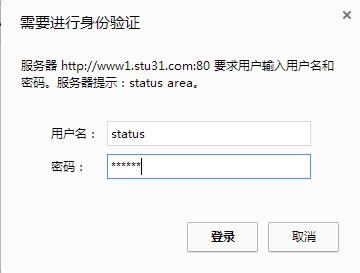
输入用户名和密码认证:
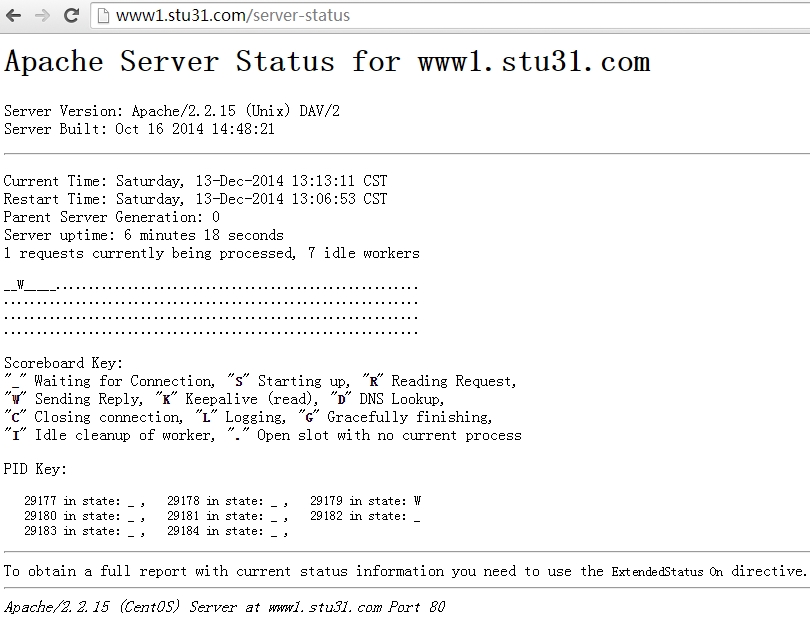
可以查看apache 服务器状态信息:
2、为上面的第2个虚拟主机提供https服务,使得用户可以通过https安全的访问此web站点;
(1)要求使用证书认证,证书中要求使用的国家(CN)、州(Henan)、城市(Zhengzhou)和组织(stu31);
(2)设置部门为tech,主机名为www2.stu31.com,邮件为admin@stu31.com;
HTTPS加密传输配置过程
(a) 建立私有CA认证服务器
[root@www named]# cd /etc/pki/CA/
#构建CA自有私钥文件
[root@www CA]# (umask 077; openssl genrsa-out private/cakey.pem 2048)
Generating RSA private key, 2048 bit longmodulus
...............+++
...........+++
e is 65537 (0x10001)
#生成自签署证书
[root@www CA]# openssl req -new -x509 -keyprivate/cakey.pem -out cacert.pem -days 3560
You are about to be asked to enterinformation that will be incorporated
into your certificate request.
What you are about to enter is what iscalled a Distinguished Name or a DN.
There are quite a few fields but you canleave some blank
For some fields there will be a defaultvalue,
If you enter '.', the field will be leftblank.
-----
Country Name (2 letter code) [XX]:CN
State or Province Name (full name) []:HA
Locality Name (eg, city) [Default City]:ZZ
Organization Name (eg, company) [DefaultCompany Ltd]:stu31
Organizational Unit Name (eg, section)[]:tech
Common Name (eg, your name or your server'shostname) []:www2.stu31.com
Email Address []:admin@stu31.com
#生成索引数据库文件
[root@www CA]# touch index.txt
#序列号文件创建
[root@www CA]# touch serial
[root@www CA]# echo 01 >serial
[root@www CA]# ls
cacert.pem certs crl index.txt newcerts private serial
CA服务器建立完毕。
(b) 为httpd服务器生成证书
#httpd服务器生成私钥
[root@www CA]# mkdir /etc/httpd/certs
[root@www CA]# cd /etc/httpd/certs
[root@www certs]# (umask 077; opensslgenrsa -out httpd.key 2048)
Generating RSA private key, 2048 bit longmodulus
...........................................................................................................................................................................................+++
.............................................................................................+++
e is 65537 (0x10001)
#生成证书签署请求文件
[root@www certs]# openssl req -new -keyhttpd.key -out httpd.csr -days 3650
You are about to be asked to enterinformation that will be incorporated
into your certificate request.
What you are about to enter is what iscalled a Distinguished Name or a DN.
There are quite a few fields but you canleave some blank
For some fields there will be a defaultvalue,
If you enter '.', the field will be leftblank.
-----
Country Name (2 letter code) [XX]:CN
State or Province Name (full name) []:HA
Locality Name (eg, city) [Default City]:ZZ
Organization Name (eg, company) [DefaultCompany Ltd]:stu31
Organizational Unit Name (eg, section)[]:tech
Common Name (eg, your name or your server'shostname) []:www2.stu31.com
Email Address []:admin@stu31.com
Please enter the following 'extra'attributes
to be sent with your certificate request
A challenge password []:
An optional company name []:
(c) 配置httpd服务使用数字证书
#CA服务器签署请求证书
[root@www certs]# ls
httpd.csr httpd.key
[root@www certs]# openssl ca -in httpd.csr-out httpd.crt -days 3650
Using configuration from /etc/pki/tls/openssl.cnf
Check that the request matches thesignature
Signature ok
Certificate Details:
Serial Number: 1 (0x1)
Validity
Not Before: Dec 13 05:30:19 2014 GMT
Not After : Dec 10 05:30:19 2024 GMT
Subject:
countryName = CN
stateOrProvinceName = HA
organizationName = stu31
organizationalUnitName = tech
commonName =www2.stu31.com
emailAddress = admin@stu31.com
X509v3 extensions:
X509v3 Basic Constraints:
CA:FALSE
Netscape Comment:
OpenSSL Generated Certificate
X509v3 Subject Key Identifier:
9A:84:73:63:C0:82:7F:45:21:9C:BA:2B:4C:FB:C3:87:7C:BA:63:58
X509v3 Authority Key Identifier:
keyid:1C:57:C2:12:E4:D3:A6:4F:9A:7A:C6:53:7F:5B:7B:86:1E:75:0D:57
Certificate is to be certified until Dec 1005:30:19 2024 GMT (3650 days)
Sign the certificate? [y/n]:y
1 out of 1 certificate requests certified,commit? [y/n]y
Write out database with 1 new entries
Data Base Updated
(d)配置https服务器加密传输
针对Apache httpd软件默认配置中:
httpd软件默认没有使用ssl模块,需要安装相应的模块程序包
[root@www certs]# yum install mod_ssl -y
[root@www ~]# rpm -qa mod_ssl
mod_ssl-2.2.15-39.el6.centos.x86_64
安装之后会在/etc/httpd/conf.d/目录下生成ssl.conf的配置文件,我们配置https就在此文件中配置:
[root@www conf.d]# ls
mod_dnssd.conf README ssl.conf welcome.conf
配置ssl.conf文件,重要配置都在下面文件中了:
[root@www conf.d]#vim /etc/httpd/conf.d/ssl.conf
LoadModule ssl_module modules/mod_ssl.so
Listen 443
<VirtualHost 172.16.31.31:443>
DocumentRoot"/web/vhosts/www2"
ServerNamewww2.stu31.com:443
SSLEngineon
SSLCertificateFile/etc/httpd/certs/httpd.crt
SSLCertificateKeyFile/etc/httpd/certs/httpd.key
</VirtualHost>
测试文件语法:
[root@www conf.d]# httpd -t
Syntax OK
重启httpd服务
[root@www conf.d]# service httpd restart
Stopping httpd: [ OK ]
Starting httpd: [ OK ]
查看服务监听端口:
[root@www conf.d]# ss -tunl |grep 443
tcp LISTEN 0 128 :::443 :::*
到windows端进行测试:
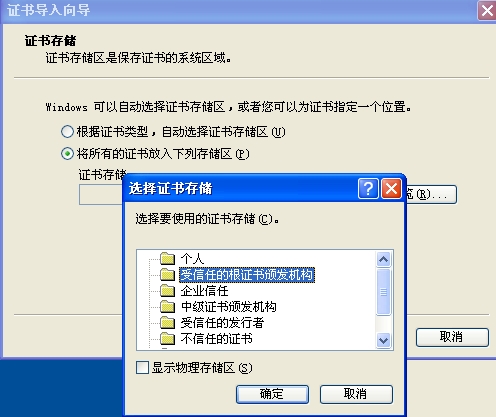
先将CA服务器的证书安装进windows中;将cacert.pem发送到windows中,改名cacert.crt,安装证书:
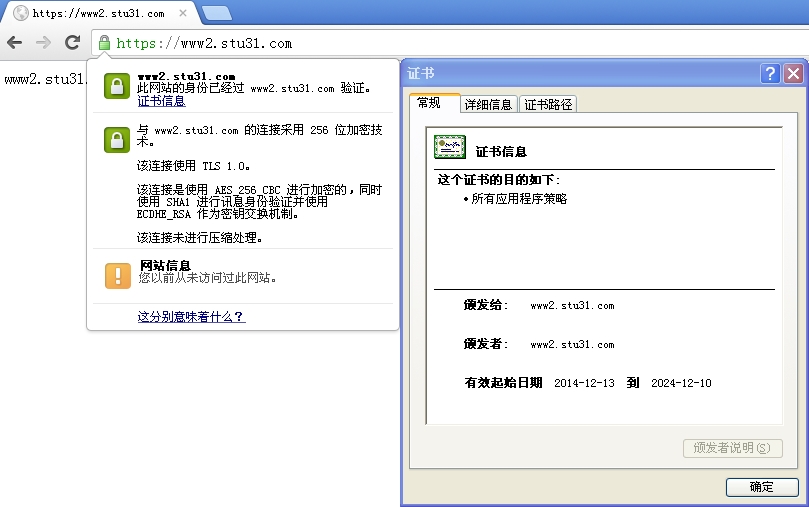
使用chrom浏览器进行测试
(责任编辑:IT)
我们就可以通过设置用户认证和实现https加密传输的实验来配置httpd了,下面是本次实验的要求:
实验环境: CentOS release6.6(Final) 1台 Windows XP 1台 IP地址: 172.16.31.31 www.stu31.com web服务器端 172.16.31.188 Windows XP 测试客户端 Windows XP 安装了chrom浏览器和系统自带的IE浏览器 软件版本: httpd-2.2.15-39.el6.centos.x86_64
实验要求: 1、建立httpd服务器,要求: 提供两个基于名称的虚拟主机: (a)www1.stu31.com,页面文件目录为/web/vhosts/www1;错误日志为/var/log/httpd/www1.err,访问日志为/var/log/httpd/www1.access; (b)www2.stu31.com,页面文件目录为/web/vhosts/www2;错误日志为/var/log/httpd/www2.err,访问日志为/var/log/httpd/www2.access; (c)为两个虚拟主机建立各自的主页文件index.html,内容分别为其对应的主机名; (d)通过www1.stu31.com/server-status输出httpd工作状态相关信息,且只允许提供帐号密码才能访问(status:status); 2、为上面的第2个虚拟主机提供https服务,使得用户可以通过https安全的访问此web站点; (1)要求使用证书认证,证书中要求使用的国家(CN)、州(Henan)、城市(Zhengzhou)和组织(stu31); (2)设置部门为tech,主机名为www2.stu31.com,邮箱为admin@stu31.com;
实验过程: 我们就通过rpm包的方式来安装httpd了,安装过程很简单;重要的是配置: [root@www ~]# rpm-qa httpd httpd-2.2.15-39.el6.centos.x86_64
1、建立httpd服务器(基于编译的方式进行),要求: 提供两个基于名称的虚拟主机: (a)www1.stu31.com,页面文件目录为/web/vhosts/www1;错误日志为/var/log/httpd/www1.err,访问日志为/var/log/httpd/www1.access; (b)www2.stu31.com,页面文件目录为/web/vhosts/www2;错误日志为/var/log/httpd/www2.err,访问日志为/var/log/httpd/www2.access; (c)为两个虚拟主机建立各自的主页文件index.html,内容分别为其对应的主机名; (d)通过www1.stu31.com/server-status输出httpd工作状态相关信息,且只允许提供帐号密码才能访问(status:status);
一. 配置DNS服务器,为客户端提供域名解析服务。 主配置文件配置: [root@www ~]# cat/etc/named.conf // // named.conf // // Provided by RedHat bind package to configure the ISC BIND named(8) DNS // server as acaching only nameserver (as a localhost DNS resolver only). // // See/usr/share/doc/bind*/sample/ for example named configuration files. //
options { // listen-on port 53 { 127.0.0.1; }; // listen-on-v6 port 53 { ::1; }; directory "/var/named"; dump-file "/var/named/data/cache_dump.db"; statistics-file"/var/named/data/named_stats.txt"; memstatistics-file"/var/named/data/named_mem_stats.txt"; // allow-query { localhost; }; recursion yes;
// dnssec-enable yes; // dnssec-validation yes; // dnssec-lookaside auto;
/* Path to ISC DLV key */ /*bindkeys-file"/etc/named.iscdlv.key";
managed-keys-directory"/var/named/dynamic"; */ };
logging { channel default_debug { file"data/named.run"; severity dynamic; }; };
zone "."IN { type hint; file "named.ca"; };
include"/etc/named.rfc1912.zones"; include "/etc/named.root.key";
区域文件配置,加入stu31.com这个区域:
区域解析库文件配置:
测试DNS服务器可用性:
二.Httpd服务器配置 创建网站目录及加入测试网页:
配置httpd的主配置文件/etc/httpd/conf/httpd.conf,我列出了主要配置: [root@www named]#vim /etc/httpd/conf/httpd.conf #DocumentRoot"/var/www/html" NameVirtualHost 172.16.31.31:80 <VirtualHost172.16.31.31:80> DocumentRoot /web/vhosts/www1 ServerName www1.stu31.com ErrorLog "/var/log/httpd/www1.err" CustomLog"/var/log/httpd/www1.access" combind <Location/server-status> SetHandler server-status Authtype Basic Authname "status area" AuthUserFile /etc/httpd/users/.htpasswd Require valid-user </Location> </VirtualHost>
<VirtualHost172.16.31.31:80> DocumentRoot /web/vhosts/www2 ServerName www2.stu31.com ErrorLog"/var/log/httpd/www2.err" CustomLog"/var/log/httpd/www2.access" combind </VirtualHost>
上面蓝色部分配置是用户认证配置,下面我们需要检查语法:
针对用户认证配置,我们需要建立用户访问的认证用户文件:
完成后我们就可以启动httpd服务,来进行用户认证测试:
三.用户认证测试:
输入用户名和密码认证:
可以查看apache 服务器状态信息:
2、为上面的第2个虚拟主机提供https服务,使得用户可以通过https安全的访问此web站点; (1)要求使用证书认证,证书中要求使用的国家(CN)、州(Henan)、城市(Zhengzhou)和组织(stu31); (2)设置部门为tech,主机名为www2.stu31.com,邮件为admin@stu31.com;
HTTPS加密传输配置过程 (a) 建立私有CA认证服务器 [root@www named]# cd /etc/pki/CA/ #构建CA自有私钥文件
#生成自签署证书
#生成索引数据库文件
#序列号文件创建
CA服务器建立完毕。
(b) 为httpd服务器生成证书 #httpd服务器生成私钥
#生成证书签署请求文件
(c) 配置httpd服务使用数字证书 #CA服务器签署请求证书
(d)配置https服务器加密传输 针对Apache httpd软件默认配置中: httpd软件默认没有使用ssl模块,需要安装相应的模块程序包
安装之后会在/etc/httpd/conf.d/目录下生成ssl.conf的配置文件,我们配置https就在此文件中配置:
配置ssl.conf文件,重要配置都在下面文件中了:
测试文件语法:
重启httpd服务
查看服务监听端口:
到windows端进行测试: 先将CA服务器的证书安装进windows中;将cacert.pem发送到windows中,改名cacert.crt,安装证书:
使用chrom浏览器进行测试
(责任编辑:IT) |