CentOS(RedHat) 6.2下Samba配置
时间:2015-01-18 02:38 来源:linux.it.net.cn 作者:IT
为了实现《基于开源软件构建高性能集群NAS系统 》中提到的全部用开源软件实现一个高性能集群NAS系统,趁着这几天有点时间,打算全部用VMware的虚拟机机来搭一个实验环境。全程参考《http://www.centos.org/docs/5/html/Deployment_Guide-en-US/ch-samba.html》与《http://docs.redhat.com/docs/en-US/Red_Hat_Enterprise_Linux/6/html/Deployment_Guide/ch-File_and_Print_Servers.html#s1-Samba》。
Samba is an open source implementation of the Server Message Block (SMB) protocol. It allows the networking of Microsoft Windows®, Linux, UNIX, and other operating systems together, enabling access to Windows-based file and printer shares. Samba’s use of SMB allows it to appear as a Windows server to Windows clients.
1. 安装Samba服务
安装后将启动3个daemons (smbd, nmbd, and winbindd)和2个services (smb and windbind) :
smbd
The smbd server daemon provides file sharing and printing services to Windows clients. In addition, it is responsible for user authentication, resource locking, and data sharing through the SMB protocol. The default ports on which the server listens for SMB traffic are TCP ports 139 and 445.
The smbd daemon is controlled by the smb service.
nmbd
The nmbd server daemon understands and replies to NetBIOS name service requests such as those produced by SMB/CIFS in Windows-based systems. These systems include Windows 95/98/ME, Windows NT, Windows 2000, Windows XP, and LanManager clients. It also participates in the browsing protocols that make up the Windows Network Neighborhood view. The default port that the server listens to for NMB traffic is UDP port 137.
The nmbd daemon is controlled by the smb service.
smbd :这个 daemon 的主要功能就是用来管理 SAMBA 主机分享什么目录、档案与印表机等等的内容。
nmbd :这个 daemon 则是用来管理群组啦、NetBIOS name 等等的解析。
winbindd
The winbind service resolves user and group information on a server running Windows NT 2000 or Windows Server 2003. This makes Windows user / group information understandable by UNIX platforms. This is achieved by using Microsoft RPC calls, Pluggable Authentication Modules (PAM), and the Name Service Switch (NSS). This allows Windows NT domain users to appear and operate as UNIX users on a UNIX machine. Though bundled with the Samba distribution, the winbindservice is controlled separately from the smb service.
The winbindd daemon is controlled by the winbind service and does not require the smb service to be started in order to operate. Winbindd is also used when Samba is an Active Directory member, and may also be used on a Samba domain controller (to implement nested groups and/or interdomain trust). Because winbind is a client-side service used to connect to Windows NT-based servers, further discussion of winbind is beyond the scope of this manual.
2. 配置Samba Serve
图形界面可以允许system-config-samba或System => Administration => Server Settings => Samba:
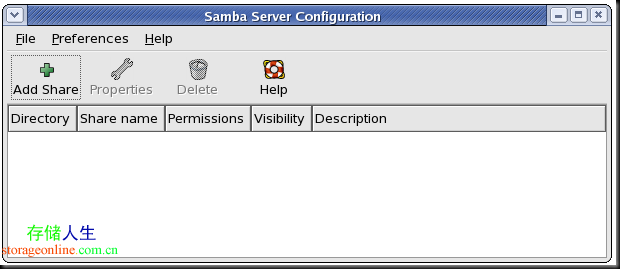
2.1 创建共享文件夹
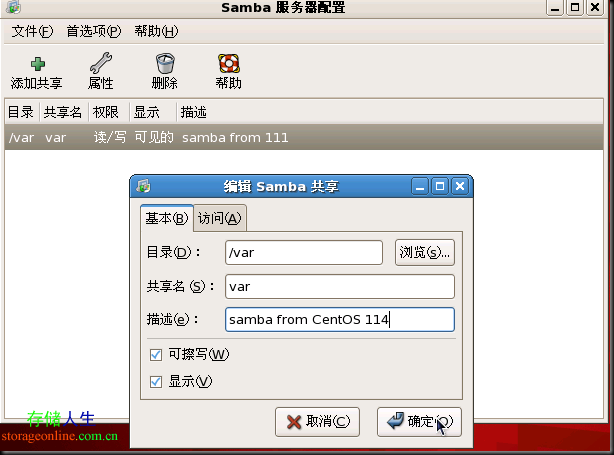
2.2 访问安全设置
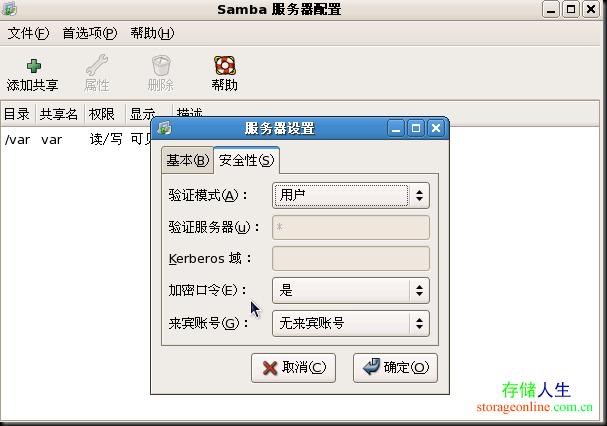
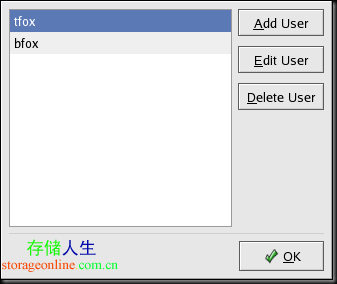
具体说明参考《http://www.centos.org/docs/5/html/Deployment_Guide-en-US/ch-samba.html》。
2.3 配置文件smb.conf
这里参考《centos下samba配置》。虽然文件内容众多,但需要改动的不多,一般为按需所配,而且很多都可以通过图形界面来配置。
(1).修改
上述四条为比较重要的.其他配置大家可按需按情况修改.
(2).创建共享文件夹.
由于用户使用权限有多种(读,写,执行),而又访问者又有多种(用户,组),所以创建共享资源的访问方式有多种,下面暂举几例:
例一: 建立资源,使登陆到该服务器的用户均有权使用该空间(包括读,写)
<1>.编辑smb.conf文件
<2>. 建立共享文件夹
<3>. 由于任何人都能使用,所以得给该文件夹设置访问权限.
<4>. 如果想在该文件夹中放置预共享文件,而又不想花时间从别的文件夹中cp过来,此时可以使用指针. 比如想共享/usr/share/doc中的文件,则可以:
进入/var/samba/resource ls一下,是不是出现指针文件了!
例二: 建立一资源,只能让用户austin全权访问.
<1>. 编辑smb.conf文件
<2>. 建立共享文件夹
<3>. 由于只能让austin使用,所以得给该文件夹设置访问权限.
此时该文件夹属于austin用户,并且只能由austin用户访问.
例三: 建立一资源,只能让root,zhang和wang访问.
<1>. 编辑smb.conf文件
<2>. 建立共享文件夹
<3>. 给该文件夹设置访问权限.
此时该文件夹只能root,zhang,wang访问了.
例四: 建立一资源,让指定的组group2中的用户访问.
<1>. 编辑smb.conf文件
<2>. 建立共享文件夹
<3>. 给该文件夹设置访问权限.
此时该文件夹只能由group2中的用户访问了.
(3). 以上为创建共享文件夹,下面为创建共享打印机.
<1>. 配置打印机的方面有很多,比如使用redhat-config-printer命令即可调出配置菜单.
<2>. 当然smb.conf中也要设置啊:
其他配置不变或按情配置
接下来再添加print驱动设置:
接着创建drivers文件夹:
最后给用户准备打印机驱动,并启动打印共享:
4. 测试并启动Samba服务器.
5. 访问Samba(1). 从Windows端访问.
使用”网络邻居”访问即可.
(2). 访问时可以使用IP地址,也可以使用主机名访问.
//创建主机名与IP的映射
访问时,使用smbclient命令,使用方法如下:
2.4 设置密码文件
2.4.1 添加Samba用户
参考《centos下samba配置》,在CentOS6.2 和 Redhat 5.7测试发现/etc/samba目录下找不到smbpasswd文件:
samba服务启用了tdbsam验证,注释掉相应的配置:
添加一行 smb passwd file:
用smbpasswd 创建新的Samba用户,还是没有smbpasswd文件产生,上网搜了一下,这里提到:
samba3.x的早期版本默认使用tdb库也就是smb.conf默认设定为passdb backend = tdbsam,只需要注释掉该行添加smb passwd file = /etec/samba/smbpasswd即可使用smbpasswd存储加密密钥。samba3.5.6更加规范了passdb backend参数的使用,取消了smb passwd file设定,如果简单注释掉passdb backend参数,密钥文件也不会被存储到smbpasswd。所以很多人说怎么修改smb.conf的配置,smbpasswd文件都无法生成,就算手工创建,内容也是0字节。
要用传统的文本方式存储只需这样设定passdb backend = smbpasswd:/etc/samba/smbpasswd(后面跟的是绝对路径,不要再画蛇添足的写上smb passwd file = /etec/samba/smbpasswd,该参数已经不适用于新版本的samba了。 注意,这里的用户名必须是linux中存在的用户,可以使用useradd命令在系统中添加一个用户,然后再增加一个对应的samba用户,也就是一个用户名使用的是两套密码。一个是系统用户密码,另一个密码存储在/etc/samba/smbpasswd文件中的samba密码,这样可以防止>系统用户密钥外泄带来的安全隐患。
测试通过:
2.4.1 给smbpasswd等文件及文件夹设置访问权限
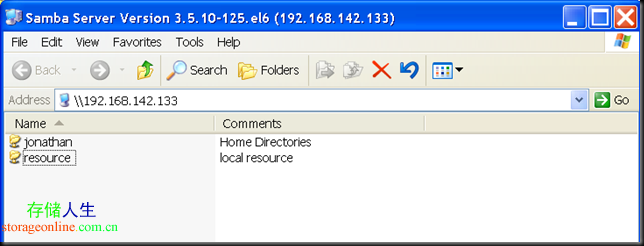
3. 访问Samba CIFS share
参考
-
http://www.centos.org/docs/5/html/Deployment_Guide-en-US/ch-samba.html
-
http://blog.chinaunix.net/space.php?uid=20715874&do=blog&id=1887729
-
http://docs.redhat.com/docs/en-US/Red_Hat_Enterprise_Linux/6/html/Deployment_Guide/ch-File_and_Print_Servers.html#s1-Samba
-
http://zhidao.baidu.com/question/409619165.html
(责任编辑:IT)
为了实现《基于开源软件构建高性能集群NAS系统 》中提到的全部用开源软件实现一个高性能集群NAS系统,趁着这几天有点时间,打算全部用VMware的虚拟机机来搭一个实验环境。全程参考《http://www.centos.org/docs/5/html/Deployment_Guide-en-US/ch-samba.html》与《http://docs.redhat.com/docs/en-US/Red_Hat_Enterprise_Linux/6/html/Deployment_Guide/ch-File_and_Print_Servers.html#s1-Samba》。 Samba is an open source implementation of the Server Message Block (SMB) protocol. It allows the networking of Microsoft Windows®, Linux, UNIX, and other operating systems together, enabling access to Windows-based file and printer shares. Samba’s use of SMB allows it to appear as a Windows server to Windows clients. 1. 安装Samba服务
安装后将启动3个daemons (smbd, nmbd, and winbindd)和2个services (smb and windbind) :
smbdThe smbd server daemon provides file sharing and printing services to Windows clients. In addition, it is responsible for user authentication, resource locking, and data sharing through the SMB protocol. The default ports on which the server listens for SMB traffic are TCP ports 139 and 445. The smbd daemon is controlled by the smb service. nmbdThe nmbd server daemon understands and replies to NetBIOS name service requests such as those produced by SMB/CIFS in Windows-based systems. These systems include Windows 95/98/ME, Windows NT, Windows 2000, Windows XP, and LanManager clients. It also participates in the browsing protocols that make up the Windows Network Neighborhood view. The default port that the server listens to for NMB traffic is UDP port 137. The nmbd daemon is controlled by the smb service.
smbd :这个 daemon 的主要功能就是用来管理 SAMBA 主机分享什么目录、档案与印表机等等的内容。 winbinddThe winbind service resolves user and group information on a server running Windows NT 2000 or Windows Server 2003. This makes Windows user / group information understandable by UNIX platforms. This is achieved by using Microsoft RPC calls, Pluggable Authentication Modules (PAM), and the Name Service Switch (NSS). This allows Windows NT domain users to appear and operate as UNIX users on a UNIX machine. Though bundled with the Samba distribution, the winbindservice is controlled separately from the smb service. The winbindd daemon is controlled by the winbind service and does not require the smb service to be started in order to operate. Winbindd is also used when Samba is an Active Directory member, and may also be used on a Samba domain controller (to implement nested groups and/or interdomain trust). Because winbind is a client-side service used to connect to Windows NT-based servers, further discussion of winbind is beyond the scope of this manual. 2. 配置Samba Serve
图形界面可以允许system-config-samba或System => Administration => Server Settings => Samba:
2.1 创建共享文件夹
2.2 访问安全设置
具体说明参考《http://www.centos.org/docs/5/html/Deployment_Guide-en-US/ch-samba.html》。 2.3 配置文件smb.conf
这里参考《centos下samba配置》。虽然文件内容众多,但需要改动的不多,一般为按需所配,而且很多都可以通过图形界面来配置。 上述四条为比较重要的.其他配置大家可按需按情况修改. (2).创建共享文件夹.
由于用户使用权限有多种(读,写,执行),而又访问者又有多种(用户,组),所以创建共享资源的访问方式有多种,下面暂举几例: <2>. 建立共享文件夹 <3>. 由于任何人都能使用,所以得给该文件夹设置访问权限. <4>. 如果想在该文件夹中放置预共享文件,而又不想花时间从别的文件夹中cp过来,此时可以使用指针. 比如想共享/usr/share/doc中的文件,则可以: 进入/var/samba/resource ls一下,是不是出现指针文件了!
例二: 建立一资源,只能让用户austin全权访问. <2>. 建立共享文件夹 <3>. 由于只能让austin使用,所以得给该文件夹设置访问权限. 此时该文件夹属于austin用户,并且只能由austin用户访问.
例三: 建立一资源,只能让root,zhang和wang访问. <2>. 建立共享文件夹 <3>. 给该文件夹设置访问权限. 此时该文件夹只能root,zhang,wang访问了.
例四: 建立一资源,让指定的组group2中的用户访问. <2>. 建立共享文件夹 <3>. 给该文件夹设置访问权限.
此时该文件夹只能由group2中的用户访问了.
其他配置不变或按情配置 接着创建drivers文件夹: 最后给用户准备打印机驱动,并启动打印共享: 4. 测试并启动Samba服务器.
5. 访问Samba(1). 从Windows端访问.
//创建主机名与IP的映射 2.4 设置密码文件2.4.1 添加Samba用户参考《centos下samba配置》,在CentOS6.2 和 Redhat 5.7测试发现/etc/samba目录下找不到smbpasswd文件: samba服务启用了tdbsam验证,注释掉相应的配置: 添加一行 smb passwd file: 用smbpasswd 创建新的Samba用户,还是没有smbpasswd文件产生,上网搜了一下,这里提到: samba3.x的早期版本默认使用tdb库也就是smb.conf默认设定为passdb backend = tdbsam,只需要注释掉该行添加smb passwd file = /etec/samba/smbpasswd即可使用smbpasswd存储加密密钥。samba3.5.6更加规范了passdb backend参数的使用,取消了smb passwd file设定,如果简单注释掉passdb backend参数,密钥文件也不会被存储到smbpasswd。所以很多人说怎么修改smb.conf的配置,smbpasswd文件都无法生成,就算手工创建,内容也是0字节。 要用传统的文本方式存储只需这样设定passdb backend = smbpasswd:/etc/samba/smbpasswd(后面跟的是绝对路径,不要再画蛇添足的写上smb passwd file = /etec/samba/smbpasswd,该参数已经不适用于新版本的samba了。 注意,这里的用户名必须是linux中存在的用户,可以使用useradd命令在系统中添加一个用户,然后再增加一个对应的samba用户,也就是一个用户名使用的是两套密码。一个是系统用户密码,另一个密码存储在/etc/samba/smbpasswd文件中的samba密码,这样可以防止>系统用户密钥外泄带来的安全隐患。 测试通过: 2.4.1 给smbpasswd等文件及文件夹设置访问权限3. 访问Samba CIFS share
参考
(责任编辑:IT) |