CentOS下搭建WordPress网站及安全设置
时间:2014-05-17 15:54 来源:linux.it.net.cn 作者:IT网
一、前言
二、环境
三、基本配置
1.搭建LAMP环境
2.安装WordPress
3.安装phpMyAdmin
四、安全配置
1.身份验证
2.来源控制
3.加密访问(https)
五、测试
-------------------------------------------
一、前言
LAMP即Linux+Apache+Mysql+PHP,一组常用来搭建动态网站或者服务器的开源软件,本身都是各自独立的程序,但是因为常被放在一起使用,拥有了越来越高的兼容度,共同组成了一个强大的Web应用程序平台。随着开源潮流的蓬勃发展,开放源代码的LAMP已经与J2EE和.Net商业软件形成三足鼎立之势,并且该软件开发的项目在软件方面的投资成本较低,因此受到整个IT界的关注。从网站的流量上来说,70%以上的访问流量是LAMP来提供的,LAMP是最强大的网站解决方案.
WordPress是一种使用PHP语言开发的博客平台,用户可以在支持PHP和MySQL 数据库的服务器上架设属于自己的网站。也可以把 WordPress 当作一个内容管理系统(CMS)来使用。WordPress 是一个免费的开源项目,在GNU通用公共许可证下授权发布。WordPress 被认为是Michel Valdrighi所开发的网志平台b2/cafelog的正式继承者。“WordPress”这个名字出自 Christine Selleck 的主意,他是主要开发者Matt Mullenweg的朋友。
phpMyAdmin 是一个以PHP为基础,以Web-Base方式架构在网站主机上的MySQL的数据库管理工具,让管理者可用Web接口管理MySQL数据库。借由此Web接口可以成为一个简易方式输入繁杂SQL语法的较佳途径,尤其要处理大量资料的汇入及汇出更为方便。其中一个更大的优势在于由于phpMyaAdmin跟其他PHP程式一样在网页服务器上执行,但是您可以在任何地方使用这些程式产生的HTML页面,也就是于远端管理MySQL数据库,方便的建立、修改、删除数据库及资料表。也可借由phpMyAdmin建立常用的php语法,方便编写网页时所需要的sql语法正确性。
二、环境
系统:redhat6.5 32位
IP:192.168.2.200/24
软件包:
wordpress-3.9-zh_CN.zip wordpress主文件
phpMyAdmin-4.1.5-all-languages.zip phpMyAdmin主文件
三、基本配置
1.搭建LAMP环境
1
2
3
4
5
6
7
8
9
10
11
12
13
14
15
16
17
18
19
20
21
22
23
24
25
26
27
# service iptables stop //关闭防火墙及SELinux
# setenforce 0
# yum install httpd mysql mysql-server php php-mysql php-gd php-xml
# service httpd start
# service mysqld start
# chkconfig httpd on //开机启动
# chkconfig --list |grep httpd
httpd 0:off 1:off 2:on 3:on 4:on 5:on 6:off
# chkconfig mysqld on
# chkconfig --list |grep mysql
mysqld 0:off 1:off 2:on 3:on 4:on 5:on 6:off
# mysqladmin -u root -p password '123' //为mysql设置用户和密码
Enter password: //此处回车即可。
# mysql -u root -p
Enter password:
mysql> create database wordpress; //创建wordpress数据库,为下面安装wordpress做准备。
mysql> show databases;
+--------------------+
| Database |
+--------------------+
| information_schema |
| mysql |
| test |
| wordpress |
+--------------------+
mysql> \q
Bye
2.安装WordPress
1
2
# unzip wordpress-3.9-zh_CN.zip //解压缩
# mv wordpress /var/www/html/
将下面IP和域名写入hosts文件C:\Windows\System32\drivers\etc\hosts
192.168.2.10 www.yinuo.com
客户端浏览器访问 http://www.yinuo.com/wordpress/

(1)点击创建配置文件。
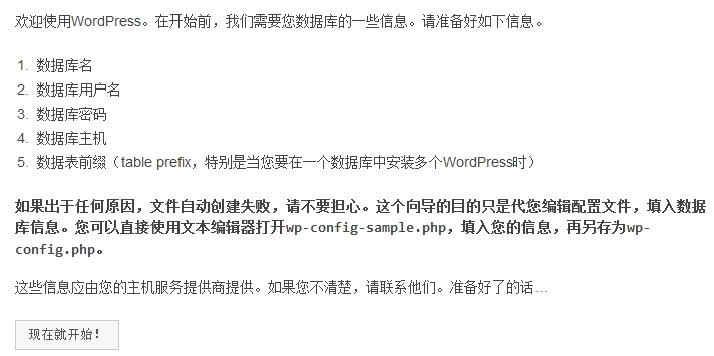
(2)点击现在就开始。
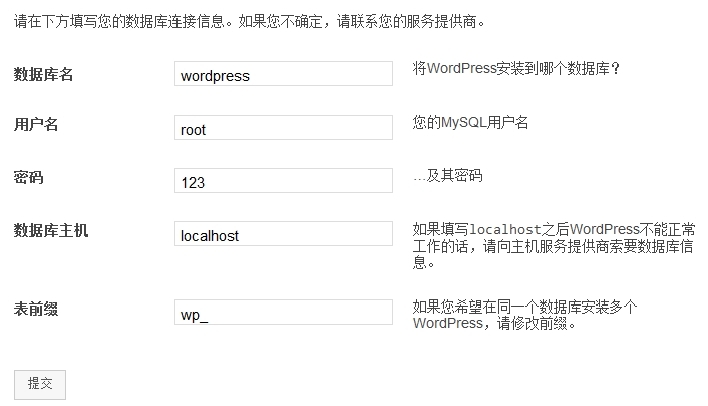
(3)写入用户名和密码,点击提交。
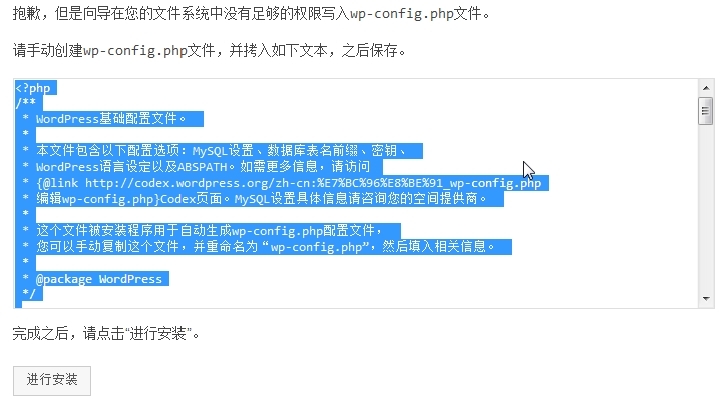
(4)按照提示,手动创建wp-config.php文件,并把文本复制进去,然后进行安装。
1
2
# cd /var/www/html/wordpress/
# vim wp-config.php
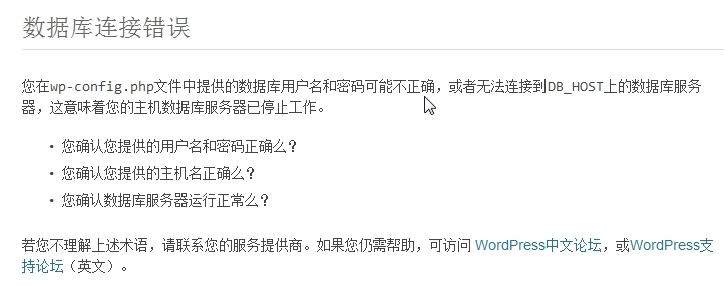
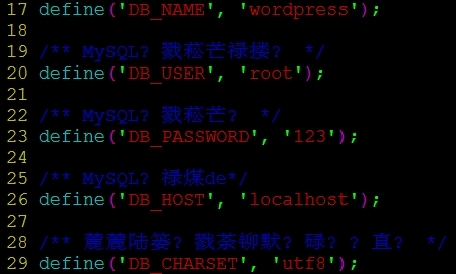
(5)如果数据库连接错误,一定要看下wp-config.php文件的17-26行,不许有任何错误(如下图)。
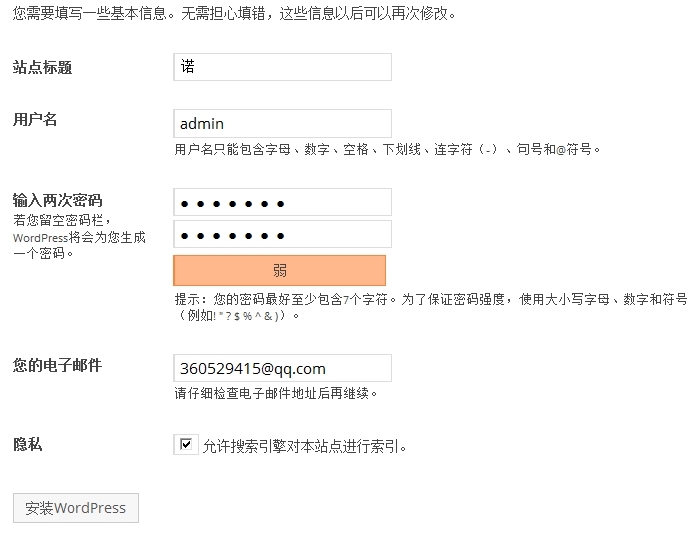
(6)填写站点信息,安装wordpress。
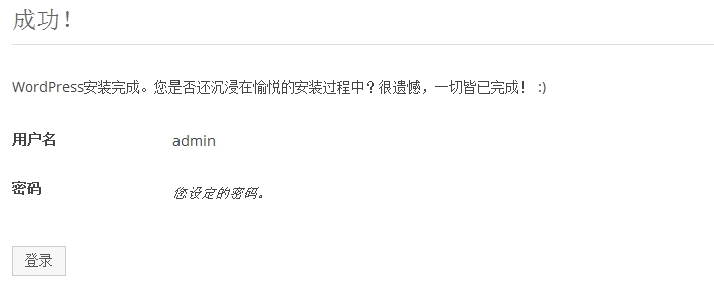
(7)已成功,可以进行登录了。
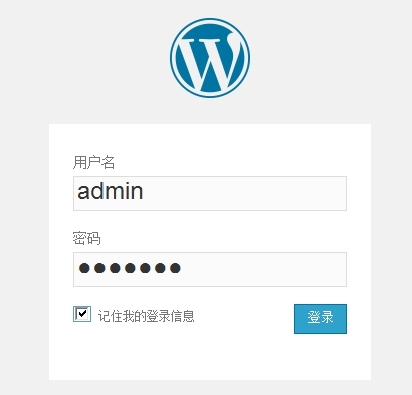
(8)登录测试。

(9)更换个性主题,如fengying.zip。
1
2
# unzip fengying.zip
# mv fengying /var/www/html/wordpress/wp-content/themes/
3.安装phpMyAdmin
1
2
3
4
5
# unzip phpMyAdmin-4.1.5-all-languages.zip
# mv phpMyAdmin-4.1.5-all-languages /var/www/html/phpmyadmin
# rpm -qa php //查看php版本信息
php-5.3.3-22.el6.i686
http://rpm.pbone.net/ //去这个网址下载和php版本相对应的php-mbstring

1
2
3
4
5
6
7
8
# rpm -ivh php-mbstring-5.3.3-22.el6.i686.rpm
# rpm -qa |grep php
php-5.3.3-22.el6.i686
php-mbstring-5.3.3-22.el6.i686
再次提醒,php和php-mbstring版本信息必须一致。
# service httpd restart
Stopping httpd: [ OK ]
Starting httpd: [ OK ]
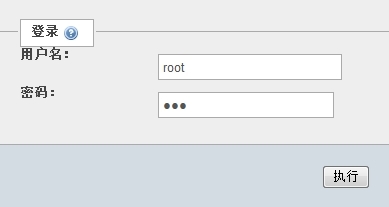
访问http://192.168.2.10/phpmyadmin/
输入数据库的账号和密码。
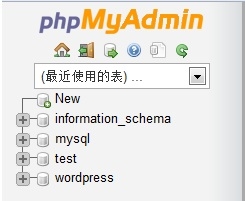
管理数据库(图形界面下的mysql管理工具)。
四、安全配置
1.身份验证
1
2
3
4
5
6
7
8
9
10
11
12
13
14
15
16
17
18
19
20
21
22
23
# vim /etc/httpd/conf/httpd.conf
338 AllowOverride all //访问需要验证
# cd /var/www/html/wordpress/
# vim .htaccess //创建验证说明文件
authuserfile /var/www/html/.htpasswd
authname "nuo"
authtype basic
require valid-user
# cd ..
# htpasswd -c .htpasswd admin //创建密码文件,用户名为admin,为了安全,密码和说明文件不在同一目录下
New password:
Re-type new password:
Adding password for user admin
# cat .htpasswd
admin:OEWyxf6WFthog
# ll -a
drwxr-xr-x. 3 root root 4096 May 14 14:21 .
drwxr-xr-x. 6 root root 4096 Mar 30 15:01 ..
-rw-r--r--. 1 root root 20 May 14 14:21 .htpasswd
drwxr-xr-x. 5 root root 4096 May 14 14:20 wordpress
# service httpd restart
Stopping httpd: [ OK ]
Starting httpd: [ OK ]
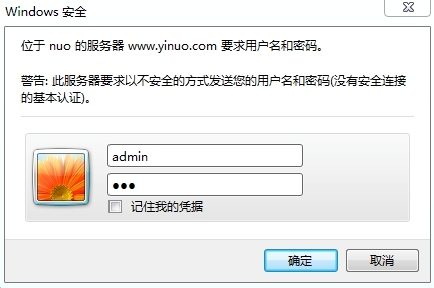
客户端浏览器访问 http://www.yinuo.com/wordpress/
需账号和密码才能正常访问个人主页。
2.来源控制
1
2
3
4
# vim /etc/httpd/conf/httpd.conf
343 Order allow,deny
344 Allow from all
345 deny from X.X.X.X
X.X.X.X 表示拒绝访问的IP。
3.加密访问(https)
1
2
3
4
5
6
7
8
9
10
11
12
# cd /etc/pki
# ll
drwxr-xr-x. 6 root root 4096 Mar 30 14:59 CA
drwxr-xr-x. 4 root root 4096 Mar 30 14:57 ca-trust
drwxr-xr-x. 2 root root 4096 Mar 30 15:41 entitlement
drwxr-xr-x. 2 root root 4096 Mar 30 14:57 java
drwxr-xr-x. 2 root root 4096 Mar 30 14:58 nssdb
drwxr-xr-x. 2 root root 4096 Mar 30 15:15 product
drwxr-xr-x. 2 root root 4096 Mar 30 14:55 rpm-gpg
drwx------. 2 root root 4096 Aug 15 2013 rsyslog
drwxr-xr-x. 5 root root 4096 Mar 30 14:59 tls
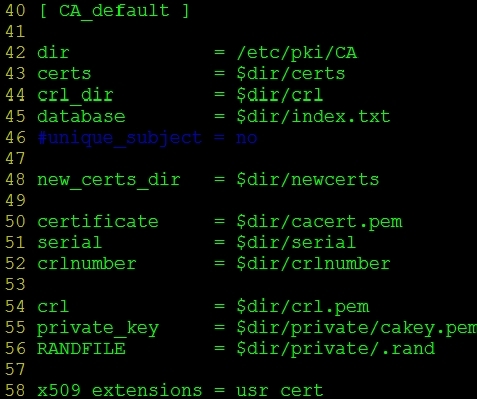
# vim tls/openssl.cnf
1
2
3
4
5
6
7
8
9
10
11
12
13
14
15
16
17
18
19
20
21
22
23
24
25
26
27
28
29
30
31
32
33
34
35
36
37
38
39
# cd /etc/pki/CA/
# touch index.txt
# touch serial
# echo 00 >serial
# openssl genrsa 1024 >private/cakey.pem
Generating RSA private key, 1024 bit long modulus
.................++++++
.........................................++++++
e is 65537 (0x10001)
# ll private/cakey.pem
-rw-r--r--. 1 root root 887 May 14 14:38 private/cakey.pem
# openssl req -new -key private/cakey.pem -x509 -out cacert.pem
You are about to be asked to enter information that will be incorporated
into your certificate request.
What you are about to enter is what is called a Distinguished Name or a DN.
There are quite a few fields but you can leave some blank
For some fields there will be a default value,
If you enter '.', the field will be left blank.
-----
Country Name (2 letter code) [XX]:CN
State or Province Name (full name) []:HeNan
Locality Name (eg, city) [Default City]:ZhengZhou
Organization Name (eg, company) [Default Company Ltd]:ZZU
Organizational Unit Name (eg, section) []:tec
Common Name (eg, your name or your server's hostname) []:rootca.net.org
Email Address []:
# mkdir -pv /etc/httpd/certs
# cd /etc/httpd/certs/
# openssl genrsa 1024 >httpd.key
Generating RSA private key, 1024 bit long modulus
.......++++++
....++++++
e is 65537 (0x10001)
# ll
-rw-r--r--. 1 root root 887 May 14 14:42 httpd.key
# chmod 600 httpd.key
# ll
-rw-------. 1 root root 887 May 14 14:42 httpd.key
# vim /etc/pki/tls/openssl.cnf // 低行命令模式:85,87 s/match/optional

1
2
3
4
5
6
7
8
9
10
11
12
13
14
15
16
17
18
19
20
21
22
23
24
25
26
27
28
29
30
31
32
33
34
35
36
37
38
39
40
41
42
43
44
45
46
47
48
49
50
51
52
53
54
55
56
57
58
59
60
61
62
63
64
65
66
67
68
# openssl req -new -key httpd.key -out httpd.crq
You are about to be asked to enter information that will be incorporated
into your certificate request.
What you are about to enter is what is called a Distinguished Name or a DN.
There are quite a few fields but you can leave some blank
For some fields there will be a default value,
If you enter '.', the field will be left blank.
-----
Country Name (2 letter code) [XX]:CN
State or Province Name (full name) []:HeNan
Locality Name (eg, city) [Default City]:ZhengZhou
Organization Name (eg, company) [Default Company Ltd]:abc
Organizational Unit Name (eg, section) []:tec
Common Name (eg, your name or your server's hostname) []:www.abc.com
Email Address []:
Please enter the following 'extra' attributes
to be sent with your certificate request
A challenge password []:
An optional company name []:
# ll
-rw-r--r--. 1 root root 651 May 14 14:46 httpd.crq
-rw-------. 1 root root 887 May 14 14:42 httpd.key
# openssl ca -in httpd.crq -out httpd.cert
Using configuration from /etc/pki/tls/openssl.cnf
Check that the request matches the signature
Signature ok
Certificate Details:
Serial Number: 0 (0x0)
Validity
Not Before: May 14 21:46:54 2014 GMT
Not After : May 14 21:46:54 2015 GMT
Subject:
countryName = CN
stateOrProvinceName = ZhengZhou
organizationName = abc
organizationalUnitName = tec
commonName = www.abc.com
X509v3 extensions:
X509v3 Basic Constraints:
CA:FALSE
Netscape Comment:
OpenSSL Generated Certificate
X509v3 Subject Key Identifier:
0A:8A:11:6A:C4:86:4B:66:DC:C3:10:B5:D4:CE:C2:AB:E8:8A:8B:DE
X509v3 Authority Key Identifier:
keyid:79:AB:D7:17:BC:30:27:1F:59:08:6F:01:70:A2:33:53:55:99:27:E1
Certificate is to be certified until May 14 21:46:54 2015 GMT (365 days)
Sign the certificate? [y/n]:y
1 out of 1 certificate requests certified, commit? [y/n]y
Write out database with 1 new entries
Data Base Updated
# cd /etc/pki/CA/
# cat index.txt
V 150514214654Z 00 unknown /C=CN/ST=ZhengZhou/O=abc/OU=tec/CN=www.abc.com
# yum install mod_ssl
# vim /etc/httpd/conf.d/ssl.conf
105 SSLCertificateFile /etc/httpd/certs/httpd.cert
112 SSLCertificateKeyFile /etc/httpd/certs/httpd.key
121 SSLCertificateChainFile /etc/pki/CA/cacert.pem
# service httpd configtest //语法测试
Syntax OK
# vim /etc/httpd/conf/httpd.conf
136 #Listen 80 //关闭80端口,仅能使用https方式访问
# service httpd restart
Stopping httpd: [ OK ]
Starting httpd: [ OK ]
# netstat -tupln |grep httpd
tcp 0 0 :::443 :::* LISTEN 25167/httpd
五、测试
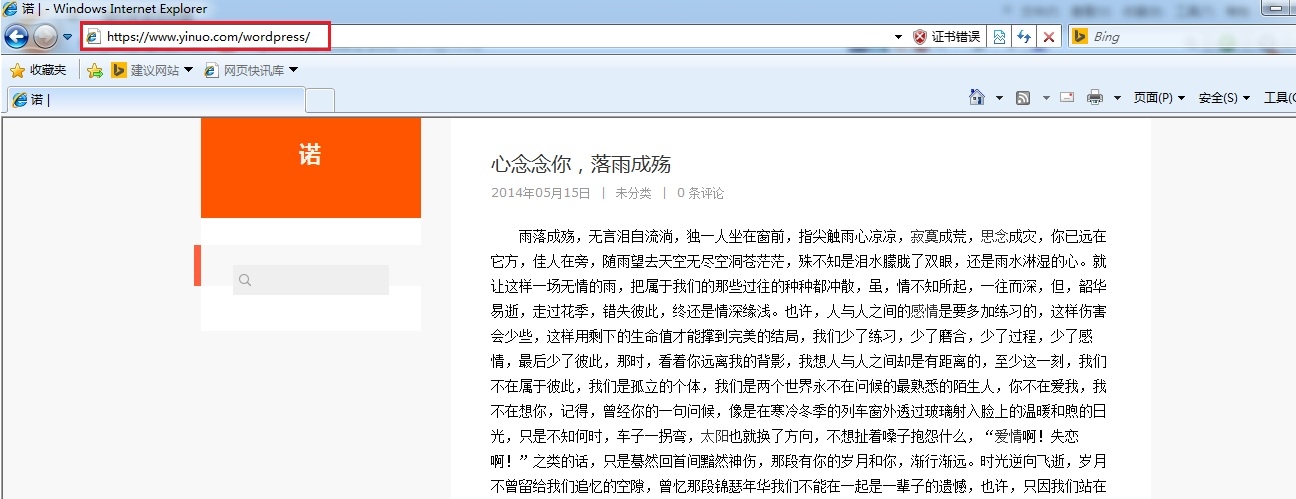
客户端浏览器访问 https://www.yinuo.com/wordpress/
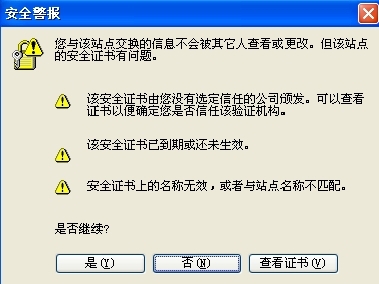
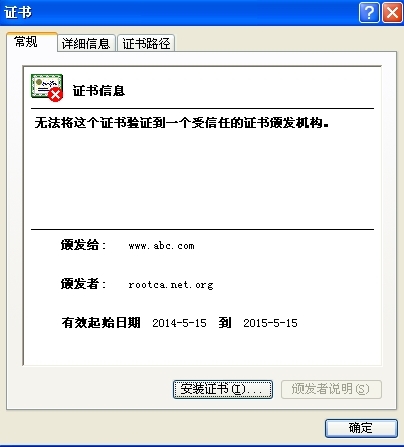
查看证书并安装。
主页展示
本文出自 “一诺千金” 博客,请务必保留此出处http://yinuoqianjin.blog.51cto.com/8360868/1352804
(责任编辑:IT)
一、前言 二、环境 三、基本配置 1.搭建LAMP环境 2.安装WordPress 3.安装phpMyAdmin 四、安全配置 1.身份验证 2.来源控制 3.加密访问(https) 五、测试 -------------------------------------------
一、前言 LAMP即Linux+Apache+Mysql+PHP,一组常用来搭建动态网站或者服务器的开源软件,本身都是各自独立的程序,但是因为常被放在一起使用,拥有了越来越高的兼容度,共同组成了一个强大的Web应用程序平台。随着开源潮流的蓬勃发展,开放源代码的LAMP已经与J2EE和.Net商业软件形成三足鼎立之势,并且该软件开发的项目在软件方面的投资成本较低,因此受到整个IT界的关注。从网站的流量上来说,70%以上的访问流量是LAMP来提供的,LAMP是最强大的网站解决方案. WordPress是一种使用PHP语言开发的博客平台,用户可以在支持PHP和MySQL 数据库的服务器上架设属于自己的网站。也可以把 WordPress 当作一个内容管理系统(CMS)来使用。WordPress 是一个免费的开源项目,在GNU通用公共许可证下授权发布。WordPress 被认为是Michel Valdrighi所开发的网志平台b2/cafelog的正式继承者。“WordPress”这个名字出自 Christine Selleck 的主意,他是主要开发者Matt Mullenweg的朋友。 phpMyAdmin 是一个以PHP为基础,以Web-Base方式架构在网站主机上的MySQL的数据库管理工具,让管理者可用Web接口管理MySQL数据库。借由此Web接口可以成为一个简易方式输入繁杂SQL语法的较佳途径,尤其要处理大量资料的汇入及汇出更为方便。其中一个更大的优势在于由于phpMyaAdmin跟其他PHP程式一样在网页服务器上执行,但是您可以在任何地方使用这些程式产生的HTML页面,也就是于远端管理MySQL数据库,方便的建立、修改、删除数据库及资料表。也可借由phpMyAdmin建立常用的php语法,方便编写网页时所需要的sql语法正确性。 二、环境 系统:redhat6.5 32位 IP:192.168.2.200/24 软件包: wordpress-3.9-zh_CN.zip wordpress主文件 phpMyAdmin-4.1.5-all-languages.zip phpMyAdmin主文件 三、基本配置 1.搭建LAMP环境
2.安装WordPress
将下面IP和域名写入hosts文件C:\Windows\System32\drivers\etc\hosts 192.168.2.10 www.yinuo.com 客户端浏览器访问 http://www.yinuo.com/wordpress/
(1)点击创建配置文件。
(2)点击现在就开始。
(3)写入用户名和密码,点击提交。
(4)按照提示,手动创建wp-config.php文件,并把文本复制进去,然后进行安装。
(5)如果数据库连接错误,一定要看下wp-config.php文件的17-26行,不许有任何错误(如下图)。
(6)填写站点信息,安装wordpress。
(7)已成功,可以进行登录了。
(8)登录测试。
(9)更换个性主题,如fengying.zip。
3.安装phpMyAdmin
访问http://192.168.2.10/phpmyadmin/
输入数据库的账号和密码。
管理数据库(图形界面下的mysql管理工具)。
四、安全配置 1.身份验证
客户端浏览器访问 http://www.yinuo.com/wordpress/
需账号和密码才能正常访问个人主页。
2.来源控制
X.X.X.X 表示拒绝访问的IP。 3.加密访问(https)
五、测试 客户端浏览器访问 https://www.yinuo.com/wordpress/
查看证书并安装。
主页展示
本文出自 “一诺千金” 博客,请务必保留此出处http://yinuoqianjin.blog.51cto.com/8360868/1352804 (责任编辑:IT) |