Windows下用Nginx+Tomcat配置集群负载均衡
时间:2015-02-02 16:25 来源:linux.it.net.cn 作者:IT
Nginx是一款轻量级的web服务器/反向代理服务器,更详细的释义自己百度了。目前国内像新浪、网易等都在使用它。先说下我的服务器软件环境:
系统:windows_server_2008_standard_enterprise_and_datacenter_with_sp2_x64
当前运行的Tomcat:非安装版本Tomcat 6.0.36
就说这两个关键的吧,目前遇到的问题是访问量剧增单个tomcat已无力负载了,经常出现超时的情况。于是就计划用nginx布置负载均衡,网络上查到的资料多是介绍linux版本的nginx的布置及使用,但在windows中如果使用linux版本的nginx只能做个测试用,实际生产环境是无法使用的,会报如下的错误:
maximum number of descriptors supported by select() is 1024 while waiting for request
这是因为文件访问句柄数被限制为1024了,当访问量大时就会无法响应。去网上有查过很多资料说是修改参数worker_connections可以解决此限制,还有其它很多说修改worker_rlimit_nofile 参数等,都尝试了但都以失败告终。就在准备换其它工具时在国外的一个论坛看到了一条回复,地址不记得了,说的是有专门的windows版本的nginx,已修改了文件句柄数据的限制。后来下载后果真配置成功运行ok了。只要下载到正确的版本配置还是so easy的。以下为下载配置过程哈~~
nginx for windows官网:http://nginx-win.ecsds.eu/
nginx for windows下载载地址: http://nginx-win.ecsds.eu/download/
我下载的是nginx 1.7.7.1 WhiteRabbit.zip这个版本,太新的版本我怕不稳定。下载完毕后解压安装包,里面有个简要的更新信息和安装指南Readme nginx-win version.txt。关键信息如下:
*** Default installation instructions;
* New: unzip this version with folder structure
* Old: overwrite with this version
* Check nginx.conf, nginx-org.conf and nginx-win.conf
* Windows optimization registry file: check your current values BEFORE setting the new ones
找到conf文件夹中的nginx-win.conf,把它复制一份更名为nginx.conf,然后在此文件中做配置,我的配置文件如下:
#user  nobody;
# multiple workers works !
# 工作进程数:这个数值要根据服务器CPU核心数来配置,如6核12线程的cpu可以配置为6或12。
<strong>worker_processes  6;</strong>
#错误日志存放路径
#error_log  logs/error.log;
#error_log  logs/error.log  notice;
#error_log  logs/error.log  info;

#pid        logs/nginx.pid;


events {
#设置单个进程同时打开的最大连接数,这个值设置大些能接受较多的连接,当然这需要cpu和内存支持哦~~
   <strong> worker_connections  32768;</strong>
    # max value 32768, nginx recycling connections+registry optimization =
    #   this.value * 20 = max concurrent connections currently tested with one worker
    #   C1000K should be possible depending there is enough ram/cpu power
    # multi_accept on;
}


http {
    #include      /nginx/conf/naxsi_core.rules;
    include       mime.types;
    default_type  application/octet-stream;

    #log_format  main  '$remote_addr:$remote_port - $remote_user [$time_local] "$request" '
    #                  '$status $body_bytes_sent "$http_referer" '
    #                  '"$http_user_agent" "$http_x_forwarded_for"';

    #access_log  logs/access.log  main;

#     # loadbalancing PHP
#     upstream myLoadBalancer {
#         server 127.0.0.1:9001 weight=1 fail_timeout=5;
#         server 127.0.0.1:9002 weight=1 fail_timeout=5;
#         server 127.0.0.1:9003 weight=1 fail_timeout=5;
#         server 127.0.0.1:9004 weight=1 fail_timeout=5;
#         server 127.0.0.1:9005 weight=1 fail_timeout=5;
#         server 127.0.0.1:9006 weight=1 fail_timeout=5;
#         server 127.0.0.1:9007 weight=1 fail_timeout=5;
#         server 127.0.0.1:9008 weight=1 fail_timeout=5;
#         server 127.0.0.1:9009 weight=1 fail_timeout=5;
#         server 127.0.0.1:9010 weight=1 fail_timeout=5;
#         least_conn;
#     }
<span style="white-space:pre">	</span># 在此处设置tomcat服务器信息,同样tomcat也可以不在同一主机中。这里设置了两个tomcat服务,比重是1:1了。 localhost更换为服务器的IP
<strong>	  upstream localhost{
	   #ip_hash;
           server  127.0.0.1:9010 weight=1;
           server  127.0.0.1:9020 weight=1;
         }  </strong>

    sendfile        off;
    #tcp_nopush     on;

    server_names_hash_bucket_size 128;

## Start: Timeouts ##
    client_body_timeout   10;
    client_header_timeout 10;
    keepalive_timeout     80;
    send_timeout          10;
    keepalive_requests    10;
## End: Timeouts ##

    #gzip  on;

    server {
#这个很关键~~它是nginx监听的端口哦~~
       <strong> listen       8080;</strong>
        server_name  localhost;

        #charset koi8-r;

        #access_log  logs/host.access.log  main;

# For Naxsi remove the single # line for learn mode, or the ## lines for full WAF mode

        location / {
            #include    /nginx/conf/mysite.rules; # see also http block naxsi include line
            ##SecRulesEnabled;
        	  ##DeniedUrl "/RequestDenied";
	          ##CheckRule "$SQL >= 8" BLOCK;
	          ##CheckRule "$RFI >= 8" BLOCK;
	          ##CheckRule "$TRAVERSAL >= 4" BLOCK;
	          ##CheckRule "$XSS >= 8" BLOCK;

	      <strong>    proxy_pass         http://localhost; </strong>
            root   html;
            index  index.html index.htm;
        }

# For Naxsi remove the ## lines for full WAF mode, redirect location block used by naxsi
        ##location /RequestDenied {
        ##    return 412;
        ##}

## Lua examples !
#         location /robots.txt {
#           rewrite_by_lua '
#             if ngx.var.http_host ~= "localhost" then
#               return ngx.exec("/robots_disallow.txt");
#             end
#           ';
#         }

        #error_page  404              /404.html;

        # redirect server error pages to the static page /50x.html
        #
        error_page   500 502 503 504  /50x.html;
        location = /50x.html {
            root   html;
        }

        # proxy the PHP scripts to Apache listening on 127.0.0.1:80
        #
        #location ~ \.php$ {
        #    proxy_pass   http://127.0.0.1;
        #}

        # pass the PHP scripts to FastCGI server listening on 127.0.0.1:9000
        #
        #location ~ \.php$ {
        #    root           html;
        #    fastcgi_pass   127.0.0.1:9000; # single backend process
        #    fastcgi_pass   myLoadBalancer; # or multiple, see example above
        #    fastcgi_index  index.php;
        #    fastcgi_param  SCRIPT_FILENAME  $document_root$fastcgi_script_name;
        #    include        fastcgi_params;
        #}

        # deny access to .htaccess files, if Apache's document root
        # concurs with nginx's one
        #
        #location ~ /\.ht {
        #    deny  all;
        #}
    }


    # another virtual host using mix of IP-, name-, and port-based configuration
    #
    #server {
    #    listen       8000;
    #    listen       somename:8080;
    #    server_name  somename  alias  another.alias;

    #    location / {
    #        root   html;
    #        index  index.html index.htm;
    #    }
    #}


    # HTTPS server
    #
    #server {
    #    listen       443 ssl spdy;
    #    server_name  localhost;

    #    ssl                  on;
    #    ssl_certificate      cert.pem;
    #    ssl_certificate_key  cert.key;

    #    ssl_session_timeout  5m;

    #    ssl_prefer_server_ciphers On;
    #    ssl_protocols SSLv3 TLSv1 TLSv1.1 TLSv1.2;
    #    ssl_ciphers ECDH+AESGCM:DH+AESGCM:ECDH+AES256:DH+AES256:ECDH+AES128:DH+AES:ECDH+3DES:DH+3DES:RSA+AESGCM:RSA+AES:RSA+3DES:!aNULL:!eNULL:!MD5:!DSS;

    #    location / {
    #        root   html;
    #        index  index.html index.htm;
    #    }
    #}

}
Tomcat的配置就比较简单了就是再复制一个改三处端口就可以了。具体自己百度了。
配置完毕运行nginx.exe和tomcat就可以验证配置情况了。
nginx启动控制我采用了网上一哥们的脚本,地址如下:
-
原作者 :leleroyn
-
地址:
-
http://www.cnblogs.com/leleroyn/archive/2010/07/08/1773388.htm#2634139
我借鉴了他的代码, 扩展了新的特性:
1.支持文件夹路径带空格,
2.显示nginx现在的进程
3.精简了 代码
先较于 上一个版本 http://feitianbenyue.iteye.com/blog/1828929 有以下更新:
1.新增 [5] 重新加载Nginx配置文件 (修改了nginx配置文件, 只需要 reload 下, 不需要重启nginx)
2.新增 [6] 检查测试nginx配置文件
3.新增 [7] 查看nginx version
什么都不说 ,上图:
什么都不说,上原码:
-
@echo off
-
rem 提供Windows下nginx的启动,重启,关闭功能
-
-
echo ==================begin========================
-
-
cls
-
-
color 0a
-
TITLE Nginx 管理程序 Power By Ants (http://leleroyn.cnblogs.com) Update by 鑫哥
-
-
CLS
-
-
echo.
-
echo. ** Nginx 管理程序 Power By Ants (http://leleroyn.cnblogs.com) ***
-
echo. *** update by 鑫哥 2013-12-14 ***
-
echo.
-
-
::*************************************************************************************************************
-
::ngxin 所在的盘符
-
set NGINX_PATH=D:
-
-
::nginx 所在目录
-
set NGINX_DIR=D:\FeiLong Soft\Essential\Development\nginx-1.2.5\
-
-
::*************************************************************************************************************
-
:MENU
-
-
echo. ***** nginx 进程list ******
-
::tasklist|findstr /i "nginx.exe"
-
tasklist /fi "imagename eq nginx.exe"
-
-
echo.
-
-
if ERRORLEVEL 1 (
-
echo nginx.exe不存在
-
) else (
-
echo nginx.exe存在
-
)
-
-
echo.
-
::*************************************************************************************************************
-
echo.
-
echo. [1] 启动Nginx
-
echo. [2] 关闭Nginx
-
echo. [3] 重启Nginx
-
echo. [4] 刷新控制台
-
echo. [5] 重新加载Nginx配置文件
-
echo. [6] 检查测试nginx配置文件
-
echo. [7] 查看nginx version
-
echo. [0] 退 出
-
echo.
-
-
echo.请输入选择的序号:
-
set /p ID=
-
IF "%id%"=="1" GOTO start
-
IF "%id%"=="2" GOTO stop
-
IF "%id%"=="3" GOTO restart
-
IF "%id%"=="4" GOTO MENU
-
IF "%id%"=="5" GOTO reloadConf
-
IF "%id%"=="6" GOTO checkConf
-
IF "%id%"=="7" GOTO showVersion
-
IF "%id%"=="0" EXIT
-
PAUSE
-
-
::*************************************************************************************************************
-
::启动
-
:start
-
call :startNginx
-
GOTO MENU
-
-
::停止
-
:stop
-
call :shutdownNginx
-
GOTO MENU
-
-
::重启
-
:restart
-
call :shutdownNginx
-
call :startNginx
-
GOTO MENU
-
-
::检查测试配置文件
-
:checkConf
-
call :checkConfNginx
-
GOTO MENU
-
-
::重新加载Nginx配置文件
-
:reloadConf
-
call :checkConfNginx
-
call :reloadConfNginx
-
GOTO MENU
-
-
::显示nginx版本
-
:showVersion
-
call :showVersionNginx
-
GOTO MENU
-
-
-
::*************************************************************************************
-
::底层
-
::*************************************************************************************
-
:shutdownNginx
-
echo.
-
echo.关闭Nginx......
-
taskkill /F /IM nginx.exe > nul
-
echo.OK,关闭所有nginx 进程
-
goto :eof
-
-
:startNginx
-
echo.
-
echo.启动Nginx......
-
IF NOT EXIST "%NGINX_DIR%nginx.exe" (
-
echo "%NGINX_DIR%nginx.exe"不存在
-
goto :eof
-
)
-
-
%NGINX_PATH%
-
cd "%NGINX_DIR%"
-
-
IF EXIST "%NGINX_DIR%nginx.exe" (
-
echo "start '' nginx.exe"
-
start "" nginx.exe
-
)
-
echo.OK
-
goto :eof
-
-
-
:checkConfNginx
-
echo.
-
echo.检查测试 nginx 配置文件......
-
IF NOT EXIST "%NGINX_DIR%nginx.exe" (
-
echo "%NGINX_DIR%nginx.exe"不存在
-
goto :eof
-
)
-
-
%NGINX_PATH%
-
cd "%NGINX_DIR%"
-
nginx -t -c conf/nginx.conf
-
-
goto :eof
-
-
::重新加载 nginx 配置文件
-
:reloadConfNginx
-
echo.
-
echo.重新加载 nginx 配置文件......
-
IF NOT EXIST "%NGINX_DIR%nginx.exe" (
-
echo "%NGINX_DIR%nginx.exe"不存在
-
goto :eof
-
)
-
-
%NGINX_PATH%
-
cd "%NGINX_DIR%"
-
nginx -s reload
-
-
goto :eof
-
-
::显示nginx版本
-
:showVersionNginx
-
echo.
-
%NGINX_PATH%
-
cd "%NGINX_DIR%"
-
nginx -V
-
goto :eof
附件下载之后,
根据自己nginx安装情况, 修改下 附件 bat 里面 这两个参数
Java代码 
-
::ngxin 所在的盘符
-
set NGINX_PATH=D:
-
-
::nginx 所在目录
-
set NGINX_DIR=D:\FeiLong Soft\Essential\Development\nginx-1.2.5\
(责任编辑:IT)
Nginx是一款轻量级的web服务器/反向代理服务器,更详细的释义自己百度了。目前国内像新浪、网易等都在使用它。先说下我的服务器软件环境: 系统:windows_server_2008_standard_enterprise_and_datacenter_with_sp2_x64 当前运行的Tomcat:非安装版本Tomcat 6.0.36 就说这两个关键的吧,目前遇到的问题是访问量剧增单个tomcat已无力负载了,经常出现超时的情况。于是就计划用nginx布置负载均衡,网络上查到的资料多是介绍linux版本的nginx的布置及使用,但在windows中如果使用linux版本的nginx只能做个测试用,实际生产环境是无法使用的,会报如下的错误:
maximum number of descriptors supported by select() is 1024 while waiting for request 这是因为文件访问句柄数被限制为1024了,当访问量大时就会无法响应。去网上有查过很多资料说是修改参数worker_connections可以解决此限制,还有其它很多说修改worker_rlimit_nofile 参数等,都尝试了但都以失败告终。就在准备换其它工具时在国外的一个论坛看到了一条回复,地址不记得了,说的是有专门的windows版本的nginx,已修改了文件句柄数据的限制。后来下载后果真配置成功运行ok了。只要下载到正确的版本配置还是so easy的。以下为下载配置过程哈~~ nginx for windows官网:http://nginx-win.ecsds.eu/ nginx for windows下载载地址: http://nginx-win.ecsds.eu/download/ 我下载的是nginx 1.7.7.1 WhiteRabbit.zip这个版本,太新的版本我怕不稳定。下载完毕后解压安装包,里面有个简要的更新信息和安装指南Readme nginx-win version.txt。关键信息如下:
*** Default installation instructions; * New: unzip this version with folder structure * Old: overwrite with this version * Check nginx.conf, nginx-org.conf and nginx-win.conf * Windows optimization registry file: check your current values BEFORE setting the new ones找到conf文件夹中的nginx-win.conf,把它复制一份更名为nginx.conf,然后在此文件中做配置,我的配置文件如下:
#user nobody; # multiple workers works ! # 工作进程数:这个数值要根据服务器CPU核心数来配置,如6核12线程的cpu可以配置为6或12。 <strong>worker_processes 6;</strong>
#错误日志存放路径
#error_log logs/error.log;
#error_log logs/error.log notice;
#error_log logs/error.log info;
#pid logs/nginx.pid;
events {
#设置单个进程同时打开的最大连接数,这个值设置大些能接受较多的连接,当然这需要cpu和内存支持哦~~
<strong> worker_connections 32768;</strong>
# max value 32768, nginx recycling connections+registry optimization =
# this.value * 20 = max concurrent connections currently tested with one worker
# C1000K should be possible depending there is enough ram/cpu power
# multi_accept on;
}
http {
#include /nginx/conf/naxsi_core.rules;
include mime.types;
default_type application/octet-stream;
#log_format main '$remote_addr:$remote_port - $remote_user [$time_local] "$request" '
# '$status $body_bytes_sent "$http_referer" '
# '"$http_user_agent" "$http_x_forwarded_for"';
#access_log logs/access.log main;
# # loadbalancing PHP
# upstream myLoadBalancer {
# server 127.0.0.1:9001 weight=1 fail_timeout=5;
# server 127.0.0.1:9002 weight=1 fail_timeout=5;
# server 127.0.0.1:9003 weight=1 fail_timeout=5;
# server 127.0.0.1:9004 weight=1 fail_timeout=5;
# server 127.0.0.1:9005 weight=1 fail_timeout=5;
# server 127.0.0.1:9006 weight=1 fail_timeout=5;
# server 127.0.0.1:9007 weight=1 fail_timeout=5;
# server 127.0.0.1:9008 weight=1 fail_timeout=5;
# server 127.0.0.1:9009 weight=1 fail_timeout=5;
# server 127.0.0.1:9010 weight=1 fail_timeout=5;
# least_conn;
# }
<span style="white-space:pre"> </span># 在此处设置tomcat服务器信息,同样tomcat也可以不在同一主机中。这里设置了两个tomcat服务,比重是1:1了。 localhost更换为服务器的IP
<strong> upstream localhost{
#ip_hash;
server 127.0.0.1:9010 weight=1;
server 127.0.0.1:9020 weight=1;
} </strong>
sendfile off;
#tcp_nopush on;
server_names_hash_bucket_size 128;
## Start: Timeouts ##
client_body_timeout 10;
client_header_timeout 10;
keepalive_timeout 80;
send_timeout 10;
keepalive_requests 10;
## End: Timeouts ##
#gzip on;
server {
#这个很关键~~它是nginx监听的端口哦~~
<strong> listen 8080;</strong>
server_name localhost;
#charset koi8-r;
#access_log logs/host.access.log main;
# For Naxsi remove the single # line for learn mode, or the ## lines for full WAF mode
location / {
#include /nginx/conf/mysite.rules; # see also http block naxsi include line
##SecRulesEnabled;
##DeniedUrl "/RequestDenied";
##CheckRule "$SQL >= 8" BLOCK;
##CheckRule "$RFI >= 8" BLOCK;
##CheckRule "$TRAVERSAL >= 4" BLOCK;
##CheckRule "$XSS >= 8" BLOCK;
<strong> proxy_pass http://localhost; </strong>
root html;
index index.html index.htm;
}
# For Naxsi remove the ## lines for full WAF mode, redirect location block used by naxsi
##location /RequestDenied {
## return 412;
##}
## Lua examples !
# location /robots.txt {
# rewrite_by_lua '
# if ngx.var.http_host ~= "localhost" then
# return ngx.exec("/robots_disallow.txt");
# end
# ';
# }
#error_page 404 /404.html;
# redirect server error pages to the static page /50x.html
#
error_page 500 502 503 504 /50x.html;
location = /50x.html {
root html;
}
# proxy the PHP scripts to Apache listening on 127.0.0.1:80
#
#location ~ \.php$ {
# proxy_pass http://127.0.0.1;
#}
# pass the PHP scripts to FastCGI server listening on 127.0.0.1:9000
#
#location ~ \.php$ {
# root html;
# fastcgi_pass 127.0.0.1:9000; # single backend process
# fastcgi_pass myLoadBalancer; # or multiple, see example above
# fastcgi_index index.php;
# fastcgi_param SCRIPT_FILENAME $document_root$fastcgi_script_name;
# include fastcgi_params;
#}
# deny access to .htaccess files, if Apache's document root
# concurs with nginx's one
#
#location ~ /\.ht {
# deny all;
#}
}
# another virtual host using mix of IP-, name-, and port-based configuration
#
#server {
# listen 8000;
# listen somename:8080;
# server_name somename alias another.alias;
# location / {
# root html;
# index index.html index.htm;
# }
#}
# HTTPS server
#
#server {
# listen 443 ssl spdy;
# server_name localhost;
# ssl on;
# ssl_certificate cert.pem;
# ssl_certificate_key cert.key;
# ssl_session_timeout 5m;
# ssl_prefer_server_ciphers On;
# ssl_protocols SSLv3 TLSv1 TLSv1.1 TLSv1.2;
# ssl_ciphers ECDH+AESGCM:DH+AESGCM:ECDH+AES256:DH+AES256:ECDH+AES128:DH+AES:ECDH+3DES:DH+3DES:RSA+AESGCM:RSA+AES:RSA+3DES:!aNULL:!eNULL:!MD5:!DSS;
# location / {
# root html;
# index index.html index.htm;
# }
#}
}
Tomcat的配置就比较简单了就是再复制一个改三处端口就可以了。具体自己百度了。 配置完毕运行nginx.exe和tomcat就可以验证配置情况了。
nginx启动控制我采用了网上一哥们的脚本,地址如下:
我借鉴了他的代码, 扩展了新的特性:
1.支持文件夹路径带空格, 2.显示nginx现在的进程 3.精简了 代码
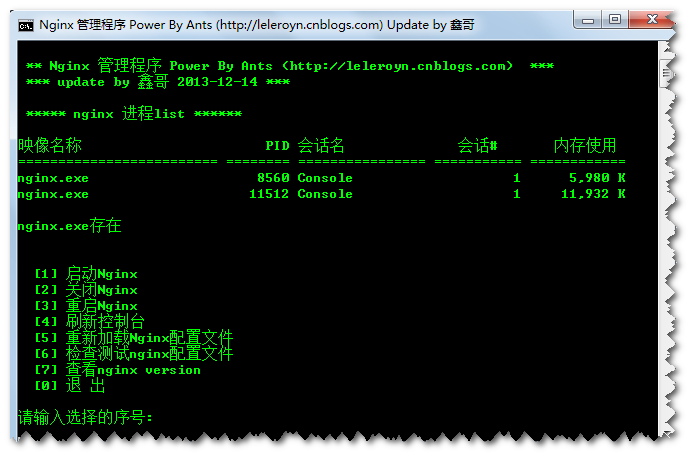
先较于 上一个版本 http://feitianbenyue.iteye.com/blog/1828929 有以下更新: 1.新增 [5] 重新加载Nginx配置文件 (修改了nginx配置文件, 只需要 reload 下, 不需要重启nginx) 2.新增 [6] 检查测试nginx配置文件 3.新增 [7] 查看nginx version
什么都不说 ,上图:
附件下载之后,
根据自己nginx安装情况, 修改下 附件 bat 里面 这两个参数
Java代码
(责任编辑:IT) |