HAproxy+keepalived+mysql高可用性Linux系统集群
时间:2014-05-19 00:24 来源:linux.it.net.cn 作者:IT网
1)在master服务器上创建mysql用户(授权复制账户)。
grant replication slave on *.* to'rep'@'192.168.1.244'identified by 'rep123';
2)编辑master服务器的mysql配置文件my.cnf。
server-id= 1 //指定服务器的ID
log-bin = mysql-bin //开启二进制日志
binlog-ignore = mysql //忽略mysql和information_schema 数据库
binlog-ignore = information_schema
binlog-do-db = blog    //同步数据库,默认同步所有数据库
3)查看master状态。
mysql> show master status;
+---------------+----------+--------------+--------------------------+
| File          | Position | Binlog_Do_DB | Binlog_Ignore_DB         |
+---------------+----------+--------------+--------------------------+
| binlog.022343 |   339244 | blog         | mysql,information_schema |
+---------------+----------+--------------+--------------------------+
1 row inset(0.00 sec)
4)在slave端创建数据库blog,导出master端的blog库,导入到此库,并修改mysql主配置文件my.cnf server-id= 2 重启mysql数据库。
mysql> change master to
-> master_host='192.168.1.243',
-> master_port=3306,
-> master_user='rep',
-> master_password='rep123',
-> master_log_file='binlog.022343',
-> master_log_pos=339244;
5)mysql主从同步测试,show slave status\G;能看到Slave_IO_Running和Slave_SQL_Running都为YES即可。
mysql> show slave status\G;
*************************** 1. row ***************************
Slave_IO_State: Waiting formaster to send event
Master_Host: 192.168.1.243
Master_User: rep
Master_Port: 3306
Connect_Retry: 60
Master_Log_File: binlog.022343
Read_Master_Log_Pos: 339110
Relay_Log_File: relaylog.005481
Relay_Log_Pos: 339244
Relay_Master_Log_File: binlog.022343
Slave_IO_Running: Yes
Slave_SQL_Running: Yes
Replicate_Do_DB:
Replicate_Ignore_DB: mysql,test,information_schema
Replicate_Do_Table:
Replicate_Ignore_Table:
Replicate_Wild_Do_Table:
Replicate_Wild_Ignore_Table:
Last_Errno: 0
Last_Error:
Skip_Counter: 0
Exec_Master_Log_Pos: 339110
Relay_Log_Space: 339244
Until_Condition: None
Until_Log_File:
Until_Log_Pos: 0
Master_SSL_Allowed: No
Master_SSL_CA_File:
Master_SSL_CA_Path:
Master_SSL_Cert:
Master_SSL_Cipher:
Master_SSL_Key:
Seconds_Behind_Master: 0
1 row inset(0.00 sec)
wget http://haproxy.1wt.eu/download/1.4/src/haproxy-1.4.24.tar.gz
tar-zxvf haproxy-1.4.24.tar.gz
cdhaproxy-1.4.24
makeTARGET=linux26 PREFIX=/usr/local/haproxy
makeinstallPREFIX=/usr/local/haproxy
cd/usr/local/haproxy
mkdirconf logs   //在此目录下面建立conf,logs目录分别存放HAproxy的配置文件,PID文件和日志文件。
vim conf/haproxy.conf
global
maxconn 50000
chroot /usr/local/haproxy
uid 99
gid 99
daemon
quiet
nbproc  2
pidfile /usr/local/haproxy/logs/haproxy.pid
#debug
defaults
log     global
mode    http
option  httplog   #每次请求完毕后主动关闭http通道
option  dontlognull #不记录健康检查的日志信息
option forwardfor
option redispatch
option abortonclose
retries 3
log 127.0.0.1 local3
maxconn 20000
contimeout      5000
clitimeout      50000
srvtimeout      50000
listen 192.168.1.236
bind *:80
mode http
stats uri /admin#后端服务器状态查看地址
stats auth admin:admin             #状态查看页面登陆帐号密码
balance source#调度算法,source是和nginx的ip_hash同理,解决session问题
option httpclose
option forwardfor
server web1 192.168.1.248:80 weight 5 check inter 2000 rise 2 fall 5
server web2 192.168.1.249:8080 weight 5 check inter 2000 rise 2 fall 5
#启动Haproxy服务
/usr/local/haproxy/sbin/haproxy-f haproxy.conf
#haproxy启动脚本
#!/bin/bash
BASE_DIR="/usr/local/haproxy"
ARGV="$@"
start()
{
echo"START HAPoxy SERVERS"
$BASE_DIR/sbin/haproxy-f $BASE_DIR/conf/haproxy.conf
}
stop()
{
echo"STOP HAPoxy Listen"
kill-TTOU $(cat$BASE_DIR/logs/haproxy.pid)
echo"STOP HAPoxy process"
kill-USR1 $(cat$BASE_DIR/logs/haproxy.pid)
}
case$ARGV in
start)
start
ERROR=$?
;;
stop)
stop
ERROR=$?
;;
restart)
stop
start
ERROR=$?
;;
*)
echo"hactl.sh [start|restart|stop]"
esac
exit$ERROR
vim /etc/syslog.conf
#添加:
local3.*        /var/log/haproxy.log
local0.*        /var/log/haproxy.log
vim /etc/sysconfig/syslog
#修改:
SYSLOGD_OPTIONS="-r -m 0"
#重新启动syslog服务
/etc/init.d/syslogrestart
wget http://www.keepalived.org/software/keepalived-1.2.5.tar.gz
ln-s /usr/src/kernels/2.6.18-164.el5-x86_64/ /usr/src/linux
tar-zxvf keepalived-1.2.5.tar.gz
cdkeepalived-1.2.5
./configure--prefix=/usr/local/keepalived
make&& makeinstall
cpkeepalived/etc/init.d/keepalived.rh.init /etc/init.d/keepalived
chmod+x /etc/init.d/keepalived
cpkeepalived/etc/init.d/keepalived.sysconfig /etc/sysconfig/keepalived
chkconfig --add keepalived
chkconfig --level 35 keepalived on
cp/usr/local/keepalived/sbin/keepalived/bin/
mkdir-p /etc/keepalived
cp/usr/local/keepalived/etc/keepalived/keepalived.conf /etc/keepalived/
#Haproxy master配置文件
vim /etc/keepalived/keepalived.conf
! Configuration File forkeepalived
global_defs {
notification_email {
shifeng_zhang88@163.com
}
notification_email_from shifeng_zhang88@163.com
smtp_server smtp.163.com
smtp_connect_timeout 30
router_id LVS_Master
}
vrrp_script chk_http_port {
script  "/etc/keepalived/check_haproxy.sh"
interval        5       #脚本执行间隔
weight         -5       #执行脚本后优先级变更:5表示优先级+5;-5则表示优先级-5
}
vrrp_instance VI_A {
state MASTER
interface eth0
virtual_router_id 50
priority 100
advert_int 1
authentication {
auth_type PASS
auth_pass sfzhang1109
}
track_script {
chk_http_port
}
virtual_ipaddress {
192.168.1.236    #haproxy虚拟IP
}
}
#Haproxy backup配置文件只需改变state和priority的值
state BACKUP
priority 50
#启动keepalived服务
/etc/init.d/keepalivedstart
vim /etc/keepalived/check_haproxy.sh
#!/bin/bash
A=`ps-C haproxy --no-header |wc-l`
if[ $A -eq0 ];then
/etc/init.d/haproxyrestart
echo"Start haproxy"&> /dev/null
sleep3
if[ `ps-C haproxy --no-header |wc-l` -eq0 ];then
/etc/init.d/keepalivedstop
echo"Stop keepalived"&> /dev/null
fi
fi
#chomd +x /etc/keepalived/check_haproxy.sh
1)Haproxy+Keepalived 高可用测试。
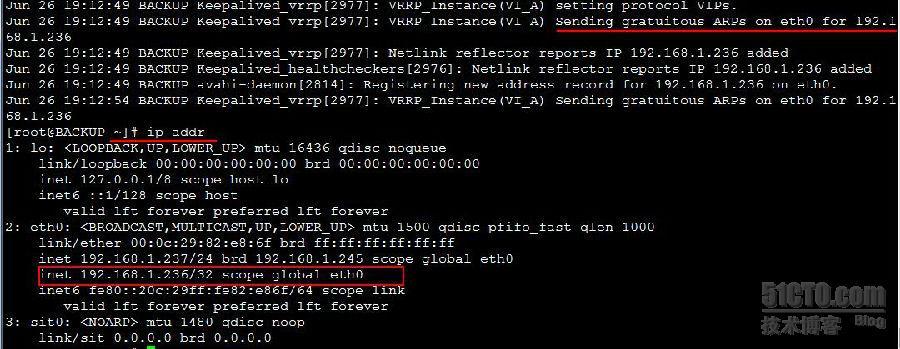
3)Haproxy+Keepalived 故障转移测试
(责任编辑:IT)
1)在master服务器上创建mysql用户(授权复制账户)。 grant replication slave on *.* to'rep'@'192.168.1.244'identified by 'rep123'; 2)编辑master服务器的mysql配置文件my.cnf。 server-id= 1 //指定服务器的ID log-bin = mysql-bin //开启二进制日志 binlog-ignore = mysql //忽略mysql和information_schema 数据库 binlog-ignore = information_schema binlog-do-db = blog //同步数据库,默认同步所有数据库 3)查看master状态。 mysql> show master status; +---------------+----------+--------------+--------------------------+ | File | Position | Binlog_Do_DB | Binlog_Ignore_DB | +---------------+----------+--------------+--------------------------+ | binlog.022343 | 339244 | blog | mysql,information_schema | +---------------+----------+--------------+--------------------------+ 1 row inset(0.00 sec) 4)在slave端创建数据库blog,导出master端的blog库,导入到此库,并修改mysql主配置文件my.cnf server-id= 2 重启mysql数据库。 mysql> change master to -> master_host='192.168.1.243', -> master_port=3306, -> master_user='rep', -> master_password='rep123', -> master_log_file='binlog.022343', -> master_log_pos=339244; 5)mysql主从同步测试,show slave status\G;能看到Slave_IO_Running和Slave_SQL_Running都为YES即可。 mysql> show slave status\G; *************************** 1. row *************************** Slave_IO_State: Waiting formaster to send event Master_Host: 192.168.1.243 Master_User: rep Master_Port: 3306 Connect_Retry: 60 Master_Log_File: binlog.022343 Read_Master_Log_Pos: 339110 Relay_Log_File: relaylog.005481 Relay_Log_Pos: 339244 Relay_Master_Log_File: binlog.022343 Slave_IO_Running: Yes Slave_SQL_Running: Yes Replicate_Do_DB: Replicate_Ignore_DB: mysql,test,information_schema Replicate_Do_Table: Replicate_Ignore_Table: Replicate_Wild_Do_Table: Replicate_Wild_Ignore_Table: Last_Errno: 0 Last_Error: Skip_Counter: 0 Exec_Master_Log_Pos: 339110 Relay_Log_Space: 339244 Until_Condition: None Until_Log_File: Until_Log_Pos: 0 Master_SSL_Allowed: No Master_SSL_CA_File: Master_SSL_CA_Path: Master_SSL_Cert: Master_SSL_Cipher: Master_SSL_Key: Seconds_Behind_Master: 0 1 row inset(0.00 sec)
wget http://haproxy.1wt.eu/download/1.4/src/haproxy-1.4.24.tar.gz
tar-zxvf haproxy-1.4.24.tar.gz
cdhaproxy-1.4.24
makeTARGET=linux26 PREFIX=/usr/local/haproxy
makeinstallPREFIX=/usr/local/haproxy
cd/usr/local/haproxy
mkdirconf logs //在此目录下面建立conf,logs目录分别存放HAproxy的配置文件,PID文件和日志文件。
vim conf/haproxy.conf
global
maxconn 50000
chroot /usr/local/haproxy
uid 99
gid 99
daemon
quiet
nbproc 2
pidfile /usr/local/haproxy/logs/haproxy.pid
#debug
defaults
log global
mode http
option httplog #每次请求完毕后主动关闭http通道
option dontlognull #不记录健康检查的日志信息
option forwardfor
option redispatch
option abortonclose
retries 3
log 127.0.0.1 local3
maxconn 20000
contimeout 5000
clitimeout 50000
srvtimeout 50000
listen 192.168.1.236
bind *:80
mode http
stats uri /admin#后端服务器状态查看地址
stats auth admin:admin #状态查看页面登陆帐号密码
balance source#调度算法,source是和nginx的ip_hash同理,解决session问题
option httpclose
option forwardfor
server web1 192.168.1.248:80 weight 5 check inter 2000 rise 2 fall 5
server web2 192.168.1.249:8080 weight 5 check inter 2000 rise 2 fall 5
#启动Haproxy服务
/usr/local/haproxy/sbin/haproxy-f haproxy.conf
#haproxy启动脚本
#!/bin/bash
BASE_DIR="/usr/local/haproxy"
ARGV="$@"
start()
{
echo"START HAPoxy SERVERS"
$BASE_DIR/sbin/haproxy-f $BASE_DIR/conf/haproxy.conf
}
stop()
{
echo"STOP HAPoxy Listen"
kill-TTOU $(cat$BASE_DIR/logs/haproxy.pid)
echo"STOP HAPoxy process"
kill-USR1 $(cat$BASE_DIR/logs/haproxy.pid)
}
case$ARGV in
start)
start
ERROR=$?
;;
stop)
stop
ERROR=$?
;;
restart)
stop
start
ERROR=$?
;;
*)
echo"hactl.sh [start|restart|stop]"
esac
exit$ERROR
vim /etc/syslog.conf #添加: local3.* /var/log/haproxy.log local0.* /var/log/haproxy.log vim /etc/sysconfig/syslog #修改: SYSLOGD_OPTIONS="-r -m 0" #重新启动syslog服务 /etc/init.d/syslogrestart
wget http://www.keepalived.org/software/keepalived-1.2.5.tar.gz
ln-s /usr/src/kernels/2.6.18-164.el5-x86_64/ /usr/src/linux
tar-zxvf keepalived-1.2.5.tar.gz
cdkeepalived-1.2.5
./configure--prefix=/usr/local/keepalived
make&& makeinstall
cpkeepalived/etc/init.d/keepalived.rh.init /etc/init.d/keepalived
chmod+x /etc/init.d/keepalived
cpkeepalived/etc/init.d/keepalived.sysconfig /etc/sysconfig/keepalived
chkconfig --add keepalived
chkconfig --level 35 keepalived on
cp/usr/local/keepalived/sbin/keepalived/bin/
mkdir-p /etc/keepalived
cp/usr/local/keepalived/etc/keepalived/keepalived.conf /etc/keepalived/
#Haproxy master配置文件
vim /etc/keepalived/keepalived.conf
! Configuration File forkeepalived
global_defs {
notification_email {
shifeng_zhang88@163.com
}
notification_email_from shifeng_zhang88@163.com
smtp_server smtp.163.com
smtp_connect_timeout 30
router_id LVS_Master
}
vrrp_script chk_http_port {
script "/etc/keepalived/check_haproxy.sh"
interval 5 #脚本执行间隔
weight -5 #执行脚本后优先级变更:5表示优先级+5;-5则表示优先级-5
}
vrrp_instance VI_A {
state MASTER
interface eth0
virtual_router_id 50
priority 100
advert_int 1
authentication {
auth_type PASS
auth_pass sfzhang1109
}
track_script {
chk_http_port
}
virtual_ipaddress {
192.168.1.236 #haproxy虚拟IP
}
}
#Haproxy backup配置文件只需改变state和priority的值
state BACKUP
priority 50
#启动keepalived服务
/etc/init.d/keepalivedstart
vim /etc/keepalived/check_haproxy.sh #!/bin/bash A=`ps-C haproxy --no-header |wc-l` if[ $A -eq0 ];then /etc/init.d/haproxyrestart echo"Start haproxy"&> /dev/null sleep3 if[ `ps-C haproxy --no-header |wc-l` -eq0 ];then /etc/init.d/keepalivedstop echo"Stop keepalived"&> /dev/null fi fi #chomd +x /etc/keepalived/check_haproxy.sh
1)Haproxy+Keepalived 高可用测试。
3)Haproxy+Keepalived 故障转移测试
(责任编辑:IT) |


