CentOS优化
时间:2015-02-21 15:10 来源:linux.it.net.cn 作者:IT
1、开机自动启动虚拟内核,现在需要启动普通内核,修改如下:
vim /etc/grub.conf
default=1 #将默认的0改成1
timeout=5
splashimage=(hd0,0)/boot/grub/splash.xpm.gz
hiddenmenu
title CentOS (2.6.18-194.el5xen)
root (hd0,0)
kernel /boot/xen.gz-2.6.18-194.el5
module /boot/vmlinuz-2.6.18-194.el5xen ro root=LABEL=/ rhgb quiet
module /boot/initrd-2.6.18-194.el5xen.img
title CentOS-base (2.6.18-194.el5)
root (hd0,0)
kernel /boot/vmlinuz-2.6.18-194.el5 ro root=LABEL=/ rhgb quiet
initrd /boot/initrd-2.6.18-194.el5.img
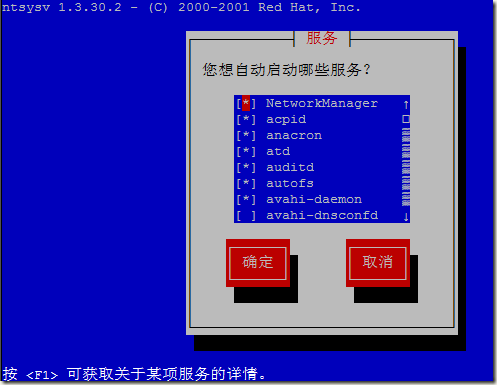
2、关闭不需要的服务器,禁止开机自启动
ntsysv

可以选中服务,按F1查看服务介绍,然后关闭不需要的服务——当然偷懒还是可以去网上下载个通用脚本,运行下就OK了。这里有相关服务中文版详细介绍http://www.ha97.com/596.html。我这里就关闭了几个不会用的:
avahi-daemon、bluetooth、cups、firstboot、hidd、ip6tables、microcode_ctl、sendmail
也可以写成如下命令:
service avahi-daemon stop
chkconfig avahi-daemon off
service bluetooth stop
chkconfig bluetooth off
service cups stop
chkconfig cups off
service firstboot stop
chkconfig firstboot off
service hidd stop
chkconfig hidd off
service ip6tables stop
chkconfig ip6tables off
service microcode_ctl stop
chkconfig microcode_ctl off
service sendmail stop
chkconfig sendmail off
3、设置时区,更新时间
yes|cp /usr/local/share/zoneinfo/Asia/Shanghai /etc/localtime
yum -y install ntp
ntpdate time.windows.com
crontab -e
*/59 * * * * ntpdate time.windows.com
4、更改SSH端口,这个必须改!!!
vim /etc/ssh/ssh_config
Host *
Port 33333 #加上这个,端口就成了33333了
GSSAPIAuthentication yes
# If this option is set to yes then remote X11 clients will have full access
# to the original X11 display. As virtually no X11 client supports the untrusted
# mode correctly we set this to yes.
ForwardX11Trusted yes
service sshd restart
注意,改了端口,scp传文件需要加上-P参数,具体见:http://www.anjing.me/542.html
同样,需要在防火墙里面添加允许33333端口——特别是远程修改的时候,千万不要悲剧!!!
5、其他一些说明:
ipv6在装系统的时候已经去掉了,所以不需要配置,如果要配置,如下:
vim /etc/modprobe.conf
alias net-pf-10 off
alias ipv6 off
service network restart
DNS记得添加:
vim /etc/resolv.conf
nameserver 202.101.172.35
nameserver 8.8.8.8
服务器间HOST映射:
vim /etc/hosts
192.168.1.2 node2
192.168.1.3 node3
5.5版本的centos更需源已经自动更新到了163.com,如果需要更换源,如下:
cd /etc/yum.repos.d
mv CentOS_Base.repo CentOS_Base.bak
wget ....(下载新源,去网上找,下载后的源如果名字不对,改成CentOS_Base.repo)
安装相关的库文件
yum -y install gcc gcc-c++ pcre pcre-devel autoconf libjpeg libjpeg-devel libpng libpng-devel freetype freetype-devel libxml2 libxml2-devel zlib zlib-devel glibc glibc-devel glib2 glib2- devel bzip2 bzip2-devel ncurses ncurses-devel curl curl-devel e2fsprogs e2fsprogs-devel krb5 krb5-devel libidn libidn-devel openssl openssl-devel openldap openldap-devel nss_ldap openldap-clients openldap-servers
基本OK,后续补充中…
(责任编辑:IT)
1、开机自动启动虚拟内核,现在需要启动普通内核,修改如下:
2、关闭不需要的服务器,禁止开机自启动
可以选中服务,按F1查看服务介绍,然后关闭不需要的服务——当然偷懒还是可以去网上下载个通用脚本,运行下就OK了。这里有相关服务中文版详细介绍http://www.ha97.com/596.html。我这里就关闭了几个不会用的:
也可以写成如下命令:
3、设置时区,更新时间
4、更改SSH端口,这个必须改!!!
注意,改了端口,scp传文件需要加上-P参数,具体见:http://www.anjing.me/542.html 同样,需要在防火墙里面添加允许33333端口——特别是远程修改的时候,千万不要悲剧!!! 5、其他一些说明: ipv6在装系统的时候已经去掉了,所以不需要配置,如果要配置,如下:
DNS记得添加:
服务器间HOST映射:
5.5版本的centos更需源已经自动更新到了163.com,如果需要更换源,如下:
安装相关的库文件
基本OK,后续补充中… (责任编辑:IT) |