CentOS下用yaf框架搭建自己的网站
时间:2015-08-30 00:09 来源:linux.it.net.cn 作者:IT
手动编译安装LAMP环境和YAF框架吧~
首先使用yum 将昨天搭建的LAMP都删除掉
# sudo yum erase httpd php* mysql*
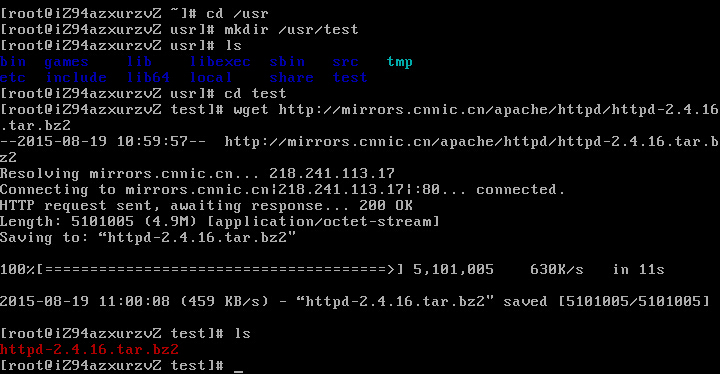
然后开始手动安装编译吧~ 我先在usr下创建了一个test文件夹,怕之后操作多了会不知道下载到哪里去了。
#  mkdir /usr/test
# cd /usr/test
1.- Apache
# wget http://mirrors.cnnic.cn/apache//httpd/httpd-2.4.16.tar.bz2

解压并进入
# tar -jxvf httpd-2.4.26.tar.bz2
# cd httpd-2.4.26

安装 gcc
# sudo yum install gcc
configure
# ./configure --prefix=/test/httpd --enable-so --enable-rewrite
若出现apr问题,解决方法请看这里
//configure没问题后
# make && make install
# sudo /usr/test/prefix/httpd -k start
如果出现error:httpd: Could not reliably determine the server’s fully qualified domain name, ……. 解决方法是找到刚刚编译的httpd文件夹,比如 我的是:/usr/test/prefix/httpd,进入之后找到conf文件夹下的httpd.conf文件,编辑,将#ServerName www.example.con:80前面的#去掉,再重启。
这样打开你的地址,出现It works! Apache就算安装编译成功啦~ PS 如果想要删除掉前面下载的压缩文件 可以用 rm -f 文件名 命令删除哦~
2.-php
# sudo yum install libxml2 libxml2-devel curl curl-devel libjpeg libjpeg-devel libpng libpng-devel libmcrypt libmcrypt-deel libtool-ltdl-devel
# wget http://cn2.php.net/get/php-5.5.28.tar.gz/from/this/mirror
# mv mirror php-5.5.28.tar.gz
# tar -zxvf php-5.5.28.tar.gz
# cd php-5.5.28
# ./configure --prefix=/usr/test/prefix/php --with-apxs2=/usr/test/prefix/httpd/bin/apxs --with-curl --with-mcrypt --enable-mbstring --with-iconv --with-gd --with-jpeg-dir=/usr/test/local/lib --enable-pdo --with-pdo-mysql=mysqlnd --with-mysql=mysqlnd --with-mysqli=mysqlnd
# make && make install
然后要等久一点咯
编译完成后
# sudo cp php.ini-development /usr/test/prefix/php/lib/php.ini
# sudo ln -s /usr/test/prefix/php/bin/php /usr/bin/php
cp赋值命令详解 ln命令详解
# sudo vi /usr/test/prefix/php/lib/php.ini
把include_path前面的分号删除,改成include_path = “/opt/php/lib/php”把include_path前面的分号删除,改成include_path = “/usr/test/prefix/php/lib/php”
# sudo vi /usr/test/prefix/httpd/conf/httpd.conf
在最下面加入一行AddHandler application/x-httpd-php .php
# sudo /usr/test/prefix/httpd/bin/httpd -k restart
# sudo vi /usr/test/prefix/httpd/htdocs/phpinfo.php
phpinfo.php的内容为
<?php
phpinfo();
?>
然后 http://地址/phpinfo.php 可以看到php的配置信息说明php装好了~ 搜索 mysqlnd pdo_mysql mysqli 如果有,说明php能访问mysql
接下来把Apache加入系统service,开机自启动
# sudo cp /usr/test/prefix/httpd/bin/apachectl /etc/init.d/httpd
# sudo vi etc/init.d/httpd
在文件开头加上
#!:/bin/sh
# chkconfig: 2345 85 15
# description: Apache is World Wide Web server
接着
# sudo chmod +x /etc/init.d/httpd
# /sbin/chkconfig --add httpd
# sudo /sbin/chkconfig --list httpd
# sudo ln -s /sbin/chkconfig /usr/bin/chkconfig
# sudo ln -s /sbin/service /usr/bin/service
3-. mysql mysql就直接使用yum安装吧 教程见上一篇搭建LAMP环境
4.-安装PHP扩展ssh2 先安装libssh2
# cd /usr/test/
# wget https://github.com/libssh2/libssh2/releases/download/libssh2-1.6.0/libssh2-1.6.0.tar.gz
#tar -zxvf libssh2-1.6.0.tar.gz
#cd libssh2-1.6.0
# ./configure --prifex=/usr/test/prefix/libssh2
# make && make install
报错说no cryoto library found. 这是因为我没有安装OpenSSLeep加密库。 所以先安装下吧
# yum install openssl-devel
再回到原来的文件夹下完成编译
再安装ssh2
# cd /usr/test/
# wget http://pecl.php.net/get/ssh2-0.11.3.tgz
# tar -zxvf ssh2-0.11.3.tgz
# cd ssh2-0.11.3.tgz
# /usr/test/prefix/php/bin/phpize
# ./configure --prefix=/usr/test/prefix/ssh2 --with-ssh2=/usr/test/prefix/libssh2 --with-php-config=/usr/test/prefix/php/bin/php-config
# make && make install
然后再/usr/test/prefix/php/lib/php.ini中加上一句 extension=ssh2.so
如此 接下来就是Yaf啦~
# cd /usr/test
# wget http://pecl.php.net/get/yaf-2.3.1.tgz
# tar -zxvf yaf-2.3.1.tgz
# cd yaf-2.3.1
# /usr/test/prefix/php/bin/phpize
# ./configure --prefix=/usr/test/prefix/yaf --with-php-confi=/usr/test/prefix/php/bin/php-config
# make && make install
编译安装完毕后需在php.ini配置里进行配置
extendsion = yaf.so
[yaf]
yaf.environ = product
yaf.library = NULL
yaf.cache_config = 0
yaf.name_suffix = 1
yaf.name_separator = ""
yaf.forward_limit = 5
yaf.use_namespace = 0
yaf.use_spl_autoload = 0
然后重启服务器,查看phpinfo()中是否有yaf扩展
大功告成~ 接下来可以用yaf框架搭建自己的网站啦~
(责任编辑:IT)
| 手动编译安装LAMP环境和YAF框架吧~
首先使用yum 将昨天搭建的LAMP都删除掉 # sudo yum erase httpd php* mysql* 然后开始手动安装编译吧~ 我先在usr下创建了一个test文件夹,怕之后操作多了会不知道下载到哪里去了。 # mkdir /usr/test # cd /usr/test 1.- Apache # wget http://mirrors.cnnic.cn/apache//httpd/httpd-2.4.16.tar.bz2
# tar -jxvf httpd-2.4.26.tar.bz2 # cd httpd-2.4.26
安装 gcc # sudo yum install gcc configure # ./configure --prefix=/test/httpd --enable-so --enable-rewrite 若出现apr问题,解决方法请看这里 //configure没问题后 # make && make install # sudo /usr/test/prefix/httpd -k start 如果出现error:httpd: Could not reliably determine the server’s fully qualified domain name, ……. 解决方法是找到刚刚编译的httpd文件夹,比如 我的是:/usr/test/prefix/httpd,进入之后找到conf文件夹下的httpd.conf文件,编辑,将#ServerName www.example.con:80前面的#去掉,再重启。 这样打开你的地址,出现It works! Apache就算安装编译成功啦~ PS 如果想要删除掉前面下载的压缩文件 可以用 rm -f 文件名 命令删除哦~ 2.-php # sudo yum install libxml2 libxml2-devel curl curl-devel libjpeg libjpeg-devel libpng libpng-devel libmcrypt libmcrypt-deel libtool-ltdl-devel # wget http://cn2.php.net/get/php-5.5.28.tar.gz/from/this/mirror # mv mirror php-5.5.28.tar.gz # tar -zxvf php-5.5.28.tar.gz # cd php-5.5.28 # ./configure --prefix=/usr/test/prefix/php --with-apxs2=/usr/test/prefix/httpd/bin/apxs --with-curl --with-mcrypt --enable-mbstring --with-iconv --with-gd --with-jpeg-dir=/usr/test/local/lib --enable-pdo --with-pdo-mysql=mysqlnd --with-mysql=mysqlnd --with-mysqli=mysqlnd # make && make install 然后要等久一点咯 编译完成后 # sudo cp php.ini-development /usr/test/prefix/php/lib/php.ini # sudo ln -s /usr/test/prefix/php/bin/php /usr/bin/php cp赋值命令详解 ln命令详解 # sudo vi /usr/test/prefix/php/lib/php.ini 把include_path前面的分号删除,改成include_path = “/opt/php/lib/php”把include_path前面的分号删除,改成include_path = “/usr/test/prefix/php/lib/php” # sudo vi /usr/test/prefix/httpd/conf/httpd.conf 在最下面加入一行AddHandler application/x-httpd-php .php # sudo /usr/test/prefix/httpd/bin/httpd -k restart # sudo vi /usr/test/prefix/httpd/htdocs/phpinfo.php phpinfo.php的内容为 <?php phpinfo(); ?> 然后 http://地址/phpinfo.php 可以看到php的配置信息说明php装好了~ 搜索 mysqlnd pdo_mysql mysqli 如果有,说明php能访问mysql 接下来把Apache加入系统service,开机自启动 # sudo cp /usr/test/prefix/httpd/bin/apachectl /etc/init.d/httpd # sudo vi etc/init.d/httpd 在文件开头加上 #!:/bin/sh # chkconfig: 2345 85 15 # description: Apache is World Wide Web server 接着 # sudo chmod +x /etc/init.d/httpd # /sbin/chkconfig --add httpd # sudo /sbin/chkconfig --list httpd # sudo ln -s /sbin/chkconfig /usr/bin/chkconfig # sudo ln -s /sbin/service /usr/bin/service 3-. mysql mysql就直接使用yum安装吧 教程见上一篇搭建LAMP环境 4.-安装PHP扩展ssh2 先安装libssh2 # cd /usr/test/ # wget https://github.com/libssh2/libssh2/releases/download/libssh2-1.6.0/libssh2-1.6.0.tar.gz #tar -zxvf libssh2-1.6.0.tar.gz #cd libssh2-1.6.0 # ./configure --prifex=/usr/test/prefix/libssh2 # make && make install 报错说no cryoto library found. 这是因为我没有安装OpenSSLeep加密库。 所以先安装下吧 # yum install openssl-devel 再回到原来的文件夹下完成编译 再安装ssh2 # cd /usr/test/ # wget http://pecl.php.net/get/ssh2-0.11.3.tgz # tar -zxvf ssh2-0.11.3.tgz # cd ssh2-0.11.3.tgz # /usr/test/prefix/php/bin/phpize # ./configure --prefix=/usr/test/prefix/ssh2 --with-ssh2=/usr/test/prefix/libssh2 --with-php-config=/usr/test/prefix/php/bin/php-config # make && make install 然后再/usr/test/prefix/php/lib/php.ini中加上一句 extension=ssh2.so 如此 接下来就是Yaf啦~ # cd /usr/test # wget http://pecl.php.net/get/yaf-2.3.1.tgz # tar -zxvf yaf-2.3.1.tgz # cd yaf-2.3.1 # /usr/test/prefix/php/bin/phpize # ./configure --prefix=/usr/test/prefix/yaf --with-php-confi=/usr/test/prefix/php/bin/php-config # make && make install 编译安装完毕后需在php.ini配置里进行配置 extendsion = yaf.so [yaf] yaf.environ = product yaf.library = NULL yaf.cache_config = 0 yaf.name_suffix = 1 yaf.name_separator = "" yaf.forward_limit = 5 yaf.use_namespace = 0 yaf.use_spl_autoload = 0 然后重启服务器,查看phpinfo()中是否有yaf扩展 大功告成~ 接下来可以用yaf框架搭建自己的网站啦~ (责任编辑:IT) |