Linux基于zabbix搭建企业级监控平台
时间:2016-01-03 01:15 来源:linux.it.net.cn 作者:IT
大型的站点对可用性要求很高,高的可用性离开不了健壮的监控平台,开源社区免费的收费的监控软件太多太多,nagios,cacti等是非常优秀的监控平台,这里要写的是zabbix的安装案例,这个文章不写zabbix的配置,仅仅写环境的搭建,为了有比较好的扩展性,这里的软件全部自己编译安装,这里不写软件解压缩、编译的过程,对于大型网站的运维人员是比较了解linux下软件的编译安装的,因为这个是基本功,这里重点描述各个软件嵌套的思路
第一部分:lnmp环境的搭建和zabbix的代码编译
这里默认的工作目录是/home/service
操作的平台是
# cat /etc/redhat-release
CentOS release 6.5 (Final)
这里选用的套件如下
mysql-5.5.25a-linux2.6-x86_64.tar.gz
php-5.4.5.tar.gz
tengine-2.1.1.tar.gz
创建工作目录
#mkdir /home/service
1、mysql设置相关的
创建数据库的管理用户
#useradd -s /sbin/nologin mysql
进入工作目录
#cd /home/service
解压缩
# tar zxvf mysql-5.5.25a-linux2.6-x86_64.tar.gz
#mv mysql-5.5.25a-linux2.6-x86_64 mysql5.5
建立软链接
#ln -s mysql5.5 mysql
#chown -R mysql:mysql /home/service/mysql
创建mysql的配置文件,这里是比较简单的,客户可以根据自己的需求添加参数
附加mysql配置文件 cat /home/service/mysql/my.cnf
 my.cnf.zip 附加my.cnf文件
初始化mysql
#cd /home/service/mysql/
#scripts/mysql_install_db --user=mysql --datadir=/home/service/mysql/data/
启动mysql
/bin/sh ./bin/mysqld_safe --defaults-file=./my.cnf --user=mysql &

2、tengine安装设置相关的
创建管理用户work
[root@iZ237blh8rlZ ~]#useradd -s /sbin/nologin nginx
[root@iZ237blh8rlZ ~]# tar zxvf tengine-2.1.1.tar.gz && cd tengine-2.1.1
编译参数如下
./configure --prefix=/home/service/tengine --with-http_stub_status_module --with-pcre
附加nginx的配置文件
附加/home/service/tengine/conf/nginx.conf
创建zabbix的nginx配置文件
#mkdir /home/service/tengine/conf/vhost
附加/home/service/tengine/conf/vhost/zabbix.conf
启动tenging
[root@iZ237blh8rlZ sbin]# cd /home/service/tengine/sbin/
[root@iZ237blh8rlZ sbin]# ./nginx
3、php设置相关的
# tar zxvf php-5.4.5.tar.gz && cd php-5.4.5
#'./configure' '--prefix=/home/service/php5' '--with-jpeg-dir' '--with-gettext' '--with-png-dir' '--enable-exif' '--enable-mysqlnd' '--with-mysql=mysqlnd' '--with-pdo-mysql=mysqlnd' '--with-curl' '--enable-ftp' '--with-mcrypt' '--disable-debug' '--enable-xml' '--enable-mbstring' '--enable-sockets' '--with-zlib' '--enable-dom' '--with-gd' '--with-tidy' '--enable-gd-native-ttf' '--with-freetype-dir' '--with-mhash' '--disable-rpath' '--enable-bcmath' '--enable-shmop' '--enable-sysvsem' '--enable-inline-optimization' '--with-curlwrappers' '--enable-mbregex' '--enable-pcntl' '--with-xmlrpc' '--enable-zip' '--enable-soap' '--enable-fpm' '--with-fpm-user=work' '--with-fpm-group=work' '--without-pear'
附加/home/service/php/etc/php-fpm.conf
附加/home/service/php/lib/php.ini
mysqli插件的编译过程
[root@iZ237blh8rlZ ~]# cd php-5.4.5/ext/mysqli/
[root@iZ237blh8rlZ mysqli]# /home/service/php/bin/phpize
Configuring for:
PHP Api Version: 20100412
Zend Module Api No: 20100525
Zend Extension Api No: 220100525
#./configure --with-php-config=/home/service/php/bin/php-config --with-mysqli=/home/service/mysql/bin/mysql_config
#make && make install
这里操作完毕要设置php.ini的如下参数
extension = /home/service/php5/lib/php/extensions/no-debug-non-zts-20100525/mysqli.so
最后启动php-fpm
[root@iZ237blh8rlZ sbin]# cd /home/service/php/sbin/
[root@iZ237blh8rlZ sbin]# ./php-fpm
4、zabbix安装相关的
安装数据库的依赖库文件
#yum -y install mysql-devel
#cd /etc
#mv /etc/my.cnf /etc/my.cnf.bak
建立软链接对应真实的my.conf
#ln -s /home/service/mysql/my.cnf /etc/
[root@iZ237blh8rlZ ~]# tar zxvf zabbix-2.4.7.tar.gz && cd zabbix-2.4.7
./configure --prefix=/home/service/zabbix --enable-server --enable-agent --with-mysql --with-net-snmp --with-libcurl
附加/home/service/zabbix/etc/zabbix_server.conf
附加/home/service/zabbix/etc/zabbix_agentd.conf
配置zabbix相关的数据库
mysql> use mysql;
mysql> update user set host='%' where user='root';
mysql> flush privileges;
创建监控数据库,并且初始化数据
mysql> create database zabbix
mysql> use zabbix;
mysql> source /root/zabbix-2.4.7/database/mysql/schema.sql;
mysql> source /root/zabbix-2.4.7/database/mysql/images.sql;
mysql> source /root/zabbix-2.4.7/database/mysql/data.sql;
mysql> flush privileges;
之后重启数据库即可
启动zabbix进程
[root@iZ237blh8rlZ ~]# cd /home/service/zabbix/sbin/
[root@iZ237blh8rlZ sbin]# ./zabbix_server
[root@iZ237blh8rlZ sbin]# ./zabbix_agentd

第二部分 zabbix的页面安装
一、建立zabbix运行的目录
#mkdir /home/zabbix
文件挪到注目录
[root@iZ237blh8rlZ ~]# cp -r /root/zabbix-2.4.7/frontends/php/* /home/zabbix/
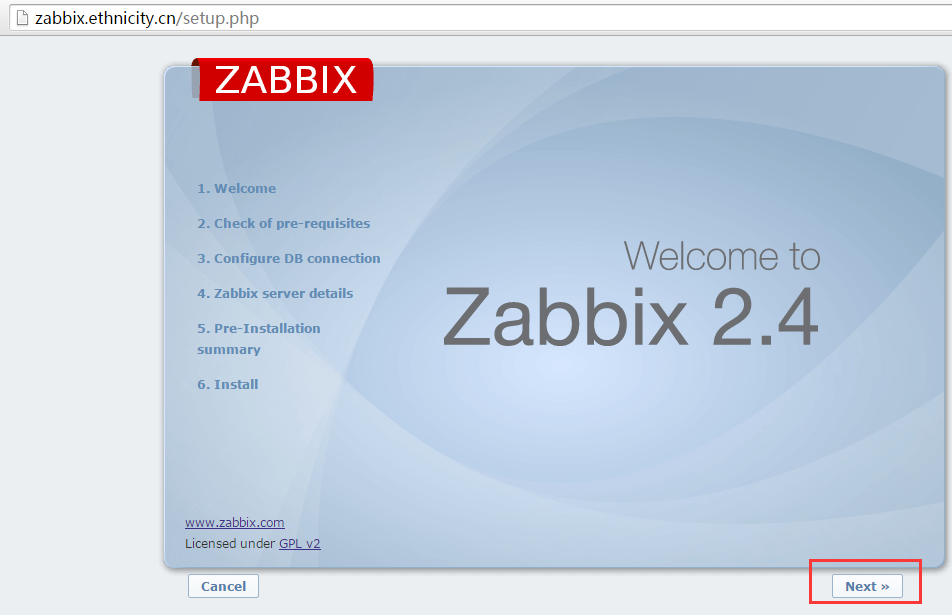
二、开始安装
1、进入安装界面
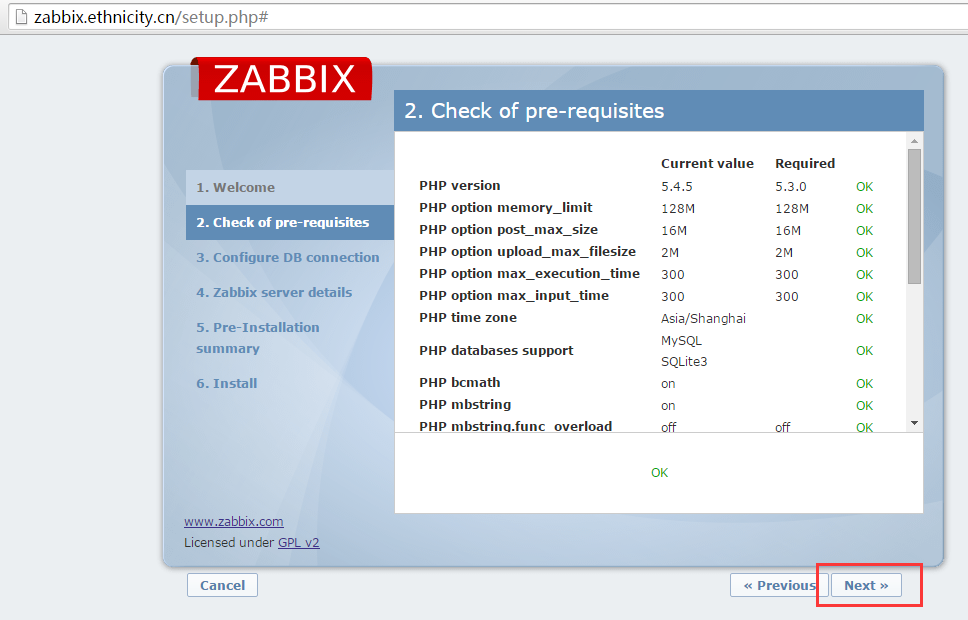
2、配置php相关的参数
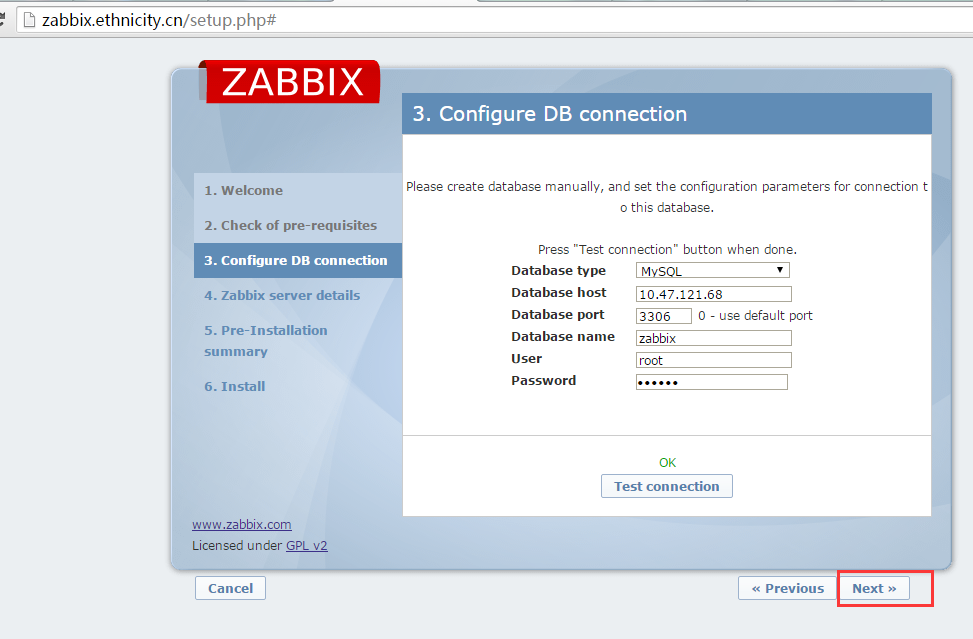
3、配置数据库连接相关的
4、生产配置文件

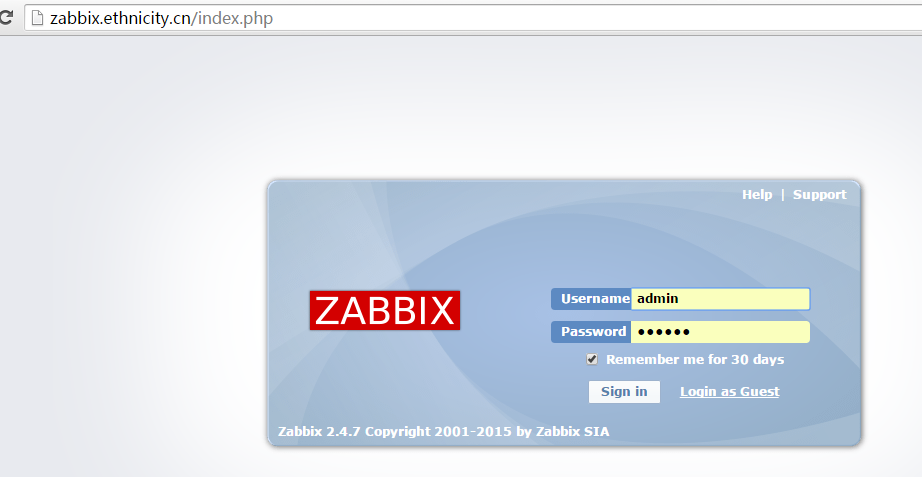
5、安装完成进入,默认的用户是admin 密码是zabbix可以在页面上修改
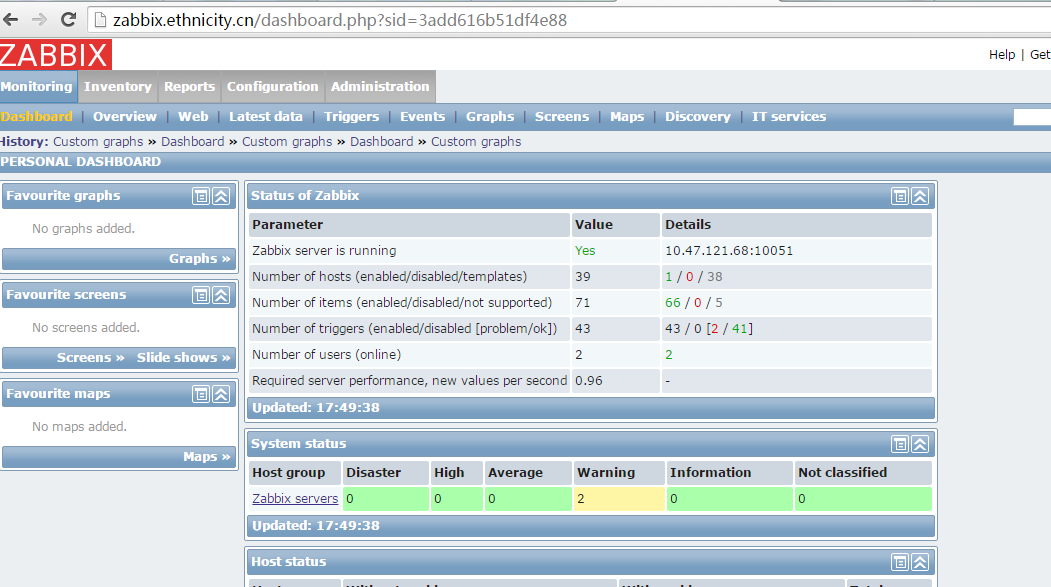
到这里就安装完成了,zabbix的页面配置会有后续文章介绍敬请期待
这里附加一张运行的图片
(责任编辑:IT)
大型的站点对可用性要求很高,高的可用性离开不了健壮的监控平台,开源社区免费的收费的监控软件太多太多,nagios,cacti等是非常优秀的监控平台,这里要写的是zabbix的安装案例,这个文章不写zabbix的配置,仅仅写环境的搭建,为了有比较好的扩展性,这里的软件全部自己编译安装,这里不写软件解压缩、编译的过程,对于大型网站的运维人员是比较了解linux下软件的编译安装的,因为这个是基本功,这里重点描述各个软件嵌套的思路 第一部分:lnmp环境的搭建和zabbix的代码编译 这里默认的工作目录是/home/service 操作的平台是 # cat /etc/redhat-release CentOS release 6.5 (Final) 这里选用的套件如下 mysql-5.5.25a-linux2.6-x86_64.tar.gz php-5.4.5.tar.gz tengine-2.1.1.tar.gz 创建工作目录 #mkdir /home/service 1、mysql设置相关的 创建数据库的管理用户 #useradd -s /sbin/nologin mysql 进入工作目录 #cd /home/service 解压缩 # tar zxvf mysql-5.5.25a-linux2.6-x86_64.tar.gz #mv mysql-5.5.25a-linux2.6-x86_64 mysql5.5 建立软链接 #ln -s mysql5.5 mysql #chown -R mysql:mysql /home/service/mysql 创建mysql的配置文件,这里是比较简单的,客户可以根据自己的需求添加参数 附加mysql配置文件 cat /home/service/mysql/my.cnf
初始化mysql #cd /home/service/mysql/ #scripts/mysql_install_db --user=mysql --datadir=/home/service/mysql/data/ 启动mysql /bin/sh ./bin/mysqld_safe --defaults-file=./my.cnf --user=mysql &
2、tengine安装设置相关的 创建管理用户work [root@iZ237blh8rlZ ~]#useradd -s /sbin/nologin nginx [root@iZ237blh8rlZ ~]# tar zxvf tengine-2.1.1.tar.gz && cd tengine-2.1.1 编译参数如下 ./configure --prefix=/home/service/tengine --with-http_stub_status_module --with-pcre 附加nginx的配置文件 附加/home/service/tengine/conf/nginx.conf 创建zabbix的nginx配置文件 #mkdir /home/service/tengine/conf/vhost 附加/home/service/tengine/conf/vhost/zabbix.conf 启动tenging [root@iZ237blh8rlZ sbin]# cd /home/service/tengine/sbin/ [root@iZ237blh8rlZ sbin]# ./nginx 3、php设置相关的 # tar zxvf php-5.4.5.tar.gz && cd php-5.4.5 #'./configure' '--prefix=/home/service/php5' '--with-jpeg-dir' '--with-gettext' '--with-png-dir' '--enable-exif' '--enable-mysqlnd' '--with-mysql=mysqlnd' '--with-pdo-mysql=mysqlnd' '--with-curl' '--enable-ftp' '--with-mcrypt' '--disable-debug' '--enable-xml' '--enable-mbstring' '--enable-sockets' '--with-zlib' '--enable-dom' '--with-gd' '--with-tidy' '--enable-gd-native-ttf' '--with-freetype-dir' '--with-mhash' '--disable-rpath' '--enable-bcmath' '--enable-shmop' '--enable-sysvsem' '--enable-inline-optimization' '--with-curlwrappers' '--enable-mbregex' '--enable-pcntl' '--with-xmlrpc' '--enable-zip' '--enable-soap' '--enable-fpm' '--with-fpm-user=work' '--with-fpm-group=work' '--without-pear' 附加/home/service/php/etc/php-fpm.conf 附加/home/service/php/lib/php.ini mysqli插件的编译过程 [root@iZ237blh8rlZ ~]# cd php-5.4.5/ext/mysqli/ [root@iZ237blh8rlZ mysqli]# /home/service/php/bin/phpize Configuring for: PHP Api Version: 20100412 Zend Module Api No: 20100525 Zend Extension Api No: 220100525 #./configure --with-php-config=/home/service/php/bin/php-config --with-mysqli=/home/service/mysql/bin/mysql_config #make && make install 这里操作完毕要设置php.ini的如下参数 extension = /home/service/php5/lib/php/extensions/no-debug-non-zts-20100525/mysqli.so 最后启动php-fpm [root@iZ237blh8rlZ sbin]# cd /home/service/php/sbin/ [root@iZ237blh8rlZ sbin]# ./php-fpm 4、zabbix安装相关的 安装数据库的依赖库文件 #yum -y install mysql-devel #cd /etc #mv /etc/my.cnf /etc/my.cnf.bak 建立软链接对应真实的my.conf #ln -s /home/service/mysql/my.cnf /etc/
[root@iZ237blh8rlZ ~]# tar zxvf zabbix-2.4.7.tar.gz && cd zabbix-2.4.7 ./configure --prefix=/home/service/zabbix --enable-server --enable-agent --with-mysql --with-net-snmp --with-libcurl 附加/home/service/zabbix/etc/zabbix_server.conf 附加/home/service/zabbix/etc/zabbix_agentd.conf 配置zabbix相关的数据库 mysql> use mysql; mysql> update user set host='%' where user='root'; mysql> flush privileges; 创建监控数据库,并且初始化数据 mysql> create database zabbix mysql> use zabbix; mysql> source /root/zabbix-2.4.7/database/mysql/schema.sql; mysql> source /root/zabbix-2.4.7/database/mysql/images.sql; mysql> source /root/zabbix-2.4.7/database/mysql/data.sql; mysql> flush privileges; 之后重启数据库即可 启动zabbix进程 [root@iZ237blh8rlZ ~]# cd /home/service/zabbix/sbin/ [root@iZ237blh8rlZ sbin]# ./zabbix_server [root@iZ237blh8rlZ sbin]# ./zabbix_agentd
第二部分 zabbix的页面安装 一、建立zabbix运行的目录 #mkdir /home/zabbix 文件挪到注目录 [root@iZ237blh8rlZ ~]# cp -r /root/zabbix-2.4.7/frontends/php/* /home/zabbix/ 二、开始安装 1、进入安装界面
2、配置php相关的参数
3、配置数据库连接相关的
4、生产配置文件
5、安装完成进入,默认的用户是admin 密码是zabbix可以在页面上修改
到这里就安装完成了,zabbix的页面配置会有后续文章介绍敬请期待 这里附加一张运行的图片
|