Centos7安装OpenLDAP
时间:2016-01-26 07:56 来源:linux.it.net.cn 作者:IT
一、环境准备
echo nameserver 114.114.114.114 > /etc/resolv.conf ##更改DNS
echo 192.168.0.190 hello.com >> /etc/hosts
systemctl disable firewalld.service && systemctl stop firewalld.service #关闭防火墙
sed -i 's//#SELINUX/SELINUX=disable/g' /etc/selinux/config ##永久关闭selinux
setenforce 0
rpm -Uvh http://dl.fedoraproject.org/pub/epel/7/x86_64/e/epel-release-7-5.noarch.rpm
##安装扩展源
yum -y install openldap-servers openldap-clients ##安装openldap服务端和客户端
cp /usr/share/openldap-servers/DB_CONFIG.example /var/lib/ldap/DB_CONFIG
chown ldap:ldap /var/lib/ldap/DB_CONFIG ##授权
systemctl start slapd && systemctl enable slapd ##启动服务,设置开机启动
二、配置管理员密码
①.slappasswd 或 slappasswd -s 密码(-s 指定密码)
输入完密码后会生成一串加密字符串
例:{SSHA}5Qiqn6d4U4U9b1G8A7dKmJAkJcUOA4fE #保存,后面会用到
②.vim chrootpw.ldif
# specify the password generated above for "olcRootPW" section
dn: olcDatabase={0}config,cn=config
changetype: modify
add: olcRootPW
olcRootPW: 上面生成的密码
ldapadd -Y EXTERNAL -H ldapi:/// -f chrootpw.ldif
ldapadd -Y EXTERNAL -H ldapi:/// -f /etc/openldap/schema/cosine.ldif
ldapadd -Y EXTERNAL -H ldapi:/// -f /etc/openldap/schema/nis.ldif
ldapadd -Y EXTERNAL -H ldapi:/// -f /etc/openldap/schema/inetorgperson.ldif
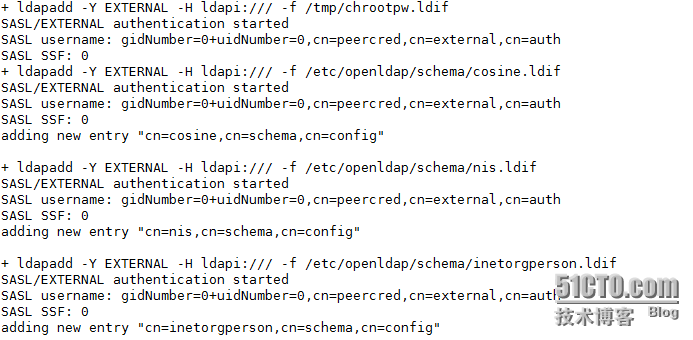
返回值如下图

三、在数据库中设置你的域名
1.生成密码
slappasswd
2.vi chdomain.ldif
# replace to your own domain name for "dc=***,dc=***" section
# specify the password generated above for "olcRootPW" section
dn: olcDatabase={1}monitor,cn=config
changetype: modify
replace: olcAccess
olcAccess: {0}to * by dn.base="gidNumber=0+uidNumber=0,cn=peercred,cn=external,cn=auth"
read by dn.base="cn=admin,dc=hello,dc=com" read by * none
dn: olcDatabase={2}hdb,cn=config
changetype: modify
replace: olcSuffix
olcSuffix: dc=hello,dc=com
dn: olcDatabase={2}hdb,cn=config
changetype: modify
replace: olcRootDN
olcRootDN: cn=admin,dc=hello,dc=com
dn: olcDatabase={2}hdb,cn=config
changetype: modify
add: olcRootPW
olcRootPW: 步奏1中生成的密码
dn: olcDatabase={2}hdb,cn=config
changetype: modify
add: olcAccess
olcAccess: {0}to attrs=userPassword,shadowLastChange by
dn="cn=admin,dc=hello,dc=com" write by anonymous auth by self write by * none
olcAccess: {1}to dn.base="" by * read
olcAccess: {2}to * by dn="cn=admin,dc=hello,dc=com" write by * read
3.ldapmodify -Y EXTERNAL -H ldapi:/// -f chdomain.ldif
4.vi basedomain.ldif
# replace to your own domain name for "dc=***,dc=***" section
dn: dc=hello,dc=com
objectClass: top
objectClass: dcObject
objectclass: organization
o: qiqiu com
dc: qiqiu
dn: cn=admin,dc=hello,dc=com
objectClass: organizationalRole
cn: admin
description: Directory admin
dn: ou=People,dc=hello,dc=com
objectClass: organizationalUnit
ou: People
dn: ou=Group,dc=hello,dc=com
objectClass: organizationalUnit
ou: Group
5.ldapadd -x -D cn=admin,dc=hello,dc=com -W -f basedomain.ldif
(责任编辑:IT)
一、环境准备
二、配置管理员密码
②.vim chrootpw.ldif
三、在数据库中设置你的域名 1.生成密码
2.vi chdomain.ldif
3.ldapmodify -Y EXTERNAL -H ldapi:/// -f chdomain.ldif 4.vi basedomain.ldif
5.ldapadd -x -D cn=admin,dc=hello,dc=com -W -f basedomain.ldif (责任编辑:IT) |