centos6.0下安装Node.js以及使用
时间:2014-02-24 15:48 来源:www.it.net.cn 作者:IT网
Linux下(centos6.0)安装Node.js
1.wget http://nodejs.org/dist/node-v0.6.9.tar.gz
tar zxvf node-v0.6.9.tar.gz
cd node-v0.6.9
./configure --prefix=/usr/local/node
----------安装提示-------------
Checking for program g++ or c++ : not found
Checking for program icpc : not found
Checking for program c++ : not found
----------------------------
yum install gcc-c++ 可以解决
-----------------------------
make
make install

2.测试
创建test.js文件,内容如下:
var http = require('http');
http.createServer(function (req, res) {
res.writeHead(200, {'Content-Type': 'text/plain'});
res.end('Hello World\n');
}).listen(1337, "127.0.0.1");
console.log('Server running at http://127.0.0.1:1337/');
执行:node test.js
# /usr/local/node/bin/node /www/test.js

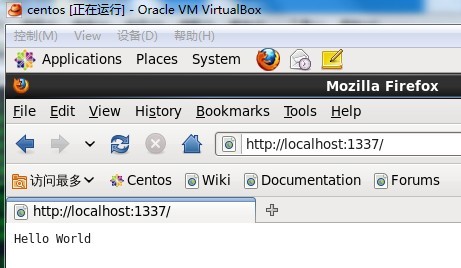
在浏览器里输入 http://127.0.0.1:1337/,可以看到 "Hello World"字样,即表示安装成功!注意后面不能加文件名.

注意事项:
1.客户端只能通过端口访问,不能指定js文件名.
2.监听IP地址可以省略,这样任何地方都可以访问.如果指定了127.0.0.1,则只能在本机才可以访问!
如果要局域网其他机器或者互联网访问
那么自然你需要修改你的侦听ip已经端口,次端口在防火墙要开启
例如80端口,如果此端口被占用你要启用其他端口
var http = require('http');
http.createServer(function (req, res) {
res.writeHead(200, {'Content-Type': 'text/plain'});
res.end('Hello World\n');
}).listen(80, "192.168.1.100");
console.log('Server running at http://192.168.1.100:80/');
-------------------------------------------
注意,如果你想要要输出 html 代码到浏览器,请设置 content-type 为 text/html ,如果设置为 text/plain 将只输出文本
response.writeHead(200, {"Content-Type": "text/html;chartset:utf-8"});
--------------------------------------------
参考:
http://www.cnblogs.com/rubylouvre/archive/2010/07/15/1778403.html
http://www.cnodejs.org/
http://club.cnodejs.org/topic/4f16442ccae1f4aa27001071
(责任编辑:IT)
Linux下(centos6.0)安装Node.js 1.wget http://nodejs.org/dist/node-v0.6.9.tar.gz tar zxvf node-v0.6.9.tar.gz cd node-v0.6.9 ./configure --prefix=/usr/local/node ----------安装提示------------- Checking for program g++ or c++ : not found Checking for program icpc : not found Checking for program c++ : not found ---------------------------- yum install gcc-c++ 可以解决 ----------------------------- make make install
2.测试 创建test.js文件,内容如下: var http = require('http'); http.createServer(function (req, res) { res.writeHead(200, {'Content-Type': 'text/plain'}); res.end('Hello World\n'); }).listen(1337, "127.0.0.1"); console.log('Server running at http://127.0.0.1:1337/'); 执行:node test.js # /usr/local/node/bin/node /www/test.js
在浏览器里输入 http://127.0.0.1:1337/,可以看到 "Hello World"字样,即表示安装成功!注意后面不能加文件名.
注意事项: 1.客户端只能通过端口访问,不能指定js文件名. 2.监听IP地址可以省略,这样任何地方都可以访问.如果指定了127.0.0.1,则只能在本机才可以访问! 如果要局域网其他机器或者互联网访问 那么自然你需要修改你的侦听ip已经端口,次端口在防火墙要开启 例如80端口,如果此端口被占用你要启用其他端口 var http = require('http'); http.createServer(function (req, res) { res.writeHead(200, {'Content-Type': 'text/plain'}); res.end('Hello World\n'); }).listen(80, "192.168.1.100"); console.log('Server running at http://192.168.1.100:80/'); ------------------------------------------- 注意,如果你想要要输出 html 代码到浏览器,请设置 content-type 为 text/html ,如果设置为 text/plain 将只输出文本 response.writeHead(200, {"Content-Type": "text/html;chartset:utf-8"}); -------------------------------------------- 参考: http://www.cnblogs.com/rubylouvre/archive/2010/07/15/1778403.html http://www.cnodejs.org/ http://club.cnodejs.org/topic/4f16442ccae1f4aa27001071 (责任编辑:IT) |