Linux服务器双网卡双IP和单网卡双IP配置方法(Debian/Ubuntu)
时间:2016-03-20 04:17 来源:linux.it.net.cn 作者:IT
一、双网卡双IP。
eth0为电信,eth1为联通。
# cd /etc/network/
#vi interfaces
# This file describes the network interfaces available on your system
# and how to activate them. For more information, see interfaces(5).
# The loopback network interface
auto lo
iface lo inet loopback
auto eth0
iface eth0 inet static
address 114.80.0.4
netmask 255.255.255.128
gateway 114.80.0.3
auto eth1
iface eth1 inet static
address 112.65.0.2
netmask 255.255.255.0
######################################################
然后做策略路由(这里的策略路由文件由机房提供)。
二、单网卡双IP。
# This file describes the network interfaces availableon your system
# and how to activate them. For more information, see interfaces(5).
#/etc/network/interfaces
# The loopback network interface
auto lo
iface lo inet loopback
auto eth0
iface eth0 inet static
address 192.168.1.116
netmask 255.255.255.0
gateway 192.168.1.2
broadcast 192.168.1.255
# dns-* options are implemented by the resolvconf package, if installed
dns-nameservers 61.134.1.4
auto eth0:1
iface eth0:1 inet static
address 192.168.1.135
netmask 255.255.255.0
gateway 192.168.1.2
broadcast 192.168.1.255
######################################################
然后做策略路由。
三、配置策略路由。
Ubuntu、debian的开机自启动服务和RedHat、CentOS都不一样,Ubuntu、debian需把写好的脚本放到指定目录!
步骤如下:
把路由列表文件static-routes放置在/etc/init.d目录中,赋予可执行权限,然后执行一下。
cd /etc/init.d
chmod +x /etc/init.d/static-routes
./static-routes.sh #带路由信息的shell脚本
update-rc.d static-routes start 99 2 3 4 5 . stop 01 0 1 6 .
#表示在2、3、4、5这五个运行级别中,由小到大,第二十个运行static-routes
#在0、1、6三个级别中,第一个关闭static-routes
#注意它有2个点号,效果等于下面方法:
update-rc.d static-routes defaults
(使用update-rc.d 命令来控制具体的加入,有点类似于RedHat下的chkconfig命令)
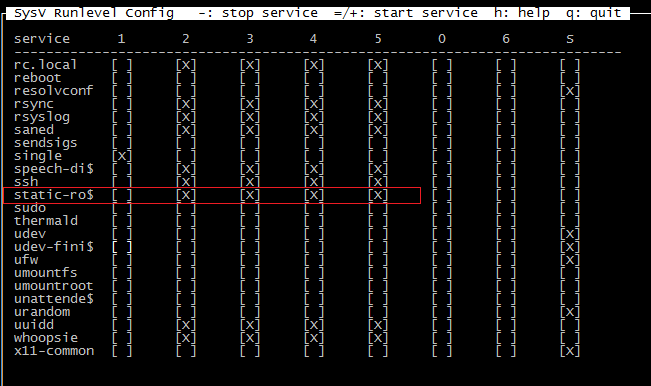
sudo apt-get install sysv-rc-conf
(一个强大的服务管理程序,有点类似RedHat下ntsysv与setup)
使用sysv-rc-conf检查static-routes是否添加并启动

清除开机启动设置执行下面的命令:
update-rc.d -f static-routes remove
完成后重启服务器,测试路由信息是否失效。
(责任编辑:IT)
一、双网卡双IP。 eth0为电信,eth1为联通。 # cd /etc/network/ #vi interfaces # This file describes the network interfaces available on your system # and how to activate them. For more information, see interfaces(5).
# The loopback network interface auto lo iface lo inet loopback
auto eth0 iface eth0 inet static address 114.80.0.4 netmask 255.255.255.128 gateway 114.80.0.3
auto eth1 iface eth1 inet static address 112.65.0.2 netmask 255.255.255.0 ###################################################### 然后做策略路由(这里的策略路由文件由机房提供)。 二、单网卡双IP。 # This file describes the network interfaces availableon your system # and how to activate them. For more information, see interfaces(5). #/etc/network/interfaces
# The loopback network interface auto lo iface lo inet loopback
auto eth0 iface eth0 inet static address 192.168.1.116 netmask 255.255.255.0 gateway 192.168.1.2 broadcast 192.168.1.255
# dns-* options are implemented by the resolvconf package, if installed
auto eth0:1 iface eth0:1 inet static address 192.168.1.135 netmask 255.255.255.0 gateway 192.168.1.2 broadcast 192.168.1.255 ###################################################### 然后做策略路由。 三、配置策略路由。 Ubuntu、debian的开机自启动服务和RedHat、CentOS都不一样,Ubuntu、debian需把写好的脚本放到指定目录! 步骤如下: 把路由列表文件static-routes放置在/etc/init.d目录中,赋予可执行权限,然后执行一下。 cd /etc/init.d chmod +x /etc/init.d/static-routes ./static-routes.sh #带路由信息的shell脚本 update-rc.d static-routes start 99 2 3 4 5 . stop 01 0 1 6 . #表示在2、3、4、5这五个运行级别中,由小到大,第二十个运行static-routes #在0、1、6三个级别中,第一个关闭static-routes #注意它有2个点号,效果等于下面方法: update-rc.d static-routes defaults (使用update-rc.d 命令来控制具体的加入,有点类似于RedHat下的chkconfig命令) sudo apt-get install sysv-rc-conf (一个强大的服务管理程序,有点类似RedHat下ntsysv与setup) 使用sysv-rc-conf检查static-routes是否添加并启动
清除开机启动设置执行下面的命令: update-rc.d -f static-routes remove 完成后重启服务器,测试路由信息是否失效。 (责任编辑:IT) |