mysql使用yum安装最新版本
时间:2016-05-23 00:07 来源:linux.it.net.cn 作者:IT
1.去官网下载mysql-community-release
下载地址:http://dev.mysql.com/downloads/repo/yum/

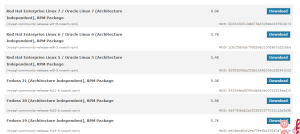
选择对应的版本进行下载:
我们这里使用的是centos6.5所以下载
http://dev.mysql.com/get/mysql-community-release-el6-5.noarch.rpm
[root@sky ~]# wget http://dev.mysql.com/get/mysql-community-release-el6-5.noarch.rpm
[root@sky ~]# rpm -ivh mysql-community-release-el6-5.noarch.rpm
Preparing… ########################################### [100%]
1:mysql-community-release########################################### [100%]
2.添加mysql官方yum库
[root@sky ~]# cd /etc/yum.repos.d/
[root@sky yum.repos.d]# vim mysql.repo
[mysql-community]
name=MySQL Community Server
baseurl=URL
enabled=1
gpgcheck=1
gpgkey=file:///etc/pki/rpm-gpg/RPM-GPG-KEY-mysql
根据自己的OS版本,替换适合的baseurl=URL内容:
1)对于EL6 (Centos6 / Redhat 6)
baseurl=http://repo.mysql.com/yum/mysql-community/el/6/$basearch/
2)对于Fedore 18 and 19:
baseurl=http://repo.mysql.com/yum/mysql-community/fc/$releasever/$basearch/
注意:gpgcheck=1,这表示我们需要添加GnuPG key
详情见:http://dev.mysql.com/doc/refman/5.7/en/checking-gpg-signature.html
设置完毕后使用以下命令安装即可:
yum install mysql-community-server
[root@sky yum.repos.d]# yum list|grep mysql
mysql-community-release.noarch el6-5 installed
mysql-libs.x86_64 5.1.61-4.el6 @anaconda-CentOS-201207061011.x86_64/6.3
apr-util-mysql.x86_64 1.3.9-3.el6_0.1 base
bacula-director-mysql.x86_64 5.0.0-12.el6 base
bacula-storage-mysql.x86_64 5.0.0-12.el6 base
dovecot-mysql.x86_64 1:2.0.9-8.el6_6.4 updates
freeradius-mysql.x86_64 2.1.12-6.el6 base
libdbi-dbd-mysql.x86_64 0.8.3-5.1.el6 base
mod_auth_mysql.x86_64 1:3.0.0-11.el6_0.1 base
mysql.x86_64 5.1.73-3.el6_5 base
mysql-bench.x86_64 5.1.73-3.el6_5 base
mysql-community-bench.x86_64 5.6.24-3.el6 mysql56-community
mysql-community-client.i686 5.6.24-3.el6 mysql56-community
mysql-community-client.x86_64 5.6.24-3.el6 mysql56-community
mysql-community-common.i686 5.6.24-3.el6 mysql56-community
mysql-community-common.x86_64 5.6.24-3.el6 mysql56-community
mysql-community-devel.i686 5.6.24-3.el6 mysql56-community
mysql-community-devel.x86_64 5.6.24-3.el6 mysql56-community
mysql-community-embedded.i686 5.6.24-3.el6 mysql56-community
mysql-community-embedded.x86_64 5.6.24-3.el6 mysql56-community
mysql-community-embedded-devel.i686 5.6.24-3.el6 mysql56-community
mysql-community-embedded-devel.x86_64 5.6.24-3.el6 mysql56-community
mysql-community-libs.i686 5.6.24-3.el6 mysql56-community
mysql-community-libs.x86_64 5.6.24-3.el6 mysql56-community
mysql-community-libs-compat.i686 5.6.24-3.el6 mysql56-community
mysql-community-libs-compat.x86_64 5.6.24-3.el6 mysql56-community
mysql-community-server.x86_64 5.6.24-3.el6 mysql56-community
mysql-community-test.x86_64 5.6.24-3.el6 mysql56-community
mysql-connector-java.noarch 1:5.1.17-6.el6 base
mysql-connector-odbc.x86_64 5.3.4-1.el6 mysql-connectors-community
mysql-connector-python.noarch 2.0.3-1.el6 mysql-connectors-community
mysql-devel.i686 5.1.73-3.el6_5 base
mysql-devel.x86_64 5.1.73-3.el6_5 base
mysql-embedded.i686 5.1.73-3.el6_5 base
mysql-embedded.x86_64 5.1.73-3.el6_5 base
mysql-embedded-devel.i686 5.1.73-3.el6_5 base
mysql-embedded-devel.x86_64 5.1.73-3.el6_5 base
mysql-libs.i686 5.1.73-3.el6_5 base
mysql-libs.x86_64 5.1.73-3.el6_5 base
mysql-server.x86_64 5.1.73-3.el6_5 base
mysql-test.x86_64 5.1.73-3.el6_5 base
mysql-utilities.noarch 1.5.4-1.el6 mysql-tools-community
mysql-utilities-extra.noarch 1.5.4-1.el6 mysql-tools-community
mysql-workbench-community.x86_64 6.2.5-1.el6 mysql-tools-community
php-mysql.x86_64 5.3.3-40.el6_6 updates
qt-mysql.i686 1:4.6.2-28.el6_5 base
qt-mysql.x86_64 1:4.6.2-28.el6_5 base
rsyslog-mysql.x86_64 5.8.10-10.el6_6 updates
rsyslog7-mysql.x86_64 7.4.10-3.el6_6 updates
安装完成后我们启动mysql
service mysqld start
查看mysql状态
service mysqld status
附件有完整的centos6.0的yum文件和对应的RPM-GPG-KEY-mysql文件下载完毕后分别放到/etc/yum.repo/和/etc/pki/rpm-gpg/下面即可使用。
附件mysql
(责任编辑:IT)
1.去官网下载mysql-community-release 下载地址:http://dev.mysql.com/downloads/repo/yum/
选择对应的版本进行下载: 我们这里使用的是centos6.5所以下载 http://dev.mysql.com/get/mysql-community-release-el6-5.noarch.rpm [root@sky ~]# wget http://dev.mysql.com/get/mysql-community-release-el6-5.noarch.rpm
[root@sky ~]# rpm -ivh mysql-community-release-el6-5.noarch.rpm 2.添加mysql官方yum库
[root@sky ~]# cd /etc/yum.repos.d/
[mysql-community] 根据自己的OS版本,替换适合的baseurl=URL内容: 1)对于EL6 (Centos6 / Redhat 6) baseurl=http://repo.mysql.com/yum/mysql-community/el/6/$basearch/ 2)对于Fedore 18 and 19: baseurl=http://repo.mysql.com/yum/mysql-community/fc/$releasever/$basearch/ 注意:gpgcheck=1,这表示我们需要添加GnuPG key 详情见:http://dev.mysql.com/doc/refman/5.7/en/checking-gpg-signature.html 设置完毕后使用以下命令安装即可: yum install mysql-community-server
[root@sky yum.repos.d]# yum list|grep mysql
安装完成后我们启动mysql
查看mysql状态 附件有完整的centos6.0的yum文件和对应的RPM-GPG-KEY-mysql文件下载完毕后分别放到/etc/yum.repo/和/etc/pki/rpm-gpg/下面即可使用。 附件mysql (责任编辑:IT) |