Ubuntu/fedora实用小技巧—禁止自动锁屏、设置免密码自动登录、免密码执行sudo操作
时间:2016-06-01 11:44 来源:linux.it.net.cn 作者:IT
首先声明:该文虽以Ubuntu 13.04为例,同样适用于Fedora 17(已测试),但在较低版本的Ubuntu下可能有所差异,具体看后面的注意事项。
技巧目录:
-
解决Ubuntu下每隔几分钟自动锁屏,需要重新输入密码的问题
-
无须输入用户名密码让Ubuntu自动登录到桌面
-
Ubuntu下如何使用sudo不用输入密码
1. 解决Ubuntu下每隔几分钟自动锁屏,需要重新输入密码的问题
有时候几分钟不用Ubuntu,系统就自动锁屏了,这是一种安全措施,防止别人趁你不在时使用你的系统。但对于大部分人而言,这是没有必要的,尤其是Ubuntu虚拟机,里面没啥重要的东西,每次锁屏后需要重新输入密码解锁实际上非常枯燥且浪费时间。
解决方案:
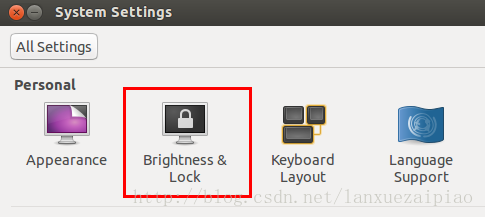
(1)打开系统设置,找到“Brightness & Lock”(亮度和锁屏)设置并打开,如下图:
(2)根据提示可以设置屏幕多久关闭和锁屏时间设定,一个“Never”和“OFF”即可搞定。
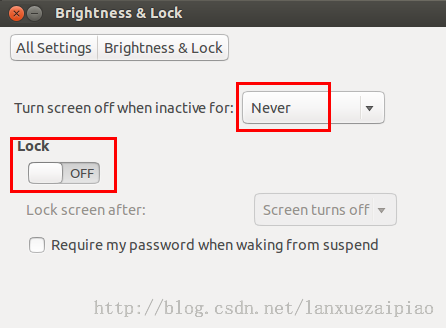 这样设置后屏幕就不会自动关闭和自动锁屏了。
2. 无须输入用户名密码让Ubuntu自动登录到桌面
每个Linux用户都必须设有密码,这与Windows不同,对于非专业使用Linux的用户来说,已经解决了自动锁屏输密 码问题,如果每次登录系统也不用输入密码 ,岂不是让我们的工作更加轻松更加easy。注意这里的免密码登录系统并不是说用户没有密码了,密码还在只是系统把密码记住了自动用你的密码登录而已。
解决方案:
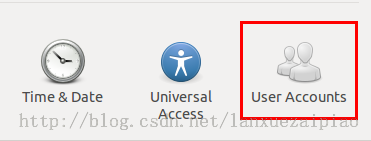
(1)系统设置里找到“User Accounts”
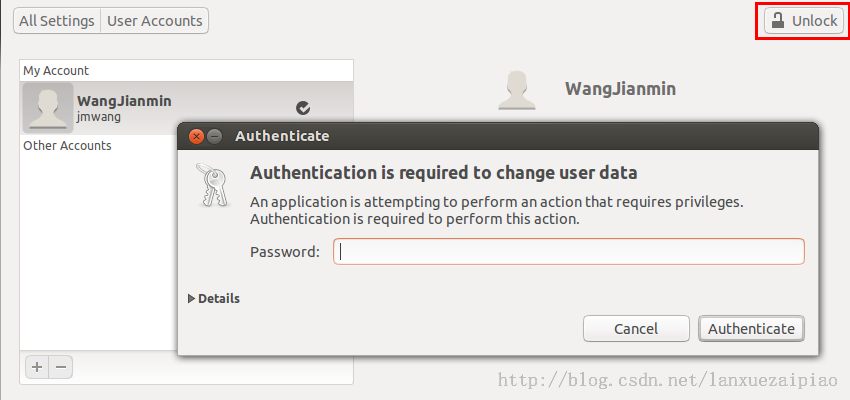
(2)然后点击右上角的“Unlock”,输入当前用户的密码解锁认证
 (3)解锁成功后,开启自动登录功能,即“Automatic Login”开关打开,保存设置即可。
 注意事项:较低版本的Ubuntu可能没有该设置选项,那么可以通过配置文件设置自动登录:
在/etc/gdm/目录下有个custom.conf或者gdm.conf或gdm.conf-custom文件,比如我的Ubuntu9.11下的gdm下有这些文件:

打开gdm.conf-custom,截取最前面的几句注释说明如下:
# GDM Configuration Customization file.
#
# This file is the appropriate place for specifying your customizations to the
# GDM configuration.   If you run gdmsetup, it will automatically edit this
# file for you and will cause the daemon and any running GDM GUI programs to
# automatically update with the new configuration.  Not all configuration
# options are supported by gdmsetup, so to modify some values it may be
# necessary to modify this file directly by hand.
#
# Older versions of GDM used the "gdm.conf" file for configuration.  If your
# system has an old gdm.conf file on the system, it will be used instead of
# this file - so changes made to this file will not take effect.  Consider
# migrating your configuration to this file and removing the gdm.conf file.
文件中后面说到如果有gdm.conf老配置文件,那么该文件中的值就不会起作用。那么我们就去gdm.conf里配置吧,打开后找到下面这一段:
[daemon]
# Automatic login, if true the first attached screen will automatically logged
# in as user as set with AutomaticLogin key.
AutomaticLoginEnable=false
AutomaticLogin=
上面的意思很好理解,将AutomaticLoginEnable变量值改为true就可以了。
当然,通过上面的提示我们知道还有一种方法修改该配置文件,就是使用sudo gdmsetup这个命令,运行后会出现设置界面,进入“Security”选项卡:
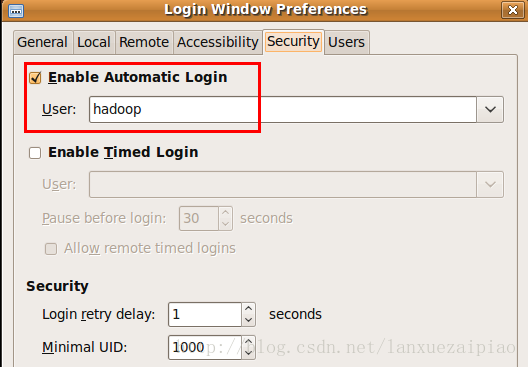
将“Enable Automatic Login“选上,然后选择你自己的用户名即可。
3. Ubuntu下如何使用sudo不用输入密码
普通用户登录Ubuntu一般使用的是普通账户而非管理员账户,因此运行有管理员权限的程序时都要输入sudo [command],这样的命令输入非常频繁,关键是每次都要输入一次用户自己的密码,非常烦人,下面就教你使用sudo不用输入密码的小技巧。
解决方案:
假设我的用户名为hadoop,使用sudo不用密码的方法如下:
运行命令:sudo visudo 或者sudo vi /etc/sudoers,如果vi来编辑,则保存时记得用"wq!"强制保存,否则会提示只读不能保存的。
上述命令就是用来编辑/etc/sudoers这个文件的。
# This file MUST be edited with the 'visudo' command as root.
#
# Please consider adding local content in /etc/sudoers.d/ instead of
# directly modifying this file.
#
# See the man page for details on how to write a sudoers file.
#
Defaults        env_reset
Defaults        mail_badpass
Defaults        secure_path="/usr/local/sbin:/usr/local/bin:/usr/sbin:/usr/bin:/sbin:/bin"

# Host alias specification

# User alias specification

# Cmnd alias specification

# User privilege specification
root    ALL=(ALL:ALL) ALL

# Members of the admin group may gain root privileges
默认情况我们会看到有"root ALL=(ALL:ALL) ALL"这么一句话,意思就是root用户可以从任何主机连接进来以任意身份执行任意命令,但是需要输入密码,如果不想输入密码只要在后面的ALL之前加 上NOPASSWD即可,关于该文件的格式及参数详解请看参考文献或运行"man sudoers"看帮助文档吧。下面直接给出方法吧:
如果想让hadoop用户使用sudo不用输入密码只要在该文件后面添加"hadoop ALL = NOPASSWD: ALL"这样一行即可。
如果想让 hadoop用户sudo不用密码即可执行某几个命令,可这样写"hadoop ALL = NOPASSWD: /usr/bin/abc.sh, /usr/sbin/adduser"。
注意:这里有个问题需要注意,就是后面的配置可能会覆盖前面的配置,所以你添加的配置最好是在最后一行。
(责任编辑:IT)
首先声明:该文虽以Ubuntu 13.04为例,同样适用于Fedora 17(已测试),但在较低版本的Ubuntu下可能有所差异,具体看后面的注意事项。
技巧目录:
1. 解决Ubuntu下每隔几分钟自动锁屏,需要重新输入密码的问题有时候几分钟不用Ubuntu,系统就自动锁屏了,这是一种安全措施,防止别人趁你不在时使用你的系统。但对于大部分人而言,这是没有必要的,尤其是Ubuntu虚拟机,里面没啥重要的东西,每次锁屏后需要重新输入密码解锁实际上非常枯燥且浪费时间。解决方案: (1)打开系统设置,找到“Brightness & Lock”(亮度和锁屏)设置并打开,如下图:  (2)根据提示可以设置屏幕多久关闭和锁屏时间设定,一个“Never”和“OFF”即可搞定。 
这样设置后屏幕就不会自动关闭和自动锁屏了。
2. 无须输入用户名密码让Ubuntu自动登录到桌面
每个Linux用户都必须设有密码,这与Windows不同,对于非专业使用Linux的用户来说,已经解决了自动锁屏输密 码问题,如果每次登录系统也不用输入密码 ,岂不是让我们的工作更加轻松更加easy。注意这里的免密码登录系统并不是说用户没有密码了,密码还在只是系统把密码记住了自动用你的密码登录而已。
解决方案: (1)系统设置里找到“User Accounts” 
(2)然后点击右上角的“Unlock”,输入当前用户的密码解锁认证

(3)解锁成功后,开启自动登录功能,即“Automatic Login”开关打开,保存设置即可。

注意事项:较低版本的Ubuntu可能没有该设置选项,那么可以通过配置文件设置自动登录:
在 /etc/gdm/目录下有个custom.conf或者gdm.conf或gdm.conf-custom文件,比如我的Ubuntu9.11下的gdm下有这些文件: 打开 gdm.conf-custom,截取最前面的几句注释说明如下:# GDM Configuration Customization file. # # This file is the appropriate place for specifying your customizations to the # GDM configuration. If you run gdmsetup, it will automatically edit this # file for you and will cause the daemon and any running GDM GUI programs to # automatically update with the new configuration. Not all configuration # options are supported by gdmsetup, so to modify some values it may be # necessary to modify this file directly by hand. # # Older versions of GDM used the "gdm.conf" file for configuration. If your # system has an old gdm.conf file on the system, it will be used instead of # this file - so changes made to this file will not take effect. Consider # migrating your configuration to this file and removing the gdm.conf file.
文件中后面说到如果有
gdm.conf老配置文件,那么该文件中的值就不会起作用。那么我们就去gdm.conf里配置吧,打开后找到下面这一段:[daemon] # Automatic login, if true the first attached screen will automatically logged # in as user as set with AutomaticLogin key. AutomaticLoginEnable=false AutomaticLogin=
上面的意思很好理解,将
AutomaticLoginEnable变量值改为true就可以了。当然,通过上面的提示我们知道还有一种方法修改该配置文件,就是使用 sudo gdmsetup这个命令,运行后会出现设置界面,进入“Security”选项卡: 将“Enable Automatic Login“选上,然后选择你自己的用户名即可。 3. Ubuntu下如何使用sudo不用输入密码普通用户登录Ubuntu一般使用的是普通账户而非管理员账户,因此运行有管理员权限的程序时都要输入sudo [command],这样的命令输入非常频繁,关键是每次都要输入一次用户自己的密码,非常烦人,下面就教你使用sudo不用输入密码的小技巧。 解决方案: 假设我的用户名为hadoop,使用sudo不用密码的方法如下:
运行命令:
上述命令就是用来编辑/etc/sudoers这个文件的。
# This file MUST be edited with the 'visudo' command as root. # # Please consider adding local content in /etc/sudoers.d/ instead of # directly modifying this file. # # See the man page for details on how to write a sudoers file. # Defaults env_reset Defaults mail_badpass Defaults secure_path="/usr/local/sbin:/usr/local/bin:/usr/sbin:/usr/bin:/sbin:/bin" # Host alias specification # User alias specification # Cmnd alias specification # User privilege specification root ALL=(ALL:ALL) ALL # Members of the admin group may gain root privileges 默认情况我们会看到有"root ALL=(ALL:ALL) ALL"这么一句话,意思就是root用户可以从任何主机连接进来以任意身份执行任意命令,但是需要输入密码,如果不想输入密码只要在后面的ALL之前加 上NOPASSWD即可,关于该文件的格式及参数详解请看参考文献或运行"man sudoers"看帮助文档吧。下面直接给出方法吧:
如果想让hadoop用户使用sudo不用输入密码只要在该文件后面添加"hadoop ALL = NOPASSWD: ALL"这样一行即可。
如果想让 hadoop用户sudo不用密码即可执行某几个命令,可这样写"hadoop ALL = NOPASSWD: /usr/bin/abc.sh, /usr/sbin/adduser"。
注意:这里有个问题需要注意,就是后面的配置可能会覆盖前面的配置,所以你添加的配置最好是在最后一行。 (责任编辑:IT) |