Ceph文件系统安装步骤
时间:2016-07-14 14:49 来源:linux.it.net.cn 作者:IT
创建用户:#sudo useradd -d /home/ceph -s /bin/bash [-m] ceph
#passwd ceph ///密码设为:ceph
#vim/etc/sudoers
添加:ceph ALL=(ALL) ALL
Linux实现SSH无密码登录
参见http://blog.csdn.net/whucs_b701/article/details/7422470
1.环境配置:
-
5台虚拟机(0.5GBRAM,1VCPU,16GBDisk),安装的是Ubuntu10.04系统
规划如下:
hostname
IP地址
Ceph组件
mds0
192.168.0.109
mds0
mds1
192.168.0.200
msd1
osd0
192.168.0.110
osd0
client
192.168.0.104
client
monitor
192.168.0.117
monitor
-
给每个节点上的/etc/hosts都加上以下内容
192.168.0.102msd0
192.168.0.200 msd1
192.168.0.110 osd0
192.168.0.104 client
192.168.0.117 monitor
-
设置ssh无密码登陆
添加所有其他节点对mds节点的SSH信任。这样mds0、mds1节点就可以使用ssh登录其他节点(以root的身份)。
-
在mds0节点上运行(产生公钥和私钥,无密码)
#ssh-keygen -d
-
由于使用ubuntu系统,所以先要为root设置密码,才能使用root登录。然后在mds0节点运行下面的命令:
#scp /root/.ssh/id_dsa.pub root@client:/root/.ssh/mds0_pub
#scp /root/.ssh/id_dsa.pub root@msd1:/root/.ssh/mds0_pub
#scp /root/.ssh/id_dsa.pub root@osd0:/root/.ssh/mds0_pub
#scp /root/.ssh/id_dsa.pub root@osd1:/root/.ssh/mds0_pub
#scp /root/.ssh/id_dsa.pub root@mon:/root/.ssh/mds0_pub
-
然后在client、mds1、osd0、osd1、mon上分别运行:
-
Cat mds0_pub >> authorized_keys
-
同理,将client、mds1、osd0、osd1、mon上生成的id_dsa.pub复制到mds0上,并cat到authorized_keys文件中
-
在mds1上做相同操作。
2.先安装依赖包
1)#apt-getinstalllibtool autoconf uuid-devlibkeyutils-dev libcrypto++-dev libfuse-dev libedit-devg++ libboost-devlibgoogle-perftools-devlibatomic-ops-dev libgdata-common libboost-filesystem-dev libboost-system-devbtrfs-tools
Libsnappy-deb
2)手动编译安装boost
a.下载源码:www.boost.org
b.解压最好解压到/usr/local:
tar jxvf **.bz2
c.执行
$ ./bootstrap.sh
生成 bjam可执行程序
d.执行下面的配置,就编译完成了:
./bjam --layout=tagged --build-type=complete stage
e.boost 已经编译好了,下面调用boost库(在mds、mon与osd上都执行)
1)在/usr/include/下生成一个boost库的include文件夹连接:
ln -s /usr/share/boos t_1_46_1/boost/usr/include/boost
2)在/usr/lib/ 下生成所有boost编译出的lib库文件的对应连接 切换到stage目录下,执行
find $PWD/lib/*.* -type f -exec ln -s {}/usr/lib/ \;
3.下载ceph-0.41(在mon-mds节点上执行)
在http://ceph.newdream.net/download/下载
#wget http://ceph.newdream.net/download/ceph-0.41.tar.gz
4.解压并安装ceph(在mds0节点上执行)
编译需花费较长时间
#tar zxvfceph-0.41.tar.gz
#cd ceph-0.41
#./autogen.sh
#./configureLIBS="-lboost_system" --prefix=/opt/ceph/install --without-tcmalloc --without-libatomic-ops
#make
#make install
【configure-问题】
#./configureLIBS="-lboost_system" --prefix=/opt/ceph/install --without-tcmalloc --without-libatomic-ops的时候出现问题:configure:error: C compiler cannot create executables。
去掉LIBS="-lboost_system",问题解决
【configure-问题】
#./configureLIBS="-lboost_system" --prefix=/opt/ceph/install --without-tcmalloc --without-libatomic-ops的时候出现问题:
error:No usable version of libedit found.
解决:sudo apt-get install libedit-dev
【configure-问题】
#./configureLIBS="-lboost_system" --prefix=/opt/ceph/install --without-tcmalloc --without-libatomic-ops的时候出现问题:
error: libaio not found.
解决:sudo apt-get install libaio-dev
【configure-问题】
总是boost库没有找到,于是到boost的源文件夹下:./bjam install
然后:#./configure --prefix=/opt/ceph/install --without-tcmalloc --without-libatomic-ops成功
【make-问题】
expat.h:没有那个文件或目录
解决:sudo apt-getinstall libexpat-dev
【make-问题:libtool: link: `libcommon_la-MonClient.lo' is not a valid libtoolobject】
【make install-问题】
在make install时出现问题:“error:cannot install `librbd.la' to a directory not ending in /usr/local/lib”,原因是libtool的版本过低。因为不知道怎么单独升级某个软件包,用apt-get install libtool又显示已经是最新的了。所以干脆直接升级全部软件包:apt-get upgrade。错误解决。
【make install-问题】
Libtool: install: error:cannot install 'librbd.la' to directory notending in /home/ceph/xyycephv1/lib
解决:make clean即可
5.把编译好的文件复制到其他节点上
#cd /opt
#tar czvf ceph-0.41.bin.tar.gz ceph/
#scpceph-0.41.bin.tar.gzmds1:/opt/
#scpceph-0.41.bin.tar.gz osd0:/opt/
#scpceph-0.41.bin.tar.gz osd1:/opt/
#scpceph-0.41.bin.tar.gz client:/opt/
#scpceph-0.41.bin.tar.gzmon:/opt/
#sshmsd1 tar zxvf /opt/ceph-0.41.bin.tar.gz
#ssh osd0 tar zxvf /opt/ceph-0.41.bin.tar.gz
#ssh osd1 tar zxvf/opt/ceph-0.41.bin.tar.gz
#ssh client tar zxvf/opt/ceph-0.41.bin.tar.gz
#ssh mon tar zxvf /opt/ceph-0.41.bin.tar.g
6.设置命令路径和库函数路径(在mds0节点上执行)
#vim /etc/profile
在最后添加上内容
PATH=$PATH:/opt/ceph/install/bin:/opt/ceph/install/sbin:/opt/ceph/install/lib/ceph
# vim/etc/ld.so.conf
在最后添加上内容
/opt/ceph/install/lib
/opt/ceph/install/lib/rados-classes
复制配置文件到其他节点上
#scp /etc/profile mds1:/etc/profile
#scp /etc/profile osd0:/etc/profile
#scp /etc/profileosd1:/etc/profile
#scp /etc/profileclient:/etc/profile
#scp/etc/profilemon:/etc/profile
#scp/etc/ld.so.conf mds1:/etc/ld.so.conf
#scp/etc/ld.so.conf osd0:/etc/ld.so.conf
#scp /etc/ld.so.confosd1:/etc/ld.so.conf
#scp /etc/ld.so.confclient:/etc/ld.so.conf
#scp/etc/ld.so.confmon:/etc/ld.so.conf
#ldconfig 是一个动态链接库命令
#ssh mds1 ldconfig
#ssh osd0 ldconfig
#ssh osd1 ldconfig
#ssh client ldconfig
#ssh mon ldconfig
7.编辑ceph.conf配置文件(在mds0节点上执行)
#mkdir/etc/ceph
# vim/etc/ceph/ceph.conf
并添加上内容
[global]
pidfile =/opt/ceph/install/var/run/ceph/$name.pid
debug ms = 1
[mon]
mon data =/mnt/mon$id
[mon.0]
host=monitor
monaddr = 192.168.0.24:6789
[mds]
[mds.0]
host= mds0
[mds.1]
host= mds1
[osd]
sudo = true
osd data =/mnt/osd$id
osd journal =/mnt/osd$id/journal
osd journal size =100
[osd.0]
host= osd0
复制到其他节点上
#cp /etc/ceph/ceph.conf /opt/ceph/install/etc/ceph/ceph.conf
#scp /etc/ceph/ceph.conf mds1:/etc/ceph/ceph.conf
#scp /etc/ceph/ceph.conf osd0:/etc/ceph/ceph.conf
#scp/etc/ceph/ceph.conf osd1:/etc/ceph/ceph.conf
#scp/etc/ceph/ceph.conf client:/etc/ceph/ceph.conf
#scp/etc/ceph/ceph.conf mon:/etc/ceph/ceph.conf
#scp /opt/ceph/install/etc/ceph/ceph.conf mds1:/opt/ceph/install/etc/ceph/ceph.conf
#scp /opt/ceph/install/etc/ceph/ceph.conf osd0:/opt/ceph/install/etc/ceph/ceph.conf
#scp/opt/ceph/install/etc/ceph/ceph.conf osd1:/opt/ceph/install/etc/ceph/ceph.conf
#scp/opt/ceph/install/etc/ceph/ceph.conf client:/opt/ceph/install/etc/ceph/ceph.conf
#scp/opt/ceph/install/etc/ceph/ceph.conf mon:/opt/ceph/install/etc/ceph/ceph.conf
每次开机需要做的
8.创建目录
在monitor上执行:
#mkfs.ext3 /dev/sdb3 //格式化新的硬盘
#mount /dev/sdb3 /mnt //挂载新分区
//开机自动挂载,则修改/etc/fstab文件,在这个文件里面添加一行:
/dev/sdb3 /mnt ext3 defaults, 0 1
#mkdir -p /mnt/mon0
在osd0上
#mkfs.btrfs /dev/sdb3
#mount /dev/sdb3 /mnt
#mkdir-p /mnt/osd0
//开机自动挂载,则修改/etc/fstab文件,在这个文件里面添加一行:
/dev/sdb3 /mnt btrfs defaults, 0 1
在所有节点上
#mkdir -p/var/log/ceph/
#mkdir-p /var/run/ceph/
9.创建启动脚本(在mon节点上执行)
# cp /opt/ceph/ceph-0.56.1/src/init-ceph /etc/init.d/ceph
修改此文件中的库路径名
10.创建文件系统(在mon节点上执行),
#mkcephfs -c /etc/ceph/ceph.conf --allhosts -v
这儿用sudo会出现错误:mkcephfs:找不到命令。应该用命令的绝对路径:
$sudo/opt/ceph/install/sbin/mkcephfs -c /etc/ceph/ceph.conf --allhosts -v
【问题】
error creating empty object store in/mnt/osd0:(95) Operation not supported
原因:因为在格式化osd的/dev/sdb3的时候将它格式化成了ext3的了。mount的时候也mount成ext3格式的
11.启动ceph(在mon节点上执行)
#/etc/init.d/ceph-a start
【问题】13.10.24
启动osd的时候显示:No module named rados….
解决:将/home/ceph/xyycephv0/lib/python2.7/site_packages/rados.py(cephfs.py/ceph_argarse.py)复制到
/home/ceph/xyycephv0/bin目录下面就可以了。
不过很奇怪,0.67.4之前的版本没有出现过这种问题
【问题】13.10.24
如上个问题,将文件拷贝后,又出现cannot open shared object file: No suchfile or directory
解决:运行ldconfig就ok!
12.查看状态信息
#ceph -s
#ceph health ///When your cluster echoes back HEALTH_OK, you may begin using Ceph.
13.在client上:http://ceph.com/docs/master/start/quick-start/?highlight=minutes
sudo scp monitor:/etc/ceph/keyring /etc/ceph/ceph.keyring
sudo chmod 644 /etc/ceph/keyring
sudomkdir -p /mnt/mycephfs
14.在client上:
fuse客户端的启动:
sudo/opt/ceph/install/bin/ceph-fuse -m 192.168.0.117:6789 /mnt/mycephfs/
【总是出现错误】ceph-fuse: error while loading shared librarieslibboost_system.so.1.50.0,但是我这个文件明明已经放在/usr/lib和/usr/local/lib下了,而且这两个路径也已经添加到/etc/ld.so.conf里面了。还是不行。
【解决】把/opt/boost_1_50_0/stage/lib目录添加到/etc/ld.so.conf里面,然后运行ldconfig,错误不再出现。
14、在client节点上:
# mkdir /mnt/mycephfs
#/opt/ceph/install/sbin/mount.ceph192.168.0.117:6789:/ /mnt/mycephfs -v -oname=admin,secret=AQD2xHRRwJvzNxAAEtHhAMK+zAsmp0QhGWFWlA==
(通过cat/etc/ceph/keyring得到secret)
secret为monitor下/etc/ceph/keyring的内容
接下来就可以在/mnt/mycephfs下进行操作了!
直接用mkdir、touch等linux就可以创建目录与文件了,在/var/log/ceph下有各个节点的日志记录!
13、在client节点上编译ceph的client
帮助信息
http://ceph.newdream.net/wiki/Building_kernel_client
获取源码
#apt-get install git-core
#git clonegit://ceph.newdream.net/git/ceph-client-standalone.git
(用 #git clonegit://github.com/ceph/ceph-client-standalone.git 速度更快)
【问题】fatal:Not a git repository(or any of parentdirectories):.git
解决:git init
#gitbranch master-backport origin/master-backport
【问题】fatal:Not a valid objectname:'origin/master-backport'
编译源码
#git checkoutmaster-backport (假如当前系统的内核版本不是最新内核版本,就要执行这个命令)
安装build文件夹
#apt-get installlinux-headers-$(uname -r)
#apt-get installbuild-essential
编译libceph模块
#make-C libceph,但是遇到出错,说缺少ceph-type.h
解决:
首先查看系统内核:uname -r(我的是2.6.32-21-generic)
然后进入相应目录:cd/usr/src/linux-headers-2.6.32-21-generic/include/keys
新建ceph-type.h文件
# vim ceph-type.h
加上内容
#ifndef_KEYS_CEPH_TYPE_H
#define_KEYS_CEPH_TYPE_H
#include<linux/key.h>
extern structkey_type key_type_ceph;
#endif
重新编译libceph模块
#make -C libceph
错误: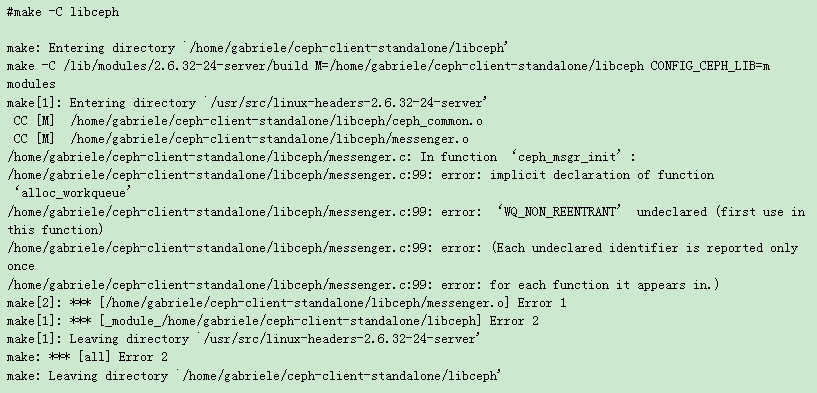
解决:http://ec2-75-101-143-172.compute-1.amazonaws.com/wordpress/2011/02/ceph-on-ubuntu-10-04/
A quick check onbranch’s commits points to the following two entries (extract):
#git show-branch--more=20
…..
+* [master~10]net/ceph: make ceph_msgr_wq non-reentrant
+* [master~11] ceph:fsc->*_wq's aren't used in memory reclaim path
….
Now, it’s just amatter to revert the commits (your commit references might vary):
#git revert -nmaster~10
#git revert -nmaster~11
【但我的是:#git show-branch --more=20 | grep ceph_msgr_wq找到
+* [master~58]net/ceph: make ceph_msgr_wq non-reentrant
+* [master~59] ceph:fsc->*_wq's aren't used in memory reclaim path
所以为:
#gitrevert -n master~58
#gitrevert -n master~59
】
The rest of theinstallation is straightforward:
#make -C libceph
编译ceph和rbd模块
#cplibceph/Module.symvers ceph/
#cplibceph/Module.symvers rbd/
#make -C ceph
#make -C rbd
加载模块
#modprobe libcrc32c
#insmod./libceph/libceph.ko
#insmod./ceph/ceph.ko
或者把模块放到/lib/modules中
#cpceph-client-standalone/libceph/libceph.ko/lib/modules/2.6.38-8-virtual/kernel/fs/ceph/
#cpceph-client-standalone/ceph/ceph.ko/lib/modules/2.6.38-8-virtual/kernel/fs/ceph/
#cpceph-client-standalone/rbd/rbd.ko /lib/modules/2.6.38-8-virtual/kernel/fs/ceph/
然后执行
#depmod 分析可加载模块的依赖性,生成modules.dep文件和映射文件。
#modprobe libceph
#modprobe ceph
#modprobe rbd
14、 client挂载ceph文件系统(在client节点上执行)这是挂载在mds上
#mount.ceph 192.168.0.21:/ /mnt(假如挂载不上,可以尝试关闭iptables)
15、查看挂载情况
#mount
16、测试rbd(在client节点上执行)
创建虚拟磁盘
#rbd create foo –size 1000
#rbd list
# echo“192.168.99.14 name=admin rbd foo” > /sys/bus/rbd/add
查看设备
#ll/sys/bus/rbd/devices/
#cat/proc/partitions
#ll /dev/rbd0
使用dd命令写设备
(责任编辑:IT)
创建用户:#sudo useradd -d /home/ceph -s /bin/bash [-m] ceph #passwd ceph ///密码设为:ceph #vim/etc/sudoers 添加:ceph ALL=(ALL) ALL
Linux实现SSH无密码登录 参见http://blog.csdn.net/whucs_b701/article/details/7422470
1.环境配置:
规划如下:
192.168.0.102msd0 192.168.0.200 msd1 192.168.0.110 osd0 192.168.0.104 client 192.168.0.117 monitor
添加所有其他节点对mds节点的SSH信任。这样mds0、mds1节点就可以使用ssh登录其他节点(以root的身份)。
#ssh-keygen -d
#scp /root/.ssh/id_dsa.pub root@client:/root/.ssh/mds0_pub #scp /root/.ssh/id_dsa.pub root@msd1:/root/.ssh/mds0_pub #scp /root/.ssh/id_dsa.pub root@osd0:/root/.ssh/mds0_pub #scp /root/.ssh/id_dsa.pub root@osd1:/root/.ssh/mds0_pub #scp /root/.ssh/id_dsa.pub root@mon:/root/.ssh/mds0_pub
2.先安装依赖包 1)#apt-getinstalllibtool autoconf uuid-devlibkeyutils-dev libcrypto++-dev libfuse-dev libedit-devg++ libboost-devlibgoogle-perftools-devlibatomic-ops-dev libgdata-common libboost-filesystem-dev libboost-system-devbtrfs-tools Libsnappy-deb 2)手动编译安装boost a.下载源码:www.boost.org b.解压最好解压到/usr/local: tar jxvf **.bz2 c.执行 $ ./bootstrap.sh 生成 bjam可执行程序
d.执行下面的配置,就编译完成了: ./bjam --layout=tagged --build-type=complete stage e.boost 已经编译好了,下面调用boost库(在mds、mon与osd上都执行) 1)在/usr/include/下生成一个boost库的include文件夹连接: ln -s /usr/share/boos t_1_46_1/boost/usr/include/boost 2)在/usr/lib/ 下生成所有boost编译出的lib库文件的对应连接 切换到stage目录下,执行 find $PWD/lib/*.* -type f -exec ln -s {}/usr/lib/ \;
3.下载ceph-0.41(在mon-mds节点上执行) 在http://ceph.newdream.net/download/下载 #wget http://ceph.newdream.net/download/ceph-0.41.tar.gz
4.解压并安装ceph(在mds0节点上执行) 编译需花费较长时间 #tar zxvfceph-0.41.tar.gz #cd ceph-0.41 #./autogen.sh #./configureLIBS="-lboost_system" --prefix=/opt/ceph/install --without-tcmalloc --without-libatomic-ops #make #make install
【configure-问题】 #./configureLIBS="-lboost_system" --prefix=/opt/ceph/install --without-tcmalloc --without-libatomic-ops的时候出现问题:configure:error: C compiler cannot create executables。 去掉LIBS="-lboost_system",问题解决
【configure-问题】 #./configureLIBS="-lboost_system" --prefix=/opt/ceph/install --without-tcmalloc --without-libatomic-ops的时候出现问题: error:No usable version of libedit found. 解决:sudo apt-get install libedit-dev
【configure-问题】 #./configureLIBS="-lboost_system" --prefix=/opt/ceph/install --without-tcmalloc --without-libatomic-ops的时候出现问题: error: libaio not found. 解决:sudo apt-get install libaio-dev
【configure-问题】 总是boost库没有找到,于是到boost的源文件夹下:./bjam install 然后:#./configure --prefix=/opt/ceph/install --without-tcmalloc --without-libatomic-ops成功
【make-问题】 expat.h:没有那个文件或目录 解决:sudo apt-getinstall libexpat-dev
【make-问题:libtool: link: `libcommon_la-MonClient.lo' is not a valid libtoolobject】
【make install-问题】 在make install时出现问题:“error:cannot install `librbd.la' to a directory not ending in /usr/local/lib”,原因是libtool的版本过低。因为不知道怎么单独升级某个软件包,用apt-get install libtool又显示已经是最新的了。所以干脆直接升级全部软件包:apt-get upgrade。错误解决。
【make install-问题】 Libtool: install: error:cannot install 'librbd.la' to directory notending in /home/ceph/xyycephv1/lib 解决:make clean即可
5.把编译好的文件复制到其他节点上 #cd /opt #tar czvf ceph-0.41.bin.tar.gz ceph/ #scpceph-0.41.bin.tar.gzmds1:/opt/ #scpceph-0.41.bin.tar.gz osd0:/opt/ #scpceph-0.41.bin.tar.gz osd1:/opt/ #scpceph-0.41.bin.tar.gz client:/opt/ #scpceph-0.41.bin.tar.gzmon:/opt/ #sshmsd1 tar zxvf /opt/ceph-0.41.bin.tar.gz #ssh osd0 tar zxvf /opt/ceph-0.41.bin.tar.gz #ssh osd1 tar zxvf/opt/ceph-0.41.bin.tar.gz #ssh client tar zxvf/opt/ceph-0.41.bin.tar.gz #ssh mon tar zxvf /opt/ceph-0.41.bin.tar.g
6.设置命令路径和库函数路径(在mds0节点上执行) #vim /etc/profile 在最后添加上内容 PATH=$PATH:/opt/ceph/install/bin:/opt/ceph/install/sbin:/opt/ceph/install/lib/ceph
# vim/etc/ld.so.conf 在最后添加上内容 /opt/ceph/install/lib /opt/ceph/install/lib/rados-classes
复制配置文件到其他节点上 #scp /etc/profile mds1:/etc/profile #scp /etc/profile osd0:/etc/profile #scp /etc/profileosd1:/etc/profile #scp /etc/profileclient:/etc/profile #scp/etc/profilemon:/etc/profile #scp/etc/ld.so.conf mds1:/etc/ld.so.conf #scp/etc/ld.so.conf osd0:/etc/ld.so.conf #scp /etc/ld.so.confosd1:/etc/ld.so.conf #scp /etc/ld.so.confclient:/etc/ld.so.conf #scp/etc/ld.so.confmon:/etc/ld.so.conf #ldconfig 是一个动态链接库命令 #ssh mds1 ldconfig #ssh osd0 ldconfig #ssh osd1 ldconfig #ssh client ldconfig #ssh mon ldconfig
7.编辑ceph.conf配置文件(在mds0节点上执行) #mkdir/etc/ceph # vim/etc/ceph/ceph.conf 并添加上内容 [global] pidfile =/opt/ceph/install/var/run/ceph/$name.pid debug ms = 1 [mon] mon data =/mnt/mon$id [mon.0] host=monitor monaddr = 192.168.0.24:6789 [mds] [mds.0] host= mds0 [mds.1] host= mds1 [osd] sudo = true osd data =/mnt/osd$id osd journal =/mnt/osd$id/journal osd journal size =100 [osd.0] host= osd0
复制到其他节点上 #cp /etc/ceph/ceph.conf /opt/ceph/install/etc/ceph/ceph.conf #scp /etc/ceph/ceph.conf mds1:/etc/ceph/ceph.conf #scp /etc/ceph/ceph.conf osd0:/etc/ceph/ceph.conf #scp/etc/ceph/ceph.conf osd1:/etc/ceph/ceph.conf #scp/etc/ceph/ceph.conf client:/etc/ceph/ceph.conf #scp/etc/ceph/ceph.conf mon:/etc/ceph/ceph.conf
#scp /opt/ceph/install/etc/ceph/ceph.conf mds1:/opt/ceph/install/etc/ceph/ceph.conf #scp /opt/ceph/install/etc/ceph/ceph.conf osd0:/opt/ceph/install/etc/ceph/ceph.conf #scp/opt/ceph/install/etc/ceph/ceph.conf osd1:/opt/ceph/install/etc/ceph/ceph.conf #scp/opt/ceph/install/etc/ceph/ceph.conf client:/opt/ceph/install/etc/ceph/ceph.conf #scp/opt/ceph/install/etc/ceph/ceph.conf mon:/opt/ceph/install/etc/ceph/ceph.conf
每次开机需要做的 8.创建目录 在monitor上执行: #mkfs.ext3 /dev/sdb3 //格式化新的硬盘 #mount /dev/sdb3 /mnt //挂载新分区 //开机自动挂载,则修改/etc/fstab文件,在这个文件里面添加一行: /dev/sdb3 /mnt ext3 defaults, 0 1 #mkdir -p /mnt/mon0
在osd0上 #mkfs.btrfs /dev/sdb3 #mount /dev/sdb3 /mnt #mkdir-p /mnt/osd0 //开机自动挂载,则修改/etc/fstab文件,在这个文件里面添加一行: /dev/sdb3 /mnt btrfs defaults, 0 1
在所有节点上 #mkdir -p/var/log/ceph/ #mkdir-p /var/run/ceph/
9.创建启动脚本(在mon节点上执行) # cp /opt/ceph/ceph-0.56.1/src/init-ceph /etc/init.d/ceph
修改此文件中的库路径名
10.创建文件系统(在mon节点上执行), #mkcephfs -c /etc/ceph/ceph.conf --allhosts -v 这儿用sudo会出现错误:mkcephfs:找不到命令。应该用命令的绝对路径: $sudo/opt/ceph/install/sbin/mkcephfs -c /etc/ceph/ceph.conf --allhosts -v
【问题】 error creating empty object store in/mnt/osd0:(95) Operation not supported 原因:因为在格式化osd的/dev/sdb3的时候将它格式化成了ext3的了。mount的时候也mount成ext3格式的
11.启动ceph(在mon节点上执行) #/etc/init.d/ceph-a start 【问题】13.10.24 启动osd的时候显示:No module named rados…. 解决:将/home/ceph/xyycephv0/lib/python2.7/site_packages/rados.py(cephfs.py/ceph_argarse.py)复制到 /home/ceph/xyycephv0/bin目录下面就可以了。 不过很奇怪,0.67.4之前的版本没有出现过这种问题 【问题】13.10.24 如上个问题,将文件拷贝后,又出现cannot open shared object file: No suchfile or directory 解决:运行ldconfig就ok! 12.查看状态信息 #ceph -s #ceph health ///When your cluster echoes back HEALTH_OK, you may begin using Ceph.
13.在client上:http://ceph.com/docs/master/start/quick-start/?highlight=minutes sudo scp monitor:/etc/ceph/keyring /etc/ceph/ceph.keyring sudo chmod 644 /etc/ceph/keyring sudomkdir -p /mnt/mycephfs
14.在client上: fuse客户端的启动: sudo/opt/ceph/install/bin/ceph-fuse -m 192.168.0.117:6789 /mnt/mycephfs/
【总是出现错误】ceph-fuse: error while loading shared librarieslibboost_system.so.1.50.0,但是我这个文件明明已经放在/usr/lib和/usr/local/lib下了,而且这两个路径也已经添加到/etc/ld.so.conf里面了。还是不行。 【解决】把/opt/boost_1_50_0/stage/lib目录添加到/etc/ld.so.conf里面,然后运行ldconfig,错误不再出现。
14、在client节点上:
# mkdir /mnt/mycephfs (通过cat/etc/ceph/keyring得到secret)
secret为monitor下/etc/ceph/keyring的内容 接下来就可以在/mnt/mycephfs下进行操作了!
直接用mkdir、touch等linux就可以创建目录与文件了,在/var/log/ceph下有各个节点的日志记录!
13、在client节点上编译ceph的client 帮助信息 http://ceph.newdream.net/wiki/Building_kernel_client
获取源码 #apt-get install git-core #git clonegit://ceph.newdream.net/git/ceph-client-standalone.git (用 #git clonegit://github.com/ceph/ceph-client-standalone.git 速度更快) 【问题】fatal:Not a git repository(or any of parentdirectories):.git 解决:git init #gitbranch master-backport origin/master-backport 【问题】fatal:Not a valid objectname:'origin/master-backport' 编译源码 #git checkoutmaster-backport (假如当前系统的内核版本不是最新内核版本,就要执行这个命令)
安装build文件夹 #apt-get installlinux-headers-$(uname -r) #apt-get installbuild-essential
编译libceph模块 #make-C libceph,但是遇到出错,说缺少ceph-type.h
解决: 首先查看系统内核:uname -r(我的是2.6.32-21-generic) 然后进入相应目录:cd/usr/src/linux-headers-2.6.32-21-generic/include/keys 新建ceph-type.h文件 # vim ceph-type.h 加上内容 #ifndef_KEYS_CEPH_TYPE_H #define_KEYS_CEPH_TYPE_H #include<linux/key.h> extern structkey_type key_type_ceph; #endif
重新编译libceph模块 #make -C libceph
错误:
解决:http://ec2-75-101-143-172.compute-1.amazonaws.com/wordpress/2011/02/ceph-on-ubuntu-10-04/ A quick check onbranch’s commits points to the following two entries (extract): #git show-branch--more=20 ….. +* [master~10]net/ceph: make ceph_msgr_wq non-reentrant +* [master~11] ceph:fsc->*_wq's aren't used in memory reclaim path …. Now, it’s just amatter to revert the commits (your commit references might vary): #git revert -nmaster~10 #git revert -nmaster~11 【但我的是:#git show-branch --more=20 | grep ceph_msgr_wq找到 +* [master~58]net/ceph: make ceph_msgr_wq non-reentrant +* [master~59] ceph:fsc->*_wq's aren't used in memory reclaim path 所以为: #gitrevert -n master~58 #gitrevert -n master~59 】 The rest of theinstallation is straightforward: #make -C libceph
编译ceph和rbd模块 #cplibceph/Module.symvers ceph/ #cplibceph/Module.symvers rbd/ #make -C ceph #make -C rbd
加载模块 #modprobe libcrc32c #insmod./libceph/libceph.ko #insmod./ceph/ceph.ko
或者把模块放到/lib/modules中 #cpceph-client-standalone/libceph/libceph.ko/lib/modules/2.6.38-8-virtual/kernel/fs/ceph/ #cpceph-client-standalone/ceph/ceph.ko/lib/modules/2.6.38-8-virtual/kernel/fs/ceph/ #cpceph-client-standalone/rbd/rbd.ko /lib/modules/2.6.38-8-virtual/kernel/fs/ceph/
然后执行 #depmod 分析可加载模块的依赖性,生成modules.dep文件和映射文件。
#modprobe libceph #modprobe ceph #modprobe rbd
14、 client挂载ceph文件系统(在client节点上执行)这是挂载在mds上 #mount.ceph 192.168.0.21:/ /mnt(假如挂载不上,可以尝试关闭iptables)
15、查看挂载情况 #mount
16、测试rbd(在client节点上执行) 创建虚拟磁盘
#rbd create foo –size 1000 #rbd list # echo“192.168.99.14 name=admin rbd foo” > /sys/bus/rbd/add
查看设备 #ll/sys/bus/rbd/devices/ #cat/proc/partitions #ll /dev/rbd0
使用dd命令写设备 (责任编辑:IT) |