Redhat/centos 通过阿里云YUM源配置OCS的php环境
时间:2017-06-13 13:40 来源:linux.it.net.cn 作者:IT
ocs是类memcache的一个阿里云产品,底层是tair兼容memcache协议
本文介绍一下centos5.8下如何通过yum快速安装高版本的gcc等依赖模块,使之符合ocs的要求(ubuntu点这里~)
首先配置一下阿里云的源,由于阿里巴巴的ABTN优势,阿里云的镜像源是国内最好的多线BGP源没有之一
01
[root@test ~]# cd /etc/yum.repos.d/
02
[root@test yum.repos.d]# wget -O /etc/yum.repos.d/CentOS-Base.repo http://mirrors.aliyun.com/repo/Centos-5.repo //配置centos5的源
03
2014-01-11 00:43:49 (179 MB/s) - `/etc/yum.repos.d/CentOS-Base.repo' saved [2436/2436]
04
[root@test yum.repos.d]# vim epel.repo //创建epel的源
05
[epel]
06
name=Extra Packages for Enterprise 5 - $basearch
07
baseurl=http://mirrors.aliyun.com/epel/5/$basearch
08
#mirrorlist=https://mirrors.fedoraproject.org/metalink?repo=epel-5&arch=$basearch
09
failovermethod=priority
10
enabled=1
11
gpgcheck=1
12
gpgkey=file:///etc/pki/rpm-gpg/RPM-GPG-KEY-EPEL-5
13
14
[epel-debuginfo]
15
name=Extra Packages for Enterprise 5 - $basearch - Debug
16
baseurl=http://mirrors.aliyun.com/epel/5/$basearch/debug
17
#mirrorlist=https://mirrors.fedoraproject.org/metalink?repo=epel-debug-5&arch=$basearch
18
failovermethod=priority
19
enabled=0
20
gpgkey=file:///etc/pki/rpm-gpg/RPM-GPG-KEY-EPEL-5
21
gpgcheck=1
22
23
[epel-source]
24
name=Extra Packages for Enterprise 5 - $basearch - Source
25
baseurl=http://mirrors.aliyun.com/epel/5/SRPMS
26
#mirrorlist=https://mirrors.fedoraproject.org/metalink?repo=epel-source-5&arch=$basearch
27
failovermethod=priority
28
enabled=0
29
gpgkey=file:///etc/pki/rpm-gpg/RPM-GPG-KEY-EPEL-5
30
gpgcheck=1
31
[root@test yum.repos.d]# yum makecache
卸载自带的低版本gcc,并安装gcc4.4(OCS要求4.2以上)
1
[root@test /]# yum remove gcc -y
2
[root@test /]# yum install gcc44 gcc44-c++ -y
3
4
[root@test /]# ln -s /usr/bin/gcc44 /usr/bin/gcc //创建gcc的软连接
5
[root@test /]# ln -s /usr/bin/g++44 /usr/bin/g++ //创建g++的软连接
安装php5.3 (ocs要求php版本高于等于5.3),以及其它必须的依赖组件
1
[root@test /]# yum install php53-devel php53-common php53-cli php53 -y
2
[root@test /]# yum install cyrus-sasl-plain cyrus-sasl cyrus-sasl-devel cyrus-sasl-lib -y
安装libmemcache
1
wget http://launchpad.net/libmemcached/1.0/1.0.2/+download/libmemcached-1.0.2.tar.gz
2
tar -zxvf libmemcached-1.0.2.tar.gz
3
cd libmemcached-1.0.2
4
/configure --prefix=/usr/local/libmemcached
5
make&&make install&&make clean
安装zlib和memcache
1
yum install zlib-devel -y
2
wget http://pecl.php.net/get/memcached-2.0.0.tgz
3
tar -zxvf memcached-2.0.0.tgz
4
cd memcached-2.0.0
5
phpize
6
./configure --with-libmemcached-dir=/usr/local/libmemcached --enable-memcached-sasl
7
make;make install
然后修改Php.ini,加载memcache的扩展
extension=memcached.so
至此已经配置完毕了
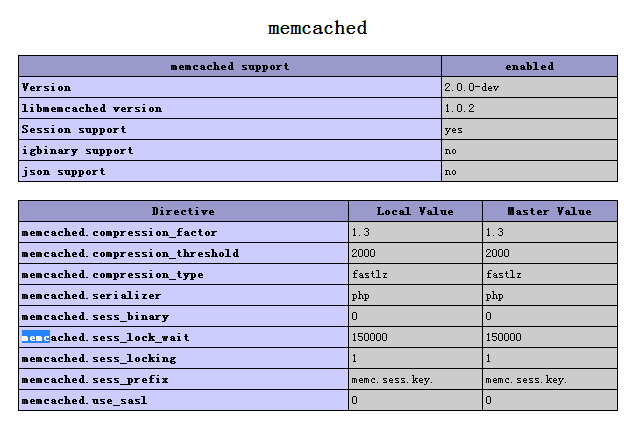
通过以下命令测试一下memcache是否配置成功,或者配置phpinfo页面查看下
1
[root@test memcached-2.0.0]# php -m | grep mem
2
memcached
3
4
[root@test memcached-2.0.0]# echo '<?php phpinfo();?>'>/var/www/html/info.php
5
[root@test memcached-2.0.0]# /etc/init.d/httpd start
6
7
Starting httpd:

至此你的服务器已经可以支持阿里云的OCS了,测试demo~
01
[root@test html]# vim /var/www/html/ocs.php
02
<?php
03
$connect = new Memcached;
04
$connect->setOption(Memcached::OPT_COMPRESSION, false);
05
$connect->setOption(Memcached::OPT_BINARY_PROTOCOL, true);
06
$connect->addServer('7d9cfd3014aa11e3.m.cnhzalicm10pub001.ocs.aliyuncs.com', 11211);
07
$connect->setSaslAuthData('7d9cfd3014aa11e3', '*******');
08
for($i=0;$i<10;$i++){ $connect->set("$i", "world");
09
echo "key".$i."is:" ,$connect->get("$i")."<br>";
10
}
11
$connect->quit();
12
?>
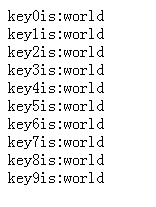
访问测试:

(责任编辑:IT)
ocs是类memcache的一个阿里云产品,底层是tair兼容memcache协议
卸载自带的低版本gcc,并安装gcc4.4(OCS要求4.2以上)
安装php5.3 (ocs要求php版本高于等于5.3),以及其它必须的依赖组件
安装libmemcache
安装zlib和memcache
然后修改Php.ini,加载memcache的扩展
extension=memcached.so
至此你的服务器已经可以支持阿里云的OCS了,测试demo~
访问测试:
(责任编辑:IT) |