使用KeepAlived搭建MySQL高可用环境
时间:2014-08-30 18:49 来源:linux.it.net.cn 作者:it

使用KeepAlived搭建MySQL的高可用环境。
首先搭建MySQL的主从复制
在Master开启binlog,创建复制帐号,
然后在Slave输入命令
change master to
master_host='192.168.1.70',
master_port=3306,
master_user='xx',
master_password='xx';
然后使用start slave开启复制。
然后编译安装KeepAlived
进入keepalived-1.2.12目录
然后使用
./configure
make && make install
然后在Master服务器编辑KeepAlived的配置文件
vim /etc/keepalived/keepalived.conf
! Configuration File for keepalived
global_defs {
router_id HA_MySQL
}
vrrp_instance VI_1 {
state BACKUP
interface eth0
virtual_router_id 51
priority 100
advert_int 1
nopreempt
authentication {
auth_type PASS
auth_pass 1111
}
virtual_ipaddress {
192.168.1.199
}
}
virtual_server 192.168.1.199 3306 {
delay_loop 2
lb_algo wrr
lb_kind DR
persistence_timeout 60
protocol TCP
real_server 192.168.1.70 3306 {
weight 3
notify_down /root/shutdown.sh
TCP_CHECK {
connect_timeout 10
nb_get_retry 3
delay_before_retry 3
connect_port 3306
}
}
}
然后编辑Slave的配置文件
vim /etc/keepalived/keepalived.conf
! Configuration File for keepalived
global_defs {
router_id HA_MySQL
}
vrrp_instance VI_1 {
state BACKUP
interface eth0
virtual_router_id 51
priority 90
advert_int 1
nopreempt
authentication {
auth_type PASS
auth_pass 1111
}
virtual_ipaddress {
192.168.1.199
}
}
virtual_server 192.168.1.199 3306 {
delay_loop 2
lb_algo wrr
lb_kind DR
persistence_timeout 60
protocol TCP
real_server 192.168.1.80 3306 {
weight 3
notify_down /root/shutdown.sh
TCP_CHECK {
connect_timeout 10
nb_get_retry 3
delay_before_retry 3
connect_port 3306
}
}
}
其中
priority 表示优先级
virtual_ipaddress 虚拟的IP地址(VIP)
delay_loop 每个2秒检查一次real_server状态
notify_down 检测到服务down后执行的脚本
connect_timeout 连接超时时间
nb_get_retry 重连次数
delay_before_retry 重连间隔时间
connect_port 健康检查端口
shutdown.sh 可以考虑加入邮件告警的功能。
#!/bin/bash
pkill keepalived
在两个服务器上启动MySQL和KeepAlived服务
service mysql start
service keepalived start
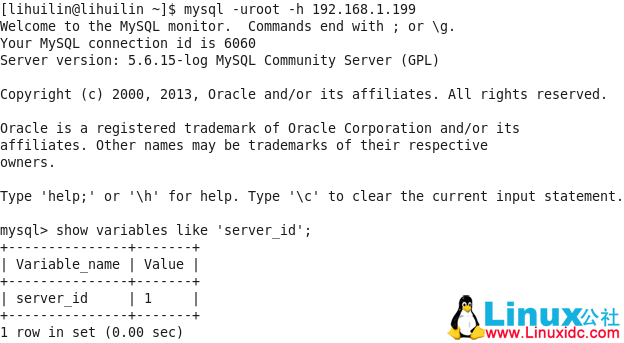
Master的server_id为1
Slave的server_id为2
然后 连接VIP的MySQL,可以看到已经连接到了Master服务器(server_id为1)

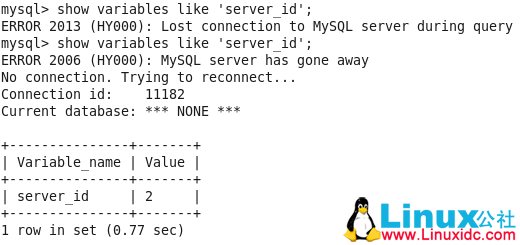
如果kill掉Master的MySQL,KeepAlived会自动转移到Slave
在Master服务器上执行
killall mysqld
然后再次查看server_id,
短暂的失去连接之后,再次连接上VIP,server_id已经变为2,说明VIP已经指向了Slave

nopreempt参数表示Master恢复正常之后,是否将VIP继续指向Master
这样的话,会再次引发切换。
两台服务器的KeepAlived会有心跳检测,
如果Master的MySQL服务挂了(3306端口挂了),那么他会选择自杀.
Slave的KeepAlived通过心跳检测发现这个情况,就会将VIP的请求接管。
KeepAlived还有很多参数没有明白是什么意思
生产环境的切换脚本,在Slave提升为Master之后,应该等待所有的中继日志应用完毕,否则可能丢失数据。
(责任编辑:IT)
使用KeepAlived搭建MySQL的高可用环境。
change master to ! Configuration File for keepalived
#!/bin/bash
如果kill掉Master的MySQL,KeepAlived会自动转移到Slave
nopreempt参数表示Master恢复正常之后,是否将VIP继续指向Master
KeepAlived还有很多参数没有明白是什么意思 |