Ubuntu 14.04 LTS Server 安装 LAMP Server
时间:2014-10-25 02:42 来源:IMCN 作者:it
LAMP 是 Linux、Apache、MySQL、PHP 的简称。本教程使用的 Ubuntu 14.04 LTS Server 64 位的系统,安装 Apache2 web服务、PHP5 支持 (mod_php)和 MySQL。
使用 SSH 连接到服务器,切换到 ROOT 账户:
sudo su
在正式安装之前更换一下源,国内的服务器,替换到国内源,为防止意外,先备份源:
cp /etc/apt/sources.list /etc/apt/sources.list_backup
在用vi编辑:
vi /etc/apt/sources.list
我比较喜欢中科大的源,比较快,共享一下:
deb http://debian.ustc.edu.cn/ubuntu/ trusty main restricted universe multiverse
deb http://debian.ustc.edu.cn/ubuntu/ trusty-security main restricted universe multiverse
deb http://debian.ustc.edu.cn/ubuntu/ trusty-updates main restricted universe multiverse
deb http://debian.ustc.edu.cn/ubuntu/ trusty-proposed main restricted universe multiverse
deb http://debian.ustc.edu.cn/ubuntu/ trusty-backports main restricted universe multiverse
deb-src http://debian.ustc.edu.cn/ubuntu/ trusty main restricted universe multiverse
deb-src http://debian.ustc.edu.cn/ubuntu/ trusty-security main restricted universe multiverse
deb-src http://debian.ustc.edu.cn/ubuntu/ trusty-updates main restricted universe multiverse
deb-src http://debian.ustc.edu.cn/ubuntu/ trusty-proposed main restricted universe multiverse
deb-src http://debian.ustc.edu.cn/ubuntu/ trusty-backports main restricted universe multiverse
跟新源:
apt-get update
1、安装数据库MySQL 5
apt-get install mysql-server mysql-client
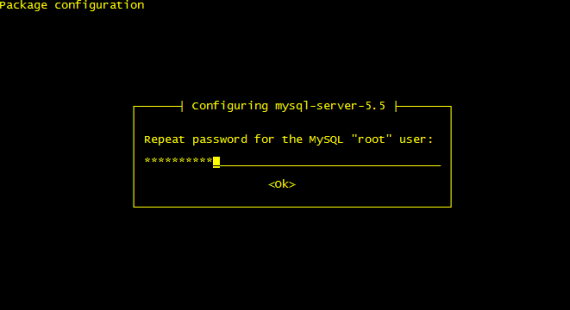
系统提示设置密码:
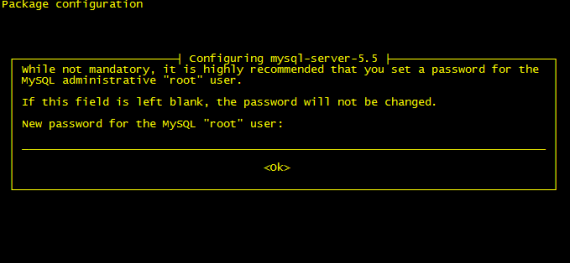
New password for the MySQL “root” user: <– 输入你的root密码
Repeat password for the MySQL “root” user: <– 在输入一次
2、安装 Apache:
apt-get install apache2
然后浏览器访问:
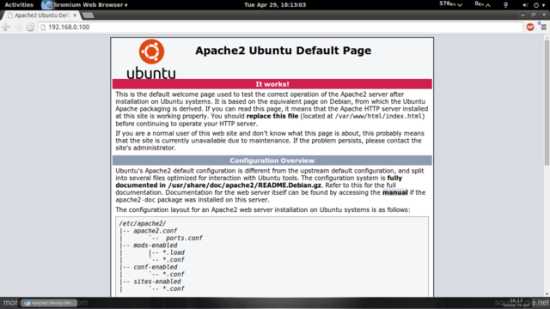
默认目录:/var/www/html,配置文件:/etc/apache2/apache2.conf
3、安装 PHP:
apt-get install php5 libapache2-mod-php5
再重启 apache2
service apache2 restart
4、测试 PHP,建立一个探针文件:
vi /var/www/html/info.php
内容如下:
<?php
phpinfo();
?>
5、让 php5 支持 MySQL
apt-cache search php5
apt-get install php5-mysql php5-curl php5-gd php5-intl php-pear php5-imagick php5-imap php5-mcrypt php5-memcache php5-ming php5-ps php5-pspell php5-recode php5-snmp php5-sqlite php5-tidy php5-xmlrpc php5-xsl
重启 apache:
service apache2 restart
6、安装 XCache 优化缓存
apt-get install php5-xcache
重启 apache:
service apache2 restart
7、安装phpmyadmin管理Mysql:
apt-get install phpmyadmin
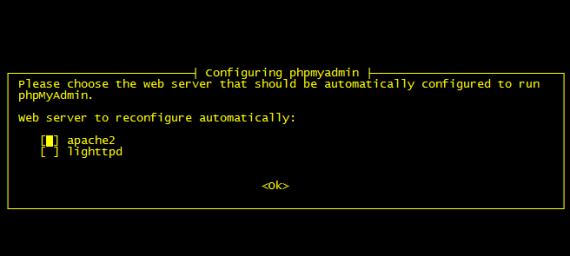
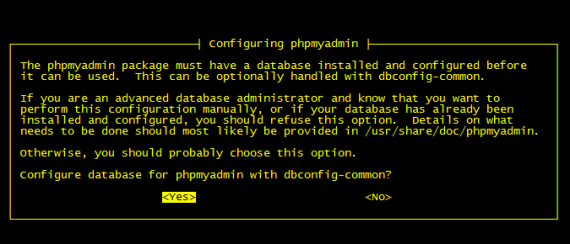
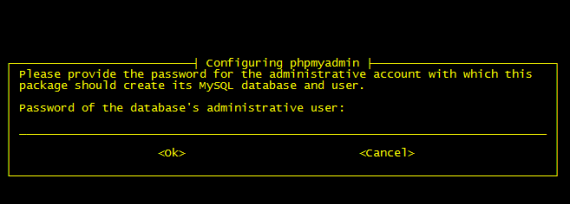
选择第一个,然后是设置phpmyadmin:
本文采用CC协议发布,原创文章,转载请注明:转自于IMCN
(责任编辑:IT)
LAMP 是 Linux、Apache、MySQL、PHP 的简称。本教程使用的 Ubuntu 14.04 LTS Server 64 位的系统,安装 Apache2 web服务、PHP5 支持 (mod_php)和 MySQL。 使用 SSH 连接到服务器,切换到 ROOT 账户: sudo su 在正式安装之前更换一下源,国内的服务器,替换到国内源,为防止意外,先备份源: cp /etc/apt/sources.list /etc/apt/sources.list_backup 在用vi编辑: vi /etc/apt/sources.list 我比较喜欢中科大的源,比较快,共享一下:
deb http://debian.ustc.edu.cn/ubuntu/ trusty main restricted universe multiverse 跟新源: apt-get update 1、安装数据库MySQL 5 apt-get install mysql-server mysql-client 系统提示设置密码:
New password for the MySQL “root” user: <– 输入你的root密码 2、安装 Apache: apt-get install apache2 然后浏览器访问:
默认目录:/var/www/html,配置文件:/etc/apache2/apache2.conf 3、安装 PHP: apt-get install php5 libapache2-mod-php5 再重启 apache2 service apache2 restart 4、测试 PHP,建立一个探针文件: vi /var/www/html/info.php 内容如下: <?php phpinfo(); ?> 5、让 php5 支持 MySQL
apt-cache search php5 重启 apache: service apache2 restart 6、安装 XCache 优化缓存 apt-get install php5-xcache 重启 apache: service apache2 restart 7、安装phpmyadmin管理Mysql: apt-get install phpmyadmin
选择第一个,然后是设置phpmyadmin:
本文采用CC协议发布,原创文章,转载请注明:转自于IMCN (责任编辑:IT) |