通过shell脚本自动设置,批量实现免密码登录主机
时间:2014-04-29 02:20 来源:linux.it.net.cn 作者:IT网
实验背景
在一个局域网,在其中指定一台主机做为管理机,其它主机做为被管理机,为以后维护的便利性,要求实现管理机无需密码,直接登录被管理机.
使用Vmware Workstation搭建一个模拟局域网
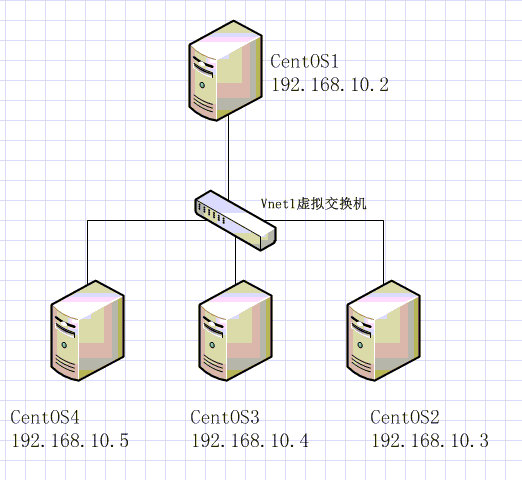
该局域网内有四台主机,通过虚拟交换机Vnet1,实现互连互通
四台主机都安装了CentOS6,并关闭了iptables和SELinux
指定CentOS1(192.168.10.2)为管理机
指定CentOS2(192.168.10.3~5)为被管理机
简单的网络拓朴如下图所示
实验目的
为了便于脚本维护与扩展,通过如下一组脚本来实现
1
2
3
4
5
6
7
# ll
total 20
-rw-r--r-- 1 root root 657 Nov 8 22:49 ClientAuthorize.sh
-rw-r--r-- 1 root root 338 Nov 8 22:24 distribute.sh
-rw-r--r-- 1 root root 279 Nov 8 22:34 excuse.sh
-rw-r--r-- 1 root root 39 Nov 8 22:15 hostip.out
-rw-r--r-- 1 root root 210 Nov 8 20:30 ServerAuthorize.sh.example
1
2
3
4
5
6
7
8
9
10
11
12
13
14
15
16
17
18
19
20
21
# vim ClientAuthorize.sh
#!/bin/bash
#声明环境变量
exportPATH="/usr/lib/qt-3.3/bin:/usr/local/sbin:/usr/local/bin:/sbin:/bin:/usr/sbin:/usr/bin:/root/bin"
exportLANG="en_US.UTF-8"
#生成管理机的公私钥
ssh-keygen
#设置管理机的相关目录权限
chmodgo-w /root
chmod700 /root/.ssh
chmod600 /root/.ssh/*
#将生成的公钥信息导入ServerAuthorize.sh脚本中
rsapub_var=$(cat/root/.ssh/id_rsa.pub)
cp/tmp/authorize/ServerAuthorize.sh.example /tmp/authorize/ServerAuthorize.sh
echo" ">>/tmp/authorize/ServerAuthorize.sh
echo"#set authorized_keys">>/tmp/authorize/ServerAuthorize.sh
echo"echo \""${rsapub_var}"\" >>/root/.ssh/authorized_keys">>/tmp/authorize/ServerAuthorize.sh
chmodu+x /tmp/authorize/ServerAuthorize.sh
#调用批量分发脚本,如果执行成功,就继续调用批量执行脚本
sh /tmp/authorize/distribute.sh &&\
sh /tmp/authorize/excuse.sh
1
2
3
4
5
6
7
8
9
10
11
12
13
14
15
16
17
18
19
# vim ServerAuthorize.sh
#!/bin/bash
#声明环境变量
exportPATH="/usr/lib/qt-3.3/bin:/usr/local/sbin:/usr/local/bin:/sbin:/bin:/usr/sbin:/usr/bin:/root/bin"
exportLANG="en_US.UTF-8"
#检查所需目录及文件,如果没有就创建一个
if[ ! -d /root/.ssh];then
mkdir/root/.ssh
fi
if[ ! -f /root/.ssh/authorized_keys];then
touch/root/.ssh/authorizedzz_keys
fi
#设置被管理机的相关目录文件权限
chmodgo-w /root
chmod700 /root/.ssh
chmod600 /root/.ssh/*
#配置信任关系
#set authorized_keys
echo"ssh-rsa AAAAB3NzaC1yc2EAAAABIwAAAQEA6YUgG2kpxJDfqeoSIEOzQk/2tj1xTpMtb6e618rm6XYnjjdP5/FdwMKnBXRc6a/fp3h2AupsM7Pzc1AxzTZWNUUxEJoI0mZxxoy0B5UITTA8bAwiBfhIsTkcHqSS3CADdaAlFYol+9JO3sZ6U8dlD1KQtZLpc9FMPX87kowEJbtuq+XNZ7xe59KV0Adt3YI+ICqVU8WHu9yO7XkP313FZFPIYISqmY9kmhKUHT8znIHDqYQVC9MOMsNxQ4HlPLHNESnBvbSlR0wdz0q1VjVqF2qxyRZAQiIWi3nkYk6oKK61UYHQ62ueLpPQ4yWZfcKLaYJZQFeVo/uQdauYYVEQww== root@CentOS1">>/root/.ssh/authorized_keys
1
2
3
4
5
6
7
8
9
10
11
12
13
# vim distribute.sh
#!/bin/bash
#声明环境变量
exportPATH="/usr/lib/qt-3.3/bin:/usr/local/sbin:/usr/local/bin:/sbin:/bin:/usr/sbin:/usr/bin:/root/bin"
exportLANG="en_US.UTF-8"
#指定远程分发的来源与目标
from_var="/tmp/authorize/ServerAuthorize.sh"
to_var="/tmp"
#通过for循环将脚本分发到各个被管理机
forhost_ip in$(cat/tmp/authorize/hostip.out)
do
scp-o StrictHostKeyChecking=no -rp "${from_var}""${host_ip}":"${to_var}"
done
1
2
3
4
5
6
7
8
9
10
11
# vim excuse.sh
#!/bin/bash
#声明环境变量
exportPATH="/usr/lib/qt-3.3/bin:/usr/local/sbin:/usr/local/bin:/sbin:/bin:/usr/sbin:/usr/bin:/root/bin"
exportLANG="en_US.UTF-8"
#通过for循环,批量执行被管理机上的配置脚本
command_var="sh /tmp/ServerAuthorize.sh"
forhost_ip in$(cat/tmp/authorize/hostip.out)
do
ssh-f ${host_ip} "${command_var}"
done
1
2
3
4
# vim hostip.out
192.168.10.3
192.168.10.4
192.168.10.5
1
2
3
4
5
6
7
8
9
10
11
12
13
14
15
16
17
18
19
20
21
22
23
24
25
26
27
28
29
30
31
32
33
34
35
36
37
[root@CentOS1 authorize]# sh ClientAuthorize.sh
Generating public/privatersa key pair.
#确认新生成的公钥保存位置,默认在当前用户家目录的.ssh目录下,此处直接回车即可
Enter fileinwhichto save the key (/root/.ssh/id_rsa):
Created directory '/root/.ssh'.
#输入密码,直接回车,使密码为空
Enter passphrase (empty forno passphrase):
Enter same passphrase again:
Your identification has been saved in/root/.ssh/id_rsa.
Your public key has been saved in/root/.ssh/id_rsa.pub.
The key fingerprint is:
6d:bc:5c:f8:32:bf:ee:4a:fe:bf:be:76:8d:29:38:aa root@CentOS1
The key's randomart image is:
| |
| |
| |
| o . |
| S = . |
| o + |
| *.. o.|
| oo+. + o|
| E...o***=+ |
#开始执行分发任务,因为在脚本中添加了StrictHostKeyChecking=no参数,所以会出现下面的warning
Warning: Permanently added '192.168.10.3'(RSA) to the list of known hosts.
#因为信任关系还没有建立,所以还是需要密码
root@192.168.10.3's password:
ServerAuthorize.sh 100% 664 0.7KB/s00:00
Warning: Permanently added '192.168.10.4'(RSA) to the list of known hosts.
root@192.168.10.4's password:
ServerAuthorize.sh 100% 664 0.7KB/s00:00
Warning: Permanently added '192.168.10.5'(RSA) to the list of known hosts.
root@192.168.10.5's password:
ServerAuthorize.sh 100% 664 0.7KB/s00:00
#分发完成后,开始在各个被管理机上执行配置脚本
root@192.168.10.3's password:
root@192.168.10.4's password:
root@192.168.10.5's password:
1
2
3
4
5
6
7
8
9
10
11
12
13
14
15
16
17
18
19
20
21
22
23
24
25
26
27
28
29
30
31
32
33
34
35
36
37
38
39
40
41
42
43
44
45
46
[root@CentOS1 authorize]# ssh 192.168.10.3
Last login: Thu Nov 7 12:25:14 2013 from 192.168.10.1
[root@CentOS2 ~]# ifconfig eth0
eth0 Link encap:Ethernet HWaddr 00:0C:29:CA:DC:71
inet addr:192.168.10.3 Bcast:192.168.10.255 Mask:255.255.255.0
inet6 addr: fe80::20c:29ff:feca:dc71/64Scope:Link
UP BROADCAST RUNNING MULTICAST MTU:1500 Metric:1
RX packets:150 errors:0 dropped:0 overruns:0 frame:0
TX packets:103 errors:0 dropped:0 overruns:0 carrier:0
collisions:0 txqueuelen:1000
RX bytes:25556 (24.9 KiB) TX bytes:16569 (16.1 KiB)
Interrupt:19 Base address:0x2000
[root@CentOS2 ~]# exit
logout
Connection to 192.168.10.3 closed.
[root@CentOS1 authorize]# ssh 192.168.10.4
Last login: Thu Nov 7 14:13:23 2013 from 192.168.10.1
[root@CentOS3 ~]# ifconfig eth0
eth0 Link encap:Ethernet HWaddr 00:0C:29:28:1C:51
inet addr:192.168.10.4 Bcast:192.168.10.255 Mask:255.255.255.0
inet6 addr: fe80::20c:29ff:fe28:1c51/64Scope:Link
UP BROADCAST RUNNING MULTICAST MTU:1500 Metric:1
RX packets:149 errors:0 dropped:0 overruns:0 frame:0
TX packets:112 errors:0 dropped:0 overruns:0 carrier:0
collisions:0 txqueuelen:1000
RX bytes:23653 (23.0 KiB) TX bytes:17595 (17.1 KiB)
Interrupt:19 Base address:0x2000
[root@CentOS3 ~]# exit
logout
Connection to 192.168.10.4 closed.
[root@CentOS1 authorize]# ssh 192.168.10.5
Last login: Thu Nov 7 15:16:27 2013 from 192.168.10.1
[root@CentOS4 ~]# ifconfig eth0
eth0 Link encap:Ethernet HWaddr 00:0C:29:51:D4:1F
inet addr:192.168.10.5 Bcast:192.168.10.255 Mask:255.255.255.0
inet6 addr: fe80::20c:29ff:fe51:d41f/64Scope:Link
UP BROADCAST RUNNING MULTICAST MTU:1500 Metric:1
RX packets:124 errors:0 dropped:0 overruns:0 frame:0
TX packets:108 errors:0 dropped:0 overruns:0 carrier:0
collisions:0 txqueuelen:1000
RX bytes:19536 (19.0 KiB) TX bytes:17163 (16.7 KiB)
Interrupt:19 Base address:0x2000
[root@CentOS4 ~]# exit
logout
Connection to 192.168.10.5 closed.
[root@CentOS1 authorize]#
(责任编辑:IT)
实验背景
在一个局域网,在其中指定一台主机做为管理机,其它主机做为被管理机,为以后维护的便利性,要求实现管理机无需密码,直接登录被管理机.
使用Vmware Workstation搭建一个模拟局域网
该局域网内有四台主机,通过虚拟交换机Vnet1,实现互连互通
四台主机都安装了CentOS6,并关闭了iptables和SELinux
指定CentOS1(192.168.10.2)为管理机
指定CentOS2(192.168.10.3~5)为被管理机
简单的网络拓朴如下图所示
实验目的
为了便于脚本维护与扩展,通过如下一组脚本来实现
|
