|
环境:
CentOS 6.3 x86_64
基础组件安装:
|
|
yum -y install wget gcc make pam-devel libpng-devel
|
一、安装qrencode
在Linux上,有一个名为 QrenCode 的命令行工具可以很容易帮我们生成二维码,google authenticator命令行生成二维码就是调用它。
|
|
wget http://fukuchi.org/works/qrencode/qrencode-3.3.1.tar.gz
tar zxf qrencode-3.3.1.tar.gz
cd qrencode-3.3.1
./configure --prefix=/usr && make && make install
|
二、安装google authenticator PAM插件
|
|
wget http://google-authenticator.googlecode.com/files/libpam-google-authenticator-1.0-source.tar.bz2
tar jxf libpam-google-authenticator-1.0-source.tar.bz2
cd libpam-google-authenticator-1.0
make && make install
|
三、配置google authenticator
Google Authenticator 其实是一套开源的解决方案,所以不仅在 Google 的网站上能用,在其他地方也能用的。然而,在 Google 的网站上,会直接给你一个 QR 码让你扫的,而自己配置的 Google Authenticator 则要自己生成了。
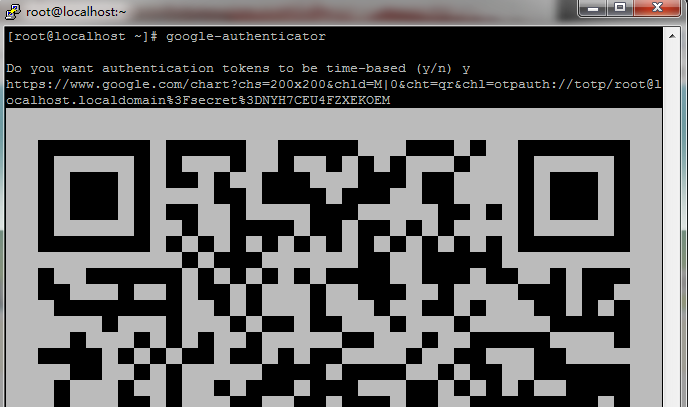
首先需要切换到对应的用户,如果 VPS 上只有一个用户的话,自然是可以省略这一步的,但是多用户的 VPS 需要先切换到对应的用户,再运行 google-authenticator 命令,程序会问你Do you want authentication tokens to be time-based (y/n),大意是基于时间生成验证码(及TOTP),这里选择y。结果类似这样:

这个 QR 码自然是给 Google Authenticator 应用程序来扫描的,也可以访问上面的那个链接,用 Google Chart API 生成的 QR 码来扫描。还可以照着 QR 码下面的文字密钥手工输入。当 Google Authenticator 识别了这个账号之后,验证器就配置好了。在文字密钥下面还提供了几个应急码,为手机丢了等情况下所用的,可以妥善保管。
这时 Google Authenticator 虽然运行了,但是相关设置还没有保存,程序会问你 Do you want me to update your “/root/.google_authenticator” file (y/n) (是否将配置写入家目录的配置文件),当然是回答 y 了。又会问
Do you want to disallow multiple uses of the same authenticationtoken? This restricts you to one login about every 30s, but it increasesyour chances to notice or even prevent man-in-the-middle attacks (y/n)
大意是说是否禁止一个口令多用,自然也是答 y。下一个问题是
By default, tokens are good for 30 seconds and in order to compensate forpossible time-skew between the client and the server, we allow an extratoken before and after the current time. If you experience problems with poortime synchronization, you can increase the window from its defaultsize of 1:30min to about 4min. Do you want to do so (y/n)
大意是问是否打开时间容错以防止客户端与服务器时间相差太大导致认证失败。这个可以根据实际情况来。我的ipad时间很准(与网络同步的),所以答 n,如果一些平板电脑不怎么连网的,可以答 y 以防止时间错误导致认证失败。再一个问题是
If the computer that you are logging into isn't hardened against brute-forcelogin attempts, you can enable rate-limiting for the authentication module.By default, this limits attackers to no more than 3 login attempts every 30s.Do you want to enable rate-limiting (y/n)
选择是否打开尝试次数限制(防止暴力攻击),自然答 y。
问题答完了,家目录中多出一个 .google_authenticator 文件(默认权限为 400),这时客户端与服务端已经配套起来了,以后不用再运行 google-authenticator 命令了,否则会重新生成一组密码。
四、配置SSH验证
此时虽然 Google Authenticator 已经配置好了,但是并没有任何程序会去调用它。所以需要设置 SSH 登录的时候去通过它验证。
打开 /etc/pam.d/sshd 文件,添加
auth required pam_google_authenticator.so
这一行,保存。再打开 /etc/ssh/sshd_config 文件,找到
ChallengeResponseAuthentication no
把它改成
ChallengeResponseAuthentication yes
并保存。最后,输入
service ssh restart
来重启 SSH 服务以应用新的配置。
这时候再用 SSH 登录的话就会这样了:

这样就成功了。
本文出自 “龍行天下” 博客,请务必保留此出处http://luojianlong.blog.51cto.com/4412415/1381725
(责任编辑:IT) |


