|
实验环境:Redhat Enterprise Linux 5.2 VMware workstation 7
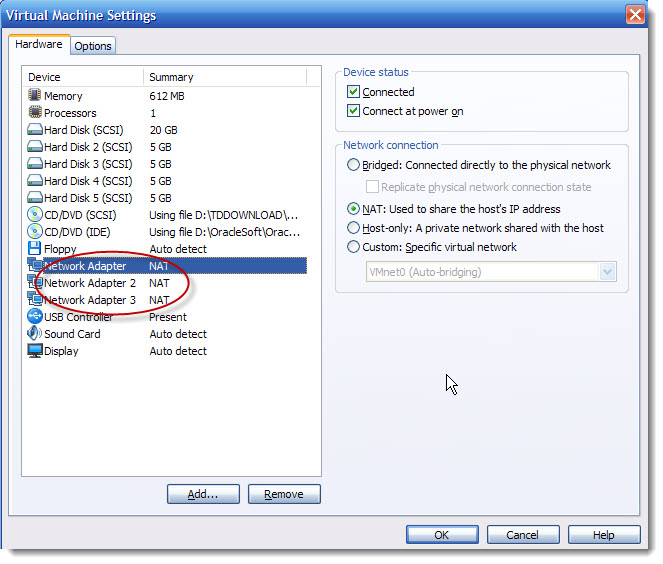
图一 实验环境网卡配置:三块虚拟网卡,工作在NAT模式
一、配置三个网卡及bond0
[root@redhat5 ~]# cd /etc/sysconfig/network-scripts
[root@redhat5 network-scripts]# ls | grep ifcfg
ifcfg-bond0
ifcfg-eth0
ifcfg-eth1
ifcfg-eth2
ifcfg-lo
[root@redhat5 network-scripts]#
用vi编辑器编辑ifcfg-eth0,在原因的基础上保保留三个参数的配置即可:DEVICE=eth0,BOOTPROTO=static及ONBOOT=yes,其它的
参数值用#号注释掉或直接删除。
[root@redhat5 network-scripts]# vi ifcfg-eth0
# Advanced Micro Devices [AMD] 79c970 [PCnet32 LANCE]
DEVICE=eth0
BOOTPROTO=static
#BROADCAST=192.168.249.255
#HWADDR=00:0C:29:42:42:61
#IPADDR=192.168.249.2
#IPV6INIT=yes
#IPV6_AUTOCONF=yes
#NETMASK=255.255.255.0
#NETWORK=192.168.249.0
ONBOOT=yes
~
~
~
"ifcfg-eth0" 11L, 248C
其它的两个网卡eth1与eth2的配置与eth0的一样:
[root@redhat5 network-scripts]# cat ifcfg-eth1
# Advanced Micro Devices [AMD] 79c970 [PCnet32 LANCE]
DEVICE=eth1
ONBOOT=yes
BOOTPROTO=static
#HWADDR=00:0c:29:42:42:6b
[root@redhat5 network-scripts]# cat ifcfg-eth2
# Advanced Micro Devices [AMD] 79c970 [PCnet32 LANCE]
DEVICE=eth2
ONBOOT=yes
BOOTPROTO=static
#HWADDR=00:0c:29:42:42:75
以某个网卡为模板创建bond0的配置文件ifcfg-bond0:
[root@redhat5 network-scripts]# cp ifcfg-eth0 bond0
用vi编辑修改ifcfg-bond0,内容如下,保留DEVICE=bond0,BOOTPROTO=static,IPADDR=192.168.249.2,NETMASK=255.255.2550即可。
[root@redhat5 network-scripts]# cat ifcfg-bond0
# Advanced Micro Devices [AMD] 79c970 [PCnet32 LANCE]
DEVICE=bond0
BOOTPROTO=static
#BROADCAST=192.168.249.255
#HWADDR=00:0C:29:42:42:61
IPADDR=192.168.249.2
#IPV6INIT=yes
#IPV6_AUTOCONF=yes
NETMASK=255.255.255.0
#NETWORK=192.168.249.0
ONBOOT=yes
二、编辑/etc/modprobe.conf文件
在/etc/modprobe.conf文件中添加两行内容:
alias bond0 bonding
options bond0 miimon=100 mode=1
[root@redhat5 /]# cat /etc/modprobe.conf
alias eth0 pcnet32
alias scsi_hostadapter mptbase
alias scsi_hostadapter1 mptspi
alias scsi_hostadapter2 ata_piix
alias snd-card-0 snd-ens1371
options snd-card-0 index=0
options snd-ens1371 index=0
remove snd-ens1371 { /usr/sbin/alsactl store 0 >/dev/null 2>&1 || : ; }; /sbin/modprobe -r --ignore-remove snd-ens1371
alias eth1 pcnet32
alias eth2 pcnet32
alias bond0 bonding
options bond0 miimon=100 mode=1
[root@redhat5 /]#
miimon=100表示网卡状态的检测时间是100毫秒。 mode参数表网络绑定的模式,模式1是三个网卡中只有一个网卡工作,其它的两个做备份。
三、最后一步让绑定生效
service network restart对网卡及bond0接口等配置生效
[root@redhat5 /]# service network restart
Shutting down interface bond0: [ OK ]
Shutting down interface eth0: [ OK ]
Shutting down interface eth1: [ OK ]
Shutting down interface eth2: [ OK ]
Shutting down loopback interface: [ OK ]
Bringing up loopback interface: [ OK ]
Bringing up interface bond0: [ OK ]
Bringing up interface eth0: [ OK ]
Bringing up interface eth1: [ OK ]
Bringing up interface eth2: [ OK ]
[root@redhat5 /]#
运行ifenslave bond0 eth0 eth1 eth2
[root@redhat5 /]# ifenslave bond0 eth0 eth1 eth2
为了让下次重启系统能够自动运行ifenslave命令,要执行下面命令:
[root@redhat5 init.d]# echo 'ifenslave bond0 eth0 eth1 eth2' >> /etc/rc.local
检验一下:
[root@redhat5 /]# cat /etc/rc.local
#!/bin/sh
#
# This script will be executed *after* all the other init scripts.
# You can put your own initialization stuff in here if you don't
# want to do the full Sys V style init stuff.
touch /var/lock/subsys/local
ifenslave bond0 eth0 eth1 eth2
上面这条命令的意思是bond0为主网卡,其它的为从网卡,其中eth0是当前活动的从网卡,即eth0用来通信。查看bond0信息:
[root@redhat5 /]# cat /proc/net/bonding/bond0
Ethernet Channel Bonding Driver: v3.2.4 (January 28, 2008)
Bonding Mode: fault-tolerance (active-backup)
Primary Slave: None
Currently Active Slave: eth0
MII Status: up
MII Polling Interval (ms): 100
Up Delay (ms): 0
Down Delay (ms): 0
Slave Interface: eth0
MII Status: up
Link Failure Count: 0
Permanent HW addr: 00:0c:29:42:42:61
Slave Interface: eth1
MII Status: up
Link Failure Count: 0
Permanent HW addr: 00:0c:29:42:42:6b
Slave Interface: eth2
MII Status: up
Link Failure Count: 0
Permanent HW addr: 00:0c:29:42:42:75
检查绑定效果,用host机不停地向虚拟机发送icmp数据包,依次down eth0、 eth1,看看网络是否还能连通。
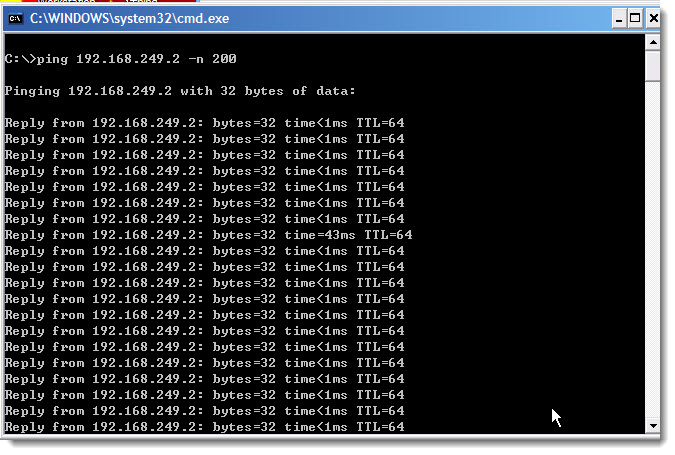
图二 ping虚拟机

图三 断开虚拟机的eth0、eth1的网卡
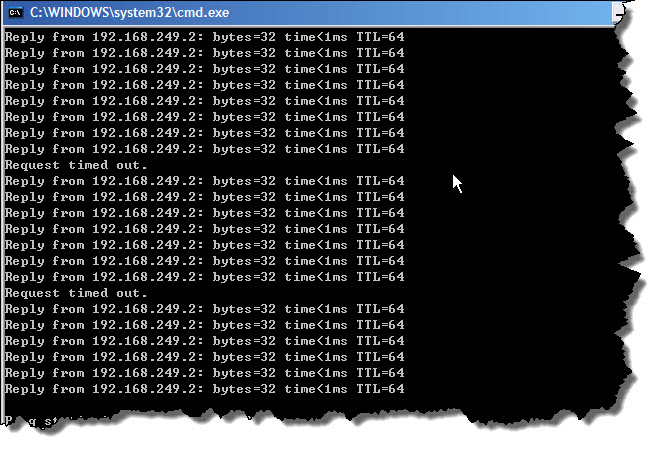
图四 每断开一个网卡会丢一个icmp数据包
当把eth0、eth1断开后,当前的活动网卡就是eth2了,
[root@redhat5 /]# cat /proc/net/bonding/bond0
Ethernet Channel Bonding Driver: v3.2.4 (January 28, 2008)
Bonding Mode: fault-tolerance (active-backup)
Primary Slave: None
Currently Active Slave: eth2
MII Status: up
MII Polling Interval (ms): 100
Up Delay (ms): 0
Down Delay (ms): 0
Slave Interface: eth0
MII Status: down
Link Failure Count: 1
Permanent HW addr: 00:0c:29:42:42:61
Slave Interface: eth1
MII Status: down
Link Failure Count: 1
Permanent HW addr: 00:0c:29:42:42:6b
Slave Interface: eth2
MII Status: up
Link Failure Count: 0
Permanent HW addr: 00:0c:29:42:42:75
[root@redhat5 /]#
四、多网卡绑定,实现负载均衡
修改/etc/modprobe.conf文件,mode=0,把绑定模式修改为负载均衡(round-robin)。
[root@redhat5 ~]# cat /etc/modprobe.conf
alias eth0 pcnet32
alias scsi_hostadapter mptbase
alias scsi_hostadapter1 mptspi
alias scsi_hostadapter2 ata_piix
alias snd-card-0 snd-ens1371
options snd-card-0 index=0
options snd-ens1371 index=0
remove snd-ens1371 { /usr/sbin/alsactl store 0 >/dev/null 2>&1 || : ; }; /sbin/modprobe -r --ignore-remove snd-ens1371
alias eth1 pcnet32
alias eth2 pcnet32
alias bond0 bonding
options bond0 miimon=100 mode=0
[root@redhat5 ~]# cat /proc/net/bonding/bond0
Ethernet Channel Bonding Driver: v3.2.4 (January 28, 2008)
Bonding Mode: load balancing (round-robin)
MII Status: up
MII Polling Interval (ms): 100
Up Delay (ms): 0
Down Delay (ms): 0
Slave Interface: eth0
MII Status: up
Link Failure Count: 0
Permanent HW addr: 00:0c:29:42:42:61
Slave Interface: eth1
MII Status: up
Link Failure Count: 0
Permanent HW addr: 00:0c:29:42:42:6b
Slave Interface: eth2
MII Status: up
Link Failure Count: 0
Permanent HW addr: 00:0c:29:42:42:75
其它模式:
mode=2
[root@redhat5 ~]# cap /proc/net/bonding/bond0
-bash: cap: command not found
[root@redhat5 ~]# cat /proc/net/bonding/bond0
Ethernet Channel Bonding Driver: v3.2.4 (January 28, 2008)
Bonding Mode: load balancing (xor)
Transmit Hash Policy: layer2 (0)
MII Status: up
MII Polling Interval (ms): 100
Up Delay (ms): 0
Down Delay (ms): 0
Slave Interface: eth0
MII Status: up
Link Failure Count: 0
Permanent HW addr: 00:0c:29:42:42:61
Slave Interface: eth1
MII Status: down
Link Failure Count: 0
Permanent HW addr: 00:0c:29:42:42:6b
Slave Interface: eth2
MII Status: up
Link Failure Count: 0
Permanent HW addr: 00:0c:29:42:42:75
mode=3
[root@redhat5 ~]# cat /proc/net/bonding/bond0
Ethernet Channel Bonding Driver: v3.2.4 (January 28, 2008)
Bonding Mode: fault-tolerance (broadcast)
MII Status: up
MII Polling Interval (ms): 100
Up Delay (ms): 0
Down Delay (ms): 0
Slave Interface: eth0
MII Status: up
Link Failure Count: 0
Permanent HW addr: 00:0c:29:42:42:61
Slave Interface: eth1
MII Status: up
Link Failure Count: 0
Permanent HW addr: 00:0c:29:42:42:6b
Slave Interface: eth2
MII Status: up
Link Failure Count: 0
Permanent HW addr: 00:0c:29:42:42:75
mode=4
[root@redhat5 ~]# cat /proc/net/bonding/bond0
Ethernet Channel Bonding Driver: v3.2.4 (January 28, 2008)
Bonding Mode: IEEE 802.3ad Dynamic link aggregation
Transmit Hash Policy: layer2 (0)
MII Status: up
MII Polling Interval (ms): 100
Up Delay (ms): 0
Down Delay (ms): 0
802.3ad info
LACP rate: slow
Active Aggregator Info:
Aggregator ID: 1
Number of ports: 1
Actor Key: 9
Partner Key: 1
Partner Mac Address: 00:00:00:00:00:00
Slave Interface: eth0
MII Status: up
Link Failure Count: 0
Permanent HW addr: 00:0c:29:42:42:61
Aggregator ID: 1
Slave Interface: eth1
MII Status: up
Link Failure Count: 0
Permanent HW addr: 00:0c:29:42:42:6b
Aggregator ID: 2
Slave Interface: eth2
MII Status: up
Link Failure Count: 0
Permanent HW addr: 00:0c:29:42:42:75
Aggregator ID: 3
需要注意的是:当mode=0可以实现负载均衡但不能实现容错。这些机制是需要交换机支持的。比如:IEEE链路聚合协议。
(责任编辑:IT) |