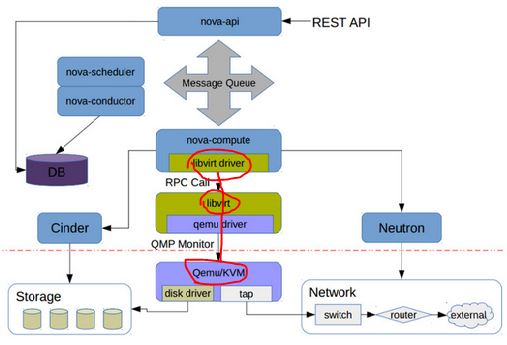
1. Libvirt 在 OpenStack 架构中的位置在 Nova Compute 节点上运行的 nova-compute 服务调用 Hypervisor API 去管理运行在该 Hypervisor 的虚机。Nova 使用 libvirt 管理 QEMU/KVM 虚机,还使用别的 API 去管理别的虚机。
libvirt 的实现代码在 /nova/virt/libvirt/driver.py 文件中。 这里是 OpenStack Hypervisor Matrix。 这里是 每个 Linux 发行版里面 libvirt, QEMU/KVM 的版本号。 请注意Juno 版本 Nova 对 libvirt 和 QEMU 的各种最低版本要求:
2. Nova 中 libvirt 的使用Nova 使用 libvirt 来管理虚机,包括:
2.1 创建 QEMU/KVM 虚机创建虚机的配置有几个来源:
(注意:image 的元数据属性的优先级高于 nova.conf 中的配置。只有在没有property的情况下才使用nova.conf中的配置) 创建虚机的过程的几个主要阶段: (1)消息由 nova-api 路由到某个 nova compute 节点 (API -> Scheduler -> Compute (manager) -> Libvirt Driver) (2)调用 Neutron REST API 去准备网络。其返回的数据类似:
[VIF({'profile': {}, 'ovs_interfaceid': u'59cfa0b8-2f5c-481a-89a8-7a8711b368a2', 'network': Network({'bridge': 'br-int', 'subnets': [Subnet({'ips': [FixedIP({'meta': {}, 'version': 4, 'type': 'fixed', 'floating_ips': [], 'address': u'10.0.10.14'})], 'version': 4, 'meta': {'dhcp_server': u'10.0.10.11'}, 'dns': [], 'routes': [], 'cidr': u'10.0.10.0/24', 'gateway': IP({'meta': {}, 'version': 4, 'type': 'gateway', 'address': u'10.0.10.1'})})], 'meta': {'injected': False, 'tenant_id': u'74c8ada23a3449f888d9e19b76d13aab'}, 'id': u'a924e87a-826b-4109-bb03-523a8b3f6f9e', 'label': u'demo-net2'}), 'devname': u'tap59cfa0b8-2f', 'vnic_type': u'normal', 'qbh_params': None, 'meta': {}, 'details': {u'port_filter': True, u'ovs_hybrid_plug': True}, 'address': u'fa:16:3e:e0:30:e7', 'active': False, 'type': u'ovs', 'id': u'59cfa0b8-2f5c-481a-89a8-7a8711b368a2', 'qbg_params': None})]
(3)从 image 启动话,nova 会调用 Glane REST API 后者 image metadata 和准备本地启动盘 image metadata:
{u'status': u'active', u'deleted': False, u'container_format': u'bare', u'min_ram': 0, u'updated_at': u'2015-04-26T04:34:40.000000', u'min_disk': 0, u'owner': u'74c8ada23a3449f888d9e19b76d13aab', u'is_public': False, u'deleted_at': None, u'properties': {}, u'size': 13167616, u'name': u'image', u'checksum': u'64d7c1cd2b6f60c92c14662941cb7913', u'created_at': u'2015-04-26T04:34:39.000000', u'disk_format': u'qcow2', u'id': u'bb9318db-5554-4857-a309-268c6653b9ff'}
本地启动盘:
{'disk_bus': 'virtio', 'cdrom_bus': 'ide', 'mapping': {'disk': {'bus': 'virtio', 'boot_index': '1', 'type': 'disk', 'dev': u'vda'}, 'root': {'bus': 'virtio', 'boot_index': '1', 'type': 'disk', 'dev': u'vda'}, 'disk.local': {'bus': 'virtio', 'type': 'disk', 'dev': 'vdb'}, 'disk.swap': {'bus': 'virtio', 'type': 'disk', 'dev': 'vdc'}}}
本地启动盘的文件信息:
root@compute2:/home/s1# qemu-img info /var/lib/nova/instances/02699155-940f-4401-bc01-36220db80639/disk.local
image: /var/lib/nova/instances/02699155-940f-4401-bc01-36220db80639/disk.local
file format: qcow2
virtual size: 1.0G (1073741824 bytes) #由 flavor.ephemeral_disk 指定其 size
disk size: 324K
cluster_size: 65536
backing file: /var/lib/nova/instances/_base/ephemeral_1_default
Format specific information:
    compat: 1.1
    lazy refcounts: false

root@compute2:/home/s1# qemu-img info /var/lib/nova/instances/02699155-940f-4401-bc01-36220db80639/disk.swap
image: /var/lib/nova/instances/02699155-940f-4401-bc01-36220db80639/disk.swap
file format: qcow2
virtual size: 30M (31457280 bytes) # 由 flavor.swap_disk 指定其size
disk size: 196K
cluster_size: 65536
backing file: /var/lib/nova/instances/_base/swap_30
Format specific information:
    compat: 1.1
    lazy refcounts: false
(4)根据这些信息,生成 domain xml,然后生成其配置使得它是一个持久性虚机 (调用 libvirt Python DefineXML API)。 一个从 image 启动的 Domain 的配置 XML 实例(蓝色部分是注释说明): <domain type="qemu"> <uuid>8352e969-0a25-4abf-978f-d9d0ec4de0cd</uuid> <name>instance-0000002f</name> <memory>51200</memory> # guest.memory = flavor.memory_mb * units.Ki 即 50 * 1024 = 51200 <vcpu cpuset="0">1</vcpu> #flavor.vcpus <metadata> <nova:instance xmlns:nova="http://openstack.org/xmlns/libvirt/nova/1.0"> <nova:package version="2014.2.2"/> <nova:name>vm11</nova:name> #input.name <nova:creationTime>2015-06-09 23:54:04</nova:creationTime> <nova:flavor name="tiny2"> #input.flavor <nova:memory>50</nova:memory> <nova:disk>1</nova:disk> <nova:swap>30</nova:swap> <nova:ephemeral>1</nova:ephemeral> <nova:vcpus>1</nova:vcpus> </nova:flavor> <nova:owner> <nova:user uuid="bcd37e6272184f34993b4d7686ca4479">admin</nova:user> <nova:project uuid="74c8ada23a3449f888d9e19b76d13aab">admin</nova:project> </nova:owner> <nova:root type="image" uuid="bb9318db-5554-4857-a309-268c6653b9ff"/> #input.source </nova:instance> </metadata> <sysinfo type="smbios"> # Nova 中写死的 <system> <entry name="manufacturer">OpenStack Foundation</entry> <entry name="product">OpenStack Nova</entry> <entry name="version">2014.2.2</entry> <entry name="serial">03bb1a0f-ae04-4765-9f3c-d200a2540675</entry> <entry name="uuid">8352e969-0a25-4abf-978f-d9d0ec4de0cd</entry> </system> </sysinfo> <os> <type>hvm</type> #表示 Guest OS 需要 full virtualiaiton 支持 <boot dev="hd"/> #指定启动盘 <smbios mode="sysinfo"/> #去读取 <sysinfo> 的定义 </os> <features> <acpi/> # Soft Reboot 需要 ACPI 的支持,否则只能使用 Hard reboot。 https://bugs.launchpad.net/horizon/+bug/1346741 <apic/> # 没 APIC 的话,Windows Guest 会在 Xen 或者 KVM 上崩溃。 https://bugs.launchpad.net/nova/+bug/1086352 </features> <clock offset="utc"/> #如果Guest OS 是 MS,则是 localtime,否则都是 utc <cpu mode="host-model" match="exact"> # 对于 KVM,如果 CONF.libvirt.cpu_mode 是 none,mode 则设为 "host-model"。具体可参考 https://wiki.openstack.org/wiki/LibvirtXMLCPUModel <topology sockets="1" cores="1" threads="1"/> #默认的时候,sockets 数目设为 vcpu 的数目,cores 和 threads 都设为 1. 可以通过设置 image 的 hw_cpu_topology 属性来改变这里的设置,具体请参考 https://blueprints.launchpad.net/nova/+spec/support-libvirt-vcpu-topology 以及 https://wiki.openstack.org/wiki/VirtDriverGuestCPUMemoryPlacement </cpu> <devices> <disk type="file" device="disk"> # 从 image 启动时候的启动盘(flavor.root_disk) <driver name="qemu" type="qcow2" cache="none"/> <source file="/var/lib/nova/instances/8352e969-0a25-4abf-978f-d9d0ec4de0cd/disk"/> <target bus="virtio" dev="vda"/> #对于 KVM,disk 的 bus 为 "virtio",cdrom 的 bus 为 "ide",floppy 的 bus 为 "fdc" </disk> <disk type="file" device="disk"> #临时分区 (falvor.ephemeral_disk) <driver name="qemu" type="qcow2" cache="none"/> <source file="/var/lib/nova/instances/8352e969-0a25-4abf-978f-d9d0ec4de0cd/disk.local"/> <target bus="virtio" dev="vdb"/> </disk> <disk type="file" device="disk"> #swap 分区 (flavor.swap_disk) <driver name="qemu" type="qcow2" cache="none"/> <source file="/var/lib/nova/instances/8352e969-0a25-4abf-978f-d9d0ec4de0cd/disk.swap"/> <target bus="virtio" dev="vdc"/> </disk> <interface type="bridge"> # 虚机通过网桥连接到 OVS <mac address="fa:16:3e:e0:30:e7"/> <model type="virtio"/> #该 type 可以由 image metadata hw_vif_type 指定。未指定的话,如果配置了 conf.libvirt.use_virtio_for_bridges = true (默认就是 true)的话,QEMU/KVM 会使用 virtio 类型。 <driver name="qemu"/> <source bridge="qbr59cfa0b8-2f"/> #qbr59cfa0b8-2f 连接虚机的 vNIC tap59cfa0b8-2f 和 qvb59cfa0b8-2f ,而 qvb59cfa0b8-2f 练到 OVS 的 br-int 上。 <target dev="tap59cfa0b8-2f"/> </interface> <serial type="file"> 当 CONF.serial_console.enabled = true 时,type 为 "tcp",使用 config 配置,其 XML 为 <serial type="tcp"> <source host="127.0.0.1" mode="bind" service="10000"/> </serial>;当为 false 时,使用 console.log 文件,type 为 file。 <source path="/var/lib/nova/instances/8352e969-0a25-4abf-978f-d9d0ec4de0cd/console.log"/> </serial> <serial type="pty"/> #每个domain都有 type 为 "pty" 的 serial 配置。 <input type="tablet" bus="usb"/> #当 CONF.vnc_enabled = true 或者 CONF.spice.enabled = true 并且 CONF.spice.agent_enabled = false 时添加 tablet,type 和 bus 都是固定的。 <graphics type="vnc" autoport="yes" keymap="en-us" listen="0.0.0.0"/> #如果 CONF.vnc_enabled = true,那么 keymap=CONF.vnc_keymap;listen=CONF.vncserver_listen <video> #如果 CONF.vnc_enabled 或者 CONF.spice.enabled,则添加该 video 配置 <model type="cirrus"/> #如果 CONF.spice.enabled,则 type 为 qxl;否则为 cirrus。 </video> <memballoon model="virtio"> #如果 CONF.libvirt.mem_stats_period_seconds >0 则添加 memballoon;对 KVM,model 固定为 "virtio" <stats period="10"/> </memballoon> </devices> </domain> 从 bootable volume 启动的话,disk 部分为: <disk type="file" device="disk"> <driver name="qemu" type="qcow2" cache="none"/> <source file="/var/lib/nova/instances/02699155-940f-4401-bc01-36220db80639/disk.local"/> <target bus="virtio" dev="vdb"/> </disk> <disk type="file" device="disk"> <driver name="qemu" type="qcow2" cache="none"/> <source file="/var/lib/nova/instances/02699155-940f-4401-bc01-36220db80639/disk.swap"/> <target bus="virtio" dev="vdc"/> </disk> <disk type="block" device="disk"> <driver name="qemu" type="raw" cache="none"/> <source dev="/dev/disk/by-path/ip-10.0.2.41:3260-iscsi-iqn.2010-10.org.openstack:volume-26446902-5a56-4c79-b839-a8e13a66dc7a-lun-1"/> <target bus="virtio" dev="vda"/> <serial>26446902-5a56-4c79-b839-a8e13a66dc7a</serial> </disk> (5). 启动 domain (调用 libvirt Python createWithFlags API) 2.2 添加 volume 到虚机 (nova volume-attach)(1)使用 volume id 通过 volume driver 找到指定的 volume (2)调用 volume driver 来建立主机和 Volume 之间的连接 主机信息为:
{'ip': '192.168.1.15', 'host': 'compute2', 'initiator': 'iqn.1993-08.org.debian:01:a9f2b45c24f9'}
建立的 iSCSI 连接信息为:
{u'driver_volume_type': u'iscsi', u'data': {u'access_mode': u'rw', u'target_discovered': False, u'encrypted': False, u'qos_specs': None, u'target_iqn': u'iqn.2010-10.org.openstack:volume-51da0d1f-0a17-4e7f-aeff-27438963348a', u'target_portal': u'10.0.2.41:3260', u'volume_id': u'51da0d1f-0a17-4e7f-aeff-27438963348a', u'target_lun': 1, u'auth_password': u'hXG64qrzEjNt8MDKnERA', u'auth_username': u'fKSAe6vhgyeG88U9kcBV', u'auth_method': u'CHAP'}}
volume 在主机上的磁盘为:
root@compute2:/home/s1# ls /dev/disk/by-path/ -ls
Disk /dev/sdc: 1073 MB, 1073741824 bytes Disk /dev/sdc doesn't contain a valid partition table (3)通过 domain name 来找到指定 domain 对象 (通过调用 lookupByName API) (4)生成 volume 连接的配置 xml,比如:
<disk type="block" device="disk"> (5)调用 attachDeviceFlags API 将 volume 挂载到该虚机 2.3 添加连接到新的网络的 interface 给虚机 (nova interface-attach)(1)运行 nova interface-attach,传入 network-id,Neutron 会分配如下network info 给 Nova
VIF({'profile': {}, 'ovs_interfaceid': u'0142efee-7382-43ef-96e8-d0084ecc893c', 'network': Network({'bridge': u'br-int', 'subnets': [Subnet({'ips': [FixedIP({'meta': {}, 'version': 4, 'type': u'fixed', 'floating_ips': [], 'address': u'10.0.0.40'})], 'version': 4, 'meta': {u'dhcp_server': u'10.0.0.3'}, 'dns': [], 'routes': [], 'cidr': u'10.0.0.0/24', 'gateway': IP({'meta': {}, 'version': 4, 'type': u'gateway', 'address': u'10.0.0.1'})})], 'meta': {u'injected': False, u'tenant_id': u'74c8ada23a3449f888d9e19b76d13aab'}, 'id': u'01630966-b21f-4a6d-95ff-10c4575f1fe2', 'label': u'demo-net'}), 'devname': u'tap0142efee-73', 'vnic_type': u'normal', 'qbh_params': None, 'meta': {}, 'details': {u'port_filter': True, u'ovs_hybrid_plug': True}, 'address': u'fa:16:3e:14:32:d9', 'active': True, 'type': u'ovs', 'id': u'0142efee-7382-43ef-96e8-d0084ecc893c', 'qbg_params': None})
(2)执行下面的命令,将 Neutron 分配的 port 连接到 OVS #添加 linux bridge brctl addbr qbr0142efee-73 #名字是 devname 的后半部分 brctl setfd qbr0142efee-73 0 brctl stp qbr0142efee-73 off tee /sys/class/net/qbr0142efee-73/bridge/multicast_snooping ip link add qvb0142efee-73 type veth peer name qvo0142efee-73 ip link set qvb0142efee-73 ip link set qvb0142efee-73 promisc on #在 OVS 上添加端口 ovs-vsctl --timeout=120 -- --if-exists del-port qvo0142efee-73 -- add-port br-int qvo0142efee-73 -- set Interface qvo0142efee-73 external-ids:iface-id=0142efee-7382-43ef-96e8-d0084ecc893c external-ids:iface-status=active external-ids:attached-mac=fa:16:3e:14:32:d9 external-ids:vm-uuid=8352e969-0a25-4abf-978f-d9d0ec4de0cd (3)生成 interface 配置的xml,比如:
<interface type="bridge"> (4)调用 attachDeviceFlags API 来挂载该 interface 到虚机
至于其他的虚机操作,会在另一篇文章中描述。 (责任编辑:IT) |