|
����Ŀ¼
1.�Ƽ���Ļ�������
1.1�Ƽ�����ʲô
1.2�Ƽ���֮ǰ��ģʽ
2.KVM����
2.1ʲô�����⻯
2.2���⻯����С��ҵӦ��
2.3KVM��Ǩ����Ǩ��
2.3.1��Ǩ�ƣ�
2.3.2��Ǩ�ƣ�
2.4�����Ǩ�Ƶij�����
2.5�����Ǩ�������ݴ���
2.6�����Ǩ���д洢
3.��װ����KVM
1.�Ƽ���Ļ�������
����������һ�ְ��������ѵ�ģʽ������ģʽ�ṩ���õġ���ݵġ������������ʣ���������õļ������Դ������(��Դ�������硢���������洢��Ӧ�ó�����)����Щ��Դ�ܹ������ṩֻ��Ͷ��Ĺ�����������������̽��к��ٵĽ���
1.1�Ƽ�����ʲô
1.�Ƽ�����һ�ָ���ָ������Դ��ʹ�ý���ģʽ
2.�Ƽ�������Ƶ��Ը��ѡ����踶�ѡ�������չ
3.�Ƽ��㲻�ù�ϵ�ײ������ʩ�ܹ�
1.2�Ƽ���֮ǰ��ģʽ
1.IDC�й� 2.IDC���� 3.�������������ռ䣩4.VPS����ר������openvz
��ͳ�����������ٵ������ȱ��
1.��Դ�����ʵ� 2.��Դ���䲻���� 3.��ʼ�ɱ��ߣ�С����ҵ���ܲ���
2.KVM����
2.1ʲô�����⻯
���⻯ָ��һ��Ӳ������Ϊ��̨���������ÿ��������������в�ͬ�IJ���ϵͳ����������������Ӱ�졣���磺��������������һ̨��������������Ϊ��̨������û�����⻯��ʱ��һ��Ӳ��������������һ�����������ɴ�����Դ�˷ѣ�ʹ�����⻯��ʵ�ַ������ж������ֵ���������Դ
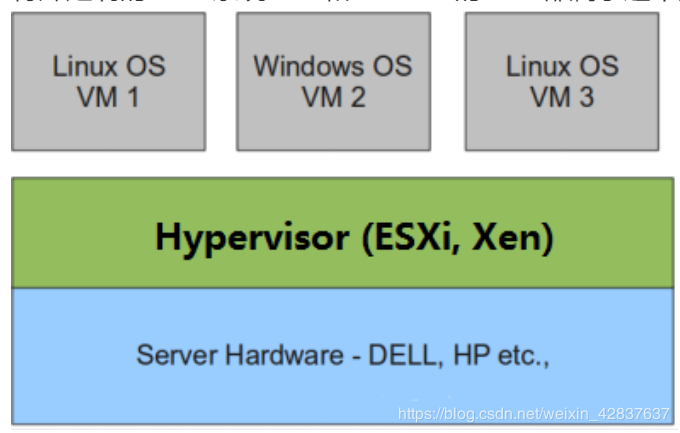
ȫ���⻯��
Hypervisorֱ�Ӱ�װ���������ϣ�����������Hypervisor������.Hypervisorʵ�ַ�ʽһ����һ�����ⶨ�Ƶ�Linuxϵͳ.Xen��VMWare��ESXi�������������

�����⻯��
�����������Ȱ�װ����IJ���ϵͳ�������ñ��Ubuntu�ĺ�Windows.Hypervisor��ΪOS�ϵ�һ������ģ�����У����Թ�����������й���.KVM��VirtualBox�ĺ�VMware����վ�������������
�������⻯�Ա�
ȫ���⻯һ���Ӳ�����⻯���ܽ������ر��Ż��������ϱȰ����⻯Ҫ��;
�����⻯��Ϊ������ͨ�IJ���ϵͳ����Ƚ�������֧�������Ƕ��Ƕ�ס���ζ�ſ�����KVM�������������KVM��
2.2���⻯����С��ҵӦ��
��ҵ�������������������豸��������Ҫ�ѷ������������⻯����Ȼ�������沿�����÷����Ҹ���Ҿٸ����������������ڹ�����һ̨�����������Dz����ܾ������沿��һ�ַ���Ҫ��ķ�����Դ�ﵽ��Դ��ֵ���
������������һ̨DELL��R730����������������⻯Ϊ��̨����
 
2.3KVM��Ǩ����Ǩ��
2.3.1��Ǩ�ƣ�
��Ǩ��ʵ�ַ����ж��֣������п�����Ǩ��ʵ����ʵ���ļ�Ǩ�ơ����ļ�Ǩ��Ϊ���������Ǩ�ơ�
2.1������ļ���Ǩ�Ʋ��裺
1���ر������
2���ҵ������λ��/var/lib/nova/instances���ļ�
3������������ļ�ȫ��copy��Ŀ����������ͬλ����
4�����û���
5���������ݿ���host,node�ֶ�ΪĿ������������
6������Ŀ��������nova-compute����
��Ǩ��(cold migration)��Ҳ�о�̬Ǩ�ơ��رյ�Դ�����������Ǩ�ơ�ͨ����Ǩ�ƣ�����ѡ�����Ĵ��̴�һ�����ݴ洢�ƶ�����һ�����ݴ洢��
�ô������������Ҫλ�ڹ����洢���ϣ����ݶ�ʧ��С��
ȱ�㣺��Ҫ�رյ�Դ��ҵ���жϡ�
2.3.2��Ǩ�ƣ�
��Ǩ�����ڲ�ͣ������������Ǩ�ƣ����������Ǩ��Ҫ���ӡ�
3.1��Ǩ�Ʋ��裺
1��Ǩ��ǰ���������
2��Ǩ��ǰ��Ԥ����
3��Ǩ�ƹ���
4��Ǩ�ƺ�Ĵ���
��Ǩ�ƣ�Live Migration�����ֽж�̬Ǩ�ơ�ʵʱǨ�ƣ������������/�ָ���ͨ���ǽ����������������״̬��������������ͬʱ���Կ��ٵĻָ���ԭ��Ӳ��ƽ̨�����Dz�ͬӲ��ƽ̨�ϡ��ָ��Ժ�������Ծ�ƽ�����У��û����������κβ��졣
�ô���������Ӳ��ϵͳ��ά������������Ӱ���û��Ĺؼ���������˷���ĸ߿����Ժ� �û�������ȡ�
ȱ�㣺���̲����жϣ��������ӡ�
2.4�����Ǩ�Ƶij�����
���� 1����������Ӳ��ϵͳ��ά����������������(upgrade)������������̨���������ϵ���������ܹػ�����Ϊ�û���Ҫ�ķ����������档
���� 2��������������ϵͳ��������(patch)��Ϊ�˲�Ӱ�������ܵ���������������ʹ�֮ǰ����Ҫ�������Ǩ�Ƶ�������������ϡ�
���� 3��һ�����������ϵĸ���̫�أ���Ҫ����һЩ��������ͷ���Դ��
���� 4�������£��е������е��������ϵ������̫�࣬�е������������������̫�٣���һ����Դƽ�⡣
2.5�����Ǩ�������ݴ���
�������Ǩ�ƣ��������ݵ�ת�ƣ��������ڵ�֮��û�й����洢������Ҫת�Ƶ����ݰ��������֣�
1����̬���ݣ��洢�ڱ��ص�������ľ����ļ���������˾���(libvirt Base)����������������������ļ�(libvirt instance disks)��
2����̬���ݣ��ڴ��������������ʱ���ݣ��ڴ���������Ƕ�̬�仯�����ݣ�����������еĸ��صĴ�Сֱ��Ӱ��Ǩ�Ƶ�ʱ�䳤�̡�
2.6�����Ǩ���д洢
�����洢��ǹ����洢
����������ݴ��ڹ���������(Shared storage-based live migration)��Ǩ��ֻ��Ҫ����ڴ����ݵ�Ǩ�ơ�

����������ݴ��ڱ��ش���(block migration)����Ҫ�Ծ����ļ����ڴ�����ͬʱǨ�ơ�

ע�⣺����ʹ�õ�ϵͳ��ubuntu18.04��OpenStack�汾��Pike������ϵͳ���г���
3.��װ����KVM
�رշ���ǽ��selinux
[root@kvm ~]# systemctl stop firewalld
[root@kvm ~]# systemctl disable firewalld
[root@kvm ~]# sed -ri 's/^(SELINUX=).*/\1disabled/g' /etc/selinux/config
[root@kvm ~]# setenforce 0
[root@kvm ~]# reboot
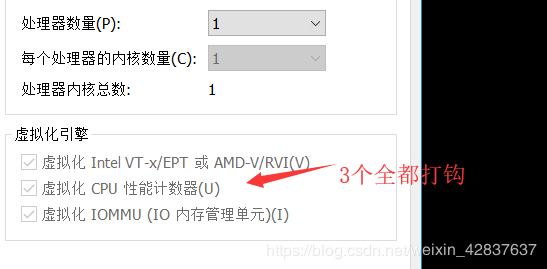
��֤CPU�Ƿ�֧��KVM������������vmx��Intel����svm(AMD)��������˵��CPU��֧�ֵ�
[root@kvm ~]# egrep -o "vmx|svm" /proc/cpuinfo
vmx
vmx
vmx
vmx
kvm��װ
[root@kvm ~]# yum -y install qemu-kvm qemu-kvm-tools qemu-img virt-manager libvirt libvirt-python libvirt-client virt-install virt-viewer bridge-utils libguestfs-tools
[root@kvm ~]# ip a show ens35
3: ens35: <BROADCAST,MULTICAST,UP,LOWER_UP> mtu 1500 qdisc pfifo_fast state UP qlen 1000
link/ether 00:0c:29:d3:9a:94 brd ff:ff:ff:ff:ff:ff
inet 192.168.100.69/24 brd 192.168.100.255 scope global ens35
valid_lft forever preferred_lft forever
inet6 fe80::c5c1:1c5e:ad1:ae53/64 scope link
valid_lft forever preferred_lft forever
[root@kvm network-scripts]# cat ifcfg-ens35
TYPE=Ethernet
BOOTPROTO=static
NAME=ens35
DEVICE=ens35
ONBOOT=yes
BRIDGE=br0
NM_CONTROLLED=no
[root@kvm network-scripts]# cat ifcfg-br0
TYPE=Bridge
DEVICE=br0
NM_CONTROLLED=no
BOOTPROTO=static
NAME=br0
ONBOOT=yes
IPADDR=192.168.199.69
NETMASK=255.255.255.0
GATEWAY=192.168.199.1
DNS1=114.114.114.114
DNS2=8.8.8.8
//��������
[root@kvm network-scripts]# systemctl restart network
[root@kvm network-scripts]# ip a
1: lo: <LOOPBACK,UP,LOWER_UP> mtu 65536 qdisc noqueue state UNKNOWN qlen 1
link/loopback 00:00:00:00:00:00 brd 00:00:00:00:00:00
inet 127.0.0.1/8 scope host lo
valid_lft forever preferred_lft forever
inet6 ::1/128 scope host
valid_lft forever preferred_lft forever
2: ens32: <BROADCAST,MULTICAST,UP,LOWER_UP> mtu 1500 qdisc pfifo_fast state UP qlen 1000
link/ether 00:0c:29:d3:9a:8a brd ff:ff:ff:ff:ff:ff
inet 192.168.100.33/24 brd 192.168.100.255 scope global ens32
valid_lft forever preferred_lft forever
inet6 fe80::10d8:3642:d44c:3543/64 scope link
valid_lft forever preferred_lft forever
3: ens35: <BROADCAST,MULTICAST,UP,LOWER_UP> mtu 1500 qdisc pfifo_fast master br0 state UP qlen 1000
link/ether 00:0c:29:d3:9a:94 brd ff:ff:ff:ff:ff:ff
inet6 fe80::20c:29ff:fed3:9a94/64 scope link
valid_lft forever preferred_lft forever
4: virbr0: <NO-CARRIER,BROADCAST,MULTICAST,UP> mtu 1500 qdisc noqueue state DOWN qlen 1000
link/ether 52:54:00:3d:76:f3 brd ff:ff:ff:ff:ff:ff
inet 192.168.122.1/24 brd 192.168.122.255 scope global virbr0
valid_lft forever preferred_lft forever
5: virbr0-nic: <BROADCAST,MULTICAST> mtu 1500 qdisc pfifo_fast master virbr0 state DOWN qlen 1000
link/ether 52:54:00:3d:76:f3 brd ff:ff:ff:ff:ff:ff
9: br0: <BROADCAST,MULTICAST,UP,LOWER_UP> mtu 1500 qdisc noqueue state UP qlen 1000
link/ether 00:0c:29:d3:9a:94 brd ff:ff:ff:ff:ff:ff
inet 192.168.199.69/24 brd 192.168.199.255 scope global br0
valid_lft forever preferred_lft forever
inet6 fe80::20c:29ff:fed3:9a94/64 scope link
valid_lft forever preferred_lft forever
//��������
[root@kvm network-scripts]# systemctl start libvirtd
[root@kvm network-scripts]# systemctl enable libvirtd
//��֤��װ���
[root@kvm network-scripts]# lsmod|grep kvm
kvm_intel 170086 0
kvm 566340 1 kvm_intel
irqbypass 13503 1 kvm
//���Բ���֤��װ���
[root@kvm network-scripts]# virsh -c qemu:///system list
Id ���� ״̬
----------------------------------------------------
[root@kvm network-scripts]# ln -s /usr/libexec/qemu-kvm /usr/bin/qemu-kvm
[root@kvm network-scripts]# ll /usr/bin/qemu-kvm
lrwxrwxrwx 1 root root 21 12�� 15 21:11 /usr/bin/qemu-kvm -> /usr/libexec/qemu-kvm
//�鿴������Ϣ
[root@kvm network-scripts]# brctl show
bridge name bridge id STP enabled interfaces
br0 8000.000c29d39a94 no ens35
virbr0 8000.5254003d76f3 yes virbr0-nic
kvm web�������氲װ
��װ������
[root@kvm network-scripts]# yum -y install git python-pip libvirt-python libxml2-python python-websockify supervisor nginx python-devel
//����pip
[root@kvm yum.repos.d]# pip install --upgrade pip
//��github������webvirtmgr����
[root@kvm yum.repos.d]# cd /usr/local/src/
[root@kvm src]# git clone git://github.com/retspen/webvirtmgr.git
����¡�� 'webvirtmgr'...
remote: Enumerating objects: 5614, done.
remote: Total 5614 (delta 0), reused 0 (delta 0), pack-reused 5614
���ն�����: 100% (5614/5614), 2.98 MiB | 133.00 KiB/s, done.
���� delta ��: 100% (3603/3603), done.
//��װwebvirtmgr
[root@kvm webvirtmgr]# cd webvirtmgr/
[root@kvm webvirtmgr]# pip install -r requirements.txt
Collecting django==1.5.5 (from -r requirements.txt (line 1))
Downloading https://files.pythonhosted.org/packages/38/49/93511c5d3367b6b21fc2995a0e53399721afc15e4cd6eb57be879ae13ad4/Django-1.5.5.tar.gz (8.1MB)
9% |������ | 757kB 12kB/s eta 0:09:26
//���sqlite3�Ƿ�װ
[root@kvm webvirtmgr]# python
Python 2.7.5 (default, Oct 30 2018, 23:45:53)
[GCC 4.8.5 20150623 (Red Hat 4.8.5-36)] on linux2
Type "help", "copyright", "credits" or "license" for more information.
>>> import sqlite3
>>> exit()
//��ʼ���ʺ���Ϣ
[root@kvm webvirtmgr]# python manage.py syncdb
WARNING:root:No local_settings file found.
Creating tables ...
Creating table auth_permission
Creating table auth_group_permissions
Creating table auth_group
Creating table auth_user_groups
Creating table auth_user_user_permissions
Creating table auth_user
Creating table django_content_type
Creating table django_session
Creating table django_site
Creating table servers_compute
Creating table instance_instance
Creating table create_flavor
You just installed Django's auth system, which means you don't have any superusers defined.
Would you like to create one now? (yes/no): yes //�����Ƿ���������Ա�ʺ�
Username (leave blank to use 'root'): root //ָ����������Ա�ʺ��û�����Ĭ������Ϊroot
Email address: //���ó�������Ա����
Password: //���ó�������Ա����
Password (again): //�ٴ����볬������Ա����
Error: Your passwords didn't match.
Password:
Password (again):
Superuser created successfully.
Installing custom SQL ...
Installing indexes ...
Installed 6 object(s) from 1 fixture(s)
\\����web��ҳ��ָ��Ŀ¼
[root@kvm webvirtmgr]# mkdir /var/www
[root@kvm webvirtmgr]# cp -r /usr/local/src/webvirtmgr /var/www/
[root@kvm webvirtmgr]# chown -R nginx.nginx /var/www/webvirtmgr
//������Կ
[root@kvm ~]# ssh-keygen -t rsa
Generating public/private rsa key pair.
Enter file in which to save the key (/root/.ssh/id_rsa):
Enter passphrase (empty for no passphrase):
Enter same passphrase again:
Your identification has been saved in /root/.ssh/id_rsa.
Your public key has been saved in /root/.ssh/id_rsa.pub.
The key fingerprint is:
SHA256:SIBNs7C9G8hfqSXPSjgCjN19O7dHaQcikzHWuAwnrX8 root@kvm
The key's randomart image is:
+---[RSA 2048]----+
| .++ . o |
| .+.+o B . |
| . o .B = |
|oo o +.o* . . |
|o.+ = *.So . o |
|. o X ...E + . |
|. o = o o..o . |
| . o . o .. |
| . .. |
+----[SHA256]-----+
[root@kvm ~]# ssh-copy-id 192.168.199.69
/usr/bin/ssh-copy-id: INFO: Source of key(s) to be installed: "/root/.ssh/id_rsa.pub"
The authenticity of host '192.168.199.69 (192.168.199.69)' can't be established.
ECDSA key fingerprint is SHA256:Jv8hH7gJNX60Ul1azgTQ1WBmlgdBlyynRjJPZfjnnmA.
ECDSA key fingerprint is MD5:bd:28:0f:12:27:e5:7c:01:f3:3a:ce:20:23:ec:59:c9.
Are you sure you want to continue connecting (yes/no)? yes
/usr/bin/ssh-copy-id: INFO: attempting to log in with the new key(s), to filter out any that are already installed
/usr/bin/ssh-copy-id: INFO: 1 key(s) remain to be installed -- if you are prompted now it is to install the new keys
root@192.168.199.69's password:
Number of key(s) added: 1
Now try logging into the machine, with: "ssh '192.168.199.69'"
and check to make sure that only the key(s) you wanted were added.
//���ö˿�ת��
[root@kvm ~]# ssh 192.168.199.69 -L localhost:8000:localhost:8000 -L localhost:6080:localhost:60
Last login: Sat Dec 15 21:38:19 2018 from 192.168.100.1
[root@kvm ~]# ss -antl
State Recv-Q Send-Q Local Address:Port Peer Address:Port
LISTEN 0 128 *:111 *:*
LISTEN 0 5 192.168.122.1:53 *:*
LISTEN 0 128 *:22 *:*
LISTEN 0 100 127.0.0.1:25 *:*
LISTEN 0 128 127.0.0.1:6080 *:*
LISTEN 0 128 127.0.0.1:8000 *:*
LISTEN 0 128 :::111 :::*
LISTEN 0 128 :::22 :::*
LISTEN 0 100 ::1:25 :::*
LISTEN 0 128 ::1:6080 :::*
LISTEN 0 128 ::1:8000 :::*
//����nginx
[root@kvm ~]# vim /etc/nginx/nginx.conf
server {
listen 80 ;
server_name _;
root /usr/share/nginx/html;
# Load configuration files for the default server block.
include /etc/nginx/default.d/*.conf;
location / {
}
error_page 404 /404.html;
location = /40x.html {
}
[root@kvm ~]# cat /etc/nginx/conf.d/webvirtmgr.conf
server {
listen 80 default_server;
server_name $hostname;
#access_log /var/log/nginx/webvirtmgr_access_log;
location /static/ {
root /var/www/webvirtmgr/webvirtmgr;
expires max;
}
location / {
proxy_pass http://127.0.0.1:8000;
proxy_set_header X-Real-IP $remote_addr;
proxy_set_header X-Forwarded-for $proxy_add_x_forwarded_for;
proxy_set_header Host $host:$server_port;
proxy_set_header X-Forwarded-Proto $remote_addr;
proxy_connect_timeout 600;
proxy_read_timeout 600;
proxy_send_timeout 600;
client_max_body_size 1024M;
}
}
//ȷ��bind���DZ�����8000�˿�
[root@kvm ~]# vim /var/www/webvirtmgr/conf/gunicorn.conf.py
bind = '0.0.0.0:8000'
backlog = 2048
//����nginx
[root@kvm ~]# systemctl restart nginx
[root@kvm ~]# ss -lnpt
State Recv-Q Send-Q Local Address:Port Peer Address:Port
LISTEN 0 128 *:111 *:* users:(("rpcbind",pid=664,fd=4),("systemd",pid=1,fd=49))
LISTEN 0 128 *:80 *:* users:(("nginx",pid=16579,fd=6),("nginx",pid=16578,fd=6),("nginx",pid=16577,fd=6),("nginx",pid=16576,fd=6),("nginx",pid=16575,fd=6))
LISTEN 0 5 192.168.122.1:53 *:* users:(("dnsmasq",pid=1186,fd=6))
LISTEN 0 128 *:22 *:* users:(("sshd",pid=940,fd=3))
LISTEN 0 100 127.0.0.1:25 *:* users:(("master",pid=1043,fd=13))
LISTEN 0 128 127.0.0.1:6080 *:* users:(("ssh",pid=13616,fd=7))
LISTEN 0 128 127.0.0.1:8000 *:* users:(("ssh",pid=13616,fd=5))
LISTEN 0 128 :::111 :::* users:(("rpcbind",pid=664,fd=6),("systemd",pid=1,fd=69))
LISTEN 0 128 :::22 :::* users:(("sshd",pid=940,fd=4))
LISTEN 0 100 ::1:25 :::* users:(("master",pid=1043,fd=14))
LISTEN 0 128 ::1:6080 :::* users:(("ssh",pid=13616,fd=6))
LISTEN 0 128 ::1:8000 :::*
//����supervisor
[root@kvm ~]# vim /etc/supervisord.conf
[program:webvirtmgr]
command=/usr/bin/python2 /var/www/webvirtmgr/manage.py run_gunicorn -c /var/www/webvirtmgr/conf/gunicorn.conf.py
directory=/var/www/webvirtmgr
autostart=true
autorestart=true
logfile=/var/log/supervisor/webvirtmgr.log
log_stderr=true
user=nginx
[program:webvirtmgr-console]
command=/usr/bin/python2 /var/www/webvirtmgr/console/webvirtmgr-console
directory=/var/www/webvirtmgr
autostart=true
autorestart=true
stdout_logfile=/var/log/supervisor/webvirtmgr-console.log
redirect_stderr=true
user=nginx
//����supervisor�����ÿ�������
[root@kvm ~]# systemctl start supervisord
[root@kvm ~]# systemctl enable supervisord
[root@kvm ~]# ss -lnpt
State Recv-Q Send-Q Local Address:Port Peer Address:Port
LISTEN 0 128 *:111 *:* users:(("rpcbind",pid=664,fd=4),("systemd",pid=1,fd=63))
LISTEN 0 128 *:80 *:* users:(("nginx",pid=16579,fd=6),("nginx",pid=16578,fd=6),("nginx",pid=16577,fd=6),("nginx",pid=16576,fd=6),("nginx",pid=16575,fd=6))
LISTEN 0 5 192.168.122.1:53 *:* users:(("dnsmasq",pid=1186,fd=6))
LISTEN 0 128 *:22 *:* users:(("sshd",pid=940,fd=3))
LISTEN 0 100 127.0.0.1:25 *:* users:(("master",pid=1043,fd=13))
LISTEN 0 128 127.0.0.1:6080 *:* users:(("ssh",pid=13616,fd=7))
LISTEN 0 128 127.0.0.1:8000 *:* users:(("ssh",pid=13616,fd=5))
LISTEN 0 128 :::111 :::* users:(("rpcbind",pid=664,fd=6),("systemd",pid=1,fd=65))
LISTEN 0 128 :::22 :::* users:(("sshd",pid=940,fd=4))
LISTEN 0 100 ::1:25 :::* users:(("master",pid=1043,fd=14))
LISTEN 0 128 ::1:6080 :::* users:(("ssh",pid=13616,fd=6))
LISTEN 0 128 ::1:8000 :::* users:(("ssh",pid=13616,fd=4))
//����nginx�û�
[root@kvm ~]# cd /home/
[root@kvm home]# mkdir nginx
[root@kvm home]# chown -R nginx.nginx nginx/
[root@kvm home]# chmod -R 700 nginx/
[root@kvm home]# su - nginx -s /bin/bash
-bash-4.2$ ssh-keygen -t rsa
Generating public/private rsa key pair.
Enter file in which to save the key (/var/lib/nginx/.ssh/id_rsa):
Created directory '/var/lib/nginx/.ssh'.
Enter passphrase (empty for no passphrase):
Enter same passphrase again:
Your identification has been saved in /var/lib/nginx/.ssh/id_rsa.
Your public key has been saved in /var/lib/nginx/.ssh/id_rsa.pub.
The key fingerprint is:
SHA256:Jgp8nZvN1ZJ8s5Ko+NF0IdoB3wi4FrrZdcFQd6HLJRw nginx@kvm
The key's randomart image is:
-bash-4.2$ touch ~/.ssh/config && echo -e "StrictHostKeyChecking=no\nUserKnownHostsFile=/dev/null" >> ~/.ssh/config
-bash-4.2$ chmod 0600 ~/.ssh/config
-bash-4.2$ ssh-copy-id root@192.168.199.69
/bin/ssh-copy-id: INFO: Source of key(s) to be installed: "/var/lib/nginx/.ssh/id_rsa.pub"
/bin/ssh-copy-id: INFO: attempting to log in with the new key(s), to filter out any that are already installed
/bin/ssh-copy-id: INFO: 1 key(s) remain to be installed -- if you are prompted now it is to install the new keys
Warning: Permanently added '192.168.199.69' (ECDSA) to the list of known hosts.
root@192.168.199.69's password:
Number of key(s) added: 1
Now try logging into the machine, with: "ssh 'root@192.168.199.69'"
and check to make sure that only the key(s) you wanted were added.
[root@kvm home]# cat /etc/polkit-1/localauthority/50-local.d/50-libvirt-remote-access.pkla
bvirt SSH access]
Identity=unix-user:root
Action=org.libvirt.unix.manage
ResultAny=yes
ResultInactive=yes
ResultActive=yes
[root@kvm home]# chown -R root.root /etc/polkit-1/localauthority/50-local.d/50-libvirt-remote-access.pkla
kvm web�������
\���������ҳ���������±���,�����������
accept: Too many open files
accept: Too many open files
accept: Too many open files
accept: Too many open files
accept: Too many open files
accept: Too many open files
accept: Too many open files
\\���
�ļ��ײ�����
[root@kvm ~]# tail -2 /etc/security/limits.conf
* soft nofile 655360
* hard nofile 655360
[root@kvm ~]# vim /etc/nginx/nginx.conf
events {
worker_connections 655350;
}
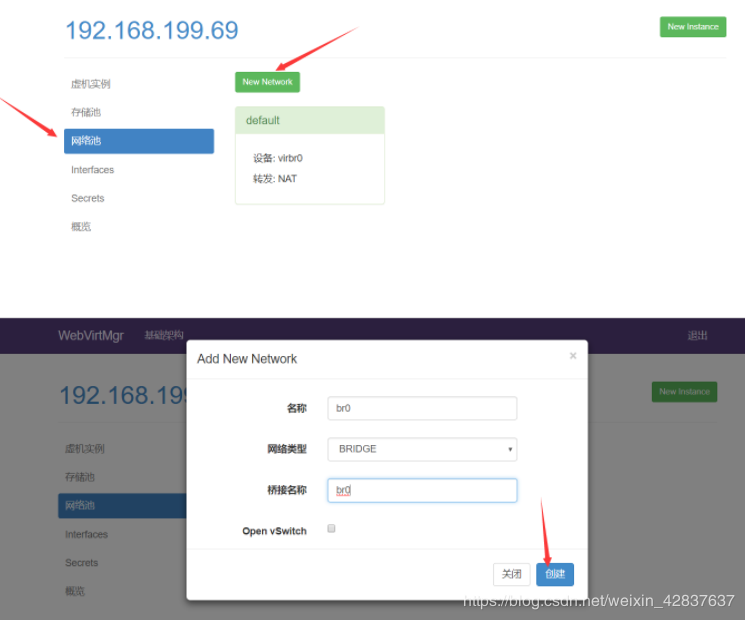
 kvm���ӹ��� 
kvm�洢����
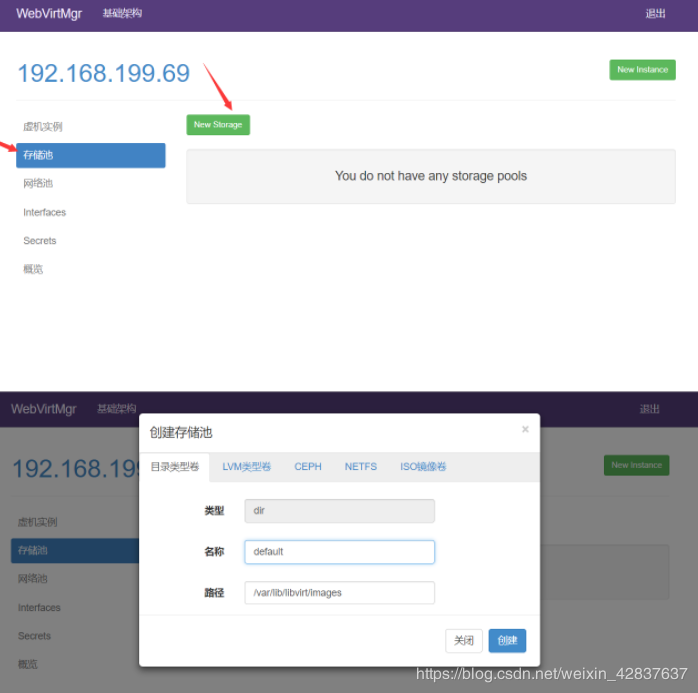
����洢��
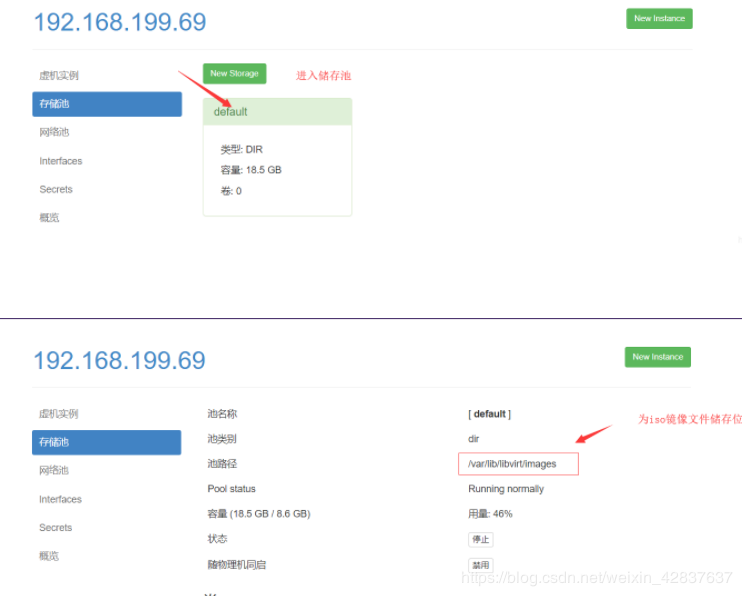
ͨ��Զ�����������ϴ�ISO�����ļ����洢Ŀ¼��/ var / lib��/ libvirt��/ͼ��/
[root@kvm images]# ls
rhel-server-7.4-x86_64-dvd.iso
��web����鿴ISO�����Ƿ����

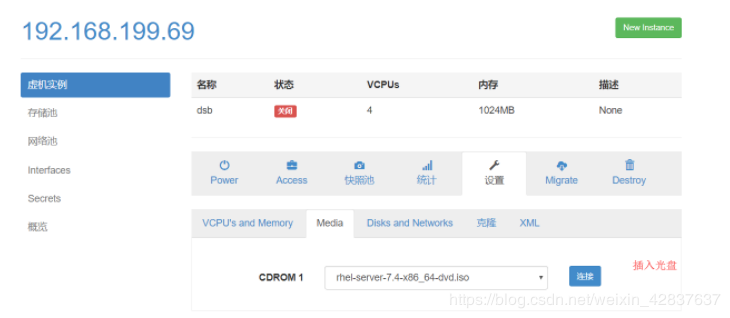
����ϵͳ��װ����

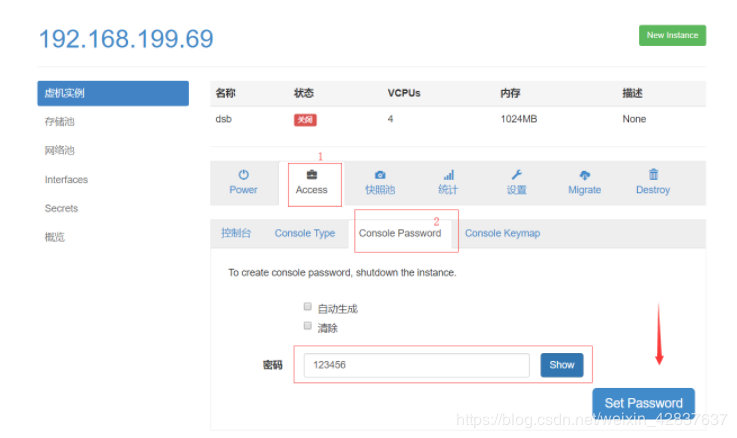
kvm�������
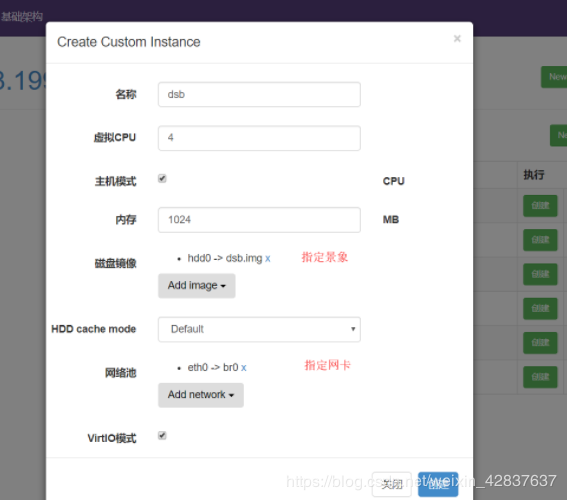
ʵ������
ʵ���������������
������������
������web�Ϸ��������������
\�������װ
  (���α༭��IT) |