|
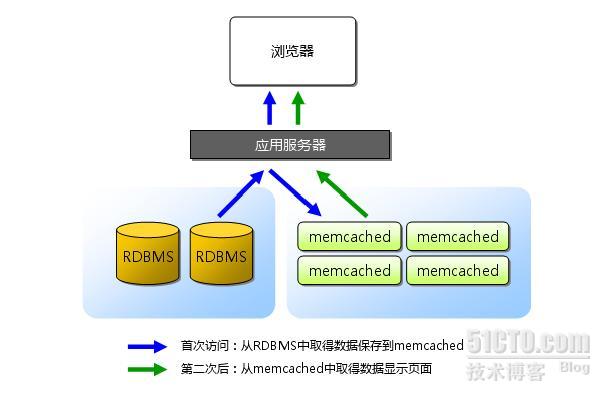
一,memcache简单介绍: memcached是高性能的分布式内存缓存服务器,为了提高性能,memcached中的数据都保存在内存中,重启memcached及重启操作系统都会导致缓存中的数据全部丢失,其缓存的数据达到指定的内存分配值之后,就会使用LRU算法删除不使用的缓存。(LRU算法的基本概念:当分配的内存可用空间不足时,它尽可能地先保留最常用的数据,将最近没有使用的数据移出内存,释放出的空间来存储其它的数据。) 其作用是缓存数据库查询结果,这样就减少了对数据库的访问次数据,从而减轻数据库的压力,这样就提高了用户的访问速度,典型应用如下图所示:
实验环境:3台虚拟机, Web——memcache——mysql web服务器安装:Apache+PHP+PHP(memcache扩展)+mysql+mysql-devel memcache服务器:libevent libevent-devel memcache mysql服务器: 安装mysql 一、web安装 1、#yum install -y mysql mysql-devel #./configure --preifx=/usr/local/apache2 --enable-so --enable-rewrite //安装Apache服务 #make ; make install #LDFLAGS=-L/usr/lib/mysql ./configure --prefix=/usr/local/php --with-apxs2=/usr/local/apache2/bin/apxs --with-config-file-path=/usr/local/php/etc --with-mysql=/var/lib/mysql --with-jpeg-dir --with-png-dir --with-bz2 --with-freetype-dir --with-iconv-dir --enable-thread-safe-client --with-mysql --with-pdo-mysql --with-mysqli=/usr/lib/mysql/mysql_config //编译安装PHP #make ; make install 注:编译PHP的时候遇到的错误: configure: error: Cannot find libmysqlclient_r under /usr. Note that the MySQL client library is not bundled anymore! 解决办法如下: [root@youxia205 php-5.2.14]# cp -r /usr/lib/mysql/* /usr/lib/ 2、#vi /usr/local/apache2/conf/httpd.conf //修改httpd.conf支持php
#AddType application/x-gzip .tgz
<IfModule dir_module> 3、安装客户端(需要PHP环境及PHP的memcache扩展): [root@youxia205 opt]# wget http://www.php.net/get/php-5.2.14.tar.bz2/from/cn.php.net/mirror [root@youxia205 opt]# tar -zxvf memcache-2.2.5.tgz
[root@youxia205 opt]# cd memcache-2.2.5
[root@youxia205 memcache-2.2.5]# /usr/local/php/bin/phpize
Configuring for:
PHP Api Version: 20041225
Zend Module Api No: 20060613
Zend Extension Api No: 220060519
[root@youxia205 memcache-2.2.5]# ./configure --enable-memcache -with-php-config=/usr/local/php/bin/php-config --with-zlib-dir
[root@youxia205 memcache-2.2.5]# make
[root@youxia205 memcache-2.2.5]# make install
Installing shared extensions: /usr/local/php/lib/php/extensions/no-debug-zts-20060613/
[root@youxia205 memcache-2.2.5]# vi /usr/local/php/etc/php.ini
extension=memcache.so
4、#vi /usr/local/apache2/htdocs/memtest.php //建立memtest.php测试页,测试memcache使用 <?php $memcachehost = '192.168.37.20'; //memcache的IP地址 $memcacheport = 11211; $memcachelife = 60; $memcache = new Memcache; $memcache->connect($memcachehost,$memcacheport) or die ("Could not connect"); $query="select * from personal_info limit 10"; $key=md5($query); if(!$memcache->get($key)) { $conn=mysql_connect("192.168.37.30","root","123456"); //这里注意IP是memcache服务IP,root是mysql用户名,123456是密码 mysql_select_db(mydb); $result=mysql_query($query); while ($row=mysql_fetch_assoc($result)) { $arr[]=$row; } $f = 'mysql'; $memcache->add($key,serialize($arr),0,30); $data = $arr ; } else{ $f = 'memcache'; $data_mem=$memcache->get($key); $data = unserialize($data_mem); } echo $f; echo "<br>"; //print_r($data); foreach($data as $a) { echo "number is <b><font color=#FF0000>$a[pi_id]</font></b>"; echo "<br>"; echo "name is <b><font color=#FF0000>$a[pi_name]</font></b>"; echo "<br>"; echo "tel is <b><font color=#FF0000>$a[pi_tel]</font></b>"; echo "<br>"; echo "qq is <b><font color=#FF0000>$a[pi_qq]</font></b>"; echo "<br>"; echo "email is <b><font color=#FF0000>$a[pi_email]</font></b>"; echo "<br>"; } ?> //OK web服务器就算安装完毕 二、 memcache安装 安装libevent库,它将Linux的epoll、freebsd操作系统的kqueue等事件处理功能封装成统一的接口,memcached使用这个库,可以发挥其高性能。
[root@youxia205 opt]# yum install libevent libevent-devel
1、下载memcache源码包:
[root@youxia205 opt]# wget http://memcached.googlecode.com/files/memcached-1.4.5.tar.gz
2、解压、编译、安装:
[root@youxia205 opt]# tar -zxvf memcached-1.4.5.tar.gz
[root@youxia205 opt]# cd memcached-1.4.5
[root@youxia205 memcached-1.4.5]# ./configure
[root@youxia205 memcached-1.4.5]# make && make install
3、安装完成之后可以看下memcache的参数:
[root@youxia205 local]# memcached -help
memcached 1.4.5
-p <num> TCP port number to listen on (default: 11211)
-U <num> UDP port number to listen on (default: 11211, 0 is off)
-s <file> UNIX socket path to listen on (disables network support)
-a <mask> access mask for UNIX socket, in octal (default: 0700)
-l <ip_addr> interface to listen on (default: INADDR_ANY, all addresses)
-d run as a daemon
-r maximize core file limit
-u <username> assume identity of <username> (only when run as root)
-m <num> max memory to use for items in megabytes (default: 64 MB)
-M return error on memory exhausted (rather than removing items)
-c <num> max simultaneous connections (default: 1024)
-k lock down all paged memory. Note that there is a
limit on how much memory you may lock. Trying to
allocate more than that would fail, so be sure you
set the limit correctly for the user you started
the daemon with (not for -u <username> user;
under sh this is done with 'ulimit -S -l NUM_KB').
-v verbose (print errors/warnings while in event loop)
-vv very verbose (also print client commands/reponses)
-vvv extremely verbose (also print internal state transitions)
-h print this help and exit
-i print memcached and libevent license
-P <file> save PID in <file>, only used with -d option
-f <factor> chunk size growth factor (default: 1.25)
-n <bytes> minimum space allocated for key+value+flags (default: 48)
-L Try to use large memory pages (if available). Increasing
the memory page size could reduce the number of TLB misses
and improve the performance. In order to get large pages
from the OS, memcached will allocate the total item-cache
in one large chunk.
-D <char> Use <char> as the delimiter between key prefixes and IDs.
This is used for per-prefix stats reporting. The default is
":" (colon). If this option is specified, stats collection
is turned on automatically; if not, then it may be turned on
by sending the "stats detail on" command to the server.
-t <num> number of threads to use (default: 4)
-R Maximum number of requests per event, limits the number of
requests process for a given connection to prevent
starvation (default: 20)
-C Disable use of CAS
-b Set the backlog queue limit (default: 1024)
-B Binding protocol - one of ascii, binary, or auto (default)
-I Override the size of each slab page. Adjusts max item size
(default: 1mb, min: 1k, max: 128m)
4、启动memcached服务:
[root@youxia205 local]# memcached -d -m 64 -u root -l 192.168.37.20 -p 11211 -c 64 -P /tmp/memcached.pid
#-u是指运行memcache的用户,-p是设置memcache监听的端口,-m是分配给memcache使用的内存数据量
-d是指作为daemon在后台启动。
5、查看是否启动成功:
[root@youxia205 local]# netstat -tunlp | grep memcache
tcp 0 0 0.0.0.0:11211 0.0.0.0:* LISTEN 14494/memcached
udp 0 0 0.0.0.0:11211 0.0.0.0:* 14494/memcached
三、mysql数据安装这里不多介绍,可以rpm或者编译安装,这里介绍web需要能登录到mysql这样才能够访问数据内容,我当时就因为这个问题折腾半天访问web看不到测试内容,最后经同事提醒我才弄好~哈哈
#允许root用户在任何地方进行远程登录,并具有所有库任何操作权限,具体操作如下:
1、在本机先使用root用户登录mysql: mysql -u root -p"youpassword" 进行授权操作: mysql>GRANT ALL PRIVILEGES ON *.* TO 'root'@'%' IDENTIFIED BY '123456' WITH GRANT OPTION; 重载授权表: FLUSH PRIVILEGES; 退出,然后测试一下在web上 mysql -u root -h IP -p 是否能登录上mysql
2、建立一个数据库表用于测试使用
设置数据库的相关信息:
#建立一个名称为mydb的库:
mysql> create database mydb;
Query OK, 1 row affected (0.00 sec)
#使用库,并创建personal_info表:
mysql> use mydb;
Database changed
mysql> CREATE TABLE `personal_info` (
-> `pi_id` bigint(20) NOT NULL auto_increment,
-> `pi_name` varchar(50) NOT NULL,
-> `pi_tel` varchar(15) default NULL,
-> `pi_qq` varchar(15) default NULL,
-> `pi_email` varchar(50) default NULL,
-> PRIMARY KEY (`pi_id`)
-> ) ENGINE=MyISAM DEFAULT CHARSET=utf8 AUTO_INCREMENT=4 ;
Query OK, 0 rows affected (0.00 sec)
#插入一条数据
mysql> INSERT INTO `mydb`.`personal_info` (
-> `pi_id` ,
-> `pi_name` ,
-> `pi_tel` ,
-> `pi_qq` ,
-> `pi_email`
-> )
-> VALUES (
-> '1', 'eric', '13611031222', '55555555', 'eric@nginxs.com'
-> );
Query OK, 1 row affected (0.00 sec)
#查看表中的数据:
mysql> select * from personal_info ;
+-------+---------+-------------+----------+-----------------+
| pi_id | pi_name | pi_tel | pi_qq | pi_email |
+-------+---------+-------------+----------+-----------------+
| 1 | eric | 13611031222 | 55555555 | eric@nginxs.com |
+-------+---------+-------------+----------+-----------------+
1 row in set (0.00 sec)
四、执行测试: http://IP/memtest.php
#执行的时候报错 Fatal error: Class 'Memcache' not found in /usr/local/apache2/htdocs/memtest.php on line 5
1、解决方法如下: [root@youxia205 htdocs]# find / -name memcache.so /usr/local/php/lib/php/extensions/no-debug-zts-20060613/memcache.so /opt/memcache-2.2.5/.libs/memcache.so /opt/memcache-2.2.5/modules/memcache.so
2、vi /usr/local/php/etc/php.ini extension_dir = "./" extension_dir = "/usr/local/php/lib/php/extensions/no-debug-zts-20060613" 3、正确就会显示如下内容:
memcache 4、查看数据库中正在执行的语句,没有发现对mydb库执行查询的线程,说明PHP直接从memcache中提取的数据:
mysql> show processlist;
+-----+----------+-----------------+-------+---------+------+-------+------------------+
| Id | User | Host | db | Command | Time | State | Info |
+-----+----------+-----------------+-------+---------+------+-------+------------------+
| 697 | prog | localhost:44175 | word | Sleep | 23 | | NULL |
| 698 | prog | localhost:44176 | word | Sleep | 23 | | NULL |
| 744 | user | localhost | mydb | Sleep | 3443 | | NULL |
| 747 | user | localhost | NULL | Query | 0 | NULL | show processlist |
+-----+----------+-----------------+-------+---------+------+-------+------------------+
4 rows in set (0.00 sec)
(责任编辑:IT) |