|
在这个 由两部分组成的教程系列 中,学习如何构建一个应用程序,以通过基于 HTML5、CSS 和 JavaScript/jQuery 的用户界面管理 SoftLayer 服务器。第 1 部分介绍了如何在移动设备上显示虚拟服务器的信息并管理它们。第 2 将部分介绍如何在移动设备上订购和配置服务器。 免费的 30 天 SoftLayer 试用版 产品包SoftLayer 将它的产品组织为 产品包 。可以通过调用 SoftLayer API 来找到可用的产品包(为便于阅读,这个只有一行的命令被拆分为了多行): curl 'https://<user>:<api-token@api.softlayer.com/rest/v3/ SoftLayer_Product_Package/getAllObjects?objectMask=id;name'|json_reformat我们想要的是产品 id 46, Cloud Server 。通过使用 对象掩码 ,可以检索云服务器产品包的详细描述: curl 'https://<user>:<api-token@api.softlayer.com/rest/v3/ SoftLayer_Product_Package/46?objectMask=capacity;prices.id;categories'|json_reformat. 图 1 显示了该产品包的结构: 图 1. 产品包结构 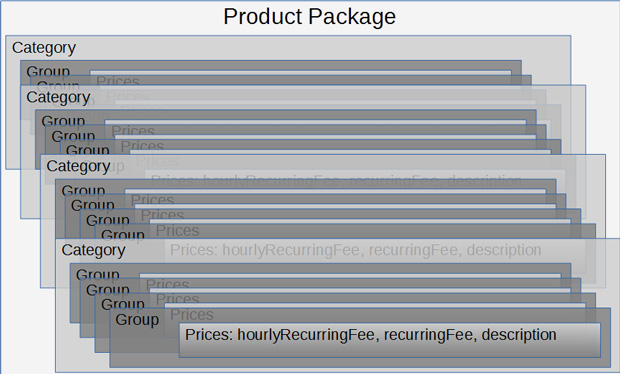
最顶层是 产品包 ,包含一些属性,比如描述。各个类别可视为云服务器选项。典型的示例包括 CPU、RAM 和磁盘,以及操作系统和网络地址(接口)。其他项可以是一个虚拟来宾的一部分,比如保证或监视选项。 每个列表有一个描述可用选项的值列表。SoftLayer REST API 将它们称为 价格 。例如,类别 CPU 具有值 1x2GHz core、2x2GHz core、4x2GHz core 等。类别 RAM 可能具有值 1GB、2GB、4GB 等。每个变体都附加了一个每小时和每月费用。 每个价格有一个惟一的价格 id,它引用一个特定类别的一个特定值。例如,一个 25GB SAN 磁盘由价格 id 2202 标识; CentOS 6.x - LAMP Install (32-bit) 由 id 13940 标识。 服务器由一组类别(或 组件 )定义,每个集合链接到一个特定的可用选项。一些类别会对值选项进行分组。例如,操作系统分组为 Centos、CloudLinux、Debian 等。 回页首 移动应用程序中的页面顺序一个订购或升级流程中的页面顺序类似于: 
产品订购流程要订购一个 云计算实例 ,在 SoftLayer 调用虚拟机时,您需要在一个 SoftLayer_Container_Product_Order_Virtual_Guest 数据类型的各部分中填入需要的属性。这些属性包括:
产品更新流程更新一个虚拟服务器需要更加留心,因为 SoftLayer API 会区分配置更改和元数据更改。 配置更改 是对虚拟服务器的组件的更改。例如,更改主机名属于 元数据更改 。 要更改一个云计算实例的配置,需要在一个 SoftLayer_Container_Product_Order_Virtual_Guest_Upgrade 数据类型的各部分中填入需要的属性:
现在可以开始编写服务器订购流程的代码了。 回页首 构建您自己的服务器从用例页面,链接到一个针对订购流程的新 jQuery Mobile 页面,这需要检索产品包定义。因为此操作需要一定的时间,所以第一个订购页面包含一些静态文本,显示数据检索正在进行中。 服务器配置有两个页面:第一个页面列出虚拟服务器的类别;第二个页面选择一个类别值。您需要在两个页面之间切换来配置服务器。
这两个页面构成了一个叫做 回页首 类别选择页面成功检索产品包后,会构建类别列表。但是,显示从 API 传入的类别之前,需要做一些准备工作。
因为类别数量相对较多,而移动设备上的空间有限,所以需要找到一种不错的方式来排序和划分类别。产品包包含一个
首先,通过 清单 1. JavaScript:包排序算法
package.categories.sort(function (a, b) {
   var s = (a.packageConfigurations[0].orderStepId - b.packageConfigurations[0].orderStepId);
   if (s != 0) return s;
   return (a.packageConfigurations[0].sort - b.packageConfigurations[0].sort);
});
作为第二种措施,可以将类别划分为 清单 2. HTML:类别页面 <div id="ciap-change-server-categories-main" role="main" class="ui-content"> <div data-role="collapsible" data-mini="true"> <h3>Mandatory</h3> <ul id="ciap-change-server-categories-mandatory-list" data-role="listview" ></ul> </div> <hr/> <div data-role="collapsible" data-mini="true"> <h3>Optional</h3> <p><ul id="ciap-change-server-categories-optional-list" data-role="listview" ></ul></p> </div> </div>
这些类别基于 清单 3. JavaScript:填入类别的 <select>
var mlist = $('#ciap-change-server-categories-mandatory-list');
var olist = $('#ciap-change-server-categories-optional-list');
for (i in package.categories) {
	var name = package.categories[i].name;
	if (package.categories[i].packageConfigurations[0].isRequired) {
		var h="<li><a href='#' onclick='ciap.onConfigItem(" + i + ")'>" + name + "</a></li>";
		mlist.append(h);
	} else {
		olist.append(h);
	}
}
单击或按下一个列表元素会调用 图 2. 类别选择:Mandatory 和 Optional 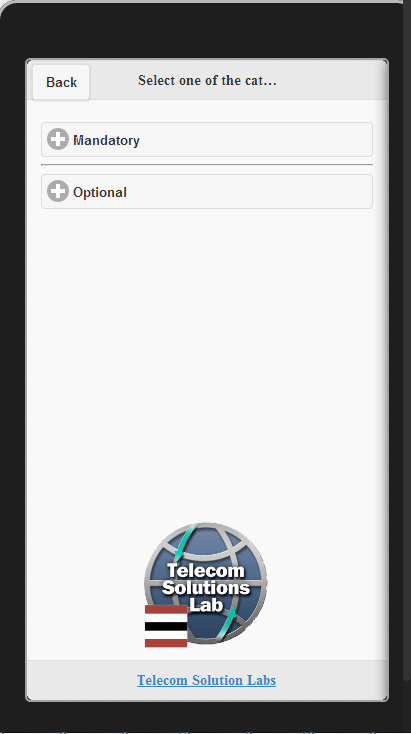
图 3. 类别选择:Mandatory 类别 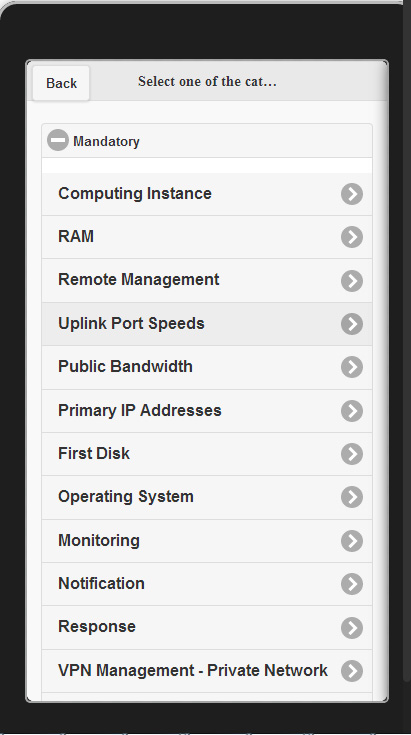
回页首 项值选择页面
此页面构建于所选类别中的结构价格之上。可用的选项以列表形式提供,列表值是字符串化的 JSON 价格对象。此结构使得使用 <select>.val() 方法获取所有需要的信息并使用这些信息来构建 该应用程序使用来自包产品的分组来简化导航。借助 jQuery Mobile,您可以在 HTML <option> 标记列表中插入分隔符。
如果某个类别不需要值,则需要在选项列表开头添加一个具有价格 id -1 的额外的 清单 4. HTML:类别值的 <select>
<div id="ciap-change-server-items-page" data-role='page'>
   <div id="ciap-change-server-items-main" role="main" class="ui-content">
      <labelid='ciap-change-server-items-label'>Select your option
      <select id="ciap-change-server-items-select"></select>
      </label>
   </div>
</div>
清单 5. JavaScript:填入类别值的 <select>
var cat = currentPackage.categories[id];
	var categoryCode = cat.categoryCode;
	var html = cat.packageConfigurations[0].isRequired ?
					"" : "<option value='{\"id\": -1}'>none</option>";
	for (var g in cat.groups) {
		var grp = cat.groups[g];
		if (grp.title || false) {
			html += "<optgroup label='" + grp.title + "'>";
		}
		for (p in grp.prices) {
			var price = grp.prices[p];
			var hr = price.hourlyRecurringFee || 0;
			var mth = price.recurringFee || -0;
			var txt = price.item.description + " $" + hr + "/hr $" + mth + "/mth";
			var id = price.id;
			price.categoryCode = categoryCode;
			var optval = JSON.stringify(price); //.replace(/\"/g, "'");;
			html += "<option value='" + optval + "'>" + txt + "</option>";
		}
		if (grp.title || false) {
		html += "</optgroup>";
	}
}
select.html(html).selectmenu('refresh');
图 5 显示了填入了类别值(价格项)的列表: 图 4. 值选择:磁盘存储 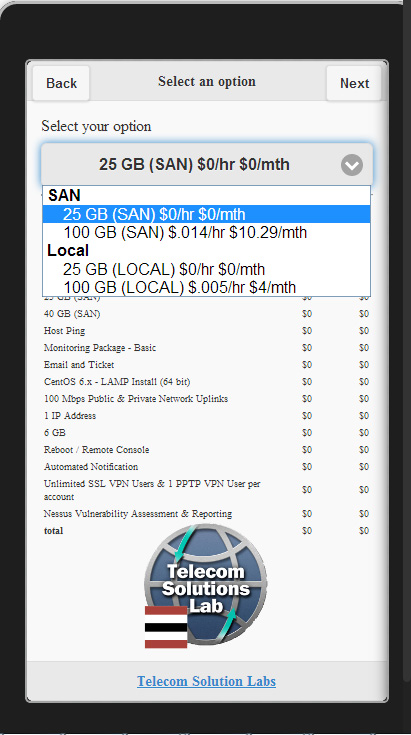
而且刷新用户界面后,应用程序用户就可以选择一个选项。参见图 6: 图 5. 值选择:操作系统 
应用程序用户选择一个值后,会调用更改监听器 清单 6. JavaScript:处理类别值更改
var select = $('#ciap-change-server-items-select');
var val = select.val(); // json string with category and price id
var selection = JSON.parse(val);
if (selection.id > 0) {
   currentConfiguration[selection.categoryCode] = selection;
} else {
   delete currentConfiguration[selection.categoryCode];
}
thiz.updateSummary();
这是价格 id -1 的用法:如果用户选择 none ,则需要删除
在退出 回页首 跟踪订单应用程序用户在配置阶段可跟踪他们的订单,因为显示了订购的商品的摘要和价格。摘要是一个简单表格。第一行包含商品名称,第二和三行包含每小时和每月费用,如清单 7 所示: 清单 7. HTML:配置摘要表定义 <label> Summary of your order <table style="font-size:x-small; widtH:100%;" > <thead> <th>Description</th> <th>Hourly Rate</th> <th>Monthly Rate</th> </thead> <tbody id='ciap-config-yourconfig'> <tbody> </table> </label>
该代码迭代 清单 8. JavaScript:构建配置摘要代码
var summary = $('#ciap-config-yourconfig');
var i;
var toth = 0,totm = 0;
var html = "";
var template = "<tr>"+
			"<td style='text-align:left;'>{conf.item.description}</td>"+
			"<td style='text-align:right;'>${conf.hourlyRecurringFee}</td>"+
			"<td style='text-align:right;'>${conf.recurringFee}</td>"+
		"</tr>\n";
	for (i in currentConfiguration) {
		var conf = currentConfiguration[i];
		if (conf.recurringFee != 0 || conf.hourlyRecurringFee != 0 || true) {
		html += template.replace(/{[^}][^}]*}/g, function (s) {
			var e = s.replace(/[{}]/g, "");
			eval("r=" + e + "||''");
			return r;
		});
	}
	toth += 1 * (conf.hourlyRecurringFee || 0);
	totm += 1 * (conf.recurringFee || 0);
}
html += "<tr>"+
	"<td><b>total</b></td>"+
	"<td style='text-align:right;'>$" + toth + "</td>"+
	"<td style='text-align:right;'>$" + totm + "<//td>"+
	"</tr>";
summary.html(html);
回页首 位置和主机名新服务器的位置、主机和域名未包含在产品包中,所以需要添加一个最终配置页面来定义这些项。 这些项的处理很简单:使用一个 HTML <select> 标签,其中包含数据中心作为选项。在应用程序启动期间,作为应用程序初始化的一部分,会加载数据中心列表。参见清单 9: 清单 9. HTML:数据中心位置和主机名
<div role="main" class="ui-content" data-theme='a'>
	<div id='ciap-server-location-name'>
		<label> Location <select name="Location" id='ciap-order-location'/></label>
		<label>Hostname
			<input type="text" name="Hostname" id='ciap-order-hostname'/>
		</label>
		<label>Domainname
			<input type="text" name="Domainname" id='ciap-order-domainname'/>
		</label>
	</div>
</div>

for (i in thiz.datacenters) {
	var c = thiz.datacenters[i];
	html += "<option value='" + c.id + "'>" + c.longName + "</option>";
}
此代码应得到一个类似图 7 的显示界面: 图 6. 指定位置和主机名 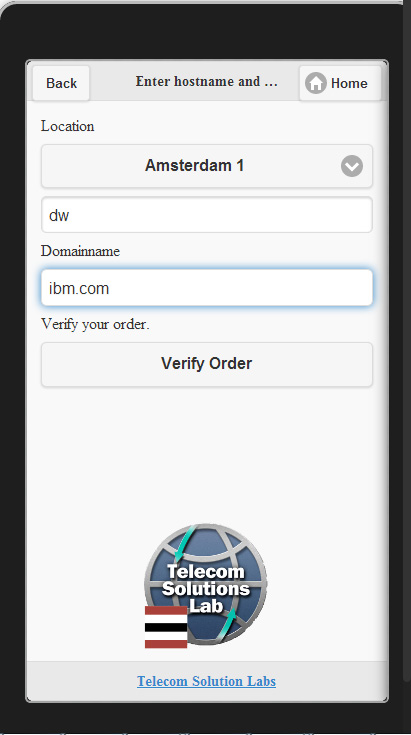
回页首 订单验证和下单
SoftLayer API 允许在最终下单之前对订单进行验证。将 Verify 按钮放在具有位置/主机/域名选项的页面上。按下 Verify 会调用
例如,请参见清单 10: 清单 10. JavaScript:构建订单对象
var prices = [];
for (var i in currentConfiguration) {
	if (currentConfiguration[i].id) prices.push({
		"id" : currentConfiguration[i].id
	});
}
var vguest = new Array; ;
if (currentServer) {
	vguest.push({
		'id' : currentServer.id
	});
} else {
	vguest.push({
		'hostname' : $('#ciap-order-hostname').val(),
		'domain' : $('#ciap-order-domainname').val(),
		'fullyQualifiedDomainName' : $('#ciap-order-hostname').val() + "." +
					$('#ciap-order-domainname').val()
	});

}
var order = {
	"properties" : [{
		"name" : "MAINTENANCE_WINDOW",
		"value" : "20000101"
	}],
	"packageId" : currentPackage.id,
	"complexType" : "SoftLayer_Container_Product_Order_Virtual_Guest",
	"virtualGuests" : vguest,
	"prices" : prices
};
var loc=$('#ciap-order-location').val();
if (loc) order.location=loc;
在 SoftLayer API 中调用 图 7. 下单前的最后确认 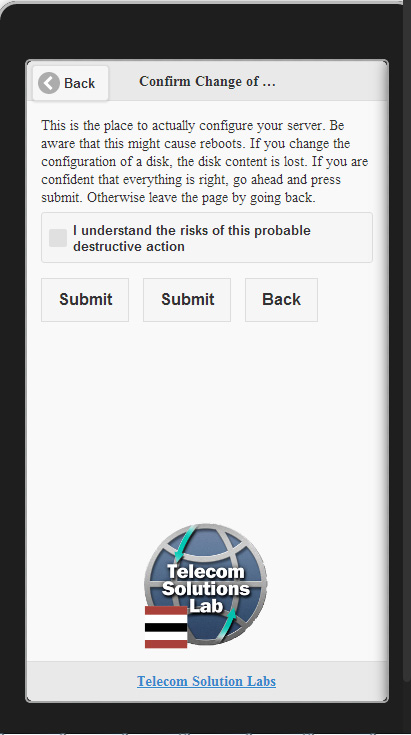
服务器配置从很大程度上讲,服务器配置包含与服务器订购相同的步骤。只需更改一些代码行来使之适合该模式。
首先,需要添加一个按钮,将服务器配置为服务器的详细视图。激活该按钮会触发 清单 11. HTML:添加服务器配置按钮 点击查看代码清单 关闭 [x] 清单 11. HTML:添加服务器配置按钮<fieldset data-role="controlgroup" data-type="horizontal" style='text-align:center;'> <input type="submit" id="ciap-server-function-pause" data-icon="minus" title="Pause" onclick="ciap.onServermanagement(this, 'pause')" function="pause <input type="submit" id="ciap-server-function-resume" data-icon="plus" title="Resume" onclick="ciap.onServermanagement(this, 'resume')" function="resume"> <input type="submit" id="ciap-server-function-config" data-icon="bullets" title="Configure" onclick="ciap.prepareConfigure()" function="configure"> <input type="submit" id="ciap-server-function-delete" data-icon="delete" title="Destroy" onclick="ciap.onServermanagement(this, 'deleteObject')" function="finally destroy"> </fieldset >
要能够显示摘要,需要为服务器实际配置实际的价格。服务 SoftLayer_Virtual_Guest 的 getOrderTemplate 方法返回一个包含实际配置的产品模板。该方法获取在这里找到的值并构造一个 清单 12. JavaScript:为现有服务器构建 currentConfiguration
currentConfiguration = {};
for (var i in ordertemplate.prices) {
	var p=ordertemplate.prices[i];
	var catCode = p.item.itemCategory.categoryCode;
	var hr = p.hourlyRecurringFee;
	var mth=p.recurringFee;
	currentConfiguration[catCode]={ "recurringFee": mth, "hourlyRecurringFee": hr, "item": p.item };
}
在构建最终订单之前,配置过程与订购过程相同。 此应用程序步允许您更改服务器的主机名或其他元数据。因此,如果配置现有服务器,则会隐藏针对位置和主机名的输入和选择字段,如图 9 所示: 图 8. 服务器升级没有位置或主机名选项 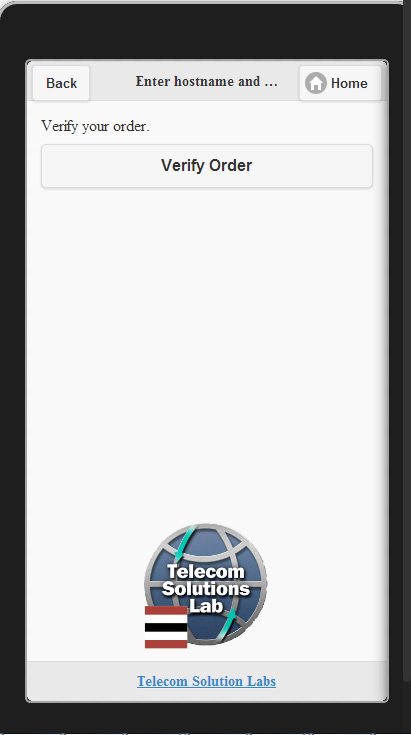
升级对象的类型为 SoftLayer_Container_Product_Order_Virtual_Guest_Upgrade ,这可以在订单结构的 "complexType" : "SoftLayer_Container_Product_Order_Virtual_Guest" + (currentServer ? "_Upgrade" : ""), 一个新订单需要订单对象中包含主机名/域名。对于现有服务器,必须提供服务器 id。参见清单 13: 清单 13. JavaScript:针对服务器升级的订单对象更改
if (currentServer) {
	vguest.push({
	'id' : currentServer.id
	});
} else {
	vguest.push({
		'hostname' : $('#ciap-order-hostname').val(),
		'domain' : $('#ciap-order-domainname').val(),
		'fullyQualifiedDomainName' : $('#ciap-order-hostname').val() + "." +
					$('#ciap-order-domainname').val()
	});
}
回页首 结束语您现在已经学会了如何使用来自 SoftLayer API 的数据构建一个应用程序,以便在移动设备上显示和管理您的 SoftLayer 云服务器(第 1 部分)。在本教程中,您学会了订购一个新服务器并配置它。您构建的应用程序基于 HTML5、CSS 和 JavaScript/jQuery,现在,您可以根据您的需求来扩展它。 (责任编辑:IT) |