|
搭建NFS服务
文章目录
搭建NFS服务
一、环境以及NFS在企业服务的介绍
二、环境准备
服务方案一
服务方案二
三、写脚本一键搭建NFS服务
四、关于排错思路
一、环境以及NFS在企业服务的介绍
1.企业没有NFS共享存储访问的缺点图

2.企业没有NFS共享存储访问的优点图

3.NFS工作流程图

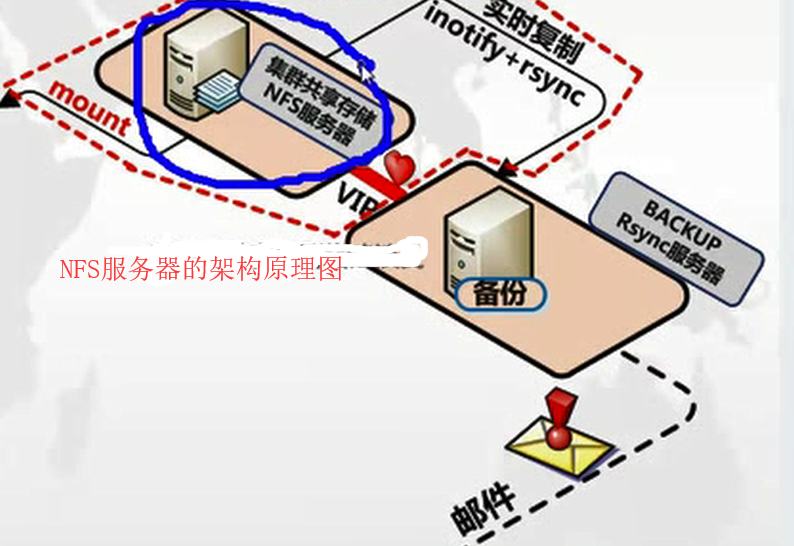
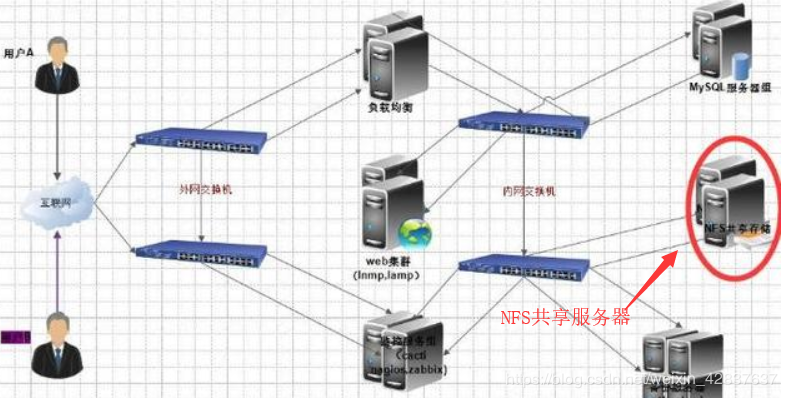
4.NFS在企业集群的架构图
主机 IP 环境
nfs服务端 192.168.100.100 centos7
nfs客户端 192.168.100.129 centos7
5.关于NFS服务简介
NFS简单指网络文件系统,它可以使本地工作站使用更少的磁盘空间,用户不必在每个网络上机器里头都有一个home目录,NFS只是一种文件系统,本身没有传输功能,是基于RPC协议实现的,才能达到两个Linux系统之间的文件目录共享;RPC( Remote Procedure Call ),远程过程调用RPC是能使客户端执行其他系统中程序的一种机制。NFS本身是没有提供信息传输的协议和功能的,但NFS却能让我们通过网络进行资料的分享,这是因为NFS使用了一些其它的传输协议。而这些传输协议用到这个RPC功能的。可以说NFS本身就是使用RPC的一个程序。或者说NFS也是一个RPC SERVER。所以只要用到NFS的地方都要启动RPC服务,不论是NFS SERVER或者NFS CLIENT。这样SERVER和CLIENT才能通过RPC来实现PROGRAM PORT的对应。可以这么理解RPC和NFS的关系:NFS是一个文件系统,而RPC是负责负责信息的传输。
6.企业应用场景
NFS在当前互联网系统架构中也是比较常用的数据存储服务之一(中小型网站公司应用频率较高),而相对于大公司或大门户网站除了使用NFS外,还可能会用到一些分布式文件系统FastDFS Moosefs(mfs)等。 NFS适用于中小型企业集群架构后端常用NFS,大型企业共享传输数据MFS、GFS、FDFS,一般在局域网让不同主机系统之间共享文件或者目录,可以通过挂载方式将NFS服务器共享数据挂在在本地目录,另外每次NFS服务端口随机分配。在NFS共享存储中介绍过,用户上传的视频、音乐、图片、附件等一些静态资源文件都是放在NFS共享存储中的,如果没有不进行备份,当NFS共享存储出现宕机、硬盘出现故障、机房出现火灾等各种因素,那么用户将无法访问严重则出现数据丢失。所以我们需要定时备份数据。
搭建nfs服务
二、环境准备
关闭防火墙关闭selinux
[root@localhost ~]# systemctl stop firewalld.service
[root@localhost ~]# systemctl disable firewalld.service
[root@localhost ~]# setenforce 0
服务方案一
目标:开放服务端/nfs/shared目录,供所有用户查阅资料
1.服务端配置
安装nfs-utils,开启,并加入到开机自启
[root@localhost ~]#yum -y install nfs-utils
[root@localhost ~]# systemctl start nfs.service
[root@localhost ~]# systemctl enable nfs.service
2.新建/nfs/shared目录
[root@localhost ~]# mkdir /nfs/shared -p
[root@localhost ~]# chmod 777 /nfs/shared/
[root@localhost ~]# touch /nfs/shared/abc
[root@localhost ~]# echo "ni hao" >/nfs/shared/abc
3.编辑/etc/exports
[root@localhost ~]# vim /etc/exports
/nfs/shared *(rw,sync)
4.重新读取exports文件重启nfs服务
[root@localhost ~]# exportfs -ar
[root@nfs-server ~]# systemctl restart nfs.service
客户端
搭建NFS服务中出现的问题
问题一
请注意在访问共享目录时候报错可能防火墙没关可能出现报错,如果正常参照下一步
[root@localhost ~]# showmount -e 192.168.69.129
clnt_create: RPC: Port mapper failure - Unable to receive: errno 113 (No route to host)
解决办法关闭服务端的防火墙
systemctl stop firewalld
问题二
客户端挂载不上查看服务端日志上面说没有出口
后来发现是目录写错,如果目录没有被共享就会报错以下
[root@localhost ~]# mount -t nfs 192.168.100.100:/nfs/share /nfs/share
mount.nfs: access denied by server while mounting 192.168.69.134:/nfs/share
[root@localhost ~]# tail -2 /var/log/messages
Jan 8 18:22:08 localhost systemd: Stopped firewalld - dynamic firewall daemon.
Jan 8 18:22:36 localhost rpc.mountd[3187]: refused mount request from 192.168.69.133 for /nfs/share (/): not exported
5.查看nfs服务器上的共享目录
[root@localhost ~]# yum -y install nfs-utils
[root@localhost ~]#showmount -e 192.168.100.129
Export list for 192.168.100.129
/nfs/shared 192.168.100.129/24
6.将共享目录挂载到mnt目录下
[root@nfs-client ~]# mount -t nfs 192.168.100.129:/nfs/shared /mnt/
7.查看验证挂载
[root@nfs-client ~]# df -h
Filesystem 1K-blocks Used Available Use% Mounted on
/dev/sda2 8897536 1605740 7291796 19% /
devtmpfs 490012 0 490012 0% /dev
tmpfs 499860 0 499860 0% /dev/shm
tmpfs 499860 6856 493004 2% /run
tmpfs 499860 0 499860 0% /sys/fs/cgroup
/dev/sda1 1038336 121688 916648 12% /boot
tmpfs 99972 0 99972 0% /run/user/0
192.168.100.129:/nfs/shared 19383296 12597504 6785792 65% /mnt
8.验证权限
[root@localhost ~]#]# mkdir aaa
mkdir: cannot create directory ‘aaa’: Read-only file system //没有写入权限
[root@localhost ~]# cat aaa //只有读取权限
服务方案二
目标:开放/nfs/upload目录为192.168.100.0网段的数据上传目录
客户端
1.新建/nfs/upload
[root@localhost ~]#mkdir /nfs/upload
2.新建用户和用户组uid和gid都是300
[root@localhost ~]# groupadd nfs-upload -g 300
[root@localhost ~]#useradd nfs-upload -u 300 -g 300 \\将upload目录的属主和属组加入到nfs-upload
[root@localhost ~]# chown -R nfs-upload.nfs-upload /nfs/upload/ \\修改/etc/exports配置文件
[root@localhost ~]#cat /etc/exports
/nfs/shared *(ro,sync)
/nfs/upload 192.168.100.0/24(rw,sync,anonuid=300,anongid=300)
3.重新读取配置文件
[root@localhost ~]#exportfs -ar
4.重启nfs服务
[root@nfs-server ~]# systemctl restart nfs.service
客户端
5.查看nfs服务器上的共享目录
[root@localhost ~]# showmount -e 192.168.100.100
Export list for 192.168.100.100:
/nfs/shared *
/nfs/upload 192.168.100.0/24
6.将共享目录挂载到nfs目录上
[root@localhost ~]# mkdir /nfs
[root@localhost ~]#mount -t nfs 192.168.100.33:/nfs/upload /nfs
7.验证检查nfs属组和属主
[root@localhost ~]# ll /nfs/
total 0
drwxr-xr-x 2 300 300 16 Sep 5 12:33 haha
8.在客户端的nfs目录下新建lala目录
[root@localhost ~]# mkdir /nfs/lala //有写入权限
[root@localhost ~]# echo "123.com" >> haha/hh //在服务端的haha目录写入文件
[root@localhost ~]#cat /nfs/haha/hh //有读取权限
9.自动挂载卸载nfs目录挂载
[root@localhost ~]# umount /nfs/
10.在/etc/fstab写入配置文件,然后重新加载配置文件
[root@localhost ~]# mount -a
[root@localhost ~]# df
Filesystem 1K-blocks Used Available Use% Mounted on
/dev/sda2 8897536 1605740 7291796 19% /
devtmpfs 490012 0 490012 0% /dev
tmpfs 499860 0 499860 0% /dev/shm
tmpfs 499860 6828 493032 2% /run
tmpfs 499860 0 499860 0% /sys/fs/cgroup
/dev/sda1 1038336 121688 916648 12% /boot
tmpfs 99972 0 99972 0% /run/user/0
192.168.100.100:/nfs/upload 1855904 6615552 119452 36% /nfs
三、写脚本一键搭建NFS服务
主机 ip
客户端 192.168.69.134
服务端 192.168.69.133
第一步、现在服务端建立openssh服务
[root@localhost ~]# ssh-keygen -t rsa
[root@localhost ~]#ssh-copy-id -i ~/.ssh/id_rsa.pub root@192.168.69.133
后面回车和输入密码
第二步、在服务端创建脚本
[root@localhost ~]#vi NFS.sh
#!/bin/bash
systemctl stop firewalld.service
echo $?
echo "firewall stop OK"
###############################
systemctl disable firewalld.service
setenforce 0
yum -y install nfs-utils
###############################
echo $?
echo "install nfs-utils OK"
rm -rf /nfs/share
rm -rf /nfs/upload
mkdir -p /nfs/share
mkdir -p /nfs/upload
###############################
echo $?
echo "chuang jian /nfs/share"
echo "chuang jian /nfs/upload"
chmod 777 /nfs/share
chmod 777 /nfs/upload
cat > /etc/exports <<EOF
/nfs/share *(rw,sync)
/nfs/upload 192.168.69.0/24(rw,sync,anonuid=300,anongid=300)
EOF
###############################
echo $?
echo "xiu gai OK"
exportfs -ar
###############################
echo $?
echo "jia zai"
ssh root@192.168.69.133 'showmount -e 192.168.69.134'
systemctl restart nfs.service
ssh root@192.168.69.133 'systemctl stop firewalld'
###############################
echo $?
echo "stop firewalld"
ssh root@192.168.69.133 'setenforce 0'
###############################
echo $?
echo "stop SElinux"
ssh root@192.168.69.133 'yum -y install nfs'
###############################
echo $?
echo "install nfs OK"
ssh root@192.168.69.133 'mkdir -p /nfs/share'
ssh root@192.168.69.133 'mkdir -p /nfs/upload'
ssh root@192.168.69.133 'systemctl restart nfs.service'
###############################
echo $?
echo "qi dong nfs"
ssh root@192.168.69.133 'mount -t nfs 192.168.69.134:/nfs/share /nfs/share/'
ssh root@192.168.69.133 'mount -t nfs 192.168.69.134:/nfs/upload /nfs/upload/'
###############################
echo $?
echo "mount success"
四、关于排错思路
第一步、先showmount检查是否发现共享目录
第二步、检查配置文件是否没写对,还有服务是否重启,
第三步、no route to host表示防火墙没关
第四步、ss -antlp检查端口是否开启
(责任编辑:IT) |