|
3、安装SNMP采集工具
SNMP全名是简单网络管理协议,几乎所有的网络设备(交换机、路由器等)和操作系统默认都安装了snmp服务。 Cacti 系统所在的服务器并不一定要安装SNMP服务,但是Cacti系统采集数据要用到Net-SNMP包里面的几个工具,所以最好也在Cacti服务器上安装 SNMP服务。我们可以直接在系统中运行snmpwalk和snmpget看是否有该命令,如果有则无需安装了。 如果操作系统没有安装SNMP,可以到Net-SNMP官方网站上下载源码或二进制包进行安装。 在centOS下可以直接用yum安装:
# yum install -y net-snmp*
4、安装Cacti
Cacti是一套PHP程序,当前最新版本是0.8.7g。安装时需要对Cacti包文件和数据库进行部分设置。
下载Cacti:
# wget -c http://www.cacti.net/downloads/cacti-0.8.7g.tar.gz
(0.8.7h http://www.cacti.net/downloads/cacti-0.8.7h.tar.gz)
解压Cacti到网站根目录:
# tar -zxvf cacti-0.8.7g.tar.gz -C /var/www/html # cd /var/www/html # mv cacti-0.8.7g/* .
添加用户cacti:
# useradd cacti –d /var/www/html
配置数据库:
# mysql -uroot -p
Enter password:
Welcome to the MySQL monitor. Commands end with ; or g.
Your MySQL connection id is 3
Server version: 5.0.77 Source distribution
Type ‘help;’ or ‘h’ for help. Type ‘c’ to clear the buffer.
mysql> create database cactidb;
Query OK, 1 row affected (0.00 sec)
mysql> grant all on cactidb.* to root@localhost identified by ‘passwd’;
Query OK, 0 rows affected (0.00 sec)
mysql> grant all on cactidb.* to cacti@localhost identified by ‘passwd’;
Query OK, 0 rows affected (0.00 sec)
mysql> q
导入数据库、设置权限:
# mysql -uroot -p cactidb < cacti.sql
Enter password:
# chown -R cacti rra/ log/
编辑配置文件/var/www/html/include/config.php
# vim include/config.php /* make sure these values refect your actual database/host/user/password */
$database_type = “mysql”;
$database_default = “cactidb”;
$database_hostname = “localhost”;
$database_username = “cacti”;
$database_password = “passwd”;
$database_port = “3306″;
# crontab -u cacti -e */1 * * * * /usr/bin/php /var/www/html/poller.php > /dev/null 2>&1
注意:不要使用root用户运行上面的“poller.php”命令,否则请再次运行chown –R cacti rra/ log/
5、安装Spine
Spine是一个基于C语言的,非常快速的轮询引擎。它是默认的cmd.php轮询的可选替代。当cacti监控的主机达到几十个的时候,cmd.php采集数据延时情况就越发地显现出来,所以安装spine来代替cmd.php。
下载Spine:
# wget -c http://www.cacti.net/downloads/spine/cacti-spine-0.8.7g.tar.gz
解压进入Spine:
# tar -zxvf cacti-spine-0.8.7g.tar.gz # cd cacti-spine-0.8.7g
编译:
# aclocal
# libtoolize –force
# autoconf
# autoheader
# automake # ./configure –prefix=/usr/local/spine –with-mysql
注意:spine需要mysql和net-snmp的支持,但是如果加了参数—with-snmp编译则会报错,所以一开始是下载了net-snmp源码包编译老半天,再来编译spine,才得以编译成功,后来测试过,编译spine时只需加—with-mysql,而不要加–with-snmp则可以编译成功,而且能够采集到数据。
安装:
# make && make install
配置:
# cp spine.conf.dist /etc/spine.conf DB_Host localhost
DB_Database cactidb
DB_User cacti
DB_Pass qqing99
DB_Port 3306
DB_PreG 0
运行:
# /usr/local/spine/bin/spine
SPINE: Using spine config file [/etc/spine.conf]
SPINE: Version 0.8.7g starting
SPINE: Time: 0.2410 s, Threads: 5, Hosts: 2
说明:spine默认配置文件需要放在/etc才会生效,否则报如下错误: 08/11/2011 04:58:29 PM - SPINE: Poller[0] FATAL: Unable to read configuration file! (Spine init)
五、Cacti基本设置Cacti安装完成后,并不能立即进行数据的采集,我们还需要对Cacti服务器和客户端进行设置:
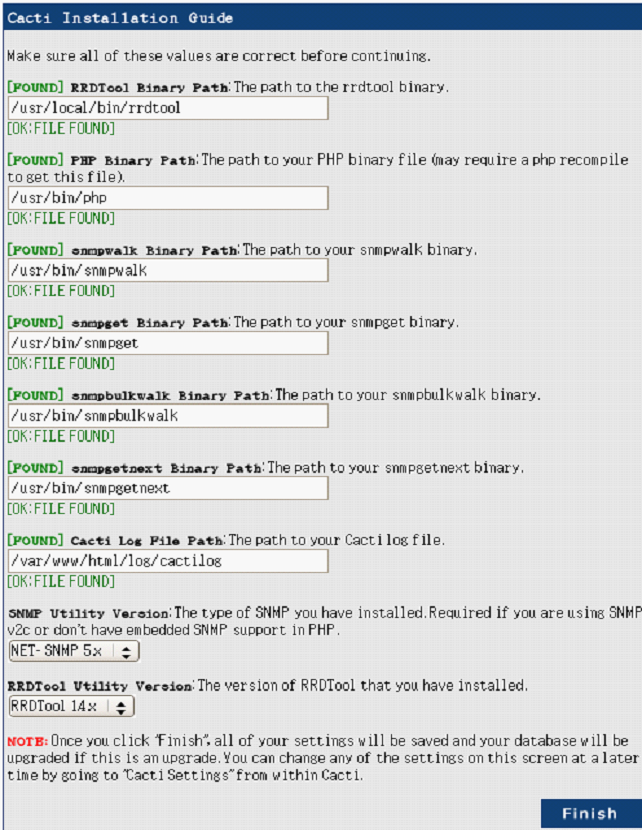
Cacti端主要是设置一些应用程序的路径和版本等信息,这些信息非常重要,因为不同版本程序的参数会有差异,有时会让Cacti不能正常工作。
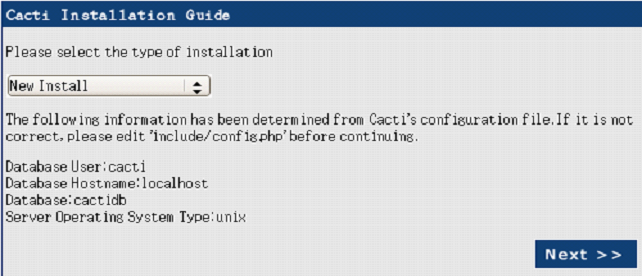
进入cacti的初始设置页面 击NEXT -> 选择“New Install”,点击NEXT ->
点击“Finish”-> 安装完成,跳转到登录界面,输入 User Name : admin Password : admin 点击“login” -> 更改admin用户的密码-> 点击 “Save”即可进入Cacti的控制面板。
然后做如下修改:
在console->settings->General->SNMP Defaults中将SNMP Version的Version1修改为Version2,点击“Save”保存。 在console->settings->Paths->Alternate Poller Path中将Spine Poller File Path的路径填写上:/usr/local/spine/bin/spine 在这下面的Structued RRD Path的Structured RRA Path (/host_id/local_data_id.rrd)可选可不选,然后点击“Save”保存。 在console->settings->Poller->General中将Poller Type修改为spine,将Poller Interval和Cron Interval修改为Every Minute,点击“Save”保存。
(责任编辑:IT) |


