|
一、服务器SSH相关配置文件的修改
首先修改SSH的配置文件。如下: [root@sample ~]# vi /etc/ssh/sshd_config ← 用vi打开SSH的配置文件点击(此处)折叠或打开
因为我们只想让SSH服务为管理系统提供方便,所以在不通过外网远程管理系统的情况下,只允许内网客户端通过SSH登录到服务器,以最大限度减少不安全因素。设置方法如下: [root@sample ~]# vi /etc/hosts.deny ← 修改屏蔽规则,在文尾添加相应行点击(此处)折叠或打开
在修改完SSH的配置文件后,需要重新启动SSH服务才能使新的设置生效。 root@sample ~]# /etc/rc.d/init.d/sshd restart ← 重新启动SSH服务器 Stopping sshd: [ OK ] Starting sshd: [ OK ] ← SSH服务器重新启动成功这时,在远程终端(自用PC等等)上,用SSH客户端软件以正常的密码的方式是无法登录服务器的。为了在客户能够登录到服务器,我们接下来建立SSH用的公钥与私钥,以用于客户端以“钥匙”的方式登录SSH服务器。 SH2的公钥与私钥的建立登录为一个一般用户,基于这个用户建立公钥与私钥。(这里以bruce用户为例) [root@sample ~]# su -bruce← 登录为一般用户bruce
[centospub@sample ~]$ ssh-keygen -t rsa ← 建立公钥与私钥
(责任编辑:IT)
Generating public/private rsa key pair. Enter file in which to save the key (/home/kaz/.ssh/id_rsa): ← 钥匙的文件名,这里保持默认直接回车
Created directory '/home/kaz/.ssh' Enter passphrase (empty for no bruce): ← 输入口令
Enter same passphrase again: ← 再次输入口令(记住口令)
Your identification has been saved in /home/kaz/.ssh/id_rsa. Your public key has been saved in /home/kaz/.ssh/id_rsa.pub. The key fingerprint is: tf:rs:e3:7s:28:59:5s:93:fe:33:84:01:cj:65:3b:8e centospub@sample.centospub.com
然后确认一下公钥与密钥的建立,以及对应于客户端的一些处理。 [centospub@sample ~]$ cd ~/.ssh ← 进入用户SSH配置文件的目录
[centospub@sample .ssh]$ ls -l ← 列出文件
total 16
-rw------- 1 centospub centospub 951 Sep 4 19:22 id_rsa ← 确认私钥已被建立
-rw-r--r-- 1 centospub centospub 241 Sep 4 19:22 id_rsa.pub ← 确认公钥已被建立 [centospub@sample .ssh]$ cat ~/.ssh/id_rsa.pub >> ~/.ssh/authorized_keys ← 公钥内容输出到相应文件中
[centospub@sample .ssh]$ rm -f ~/.ssh/id_rsa.pub ← 删除原来的公钥文件 [centospub@sample .ssh]$ chmod 400 ~/.ssh/authorized_keys ← 将新建立的公钥文件属性设置为400
然后,将私钥通过安全的方式转移到欲通过SSH连接到服务器的PC上。这里,以通过3.5寸磁盘为介质为例: centospub@sample .ssh]$ exit ← 退出一般用户的登录(返回root的登录)
[root@sample ~]# mount /mnt/floppy/ ← 加载软盘驱动器
[root@sample ~]# mv /home/centospub/.ssh/id_rsa /mnt/floppy/ ← 将刚刚建立的私钥移动到软盘
[root@sample ~]# umount /mnt/floppy/ ← 卸载软盘驱动器
这样,我们通过对应于centospub用户的私钥,就可以在远程终端上通过SSH客户端连接到服务器了。
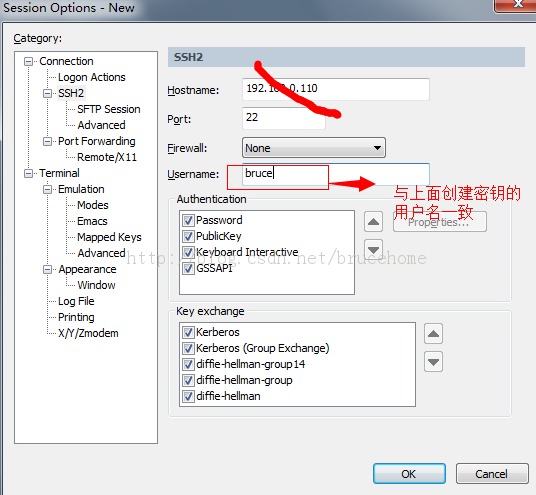
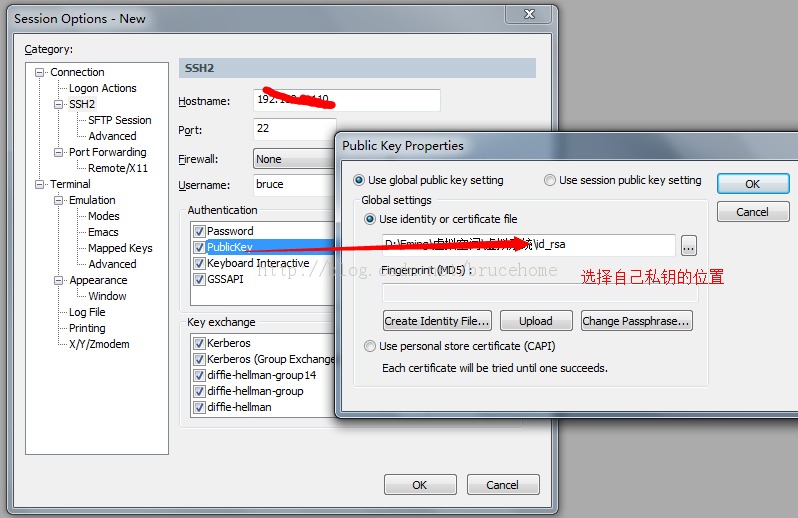
二、SecureCRT 7.0客户端配置登录
第一步:
第二步:
第三步:
第四步:初次登录会弹出输入密钥密码框,输完以后就不用输密码了 |