centos服务器搭建ntp服务
时间:2017-01-24 02:41 来源:www.it.net.cn 作者:IT
1、安装前的准备
查看系统上面设置的时区
[root@linux-node1 ~]# cat /etc/sysconfig/clock
ZONE="Asia/Shanghai"
思想:怎么修改linux主机上面的解决办法:
修改时区
vim /etc/sysconfig/clock
ZONE="Asia/Shanghai"
UTC=true
ARC=false
覆盖系统时间文件
cp -a /usr/share/zoneinfo/Asia/Shanghai /etc/localtime#2、开始安装ntp服务器
采用yum/rpm方式安装
yum install ntp -y
查看安装是否成功
[root@linux-node1 ~]# rpm -qa ntp
ntp-4.2.6p5-10.el6.centos.1.x86_64
3、开始配置ntp服务器
vim /etc/ntp.conf
下面为我修改的/etc/ntp.conf配置文件,下面为大家解释一部分参数的意思:
# Permit time synchronization with our time source, but do not
# permit the source to query or modify the service on this system.
restrict default kod nomodify notrap nopeer noquery         #默认是拒绝所有的ntp连线
restrict -6 default kod nomodify notrap nopeer noquery      #拒绝IP-V6的ntp连线

# Permit all access over the loopback interface.  This could
# be tightened as well, but to do so would effect some of
# the administrative functions.
restrict 127.0.0.1                                          #这里也可以允许单个ip进行对时服务
restrict -6 ::1

# Hosts on local network are less restricted.
restrict 192.168.17.0 mask 255.255.255.0 nomodify notrap    #允许哪些网段可以使用这个ntp对时服务

# Use public servers from the pool.ntp.org project.
# Please consider joining the pool (http://www.pool.ntp.org/join.html).
#server 0.centos.pool.ntp.org iburst
#server 1.centos.pool.ntp.org iburst
#server 2.centos.pool.ntp.org iburst
#server 3.centos.pool.ntp.org iburst

server 2.cn.pool.ntp.org                                    #上层ntp服务器
server time.nist.gov prefer
server 1.cn.pool.ntp.org
4、时间同步服务器上面的操作
[root@linux-node1 ~]# /etc/init.d/ntpd restart
Shutting down ntpd:                                        [  OK  ]
Starting ntpd:                                             [  OK  ]

[root@linux-node1 ~]# ntpq -p
     remote           refid      st t when poll reach   delay   offset  jitter
==============================================================================
+panel.gerardope 116.49.102.213   2 u   24   64    1  211.688  -17.119   0.122
*time-d.nist.gov .ACTS.           1 u   22   64    1  348.603    3.607   0.122
 static-5-103-12 .GPS.            1 u   22   64    1  311.951  -16.711   0.122

解释:
*号的意思:表示正在使用的上层NTP
+号的意思:表示已经连线成功的,可提供替补的时间同步服务器
5、客户机上面的操作
查看当前时间
[root@linux-node2 ~]# date
Wed Jan 11 00:08:37 CST 2017
更新时间
[root@linux-node2 ~]# ntpdate 192.168.17.23
23 Jan 20:33:13 ntpdate[27191]: step time server 192.168.17.23 offset 1110147.826055 sec
更新时间成功
[root@linux-node2 ~]# date
Mon Jan 23 20:33:15 CST 2017
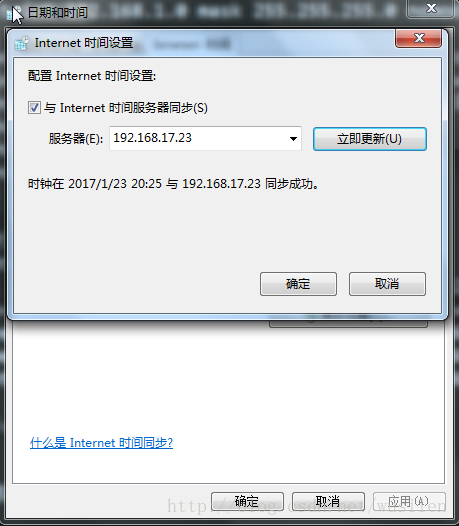
6、在Windows服务器上面进行操作
如下图所示:

(责任编辑:IT)
1、安装前的准备查看系统上面设置的时区
3、开始配置ntp服务器
4、时间同步服务器上面的操作
5、客户机上面的操作
6、在Windows服务器上面进行操作
如下图所示: |